

Making Of
The Making Of Salle de Sport
This week's Making Of is by artist Jean-Marc EMY for a recent project for the French architectural studio MHJV.

Introduction
These are images I have created for the French architectural studio MHJV (http://www.hessamfar-verons.fr/) for an architectural competition renovating a market place into an indoor sport unit and shops.
For this I used 3ds Max and V-Ray but as my work is more NPR oriented this presentation will focus mostly on the post process work.
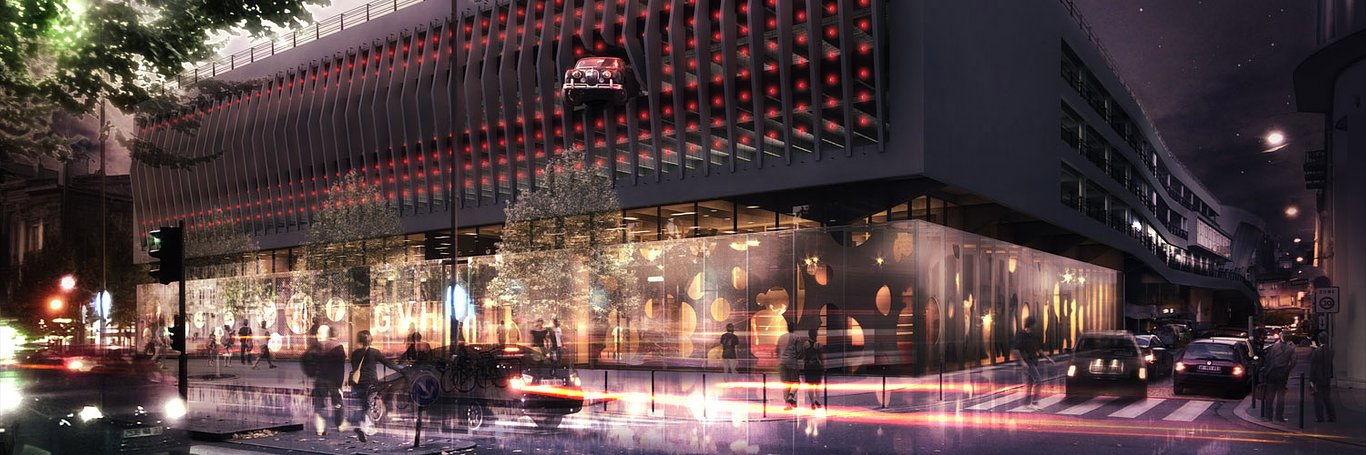
As the project was a box of glass under an existing concrete structure with a lighting design project to enhance the parking frontage, it seemed obvious to illustrate the project at three different times : daytime, dusktime (between "dogs and wolves") and night time.
I started by taking pictures of the existing building in order to choose the main point of view, but also to collect peoples, cars, street furniture that I could blend into my images. I also took pictures of the opposite buildings to use them as reflection maps.
Original picture

With the image composition notice that the vanishing point is inside the image and that there is tree foliage in the foreground which adds depth to the image.
Model
As you can see in the screenshot this building is quite simple, there is nothing special about modeling techniques. I have first modeled the existing structure which was used to Camera Match the base photo.

This is the project itself on the ground level with its glass panels and perforated wood screens. And finally the bright pearl grid on the parking frontage .

I also used a simple plan to apply my environment bitmap reflection.

Materials and Lights
Most of the materials are basic tileable textures. Notice that I used mostly VrayDirt in the diffuse slot in this example with a concrete texture from Arroway.

In fact the more noticeable materials are self illuminated:
I have VrayLightMtl with opacity mask for the reflection planes.
Day and night reflection map + alpha

As I needed to create light patterns, like letters or signs, from the pearls grid, I merged all my lighting pearls in one polyobject and added a modifer to change element ID. A two ID multi/sub-objects material with two VrayligthMtl for on and off light was applied. This modifier is enabled/disabled via the 3ds Max scene state.


To add a slight indoor light variations for the dusk and night images I have used Renderare's trick (http://www.renderare.com) : a VRayLight material is applied to a simple box which is not visible to camera, nor affecting reflections and shadows. A tile map with fade and color variations creates different intensity and hue for the light.

For the main lighting I usually start with a VrayLight dome using an HDRI and a VraySun. For these scenes I used two HDRI : one for the day and one for the dusk and night. For the night version a low multiplier value is applied. I've also used visible VrayLight planes for the parking.

Three scene state were created, allowing me to change the dome's HDRI file and intensity, to swap between day and night environment bitmap reflection, to turn on/off some of the red lights, and hide/unhide the indoor and parking lights.
Render setup
Render setup is done with SolidRocks from my friend Jérôme Prevost (http://solidrocks.subburb.com/). Because I do a lot of post-process work like painting and collage, a medium quality setup works perfect.

Render pass
I use V-Ray render elements in postprocess to enhance the image, especially in this case for glass reflections, but I always calculate a few more passes, usually Ambient Occlusion to add dirt or details. I also use VRayWireColor pass and rendermask script (http://www.tepavicharov.com) to help make specific selections for the adjustment layer masks in Photoshop.
Compositing
Post production : Day time
V-Ray Base render

Here you can see the render coming straight from V-Ray, it looks rough.
Adding Background, AO + value corrections.

The first bunch of color corrections are made on the top of the base render layer.
Changing sky + color corrected background

The next step is to match the render with the background picture and the sky.
Adding enhanced glass reflections

Adding foreground elements

Then to add elements from background to foreground if possible.
Adding people and cars

The cropping of people and cars was done very roughly because most of them came from the same set of pictures so they blend easily in the image. Therefore I wanted some transparency and blurry effects to give the feeling of catching a fleeting glimpse.
Light + color adjustments

A second color correction set is added once all the elements are composed: Black and white layer adjustement in soft light blend mode to increase contrast and gradient map in overlay blend mode to pump up saturation.
Final effects

Once the overall color and value balance is ok, I can start making final refinements. Even if itt is subtle, I always try to add extra effects. The idea is to add some texture and unity to the image, to attenuate the 3d look and to enhance the blending of the composited elements.
Post production : Dusk time
As you can see below the compositing steps are almost the same for the three versions, except for some color corrections and lights effects.
V-Ray Base render

AO + value corrections, adding color corrected Background, Changing sky.

Adding light effects + enhanced glass reflections

Adding foreground elements

Adding people and cars

Adding ground reflections

For the dusk and the night version a ground reflection was created with a simple copy merge and vertical mirror, using softlight blend mode.
Light + color adjustments

Final effects

Among the final refinements, I have also used a huge gaussian blur applied on a colored version of the image in hard light blend mode to enhance the gloomy light effect.
Post production : Night time
For the three images I have used the same original background picture, so below here is a breakdown to illustrate the shift from the day to night mood.
Base picture /+ levels correction/ + sky/ + color correction/ + light effect

V-Ray Base render

AO + value corrections, Adding color corrected Background, Changing the sky

Adding light effects + enhanced glass reflections

Adding foreground elements

Adding people and cars

Adding ground reflections

Light + color adjustments

Light effect layer (normal blendmode)

For this night version I also added a light layer that is a mix of light effects extracted from pictures or drawn with a tablet on a black filled layer in color dodge blend mode.
Light effect layer (colordodge blendmode)

Final effects

That's all for this Making Of. I Hope you find it useful. Feel free to comment if you have any questions, I'll try to answer.
You must be logged in to post a comment. Login here.
Nigel Stutt
Report Abuse
Superb to see how you changed the lighting effects.
EMY Jean-Marc
Report Abuse
Merci Hieu Nguyen!
H
Hieu Nguyen
Report Abuse
Genial
EMY Jean-Marc
Report Abuse
Merci pour tes encouragements Alex! J'ai un petit faible pour celle-là également.

martel alexandre
Report Abuse
Salut Jean Marc, super taf et bravo!
Je trouve que la version violette est vraiment superbe.
Alex AM Graphisme
EMY Jean-Marc
Report Abuse
Thanks Angelina! Yes it's a car!! A Jaguar I think...
EMY Jean-Marc
Report Abuse
Thanks everyone! And thanks to Jeff Mottle for giving me the occasion to share my work on CGarchitect.com.
A
ANGELINA DALLAGO
Report Abuse
Great work, thanks for sharing. Is that a car (!?) breaking through the facade?
D
Darwin Nino
Report Abuse
Thanks for share! Tu Trabajo es espectacular, felicitaciones!
k
kyle hungerford
Report Abuse
Fantastic work! Love the attention to detail.
About this article
This week's Making Of is by artist Jean-Marc EMY for a recent project Salle de Sport for the French architectural studio MHJV.
visibility12.9 k
favorite_border10
mode_comment10


