

Making Of
The Making Of Ms. Anne's Dining Room
Introduction
Hi guys, first, I would like to say thank you to Jeff Mottle for this favourable opportunity and a good friend of mine, Reinaldo Handaya (CEO of 2gs studio) for his valuable feedback in regards to my works all these times. My name is Lucas Aditya Djunaedy. I am an Indonesian but I am currently residing in Singapore. I am currently working as a Senior Interior Designer and as a freelance 3d artist.
This project below is actually a conceptual work that I had done some time ago in my free time. Due to my workload in the office I rarely have free time to do a conceptual visualization. When I saw a friend of mine, Gunadi Winarto, making a conceptual scene (walls, windows, and some furniture) I immediately had an idea for my own scene. I requested the file from him and he was kind enough to share the file with me. After that I modified the scene a little bit and then I started to make it my own.
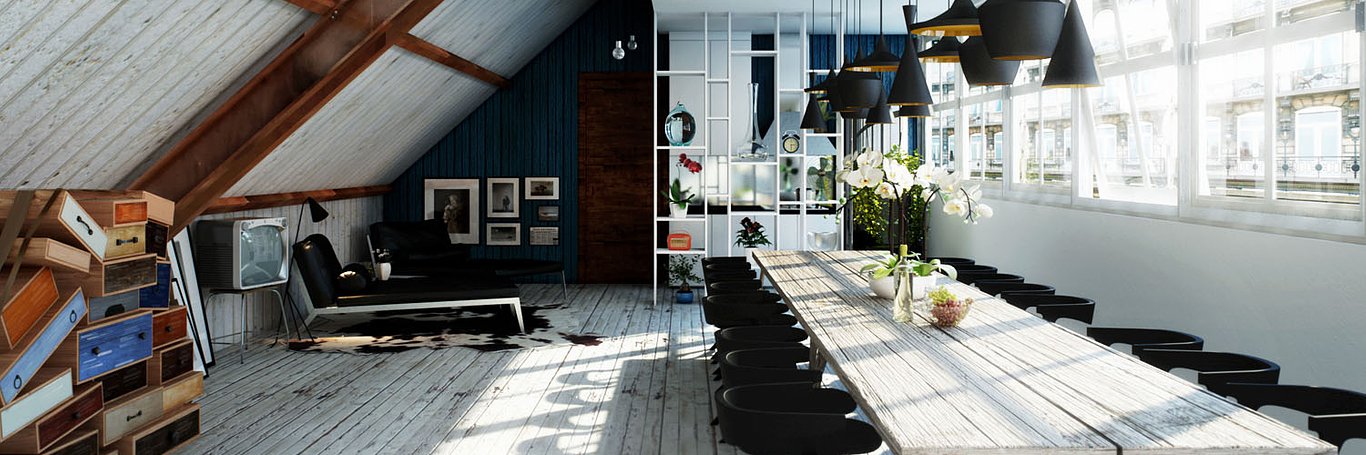
I had an idea of making this space not so “clean”, let’s say semi-clean. I wanted to have an interior space where there was fresh morning sun coming in to the space, a little bit messy, and rough texture. So, I decided to make the scene as if “this person” had just recently moved in to her new place, where there were unpacked items, peeled wooden-floor, wooden tables, a little bit dusty, etc. Then I just named this scene as Ms. Anne’s Dining Room.
I used 3ds Max 2010 (64bit), V-Ray 1.5 sp5, and Photoshop CS3
Process
Workflow
My workflow is definitely not something unique; I could say it is the same as everybody else. I used LWF (Linear Workflow) with gamma 2.2 both input and output. You can see the settings below.

The image below shows how I set up the user interface layout while working on the scene and I used the third-grids rules to compose the view.


And here are my render parameters.

Modelling
As I have mentioned above, the general interior structure modelling was not done by me. Below is the comparison between the original modelling and the one I had modified.


Here is another item that I modelled myself to be added in to the scene.

The other furniture items were grabbed from my library, they were ready-to-use models from Evermotion (Archinteriors & Archmodels) and others are from BBB3viz and designconnected. TThey were just nice to be used in this scene. Below are the models in the scene.

Here is the view of the complete scene, before lighting being added.

Materials
The materials were from cgtextures.com. I modified them a little bit to avoid tiling. I used very basic material settings.
Copper beam structure & slanted ceiling wood texture


Blue wooden wall panels & general white wall texture

General flooring, window frames & dining table

Materials settings


As you all can see above, the settings are very basic, nothing special indeed. The other materials are just standard materials such as laminate, clear glass, steel, and leather.
Lighting Setup
The main lighting used was Vray Dome which I attached with an HDRI from openfootage.net and actually I did not link it to either the environment (shortcut 8) nor GI (vray environment tab, F10), and Vraysun for the sunlight (when it asked to link to vraysky, I chose no). (You can refer to my render parameter setting above on point 2.1)
Image below shows how I laid out the lighting.

Vraysun and Vraydome+HDRI settings.


I added a Vray light plane from the window and a bent plane which was the background of this scene. These two things were actually helpful in achieving the mood that I initially wanted in the first place.
The image below shows the setting for the vray light plane from the window. I used this to enhance the mood and for better lighting calculation.

The background image (original & edited) and how I set it. I got the image background from cgtextures.com as well.


In the viewport it actually looks blurred but not to worry, the actual file is considered as high-resolution, it is more than 3000x pixels by size. So when it is rendered, it does not look blurred at all.
Many of my friends asked me: “hey why don’t you put the background in Photoshop? Isn’t it easier? “. Well, there is nothing wrong with that. However, the colour of the background itself does have the power to affect the overall mood of the space, that is why in my opinion it is better to include the background in the rendering process as well.
Other than that is the camera setting. I used Vray camera. The image below shows the Vray camera settings and a the free light that I used for the floor lamp.


Post Production
The images below show the "fresh-from-the-oven" render results and the entire render elements. I saved it all in JPEG
Original rendered image

Render element (Vray extratex – Dirt)

Render element (Vray Zdepth)

Render element (Vray Reflection)

Honestly speaking, the results came about pretty nicely compared to what I wanted so there was only minor editing involved in this scene. Here are the editing processes:
Step 1 – Combining original images with all the render elements.


Step 2 – Touch up (colour, contrast, flares, etc). You will see below, that actually the editing is very simple. Nothing complicated at all.


You will see that I applied diffuse glow and darken the shadow in certain areas. How did I do it? It is easy. I used polygonal lasso tool to select the area and then I used feather selection (ctrl+alt+d) and after that I copied them into different layers.


Almost finished. Here are the last few steps.

As you can see below, I selected the front-lower part of the image then I blurred it just a little bit (Filter>Blur>Blur), because I wanted to focus more on the back part.


Then I used Chromatic Aberration to smoothen the image a little bit (Filter->Distort->Lens Correction->Chromatic Aberration). You can see it below.

Lastly, the image below shows the watermark composition.

Final Image
The image below shows the final image with my watermark.

Well, that is all there is to it. I hope you guys learned something from this simple article and enjoy reading it. My friend, Reinaldo Handaya, always said to me “The details of every scene are the ones that are going to make it valuable and more realistic”. Take passion in everything you do, and you will always find a great satisfaction behind it. Thank you so much guys! Cheers.
Regards
Lucas Aditya Djunaedy
You must be logged in to post a comment. Login here.

Rombout Versluijs
Report Abuse
Aha i get it. Bu your normal workflow is from bottom to top right? This seems a but weird, but i think you worked down the list cause it was already setup
L
Lucas Djunaedy
Report Abuse
Hi,I added 5 curve because I wanted to see the increment of the brightness gradually. I don't like it with just 1 curve adjustment layer. As a result, it came out nice for me, so i guess i did not blow out the image?
Rombout Versluijs
Report Abuse
Hi There,
really nice final image. WHat i dont really get is why you add 5 curve adjustment layers?! This way you blown out the image and make earlier adjustments cancel out.
Is there a specific reason for this, you didnt set them to certain blend types did you?
c
cao minhphuong
Report Abuse
have you use the sRGB button on Vray frame buffer ?

ADC Visualizations
Report Abuse
good one, super detailed!
L
Lucas Djunaedy
Report Abuse
Thanks all, cheers. Really appreciate it.
L
Lucas Djunaedy
Report Abuse
no problem. cheers
roye long
Report Abuse
Gorgeous color and light. utterly amazing .
Architectural Visualization
B
Bulut Bora
Report Abuse
Thank you
B
Blueprint Effects
Report Abuse
Fascinating! So helpful and detailed. Great work!

Federica Crocetti
Report Abuse
Thank you!
L
Lucas Djunaedy
Report Abuse
No problem !

thiyagu arjunan
Report Abuse
“The details of every scene are the ones that are going to make it valuable and more realistic”. ......GRT SAID;-)))))THANK U
L
Lucas Djunaedy
Report Abuse
Thanks much, Xzent !

Xzent DS
Report Abuse
Nicely Done. Congrats!!
L
Lucas Djunaedy
Report Abuse
Thanks, all mates !

Vasil
Report Abuse
thanks,great tutorial

3D VisualFx ..
Report Abuse
wonderful work.....
_____________________
3D Rendering, Architectural Animation, Visualization services

Ronald Aburizal
Report Abuse
tutorial yang sangat bagus pak djunaedi, saya mencoba memakai setting anda tetapi dengan sedikit modifikasi pada modelnya..trims sudah berbagi ilmu yang sangat bagus..bolehkah saya tau spesifikasi PC yang anda pakai pak djunaedy dan berapa waktu untuk renderingnya?trims..

Ramiro Ortiz
Report Abuse
Muy Buen Tutorial.
muchas Gracias...
About this article
Indonesia's Lucas Aditya Djunaedy shows us the Making Of his recent Ms. Anne's Dining Room scene.
visibility52.7 k
favorite_border54
mode_comment43


