

Making Of
The Making of 3DRP 6

Juan Gayarre Calvo from GAYARRE infografía was the recent winner of the 3D Render Party 6 Competition. He's created a detailing Making Of of his winning image for CGarchitect.
INSPIRATION
Once we chose the point of view and the aspect of the scene, we set out to search for reference images, which help us to get as close as possible to the final idea.
The fundamental keys of our image were the deterioration and the abandonment of the scene. We were looking for images that showed a feeling that we could apply to our scene. The first search was made on bridges or similar locations with some deterioration.

We think it could be a habitable place for animals who often use this type of place for nesting, like crows, vultures, etc.
So, this was the second Internet search.

After deciding that the scene would be lit with a night or evening ambiance with snow, we made a third and final search, searching dusk sunset skies, and places where the snow is present.

MODELLING SNOW
For snow creation, we used a plugin for Cinema 4D: MagicSnow.
http://nitro4d.com/blog/freebie/magic-snow/

Defaults settings for Magic Snow
This plugin had advantages and disadvantages. The advantages were obvious, it brought something different to the scene. The big drawback was that we had to wait a long time, as the snow fills the scene in real time. There wasn't something like an airbrush to paint snow in the scene. We had to put snow on the different objects in the scene to see how they would appear. We also had an additional problem because the snow uses pure and simple geometry. Our computers did not like it if we tried to do the whole scene at once.
We had to make it snow in pieces and then adapt the final snow geometry to the scene. The snow in the background could be less in quantity, resolution and definition.
Finally we were able to fill the scene after multiple tests, as we did not always chose in the right values. Mainly because it was a novelty for us to use this plugin for the first time.
This video was very useful for us to understand the process:
Some screenshots of the snow process:


PUDDLE
Initially the puddle was an element that was going to have some prominence, because we wanted to put it in the foreground. Its inclusion in the surroundings, along with its reflection, diffusion, etc., would make it an attractive element in the scene. We sought photographic references to get ideas.

We used geometry and tried to to replicate reality as much as possible.


VEGETATION
Regarding the issue of modeling vegetation, we used "hair" in Cinema4d, proxies for trees and simple 3d models for the dry trees.
Background trees were placed in post-production. During the process, many vegetation tests were conducted.


The trees were placed back in post-production, because we obtained more control, and we avoided having to place snow on that many trees, and also reduced the polygon count.
We kept a large percentage of foliage and shrubs. Unfortunately most of them were hidden by snow.
SINGULAR 3D MODELS
A number of elements were custom modeled for the scene.
BIRDS
We decided to place the crows perched on the bridge deck and generated renderings from different viewpoints.

We generated a specific UV map for this model. The object is sectioned into "slices" and these are used as a canvas to "paint" on the texture obtained from several photos. The realism is good close up. In the end the model is a bit off, but all the details increase the realism of the final image.
DRY LEAVES
As with the crow model, we used UV maps to texture the leaves. Later, we adjusted to the model. We used a projection canvas floor as a guide.

With the 3d paint brushes in C4D we directly retouched it into the camera perspective to tune.
"BREAKING" THE BRIDGE
The bridge was modeled and modified slightly to give it an old weathered look.

We first modelled all the glass areas, then using the Thraussi plugin, we broke it. It generates random cuts in the model, but unfortunately the number of polygons exceeded the power of our computer. We thought that we could gain time and realism.
We modified the top rail stairs manually to create breaks and folds.

We used a tool that appears in the latest version of Cinema 4d and previously was found in other organic modeling applications: "SCULPT". With this tool we could bend and soften the cuts and create dents.
We made major breaks manually and then refined the details later.

In the creation process we used several options, but some of the elements didn't appear in the final image.
In a version with less snow, the surrounding soil appeared full of small bushes and stones. We used the MoGraph, a tool to multiply and distribute copies of an object. We modeled three or four stones and three or four bushes. With the aid of this tool, we randomly copied them on the ground.

We used several polygon selections on the ground to make it even more random (mostly to avoid overloading the file by placing elements only where needed).
TEXTURES
Due to the aspect ratio of the image, there were several items that required some special attention during texturing. Some of them were in the background or they had less prominence in the end, but they are there and we think they worked well.
One of them was the puddle mentioned above and others were the drum, graffiti, the crows etc.
DUST BIN
The drum was an added element at the last minute. Its texturing was based on finding an original picture and a model adaptation.
REAL PICTURE

CINEMA 4D RENDER:

The texture map was something like this:

We joined two textures because the first didn't have graffiti painted. Eventually some of the graffiti was lost on the ground by the snow.
We added a bump to show damage, and a weight material to trim the texture. With these tricks we got the same effect with a simple cylinder, but with a more efficient 3d model and less polygons. Finally some specular was added to the material.
The next screenshot, shows the model with its texture and a reference about their labels.
DUSTBIN IN CINEMA 4D


TESTING THE DUST BIN INSIDE THE SCENE:

GRAFFITI
Other elements were textured, and we made successive tests to achieve the desired results.
Some screenshots of the process:
Test ground with graffiti included, first test of damage on the beams.

Testing ground graffiti: It was eventually hidden by snow, but was textured just the same.


Clean indoor tests, no shrubs, or vegetation, only a few leaves and a bit of "hair" (grass) in the boards.

Tests graffiti, glass.

BROKEN GLASS
Here, you can see a test with the glass broken with a texture effect.

LIGHTING AND SETTINGS
We used a GI Environment map (both cloudy and night). We didn't use any physical light for general lighting. The scene also contains several artificial lights that illuminate the upper structure of the bridge and the lower corridor.
In all cases, they are area lights except for the cloudy scene. The standard configuration of these lights was:


During the process, we did several lighting tests. Different lighting situations were proposed for the scene, specifically these three: DAY, CLOUDY AND NIGHT.
Examples of the work in progress :

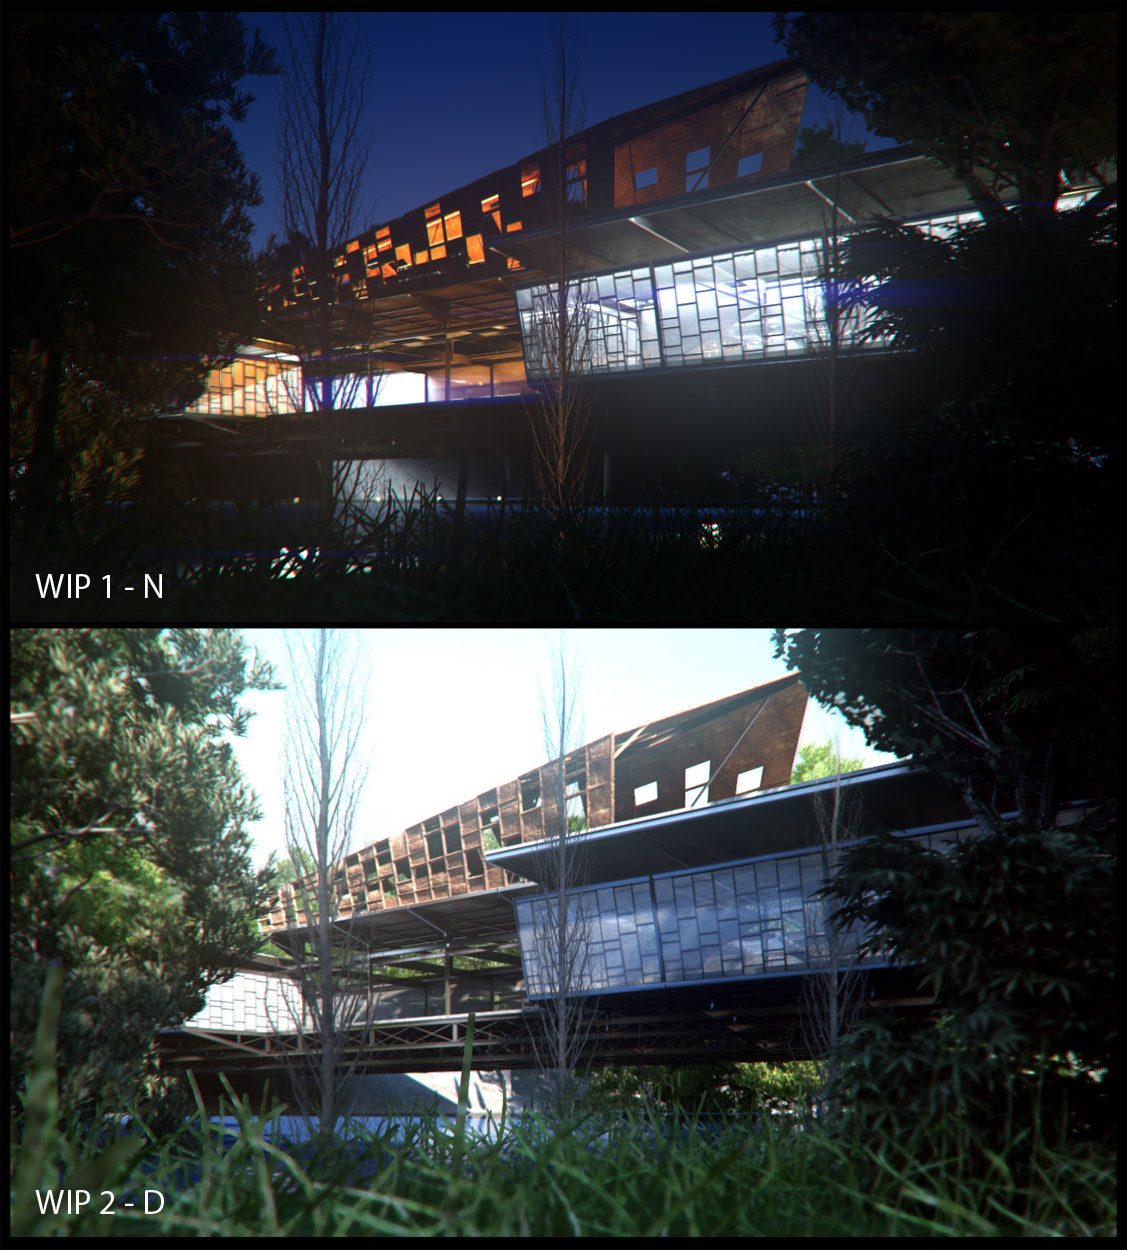

With the snowy scene chosen, we discovered that day lighting did not work as we wanted, so the two options that we considered were cloudy and night.
In the process we were not sure which one was better and which one could evoke more emotion. We loved the night shot, so we didn't waste the opportunity to present both.
An example of the previous study of both illuminations, before the final process:

GENERAL SETTINGS
For the rest of the settings, we applied a MAP + LIGHT CACHE IRRADIANCE.
In both cases, the settings were the same, the only thing that varied was the GI main map.
Some screenshots of the general configuration of IRR + LC:


POST-PRODUCTION
This part was the "twist" ending to the scene. In this process, we did several important steps that dressed the image.
The common elements for both images were added, like the birds flying, or background + sky. Obviously in this case they should have different highlights.
Despite working all 3d vegetation through proxies, we finally decided to replace it with a background of snow covered trees in both cases.
Small elements were inserted, although barely noticeable. They are the fog, the snow, and the tree sticking out of the top.
There were many retouching steps in this process and many options and tools used. We used different programs and combined their results.
They adjusted exposure values, brightness, contrast, hue, saturation, levels, color balance, chromatic aberration, vignette, focus, and blur.
Some screenshots of the post-production process:


You must be logged in to post a comment. Login here.

Juan Gayarre
Report Abuse
Thanks man !
Raymundo 8AD
Report Abuse
AMAZING WORK
Juan Gayarre
Report Abuse
Thanks Roye !
roye long
Report Abuse
the work was really very very inspiring ....
---------------------------
Architectural Visualization
Juan Gayarre
Report Abuse
Thanks man !

Muhammad Husnain
Report Abuse
astonishing skill man...
Juan Gayarre
Report Abuse
Thanks a lot !
I'll tell it to the great team for sure ;)

thiyagu arjunan
Report Abuse
love the way u told abt ur workflow..grt tut and inspired one..thanks for sharing..grt team;-)
Juan Gayarre
Report Abuse
Very honored when we received comments from people like you.
Sincerely, thanks !
Did you see ALONE?
Sérgio Merêces
Report Abuse
Congrats Juan, Awesome Work! Regards
Juan Gayarre
Report Abuse
Wow Manole !
Thanks a lot ! I'll tell it to the rest of the team ;)

Manole Romulus
Report Abuse
Exceptional work,the kind of work that shows why 3D modeling and visualization is a new art, congratulations!
Juan Gayarre
Report Abuse
For sure Diego !
Thanks so much for your comment ! ;)

Diego Peixoto
Report Abuse
That's brilliant, nice rendering and workflow.
Keep it up!
Juan Gayarre
Report Abuse
It's a pleasure for us, thanks !
Juan Gayarre
Report Abuse
Thanks so much !
We hope that could be useful a little bit ;)
Franz-Lorenz Wagner
Report Abuse
Wonderful "making of" and tutorial!
Very good to see the whole research to get these great pictures!
j
joris Sykovas
Report Abuse
This is unbelievable. Amazing tutorial, thank you so much.
About this article
Juan Gayarre Calvo from GAYARRE infografía was the recent winner of the 3D Render Party 6 Competition He's created a detailing Making Of of his winning image for CGarchitect.
visibility21.5 k
favorite_border29
mode_comment18


