
Making Of
The Making of Birch Grove

Introduction
My name is Timur Abdulov, and I am a founder of Revolution production studio in Moscow. Architectural graphics, especially videos, are still our principal area of activity, although the studio pays more and more attention to the production of visual effects for feature films and advertising projects in fields other than architecture.
In this article I will try to explain the creation of “Birch Grove” (or “Birch wood”) video, but I'm not going to focus on the technical aspects of production; instead, I will try to describe the whole process, from concept to final result. I hope that this material will be useful primarily to other studios with similar tasks.
It is difficult to describe the specific role that I played in this project, I'm one of those crazy people who do most of the work themselves. For simplicity I will say that I acted as director and VFX Supervisor. A strong team of experts in various fields was put together to work on this project. On this occasion I once again thank each of those who participated in the project.
Description of the problem
The customer’s task looked pretty standard. It was necessary to create a video advertising “Birch Grove”, a new residential complex in St. Petersburg. The distinctive feature of the project was the fact that the complex buildings were located in close proximity to the picturesque birch grove and the client wanted to focus on this fact. The second aspect of the project was to create a modern, hi-tech image of the developer.
Creative concepts
Work started with the elaboration of several variants of ideas for the video (creative concepts). In total, two key ideas were proposed to the customer; they focused on the nature, convenient location and comfort. As an additional version, a third idea was proposed which was radically different from the previous two: the action took place in some abstract future with holographic projection effects, futuristic environment and other elements that accentuated the modernity of the company and complex. To my surprise, the customer showed interest in this one! The only comment was a wish to keep focus on the nature in the video.

Start of work. Planning.
We have a small studio, and we worked with various project managers, from Cerebro to Shotgun, during many years of doing business. Each of them has its advantages and disadvantages, and the selection of one or another "scheduler" depends on your personal requirements, as well as the specifics of projects, the size of the working group, etc. Personally, I don’t need more than a notebook, e-mail and telephone to plan and control the process. In many ways, compliance with deadlines and stages of work lies on the producer who combines the functions of project coordinator in our case.
Inspiration
For me, work starts with inspiration. In principle, I always look through the works of various production houses or CG artists, trying to memorize interesting tricks, moves, new fads. This applies to everything - from dramaturgy and acting to interior lighting and brightness of lens effects in the frame. But when the basic idea of the project has been formed, the range of references I pay attention to is narrowed to a specific format. In our video more attention is being paid to the futuristic component, so I revised and saved a lot of up-to-date references from fiction genre (Tron: legacy, Ironman, gattaca, etc). At the beginning of the project, hundreds of images were selected and sorted into several categories in my folder.

Music
Musical accompaniment plays a crucial role in the creation of any work, especially when this refers to short videos. For me, music is not a complementary but a forming element. 51% of the project success is a good soundtrack, the music has the control package of shares in your success, if I may say so. Birch Grove project required author’s music composed for it to avoid copyright issues, but at the initial stage, including the animatic (PreViz) creation, I picked two compositions of suitable rhythm and mood, mixed them in Adobe Premiere and used as a basis for the video. The message of lyrics (if any) is not important to me, it is the mood created by its general sounding which is essential. Later, when the animatic acquired a more or less complete form and I became confident in the correctness of the selected musical reference, it became a part of the specification for the composer whose task was to create his own, exclusive interpretation, which would preserve the rhythm, emotional swings and a general feeling of the composition. Working on the soundtrack took 2 months, almost the complete duration of the project. Dozens of variations were created in this period by 5 independent sound productions and composers.
Here are some of them:
Scenario, Animatic.
In accordance with the approved creative concept, a detailed scenario was produced and broken down into blocks and separate scenes. But it is not the scenario but the animatic creation that plays a key role in the whole pre-production stage. I don’t draw story boards for our projects on a principle. In my opinion, with a few exceptions, the creation of storyboards is useless. It is better to create a detailed animatic with selected and cutted reference music in order to have full control over the dynamics, emotional swings, work off the combinations of plans, their duration and content. A good detailed animatic is practically a finished video: all that remains to do after its creation and polishing is to replace the conventional shots by real ones.
That’s one of the animatic draft versions (incomplete):
I not only found the right plans, worked out a combination of shots, but also conceived almost all the actions and gestures of the actress in the animatic, which greatly helped during shooting. The animatic also made it possible to pre-determine and specify the camera lenses which were then used during shooting.
Casting and Costume Design
According to the plot, there is a character in the video, a girl that symbolizes the company and makes the project presentation. Two girls were selected out of 15 candidates. In the end, one of them received the starring role.

The character’s look and clothes played an important role. She had to emphasize the futuristic nature of what was happening, her style had to bear an evident hint that the action was set in the future. References of all possible dresses and accessories reflecting the task set were collected.

We engaged a designer to work. Several sketches were created on the basis of selected references.

After the sketches were approved, we started to produce the real dress, selecting materials, fabric and ordered a dress to be sewn to the measures of the selected actress.

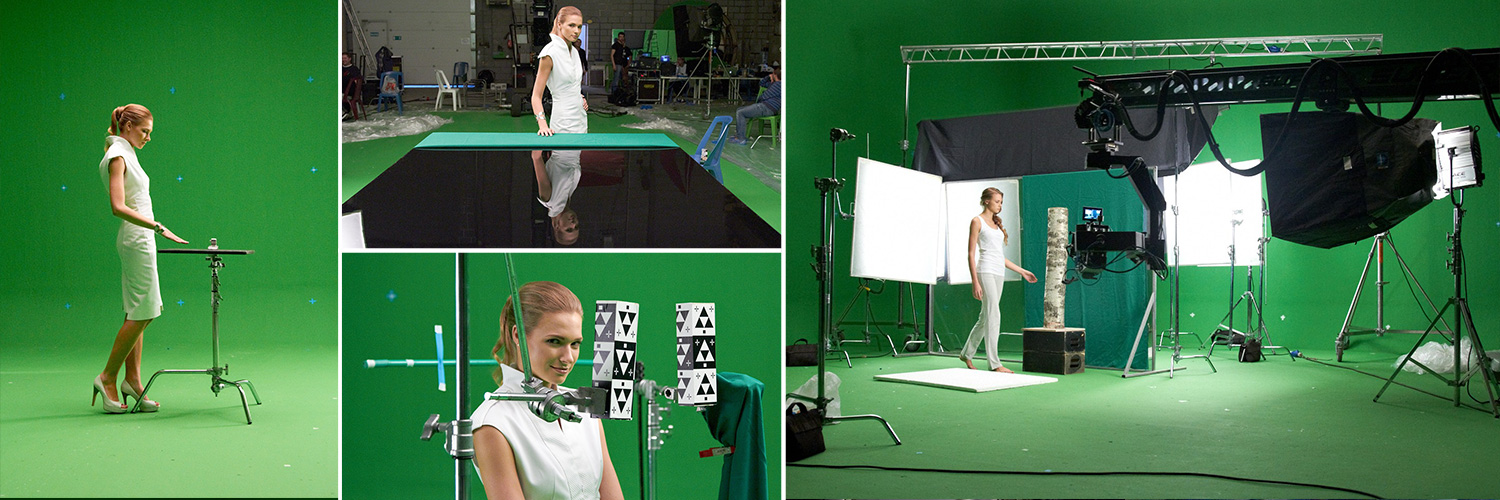
On set
The actress was shot in the 20х20 meters chromakey pavilion, with 7-meter high walls. A REDEPIC digital camera and a SUPERTECHNO 10m telescopic camera crane to reproduce all the necessary trajectories. The main light filling of the chromakey was ensured with the help of 6 ARRIS space lights with the capacity of 20 kW each. To get reflection on the surface of the future CG holographic panel, we used a sheet of glossy black polystyrene where our actress was reflected. As I said before, the trajectories and speed of the camera flight, as well as the movements of the actress had been defined in the animatic by the moment of shooting, which made it possible to save a lot of time and cut the duration of rehearsals on set.

3D graphics – exteriors
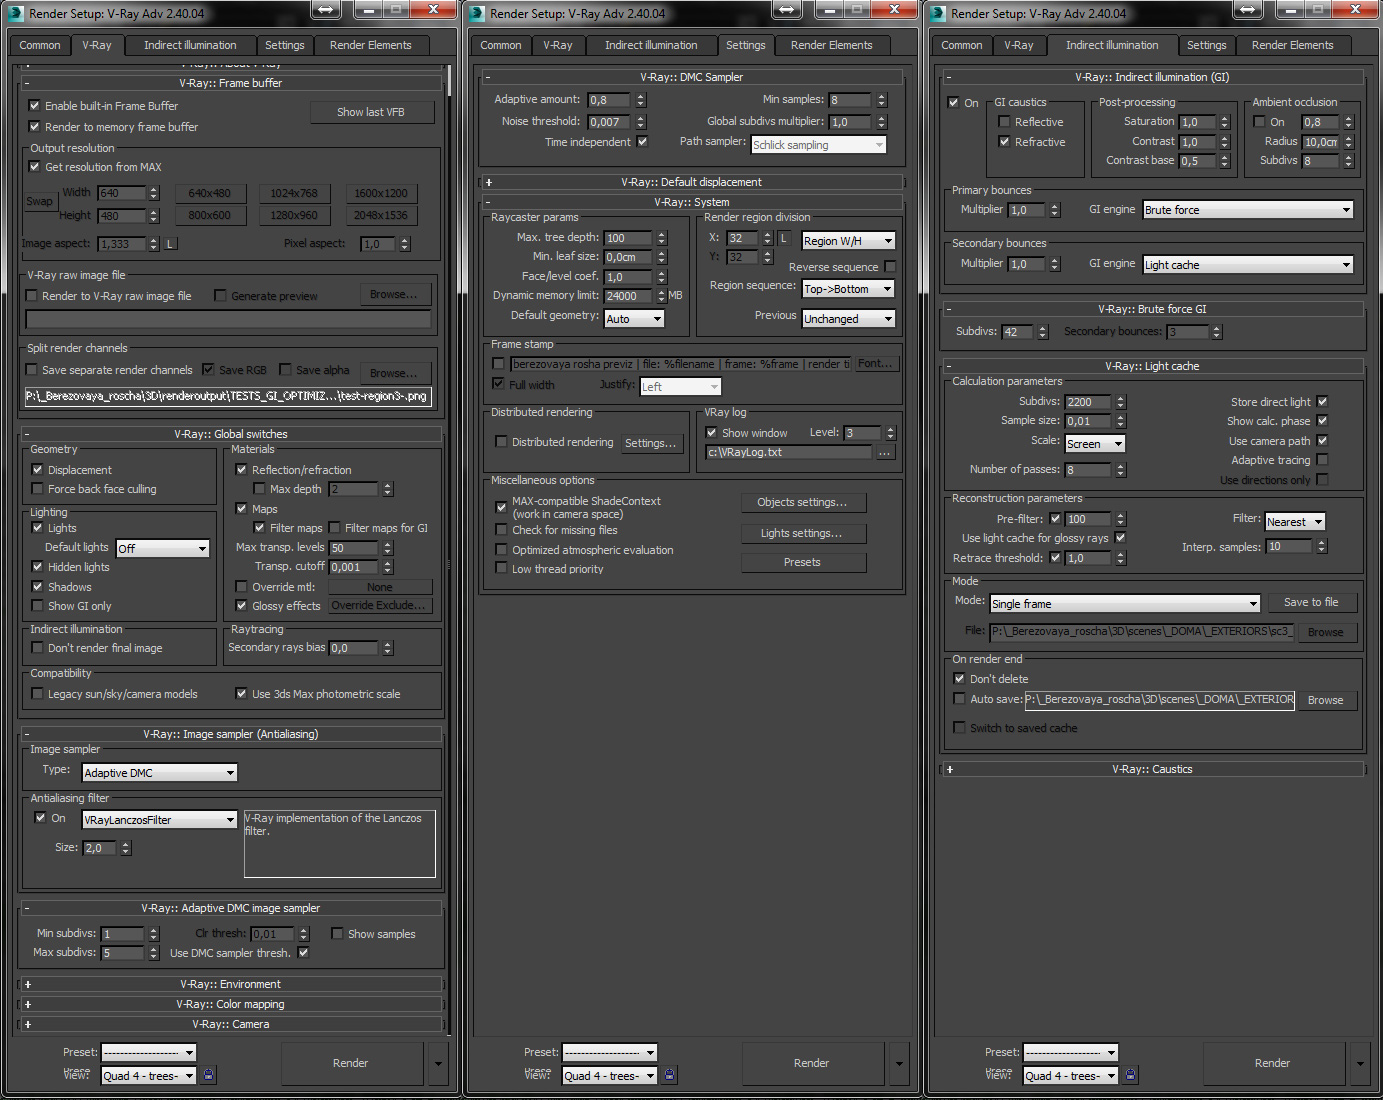
Meanwhile, work on exterior shots started. There are no special secrets. All the scenes was created in 3dsmax 2014, shaders and rendering – in vray 2.40.04. The lighting was provided by vray Domelight + hdri + direct light imitating the position of the sun. But two elements are of special interest, and I am going to talk about them in greater detail (city panorama and animated trees):
- The cityscape in the background was created using the means of Camera projection mapping. A huge panoramic photo of Saint Petersburg was assembled for that purpose. The image was processed, all the objects before the river were removed from photo, in case of future replacement by 3D landscape.

The panoramic view was divided into 3 fragments (separate maps), each fragment was projected on the created city geometry using a separate camera. 3 cameras, used for projection, make up 180 degrees by the sum of angles.

As a result, we received a real 3D city, with detailed parallax of objects and a possibility to add effects with the help of zdepth, such as fog, for example. The system made it possible to freely move the animated camera within quite a wide zone. An important peculiarity for creating such settings was the fact that the projection camera (or cameras in this case) should be located on the maximum height for your final animation, so that the real camera would not fly above the level from which projection is made. Projection was created with the help of Camera Map Gemini plugin which makes it possible to correctly apply the projected texture on lowpoly objects.
3D graphics – trees
One of the most important emphases of the video was laid on the nature surrounding the complex. To make these shots more efficient and spectacular, we decided to use dynamic trees, swaying in the wind, instead of static ones. Having analyzed a lot of software for vegetation creation, we made an obvious choice of GrowFX package. At present time this is the best solution for creation and animation of any sort of plants from those existing on the market. 14 kinds of trees (from birches to poplars) and about 8 kinds of bushes were created in GrowFX.
Here are some of them:

In general, it took us 4 weeks to create the correct wind animation. We made dozens of tests before we achieved good results. The animation was also performed in GrowFX, after which it was transferred to 3dsMAX, and each separate tree was converted in Vrayproxy.
Here are some of the initial tests:
Rendering of the scenes with animated trees was a real problem. First of all, the render farm we used had only 12Gb of memory in its slaves, and the peak values of complete scene rendering exceeded 20 Gb, so we had to render the trees by separate groups in separate scenes – distant view, midshot and close-up. Further on, these layers were combined in After Effects.
Another problem occurred in the course of rendering. The number of polygones reached billions, trees were mobile and we had to use Bruteforce+LC to calculate GI, Vray 2side materials with translucency, glossy refraction + reflection was used in the settings of leaves. The time of rendering one frame reached up to 6 hours. We had to work with the settings to achieve optimal results, but in the end, as we were really in short deadline, we had to leave some values below the desired level.
Settings of the leaves shader:

Wireframe of one of the scenes:

Particles
The effect of building geometry with holographic cubic particles was fully realized using of RayFire (Voxels). It turned out to be a very convenient instrument that makes it possible to transform any geometry into blocks and set the animation of rotation, scale and movement with the control of procedural textures and masks. Additional effects with particles, for instance, falling leaves were created with the help of PFLOW, some scenes required additional simulation of particles in REALFLOW.


Keying, Matchmoving, compositing
All the shots with the girl were made at the green background (chromakey). We had to do a huge amount of work to process these materials. Keying was performed in After Effects with the help of keylight. We tried other instruments before, for example, Primatte Keyer, but despite its seeming convenience Key Light showed better flexibility and quality. Matchmoving was performed in Boujou for simple shots and in SynthEyes for several complicated shots. SynthEyes is a more professional solution with a large number of functions, but it requires higher skills, while Boujou works perfectly with cameras which are not very complicated.
The shooting stage was filled with tracker markers placed in a special way to ensure stable and precise tracking.


The compositing was performed in After Effects. LOOKS was used for color grade and to add some secondary effects, such as chromatic aberrations wherever it was appropriate. Vignetting and grain were created in genarts sapphire, Frischluft was used for DOF, Twixtor was used for retime effects and Optical Flares was used for lens effects.
Conclusion.
The more I work in the industry of visual effects and in the cinematograph on the whole, the more I am assured of the fact that the tools are not important. The instruments you select for your work are always secondary, while the sense of style, dynamics and general understanding of the task are much more important. I wish you luck in all of your projects.
Timur Abdulov
Revolution production studio. Moscow.
www.revo-studio.com
You must be logged in to post a comment. Login here.
a
arunkumar thonangi
Report Abuse
Its very interesting, I have inspired by this Article and please keep posting this kind of very inspiring post.It gives lot of details for an artist like me......Thank you so much
C
Cristian Savakis
Report Abuse
Really nice. Thanks for sharing it.

Jeff Mottle
Report Abuse
Sorry all, I assumed most would have know it was on the 3dawards site given it was a winner. I suppose I should have linked it: http://3dawards.cgarchitect.com. I also just linked the video directly in the article to the one we had on our Vimeo channel.

Adrien Binet
Report Abuse
Great article. Is there a link to the final video I missed somewhere?

DE VISUAL
Report Abuse
Great works
f
fabio pif
Report Abuse
Inspiring. Thank you for sharing such a valuable know how.
About this article
The Making of Birch Grove by Revolution Studio, 2014 3Dawards Commissioned Film Winner.
visibility17.2 k
favorite_border16
mode_comment6


