

Making Of
Making of The Aether
About Me:
Hey, my name is Mac and I’m currently working as a 3D retail designer at Momentum in Manchester, England. I graduated last year from the University of Huddersfield where I studied Transport Design BA. There I learned automotive design skills as well as 3D visualization skills.
I’ve had a passion for CG visuals since watching Jurassic Park as a kid and thinking they had actually made a real dinosaur!
Along-side University, in my free time I also worked on my 3D skills, just out of curiosity and passion for the industry. Here are a few examples of the projects I’d done before final year:

Project Overview:
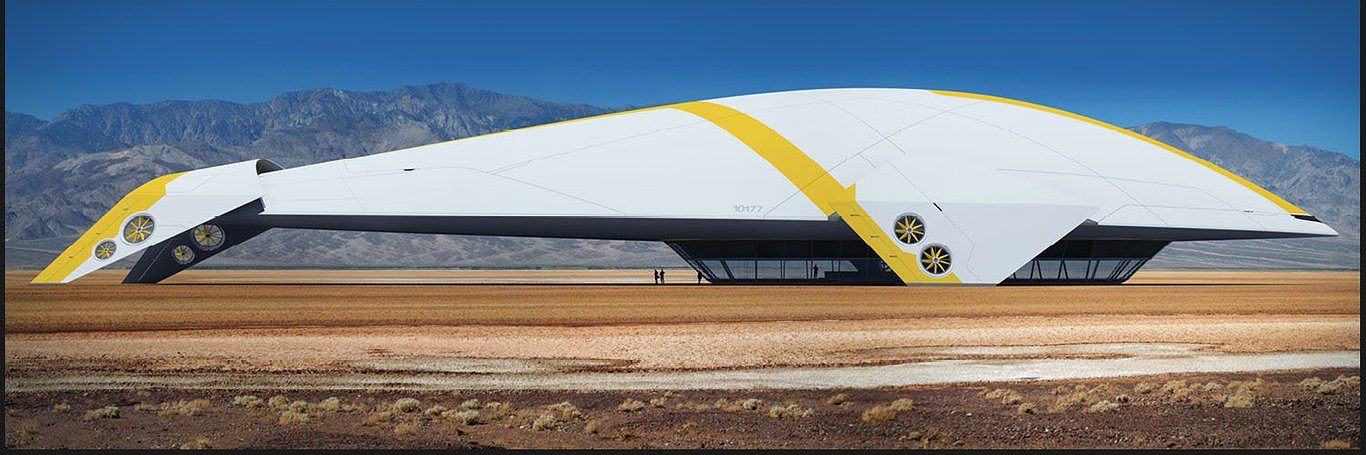
During my final year at The University of Huddersfield, we were given the task of finding a problem or opportunity for design within current transport solutions. I chose to look at airship technology and its comeback. This was because I felt that these vehicles, with their immense size and grace, have the ability to truly capture people's imagination. Further research involved looking into the possible uses of such vehicles and the sector that excited me the most was the leisure industry; particularly activities like cruising.
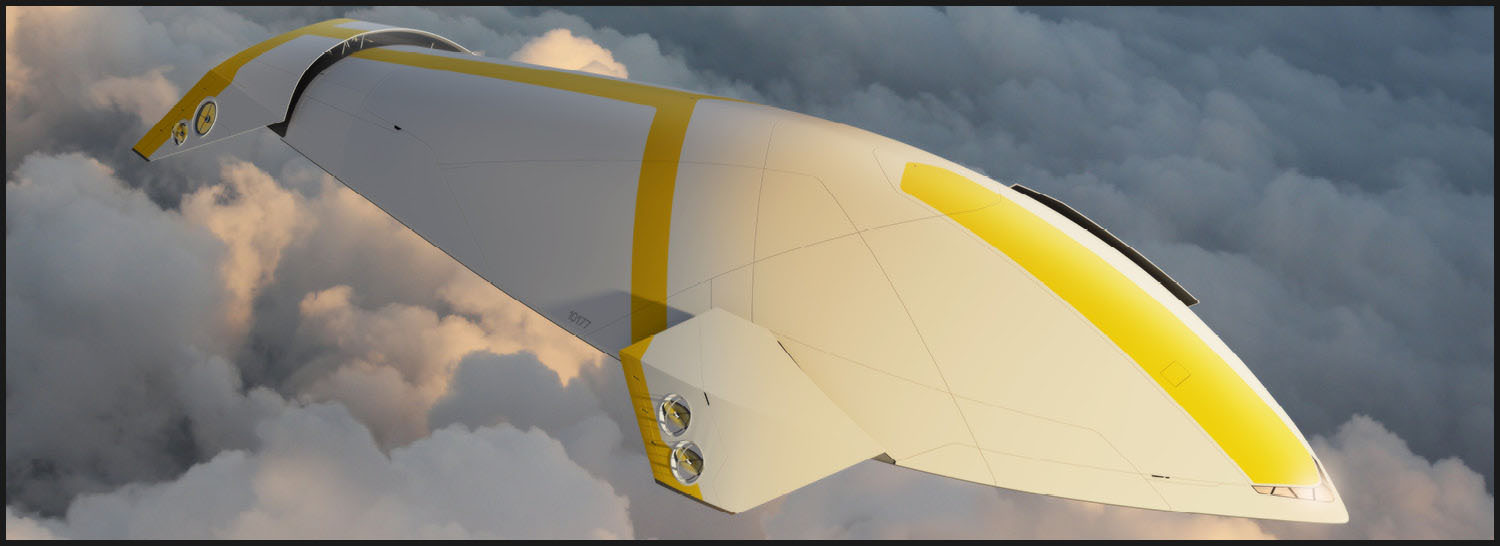
Such a vehicle would provide an experience like no other. Giving passengers the chance to wake up sailing upon the clouds or see an epic mountain range from above.

Design:
Here’s a brief look at the design process of the Aether:


I find that even when starting a purely visualization piece, I still use a biro and do rough sketches to gain an understanding of shapes. This also gives me a better understanding of how I want the overall shots to look and feel.
To take a look at the finished 3D design, check out the short film:
Planning:
To start out, I looked into high end visualization and VFX in films to gain a better understanding of how professional CG artists work. What I found on exterior renderings was matte painting and photo-composites. This was the way forward. Reducing the amount of 3D in the scene that needed to be modelled and rendered.
The inspiration for my final images and animation came from the landing sequence in the film Prometheus (2012). Here the spaceship lands on a Martian desert in a vast canyon plane. This kind of environment was both; a suitable landing place for such a large vehicle and the canyons added a sense of scale and depth to the shots. Therefore I chose Death Valley, Utah as my backdrop.
The other thing I decided on was that I was going to use Mental Ray render and 3DS Max for the final rendering.
Tests:
To get a good idea of how the lighting was going to work and look with these new backgrounds, I created a quick mock up model that I could Photoshop over to get a good idea of what the final renders were going to look like.

From these, I liked the sense of scale, and I also found that the side profile of the airship would be the most impressive, extending the vehicles visual size to its maximum.
Modelling:
To start modelling, I created a full set of interior and exterior plans to work from. These were created in Illustrator and refined with the use of laser cut scale models. To setup these blueprints in 3DS Max I:
1. Cropped the full plans in Photoshop to produce low resolution pictures of just the front, back, side and top view.
2. Created in Max a set of planes that are the same pixel ratio as the plans. (ie 1200px = 1200mm)
3. Placed the images onto the planes via slightly transparent “Standard” texture maps.
4. Scaled the planes all together and then moved them apart.
5. Selected the planes Object Properties and un-ticked Show Frozen in Grey, while ticking Backface Culling.

Even though I’d set up the plans for both the interior and exterior at the same time, I first modelled the gondola / living area of the airship. This was because this section had already been resolved using physical models.
The exterior was started with a rough mock-up to judge scales and proportions. Once the proportions had been refined, this mock-up was then smoothed and then cut up to produce the sections. This insured a high surface finish without distortion.
For the wings, I used the cut and detach tool on the turbo-smoothed balloon. Pro Boolean was then used to create the turbine cut-outs. This is not something I would advise as it produces very disrupted and broken topology. However it did save a lot of time. The turbines could then be modelled and fitted.

The underneath of the Aether was filled in from a copy of the top shell. It was first flattened as to align to the passenger section. Then I smoothed it to match the aesthetics of the top section.
For the interior of the wings, I started by duplicating the wing section and manipulating it into shape.
To finish the exterior, I created a shroud around the thrust engine exhaust. I also added wing-lets to this opening. Glass was also added, as well as the hydraulics for the wings. These were rigged using look at constraints so they would move with the wings as they move and transform.

Texturing:
To save time I relied heavily on the textures to produce the fine details of the vehicle such as shut lines and graphics.
The first stage of the texturing was un-wrapping all the exterior surfaces. This would allow me to effectively draw on the model in Photoshop. To do this I took a little help from the Xray Unwrap. This is a plugin that helps when un-wrapping organic models like airships or pillows. Once I had all my surfaces unwrapped, I rendered out templates for me to Photoshop under. These had to be huge as I was looking to create an10,000+ pixel rendering of this exterior. Therefore the top surface template was 10,240 pixels square, with the side wings coming in around 5,120 pixels square.
Before creating the full shut-line maps for my model, I first created a group of smaller rough textures; created using pen paths in Photoshop. These could be put on the model to see how it looked in 3D before creating the full resolution version. I also did the yellow graphics in the same way.
Once I was happy, I created the full sized version with a normal map for the shut lines. I did this by using the NVIDIA plugin for Photoshop. To do this I:
1. Turned off all layers, except the shut-lines.
2. Flattened the image.
3. Clicked the NVIDIA plugin.
4. Selected a depth of 5 and 3 x 3 sampling for a sharp bump.
For the actual material for Mental Ray I only use the Arch and Design template material; Adding in maps when needed. I find that Mental Ray gives quick outstanding results when only these materials are used.

Rendering:
Scene setup began with me matching the 3D camera to the perspective of the back plate image. To do this I:
1. Saved out a smaller version of my final backdrop.
2. Set my render resolution to the same as the backing image.
3. Activated safe frames (Ctrl + F)
4. Clicked Viewport Styles / Configure Viewport Background. Then selecting custom image file and loading my backdrop.
I had to do this by eye, using the airship as reference as there were no solid tracking points for me to line up. For this, I’d normally utilize the perspective match tool found under the utilities tab within 3DS Max.
Once this was done I started to look at the lighting. I was going to do this using the Mental Ray daylight system. This is a fast way to get great daylight lighting very quickly. With this I made sure to position the Sun so that it matched the angle of the shadows found on the plants and mountains.
For the settings, I didn’t use Global Illumination but instead, just used Final Gather. This saves time and with outdoor scenes, doesn’t affect the quality. For saving, I saved Targa’s as they have great 16-bit color depth (Allowing more adjustment later). They also have an Alpha channel, allowing me to cut out objects neatly in Photoshop. Here’s a full look at my render settings:

The renders for the final image:
1. Airship (RGB + Alpha).
2. Airship Shadow (RGB + Alpha).
The renders passes for the final image:
1. Z-Depth.
2. Output Diffuse Direct Illumination.
3. Output Diffuse Indirect Illumination.
4. Output Specular.
5. Output Transparency.
Photoshop:

This is the already cropped blank background image used when setting up the camera in the 3D scene. This is taken by Paxson Woelber and can be found on Wikipedia.

So to start off, I added a curves and color balance layer to my stack. This was to add vibrancy to the backing image and bring it closer to how I wanted the scene to look.

In this image, I’ve added the shadows. This was rendered in 3DS Max with the airship set to “Invisible to camera” and the floor acting as an alpha matte.
To import this, I first opened it in Photoshop separately, then I selected Select / Load Selection / Alpha 1. This creates a selection round the shadow that when inverted (Ctrl + Shft + I) allows me to delete the background. I then dragged the new cut-out layer over into my backdrop file holding shift, so that it’s pasted in place.
In Photoshop this layer was set to “Overlay” mode and then put on a lower opacity. As the sun is high, shadows appear dark and harsh. This is because the “Sun” has more influence than the “Skylight” at this time of day. I therefore left this shadow layer on a relatively high Opacity.

Here I have added the final airship (Using the same method as when importing the shadow). As a raw render it has way too much contrast and it doesn’t look like it fits with the background.

To fix this I added a Hue/Saturation layer adjustment; set to Clipping Mask so it only affects the airship layer. This was a very subtle adjustment but it brings the 3D rendered image closer to the backdrop. Also with a clipping mask, I added the Indirect Illumination pass to brighten up the underside of the airship a little more. I usually also add a Curves layer adjustment at this stage.

The next stage of this Photoshop piece was to add the atmospheric distortion/fog. I did this by adding an Overlay effect to the airship layer. For this I color picked the light blue of the sky as it’s this color that would be the most prominent in this distortion. This was then set very low at 7%. This value I set by eye, by looking at how much atmospheric distortion/fog is present in the mountains behind.

Due to this being such a large and conceptual vehicle in a very large, open landscape, I find people and animals can help bring a solid sense of scale. For this I’ve added a few people under the vehicle. These were Pen tooled out in Photoshop from random images I had on my computer.

To set the characters in the scene I added an overlay to them. This one however was color picked from the underside of the airship. This was because all the characters fall into the shadow; so with the exposure of this photograph, they would not appear very bright at all.

The upper deck of the airship in the concept has heavily tinted glass. This was to add privacy as these are all bedrooms. This didn’t come through effectively in the Max render so I decided to darken these manually. I did this by simply penning out a selection round the glass and filling with black. I then lowered the opacity (51%) of the layer until it had the desired effect.
Other adjustments added at this stage include adding a shadow at the points where the airship touches the ground and refining the cockpit glass, using digital painting techniques and small masks.

At this stage I duplicated and collapsed/merged my layers; saving the original layers in a folder for later. This was now a single layer I could adjust to my liking. For this I only needed a curves adjustment as I was already happy with the colors. I find that doing a final color correction after you already balanced the color helps to blend the images together even further. Something I’ve done in other projects involves using the color balance to offset the shadows toward a bluish tint and the light areas towards a yellow tint.

The final touches for this piece were to add a vignette and bloom. The vignette was created by filling a new layer with white then using the lens correction filter. Once this layer is set to Multiply, it gives a great, natural vignette.
The bloom was created by duplicating the main layer and adding a Gaussian blur. I then lowered the opacity of this layer on top of the original (44%) to create a subtle effect.
Closing:
Many thanks for letting me show you how I did this project! It was fantastic to work on and I feel with some very simple and straight forward techniques I was able to create an image that really sells my design and the technology to the viewer. I hope this was enlightening!
You must be logged in to post a comment. Login here.
E
Erkut Acar
Report Abuse
great design, keep up the good work
Intravenous Agnostic
Report Abuse
The way I see it, passengers would fly to, say, Norway; a bus would take them to an airfield outside of Oslo where they would board the airship for a trip to the North Pole. Can you imagine? What a trip!
Ultimately, you'd want one or two airships per continent. In Brazil, the Belem airship would fly up the Amazon River; in Nepal, the Kathmandu airship would fly the Himalayas; and so on. :-)
Flight duration could be anything from a day-trip to a cruise lasting a couple of days with stop-overs where passengers get to disembark and spend a couple of hours with their feet on the ground.
M
Mac Byers
Report Abuse
Good plan! I'll let you k ow if he hits me back!
Intravenous Agnostic
Report Abuse
Pitch it as a tourist thing (an airship cruise through the Himalayas!) and slap the spacex logo on it
M
Mac Byers
Report Abuse
Thanks everyone for your complements!!
This was an amazing project to work on! I'll send a tweet to Elon Musk to see if he'd be interested in building one...

Dhub Limited
Report Abuse
So, so, so cool and a very inspired name. Great work, there’s no surprise you had tons of fun working on this project!
Adam Ambrus
Report Abuse
thanks for the tips at the end :)
Intravenous Agnostic
Report Abuse
A sky-whale! I love it! Elon Musk should see this: he's all about alternative modes of transport.

Adam Whalley
Report Abuse
Great stills - nice use of texture maps.

Sketchrender Ltd
Report Abuse
Love it , Great design, colours, look.
Well done.
About this article
Making of The Aether By Mac Byers
visibility9.76 k
favorite_border12
mode_comment10


