

Making Of
The Making of The Step
BY ASWIN GOPAKUMAR
INTRODUCTION
This project is about re-kindling my passion with my work, it is also about exploring design skills, for which I choose to first design and then visualize it. I wanted it realistic, different and thoughtful. So three things were addressed doing this project, Design - Visualization – Learning. I named this project ‘The Step’ because when I started this project I was clueless of how I would do it, and what I dreamed to do back then was beyond my skills. What I learned is, to put effort every day, have the patience and allow it to happen. All that matters is that single step; rest of the story just happens by itself. Hope this sends a message to many including myself, to do what you love and keep doing it till you reach and to believe in yourself!
This is a design to visualization project, so first part of the article covers the idea formation. The later part is about tools that have been used and how the visualization was carried out, and finally the output / final renders. For ease, the main contents of this article is presented in order below.
THE DESIGN
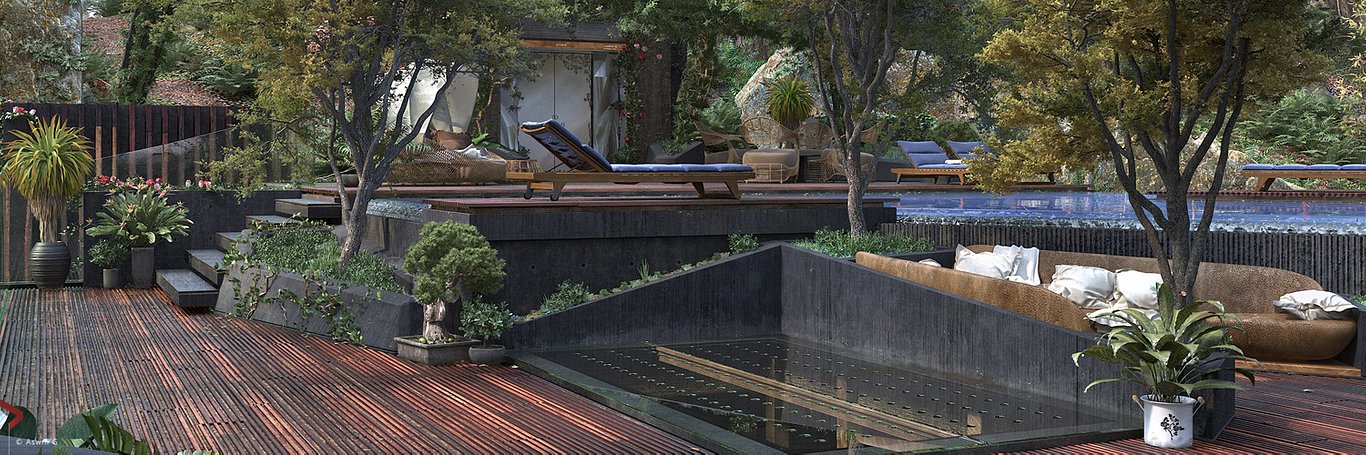
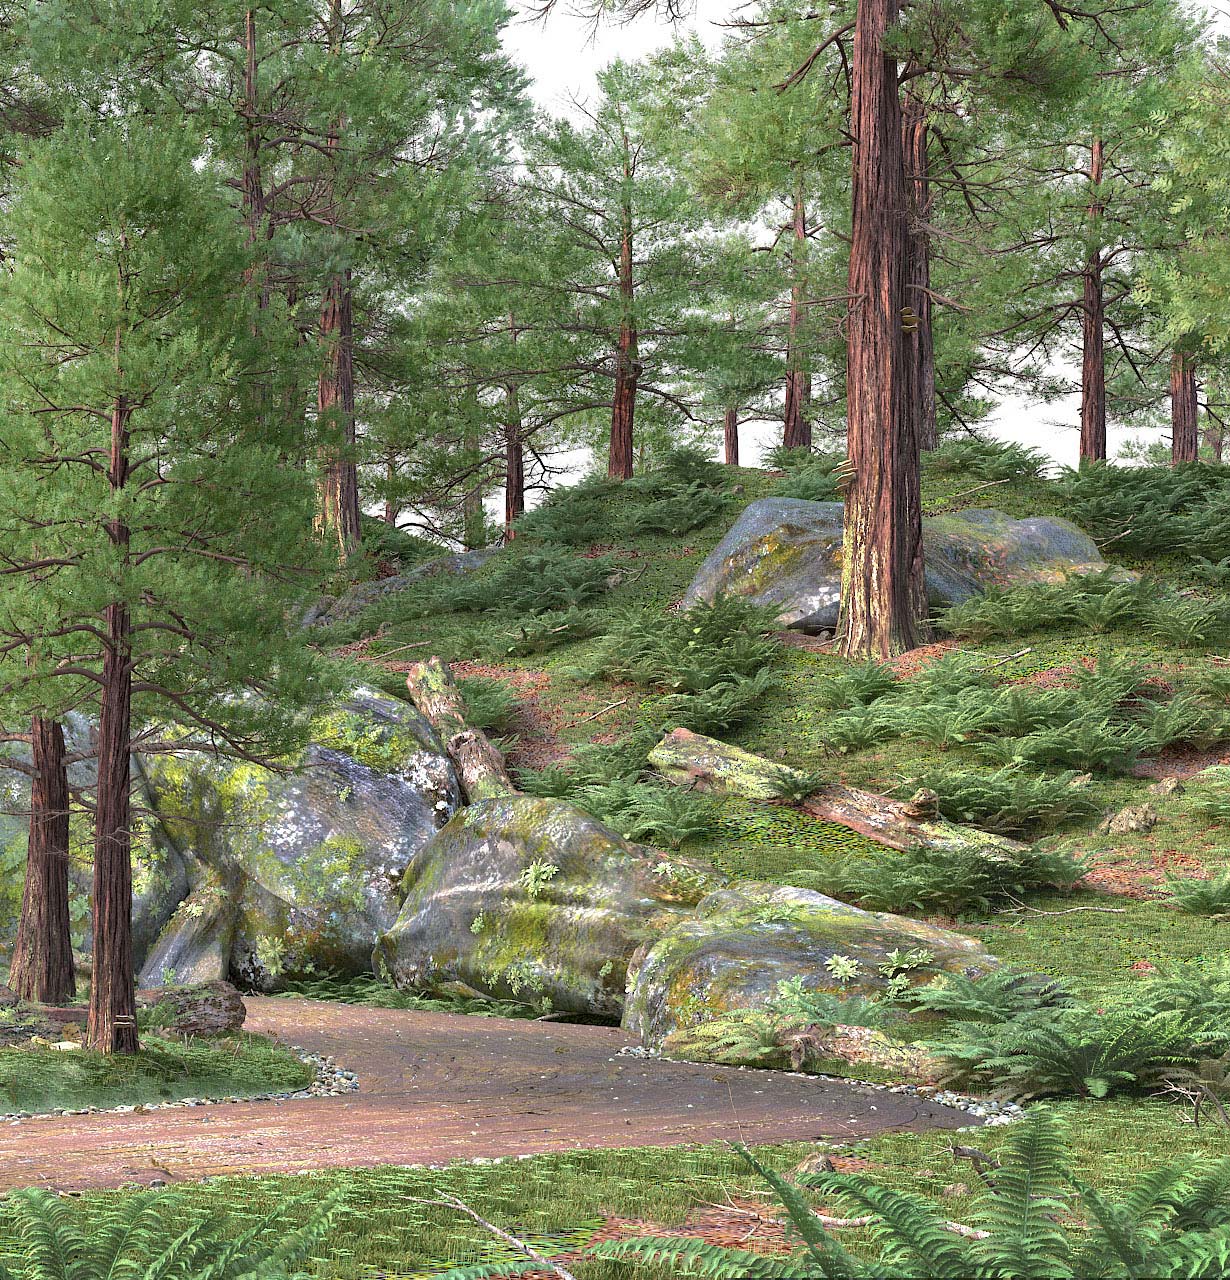
It all started when I came across this image somewhere while going through some reference images for my office job.
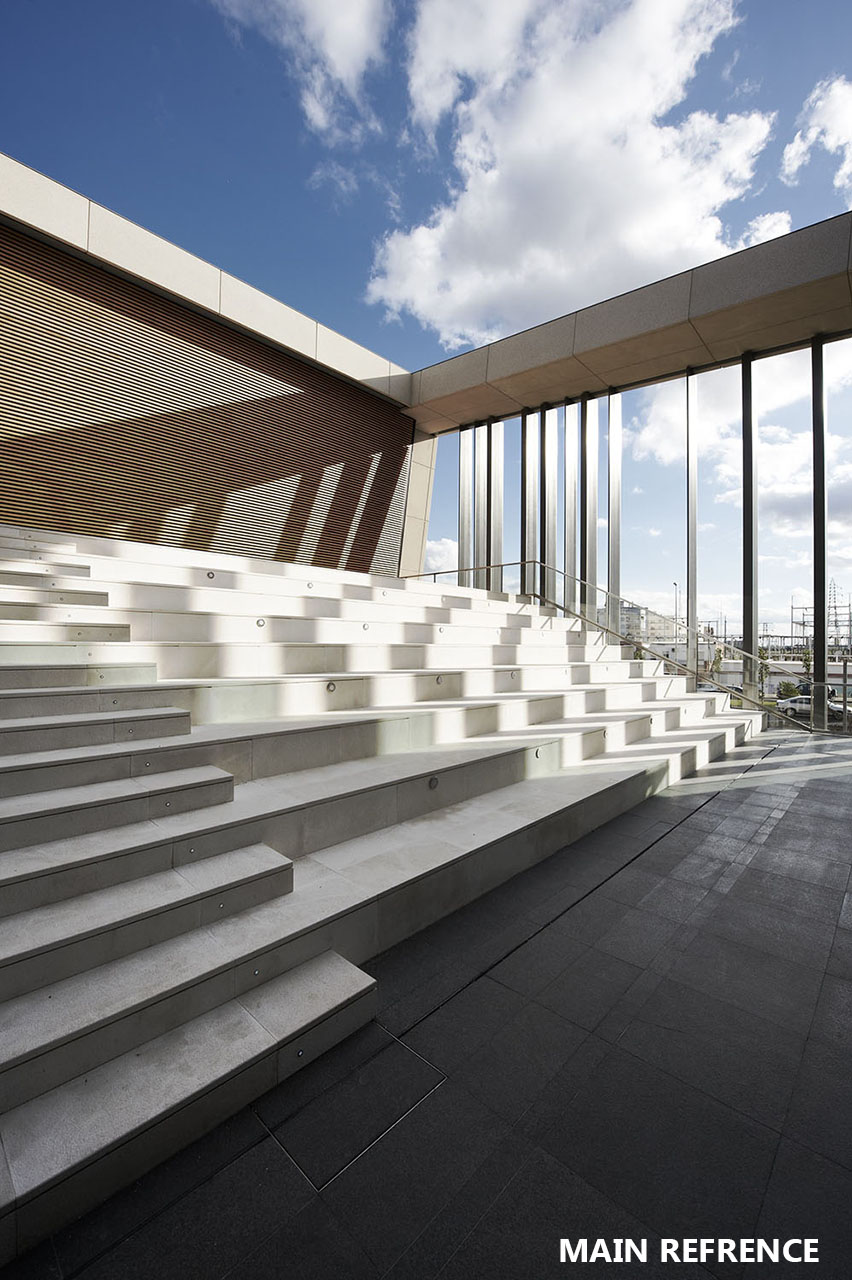
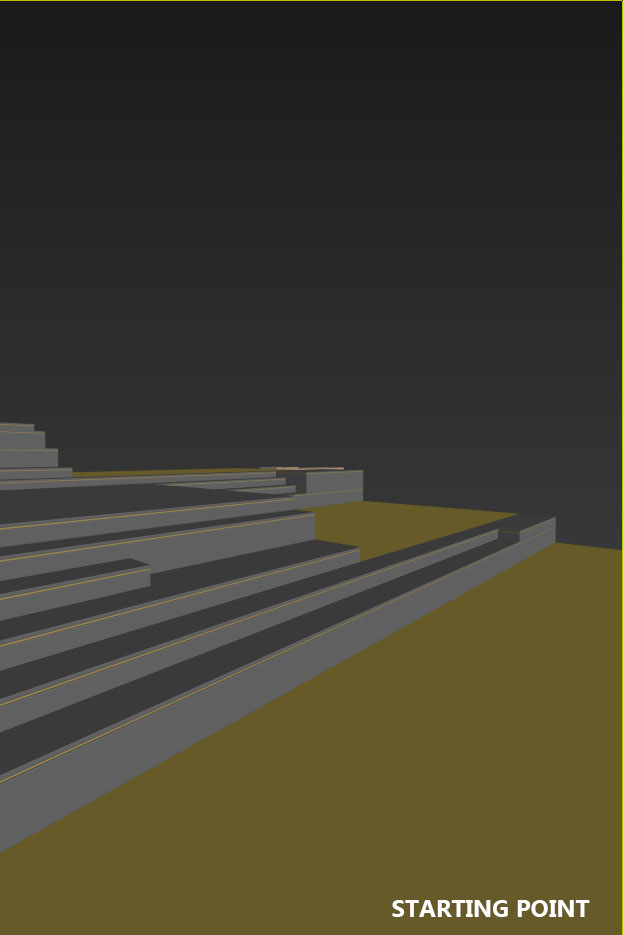
It made me think about the possibility of turning this into a living space and stared at it for a long time; to understand the work, about what can be done, what is possible. Once a rough sketch was made up, work started. Did a camera match and started modelling the STEPS, and the first file looked like this.
Spaces were introduced between the steps to make room for the different living areas in the apartment. The left and right sides, the roof, had to be sorted out. Also had to make sure that it had all the areas that one would need in a house; importantly each area had to have a function, a good design and logical measurements. It began to take shape part by part.

The right side as you see in the image, vertical suspended bars that can rotate and move along to close like a shutter was introduced. This meant huge vertical glass panels would come just behind them and would form the boundary at this side of the apartment. And each living area at this side will have access to those massive windows.
Next the rear end had to be sorted out. If the steps go up connecting each area, wouldn’t it be better if it did not hit a dead end, so a door was provided at the rear end. Next was to where would it open to? Since this was a huge level up comprising of all steps leading the way up, it was logical to suppose that it went up hill and maybe an upper land area could join to where the door opened. Placing the building against a hill made it fit the terrain. The couples living here can walk up to the hill through their living space.
So now there was lots of space under those steps. Instead of assuming it to be filled with earth, a car garage could fit in there! Considering the area, there was so much space left. The area was split at left to accommodate a couple of huge trenches; that would allow trees to grow inside the apartment. A bathroom was to be included; the rear left end was vacant and it helped. The extra area at left mid was set apart for a reading area to those who are in love with dreams and books! A view from the top explains.

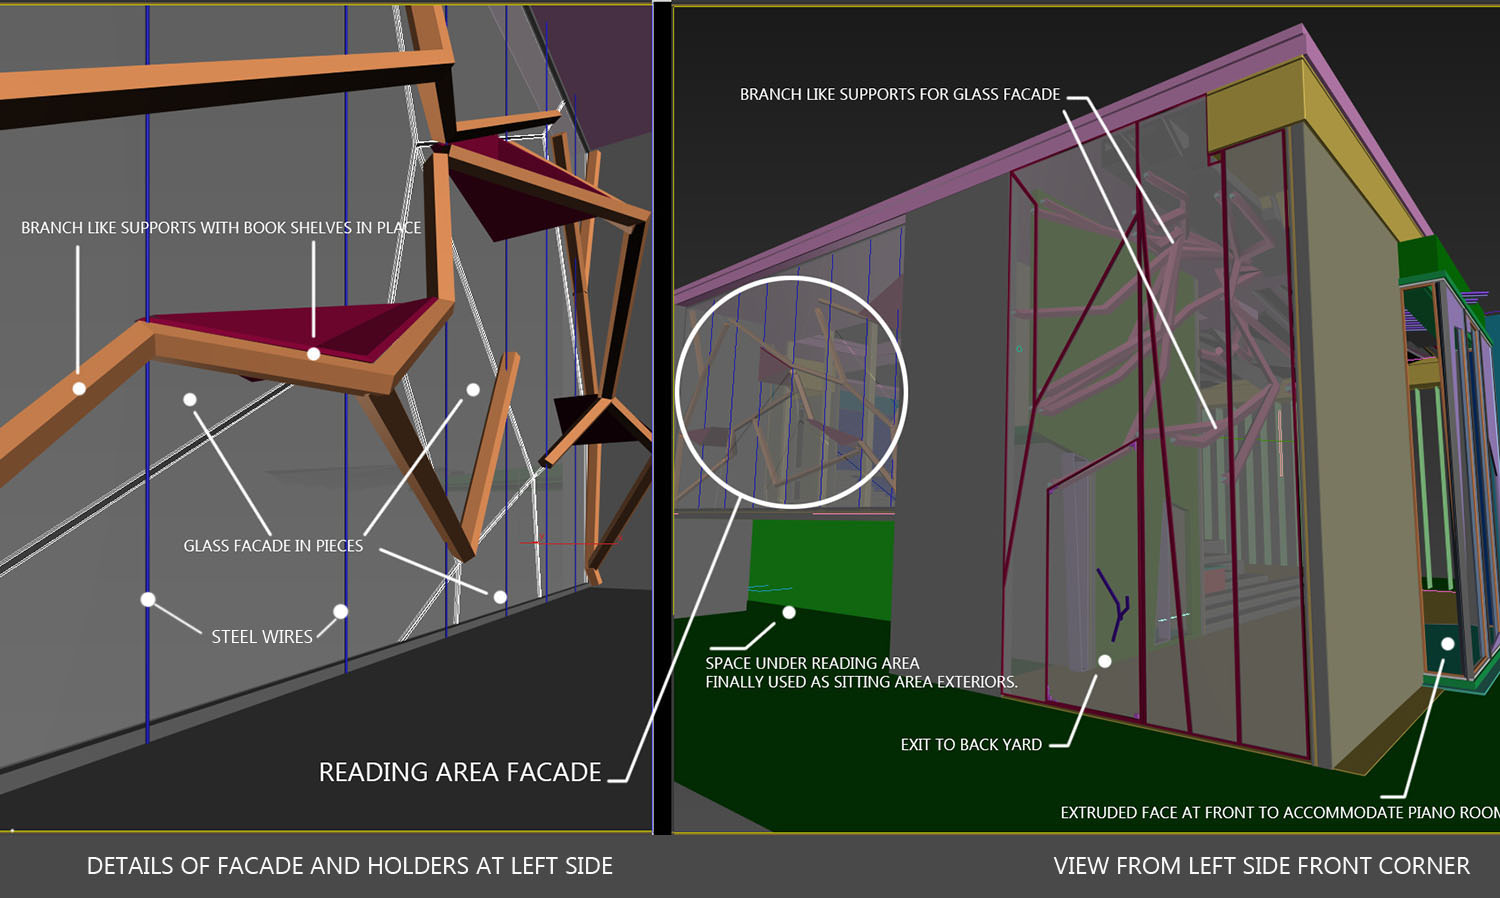
The front end of the long hall was still blank so a big screen was introduced there. To movie lovers, with this screen in place, one can watch movies/content from anywhere inside the villa. Coming to the left side, huge glass facades looked beautiful with buildings having high ceiling. So a huge glass façade could do here, but plane glass so massive would look boring and maybe not be practical, so it was split into pieces unevenly for a change. Splitting the glass in an uneven way meant it would need special holders to hold. The branch shaped holders solved the problem. Steel wires running vertically through them reinforced the strength of the branches as seen in the image.
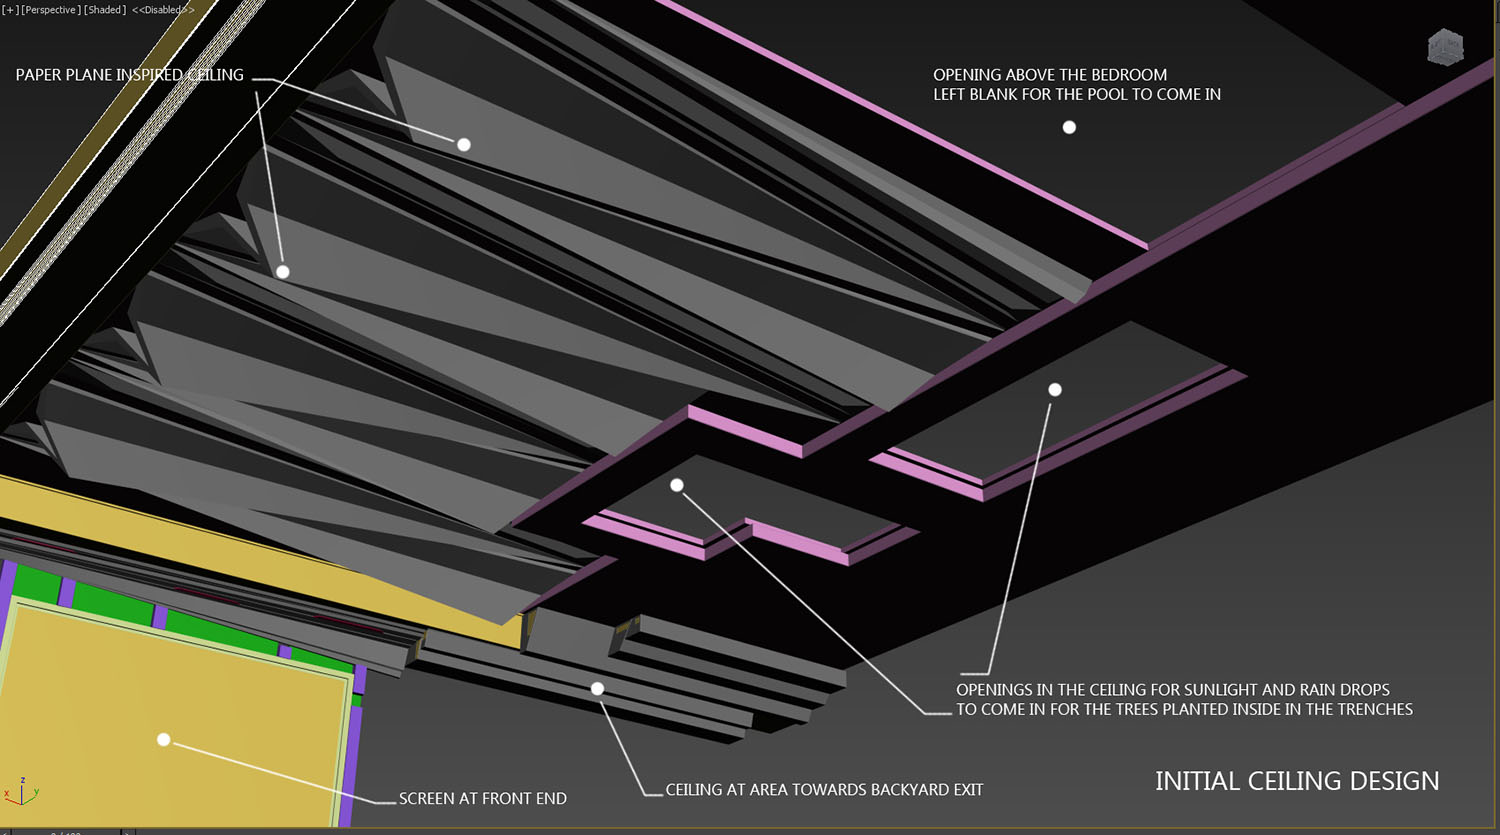
The ceiling part of the long hall was a massive area when it came to designing the roof. It needed to look interesting from inside, so a design that was easy to make and looks great was required. While searching for references I came across Paper planes that sparked the idea of suspending false ceilings like paper planes side by side and could also embed light fixtures into it. But since the roof had to enclose the entire area which was huge, other designs had to be looked at as well. For now I left the space above the bedroom blank. The image shows the initial ceiling design for the entire hall.
While designing the ceiling the terrace also had t be considered, since both are sides of the same coin. There was lots of space on the terrace and it had to be utilized, introducing a pool solved the problem. It also came with sitting areas and other features. This is when I thought to let the pool sink in as the ceiling on top of the bedroom. The couples on bed could watch the stars on a romantic night through the pool above them!
The normal rectangular pool was pretty common, so some odd shapes were under consideration; keeping in mind one should have the decent length to go for a long swim. Much iteration was done before finalizing on one. Since there was not enough space to completely sink the pool into the roof; raising it and making it look like run infinitely to all three sides was the option. See picture showing the iterations done while making the pool.

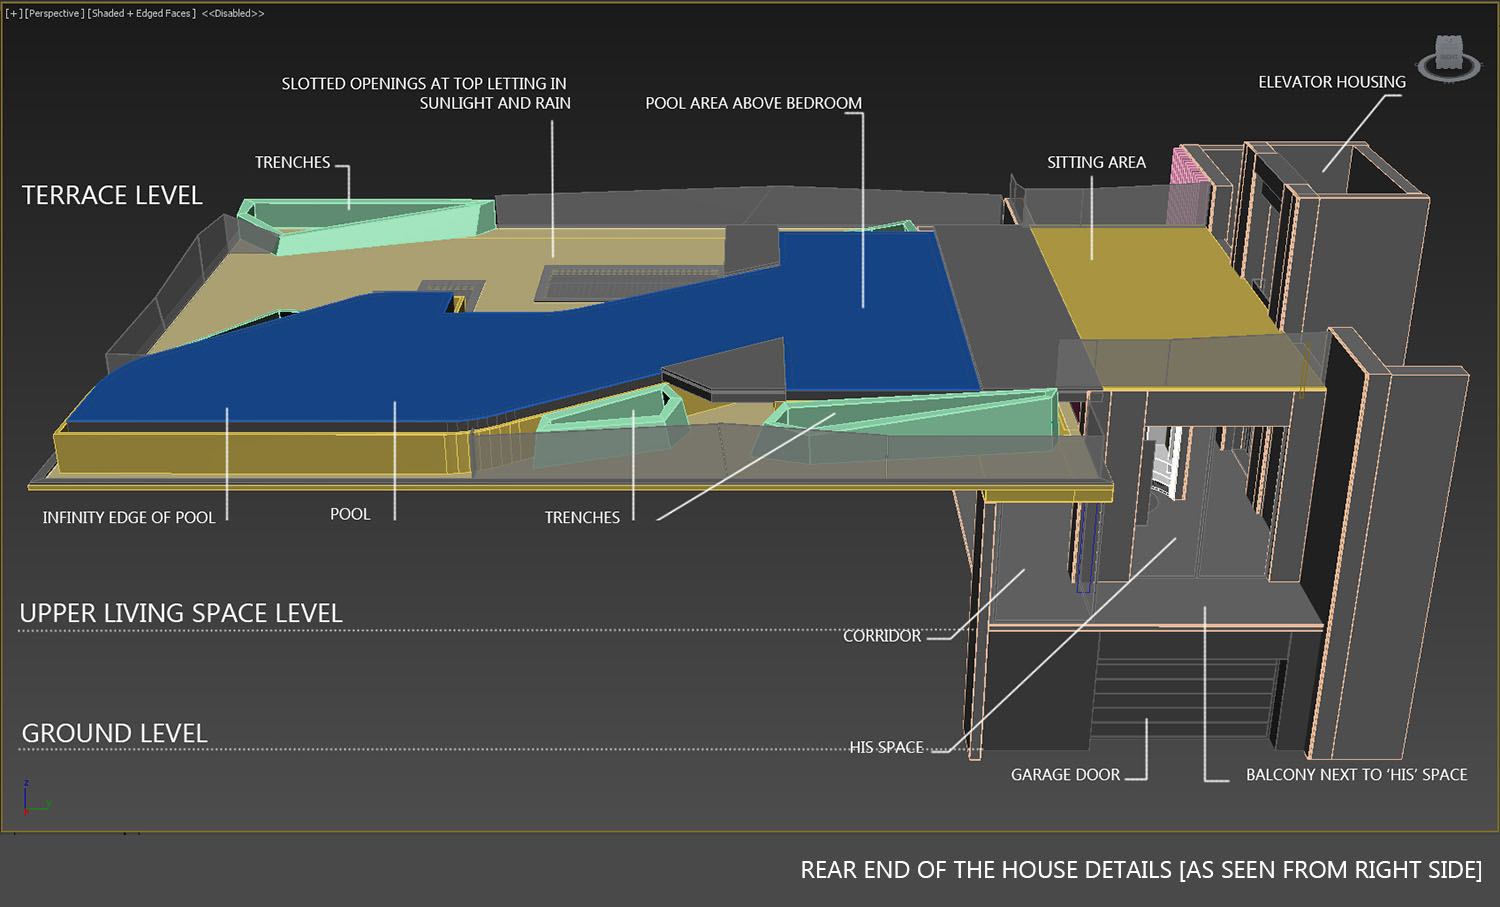
The back side of the building was incomplete; also I was looking for a way to connect the interiors with the terrace and garage at bottom. This lead to introducing an elevator, that could connect all three levels. Placing the elevator bluntly just after the rear door of the long hall did not seem to be a very impressive idea. There had to be a breathing space where something can happen. The rear end of the interiors was extended. Here two new areas was introduced; the His and Her space [ that also served as dressing rooms]. A corridor right after the rear door split to left and right to her & His space respectively. I believe in the idea that being partners you do require time to yourself as individuals; so this part was for that purpose. Balconies were provided at both sides. The elevator was thus placed at the rear most end and it effectively connected the three levels of the house. The garage came right under this. Image shows the rear end of the house with the above details.
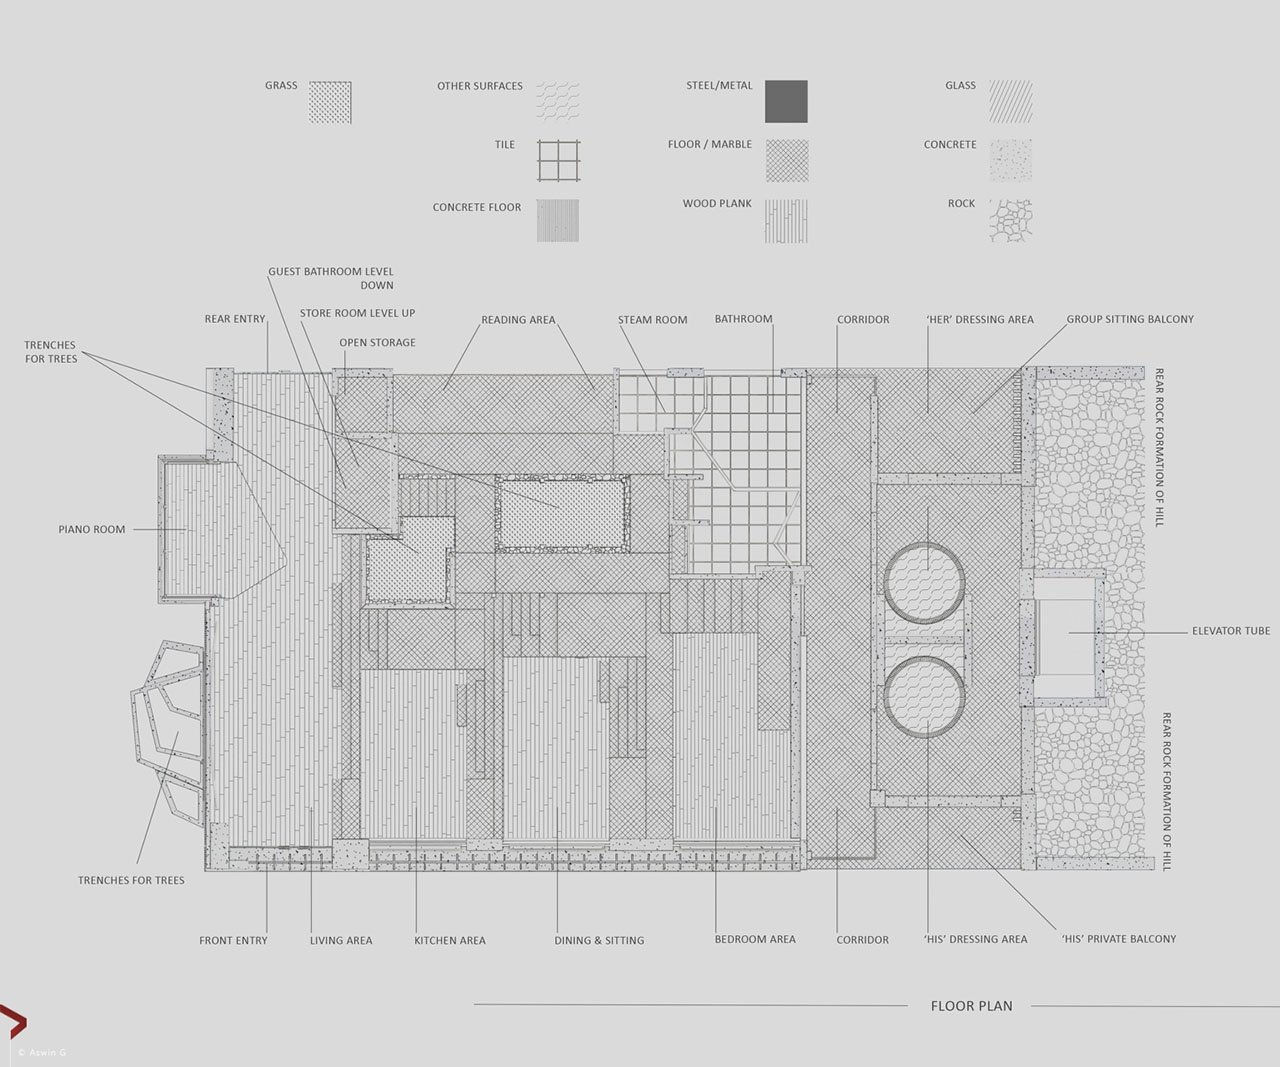
I have prepared some 2D drawings [pans & elevations] based on the final design. They are presented here for understanding the concept better. Starting with the floor plan of the living space [Interiors] see the drawings presented. Please have a detailed look.
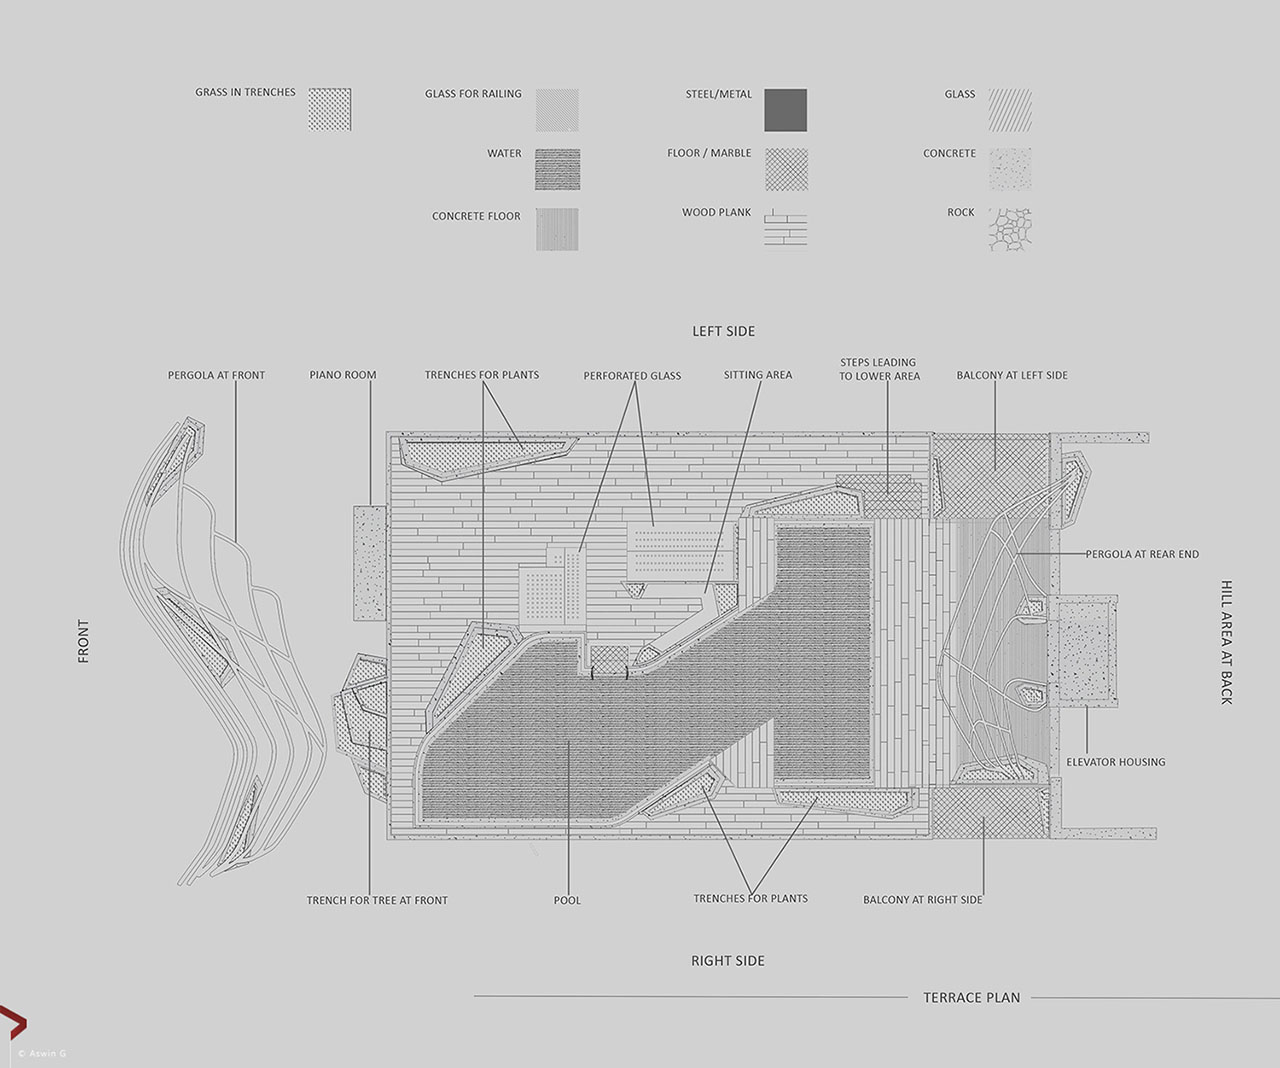
Shown Below is the floor plan of the terrace.
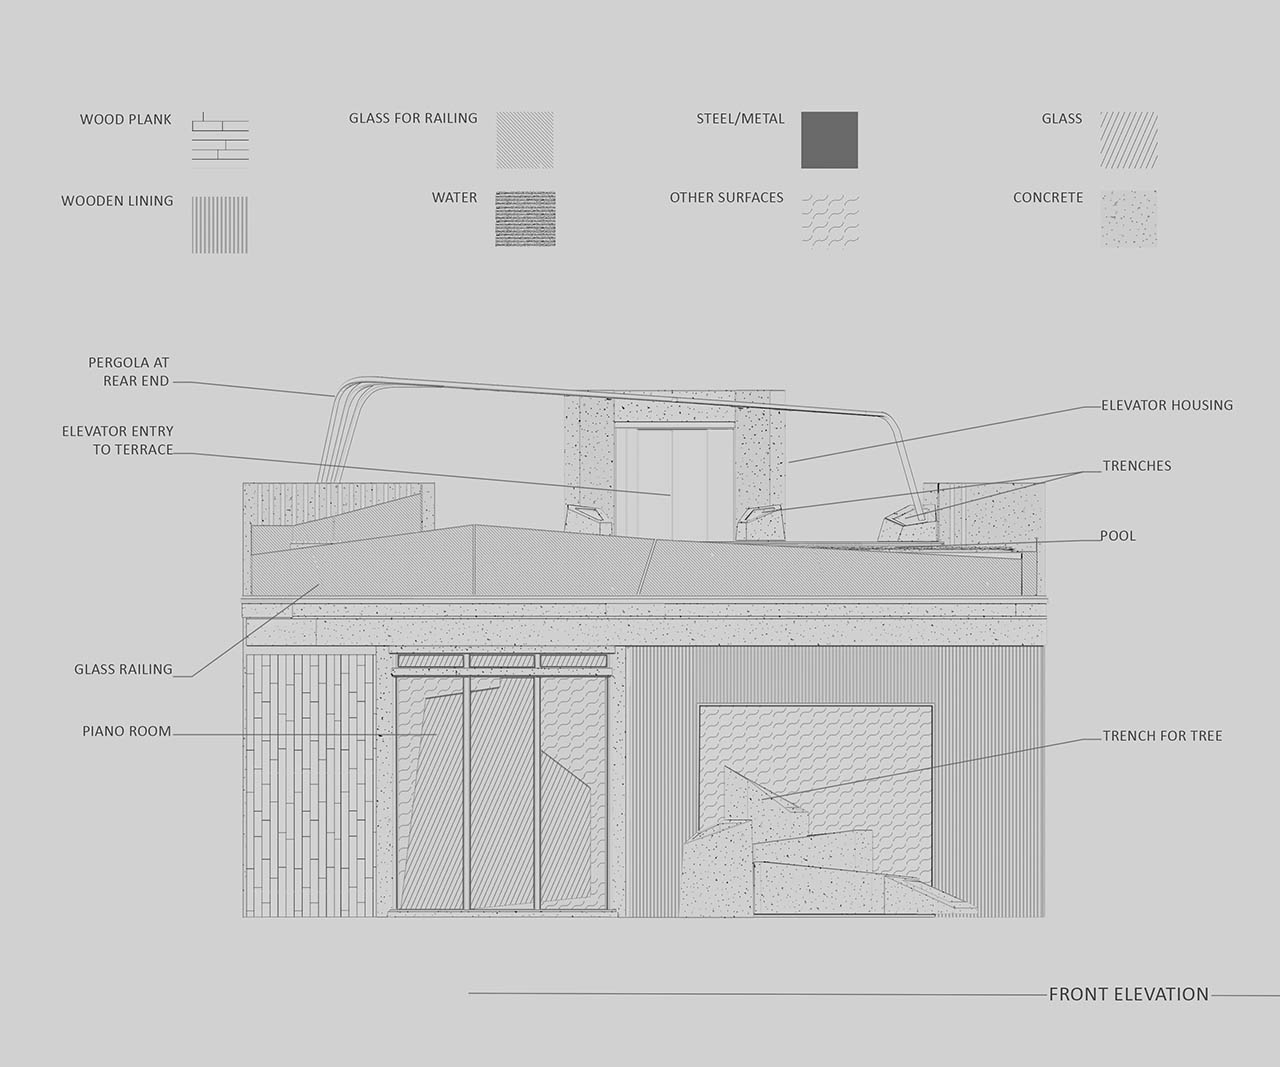
Shown Below is the front elevation.
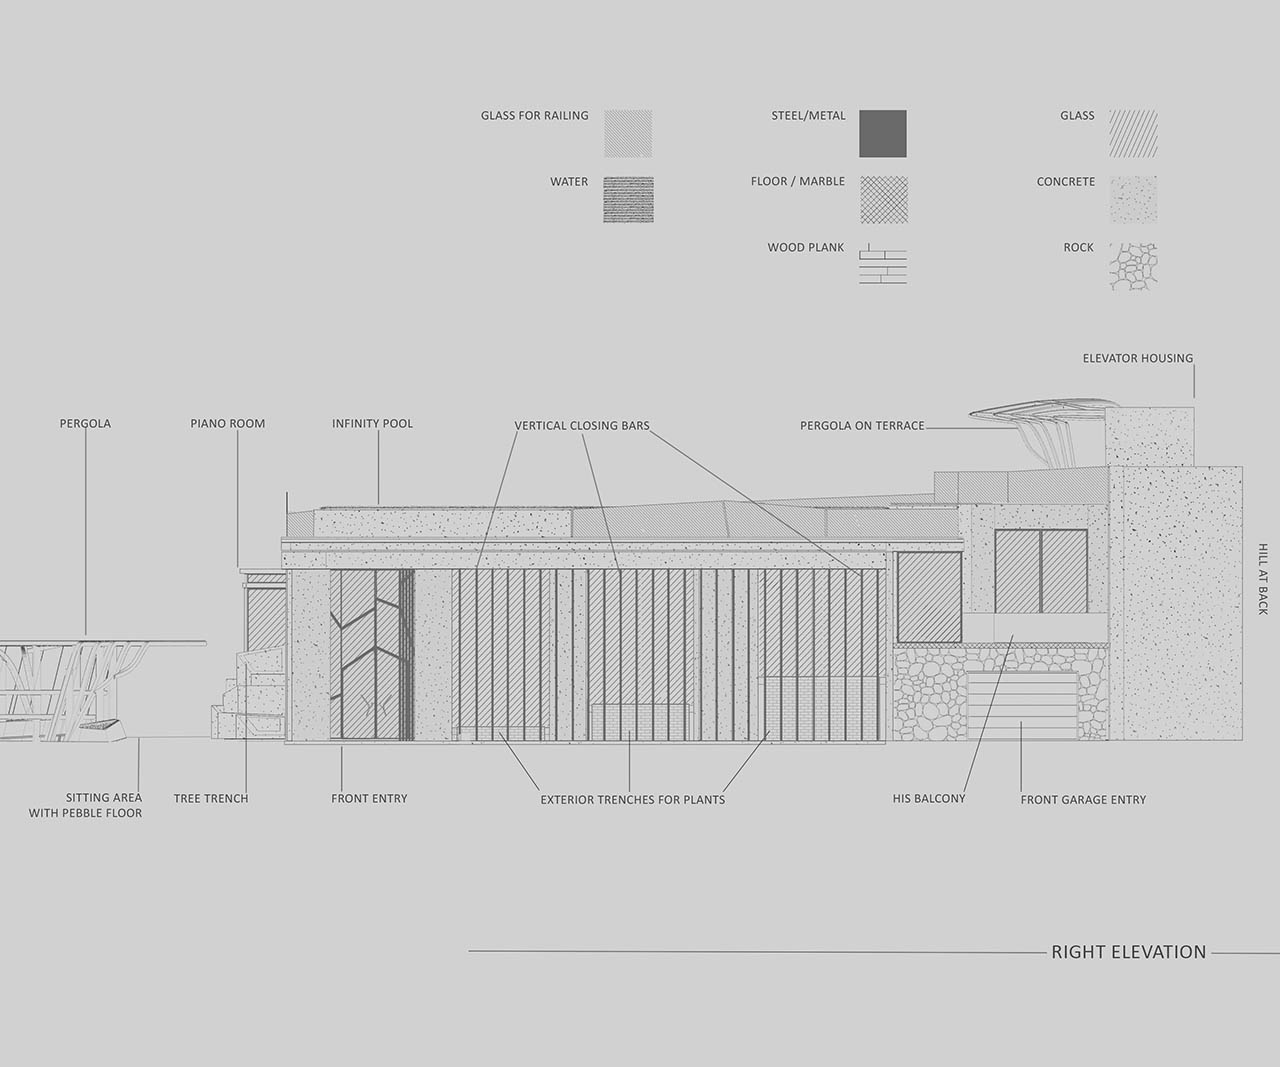
Shown Below is the right side elevation.
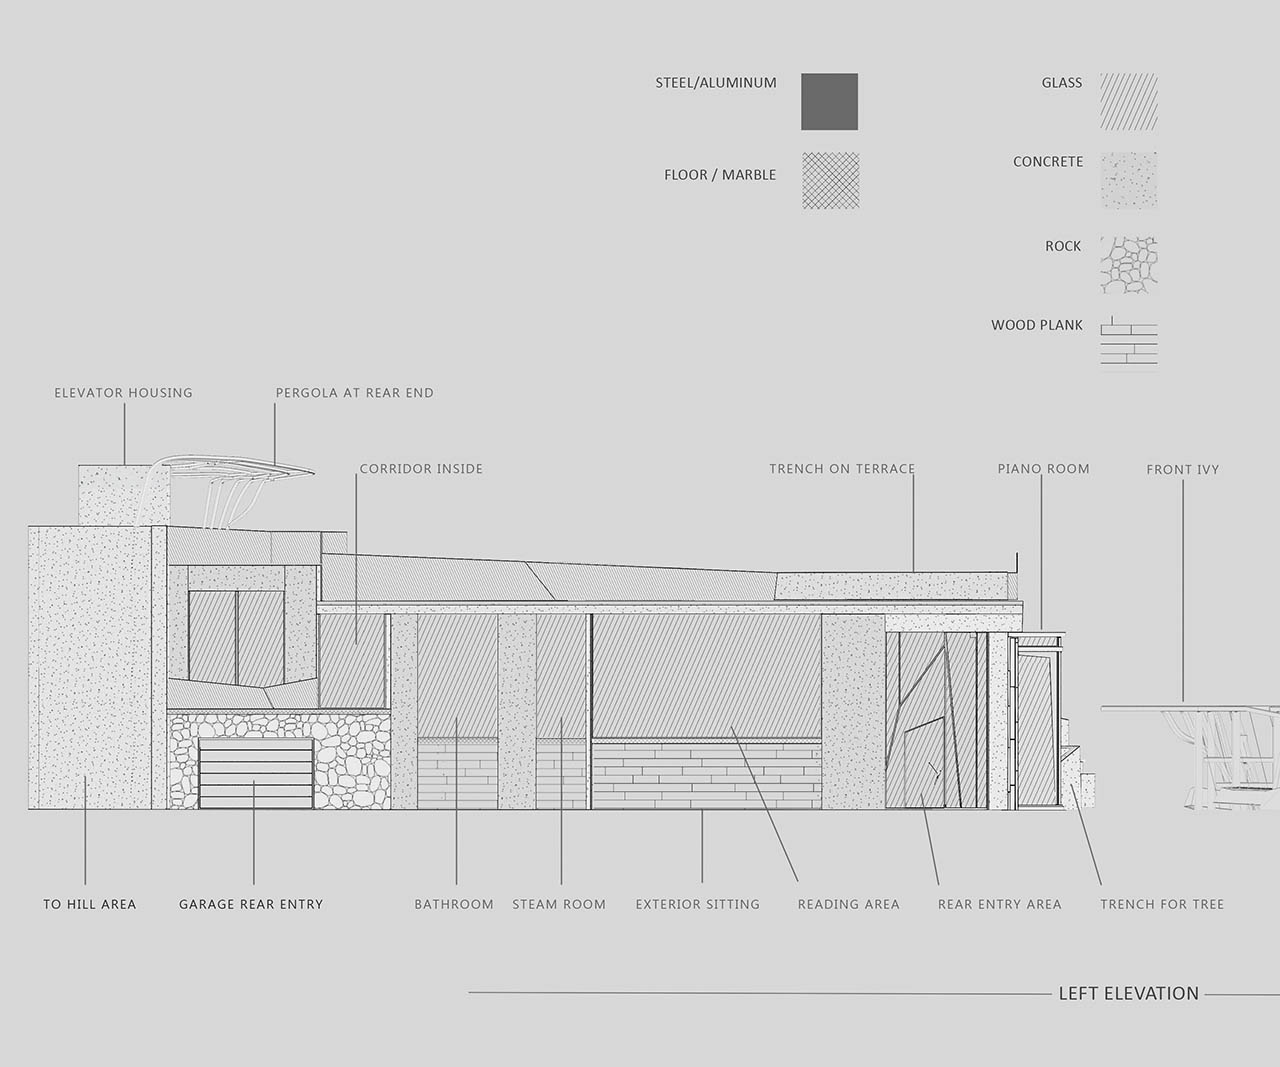
Shown Below is the left side elevation.
Please note that, elements like the pergolas, the big trench at front etc. was done during the final stages of visualization while detailing the scene. Design is complete for the interiors, like custom cupboards, an entire dressing room set, some false partitions inside the bathroom, the steam room, a guest bathroom; a place to keep your bikes was also sorted out. Added wooden cladding at areas to make the structure interesting and several other features were added while refining it for the final views.
Once the building was complete, ready to be tested in an environment I started working on the exteriors. Even though I wanted to do interiors; the exteriors became a priority as the views from the villa opened wide to the world outside.
Note: kindly do not use the designs since I am looking forward to collaborate with someone who can bring this to reality.
THE LANDSCAPE DESIGN
The concept of the house was to be situated amidst a forest. So it was time to decide what kind of forest should surround the plot? Redwood trees always inspired me and I thought of making a redwood forest around. Reference images were collected. Researched on what all kind of ground cover normally runs in a redwood forest, and the various species of plants in that environment. It was mostly clovers beds, mushrooms, dead trunks, redwood seeds, rocks scattered here and there, twigs and fallen leaves that formed a carpet on the ground [all these were just great and just what I was looking to have]. The good thing was that the ground was not densely covered with different varieties of plants as it would look too dense and chaotic. I wanted the ground to be clear, so that one can walk around into the forest. See below the references that helped me.
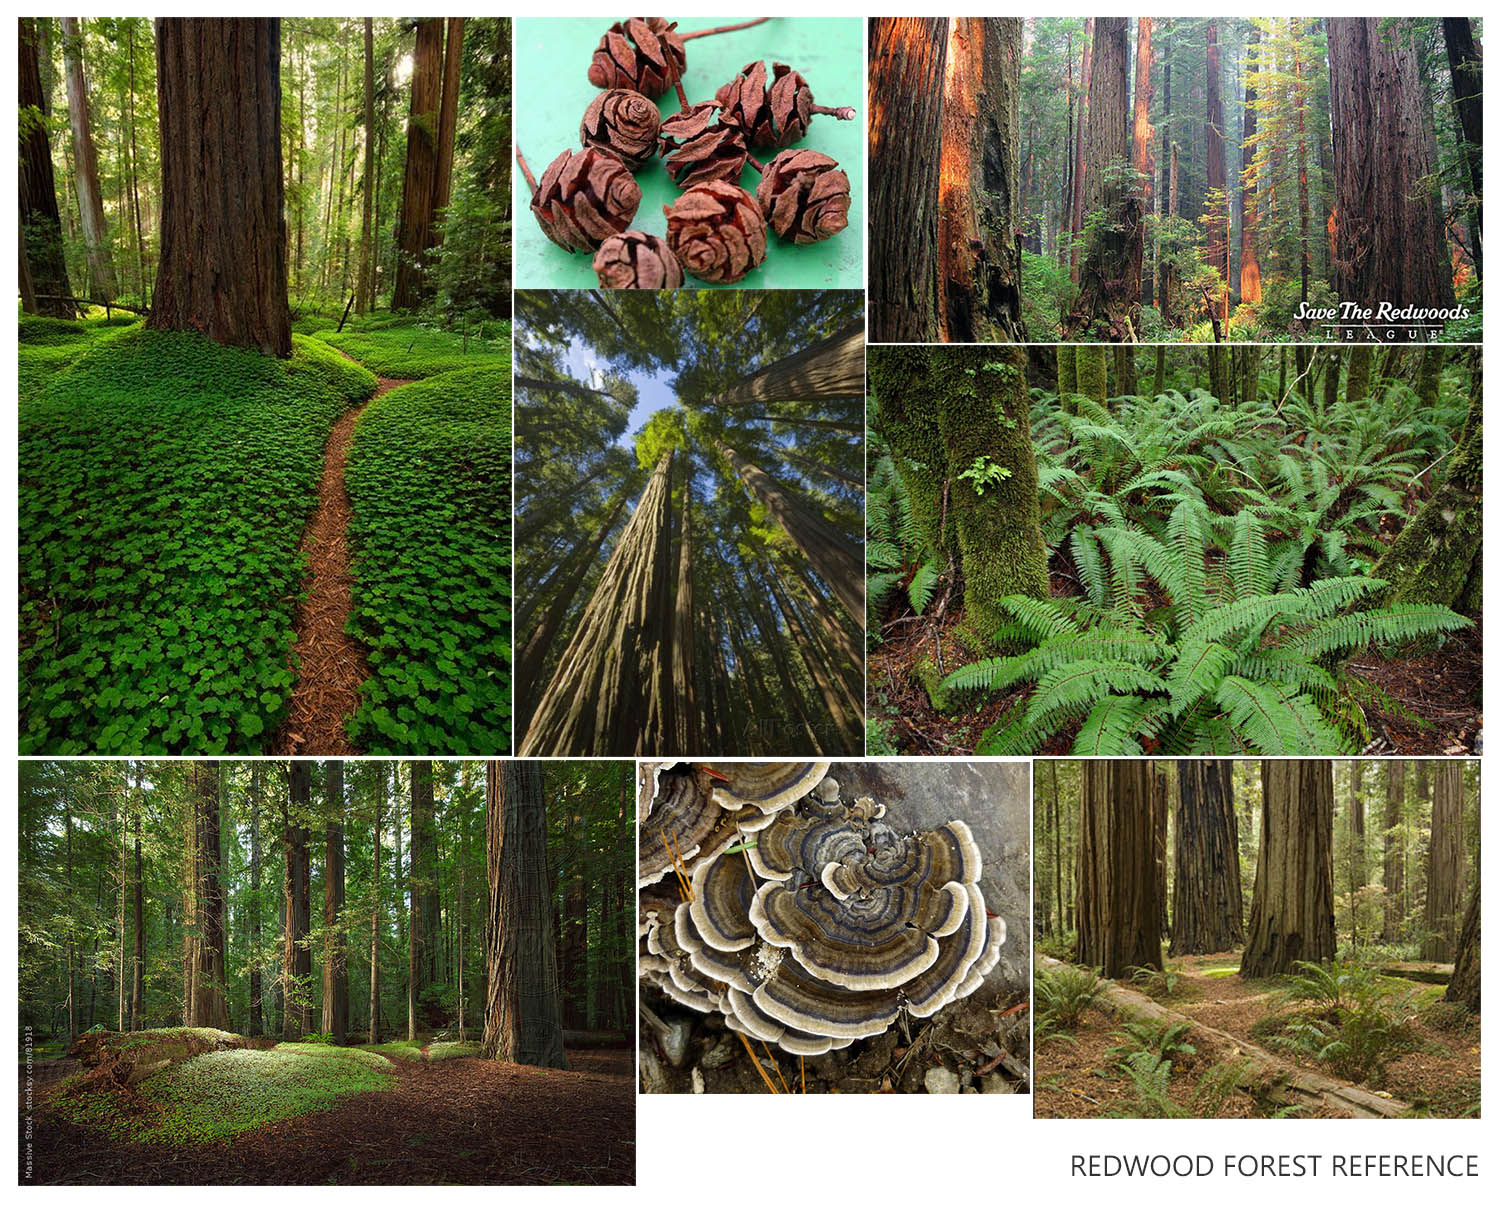
These are random pictures I came across while searching online. They belong to the respective owners, but as you see it is only for reference.
The first challenge thus came up; there was no redwood tree model in my library neither did I find it online for sale anywhere so making it was the only way out! To model it, I chose Mudbox since it had a direct integration with 3Ds Max and I felt it was relatively simple and not as complex. It also has the feature that your texture resolution does not depend on your mesh count. And I needed low poly to be used in 3Ds Max; considering the fact that the scene was going to real heavy in the end. The work will be done by normal maps and high resolution textures.
It took a few days to study to work with Mudbox 2011, and these free tutorials from YouTube helped! Thanks to the respective authors.
https://www.youtube.com/watch?v=ziWLs9-clis&list=PL588F2FB72B0B1EF5
https://www.youtube.com/watch?v=fJJQaQDRkG8
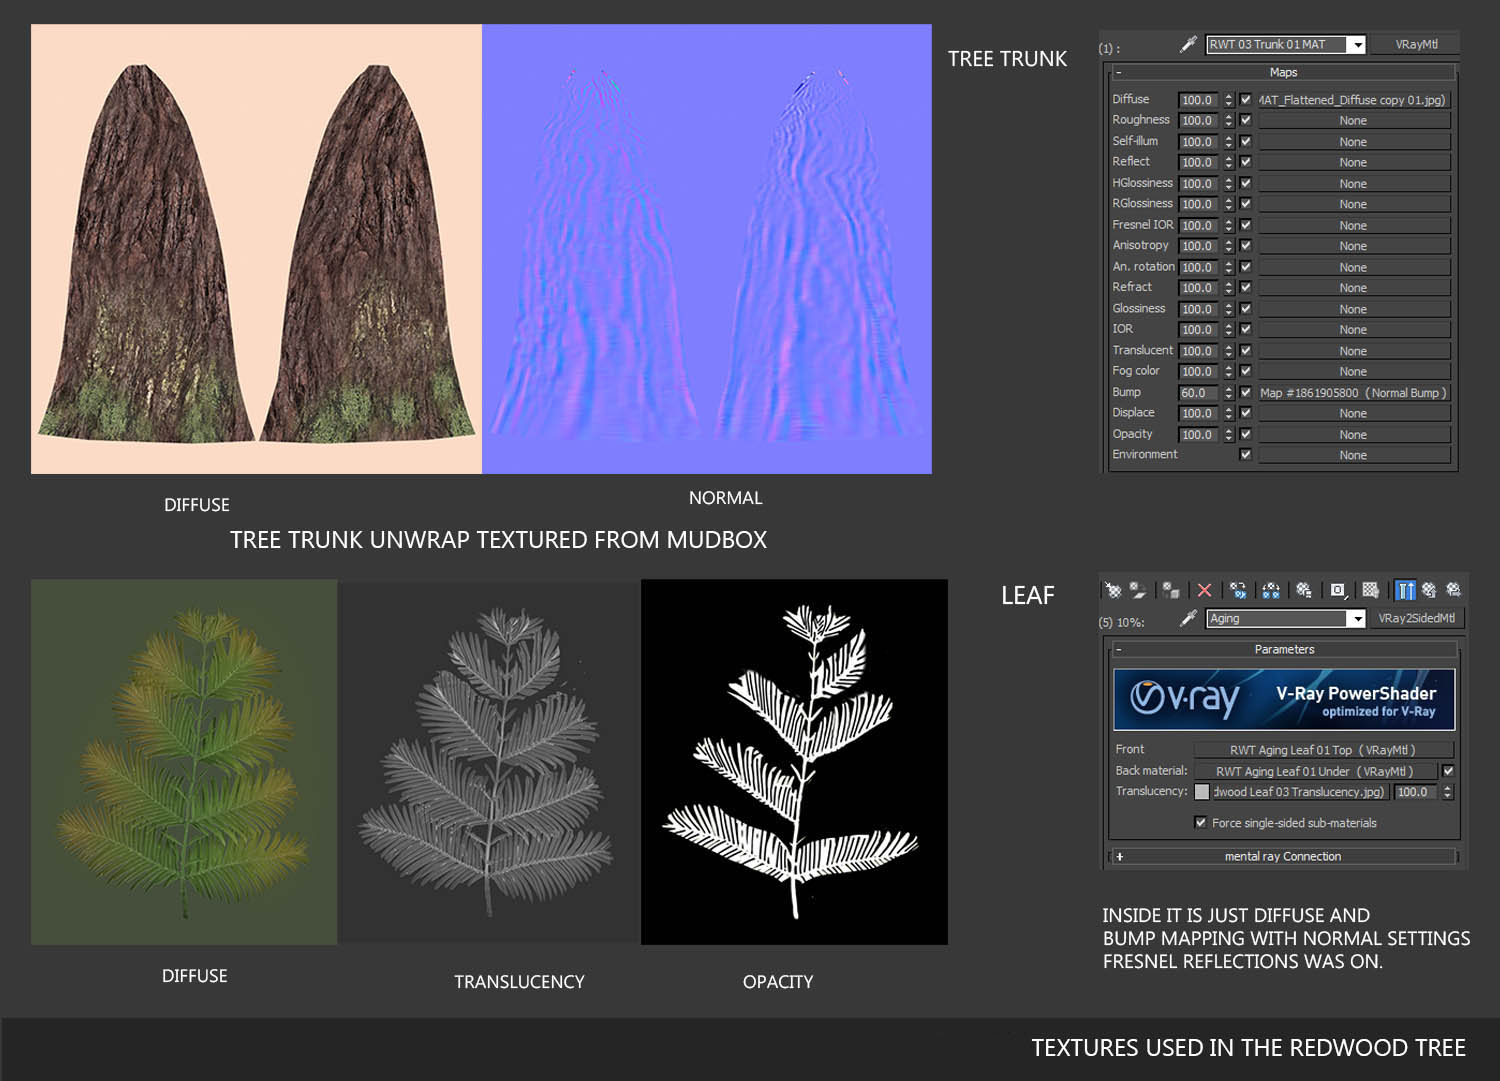
Practice was necessary before forward with doing models for the project. Firstly the tree trunk of the redwood tree had to me made. There were 3 tall trees in the library, took out the main trunk, unwrapped it and exported it to Mudbox for modelling and texturing. I was lazy to unwrap initially, but once I figured the easy way out, it was fun to do. It seems there are some automatic unwrap plugins like polyunwrapper, UnwrellaMax, but only demo versions were available and needed purchase. I did use “Steamroller” which is freely available at “Script Spot” and does the job to an extent. So finally it was done manually using the tools in 3Ds Max.
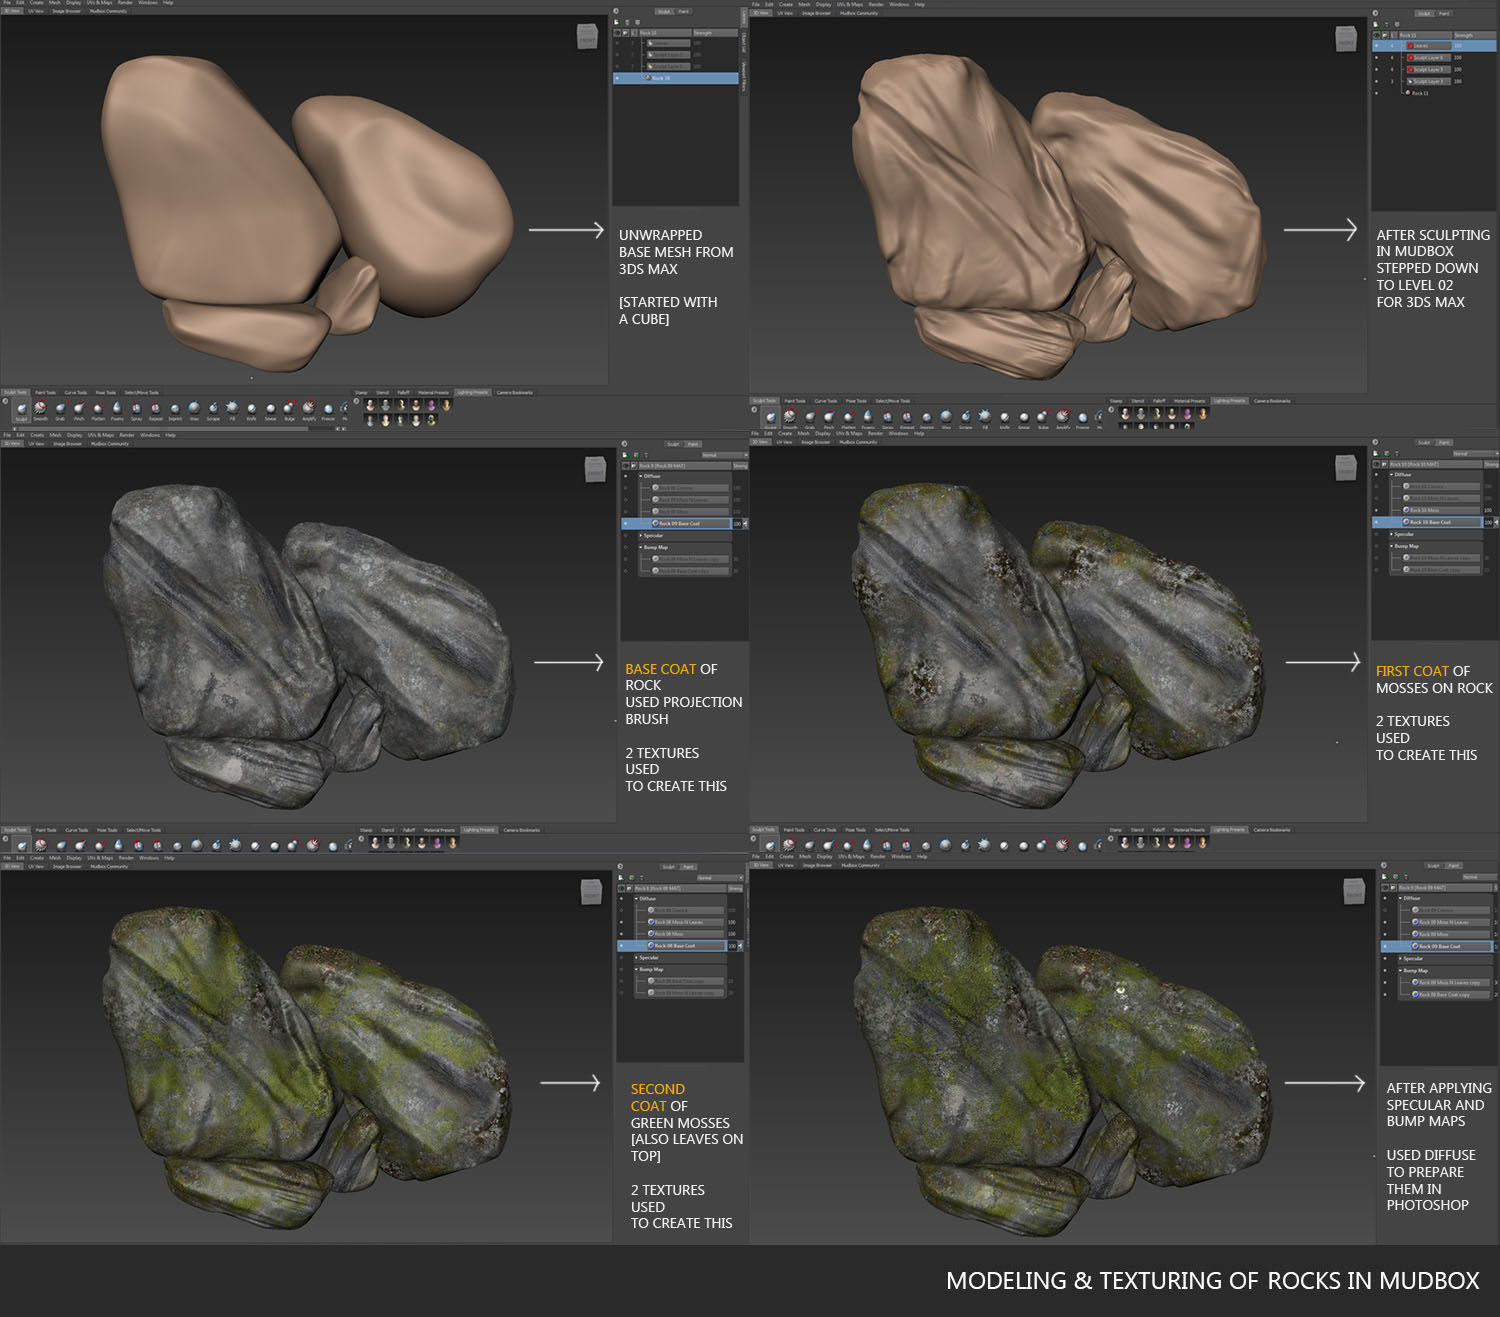
From 3 low poly base meshes 6-7 variations of tree trunks were made, that were of different heights and age. I guess I will not be going into how to use MudBox but will point out a few things. Mudbox uses layers similar to Photoshop for adding sculpt & texturing details [You can have multiple layers for each map]. Diffuse maps, Specular, and Normal & Bump maps will be generated in Mudbox for a given model. The image shows modelling in Mudbox step by step.
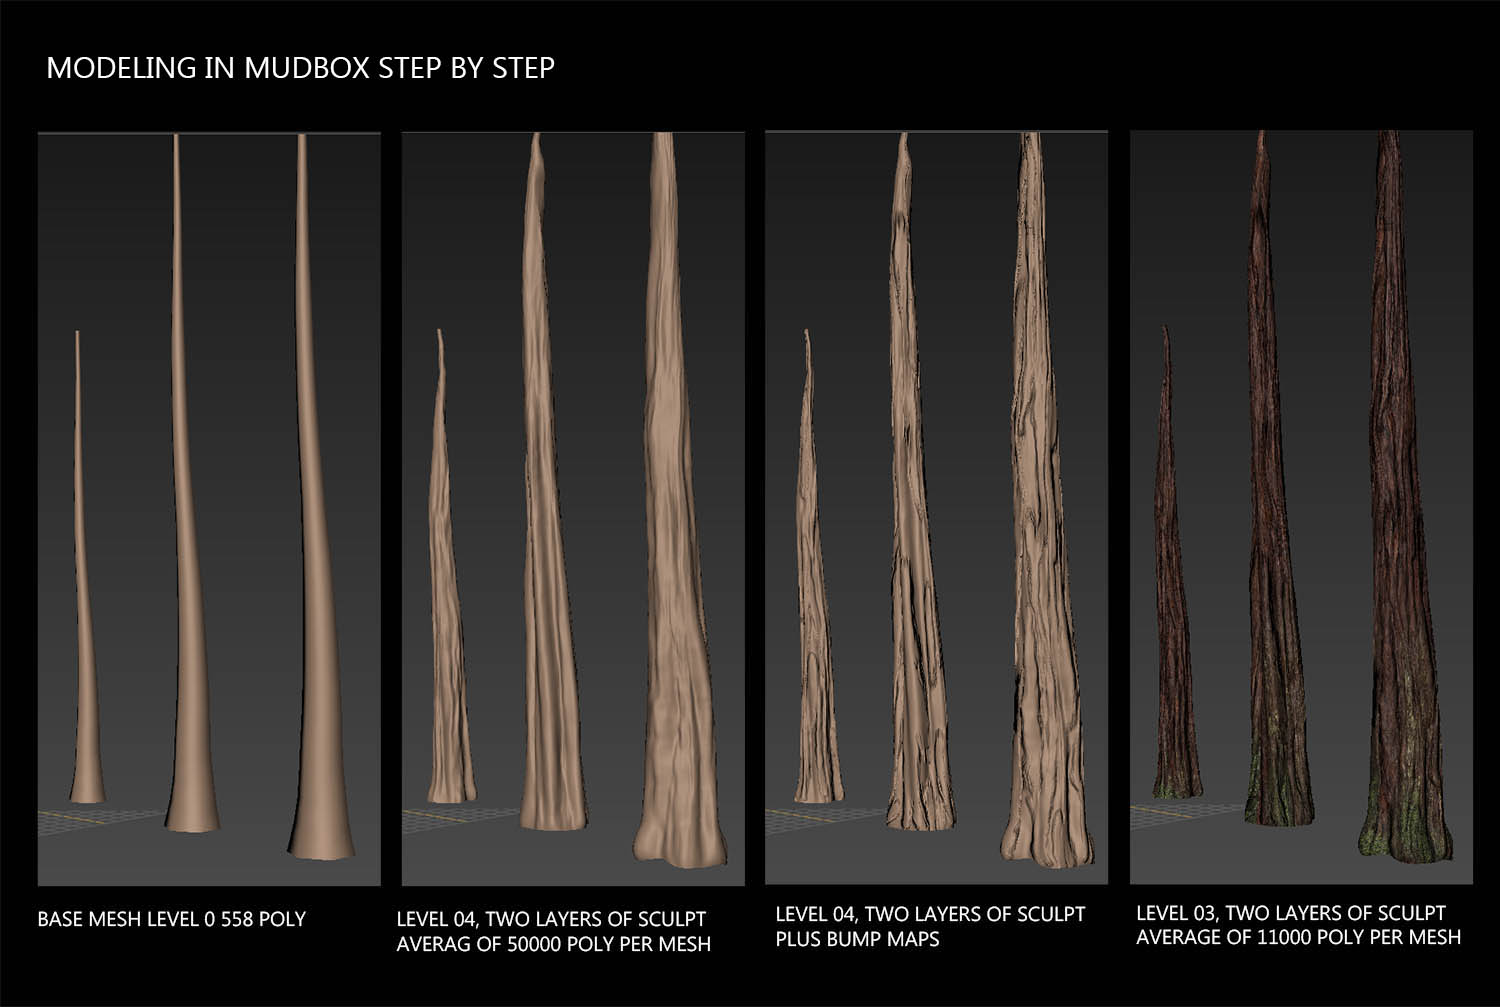
Even though the final meshes have a high poly count inside Mudbox at Level 04, with around 50000 polygons per model; Level 03 was used with less than 11000 polygon per tree trunk [I could have used level 02 with 6000 polygons but level 03 was better]. Remaining details were compensated by normal bumps and the detailed textures that were used. I will cover texturing in Mudbox later in this article in another example.
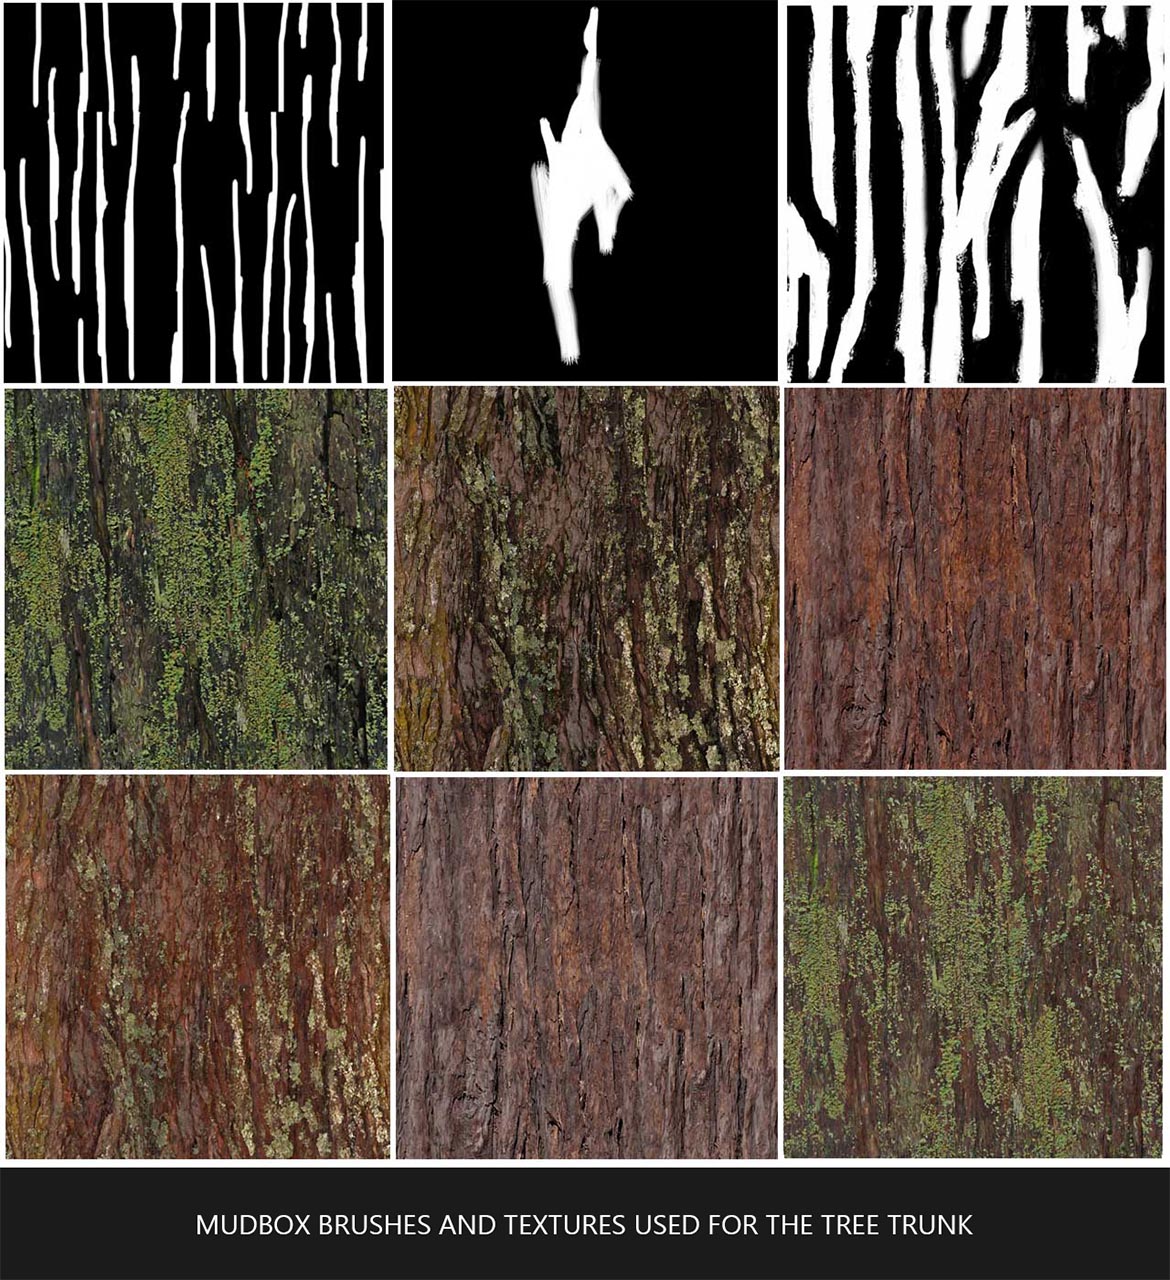
Here are a few brushes & textures that were used for creating the tree trunk.
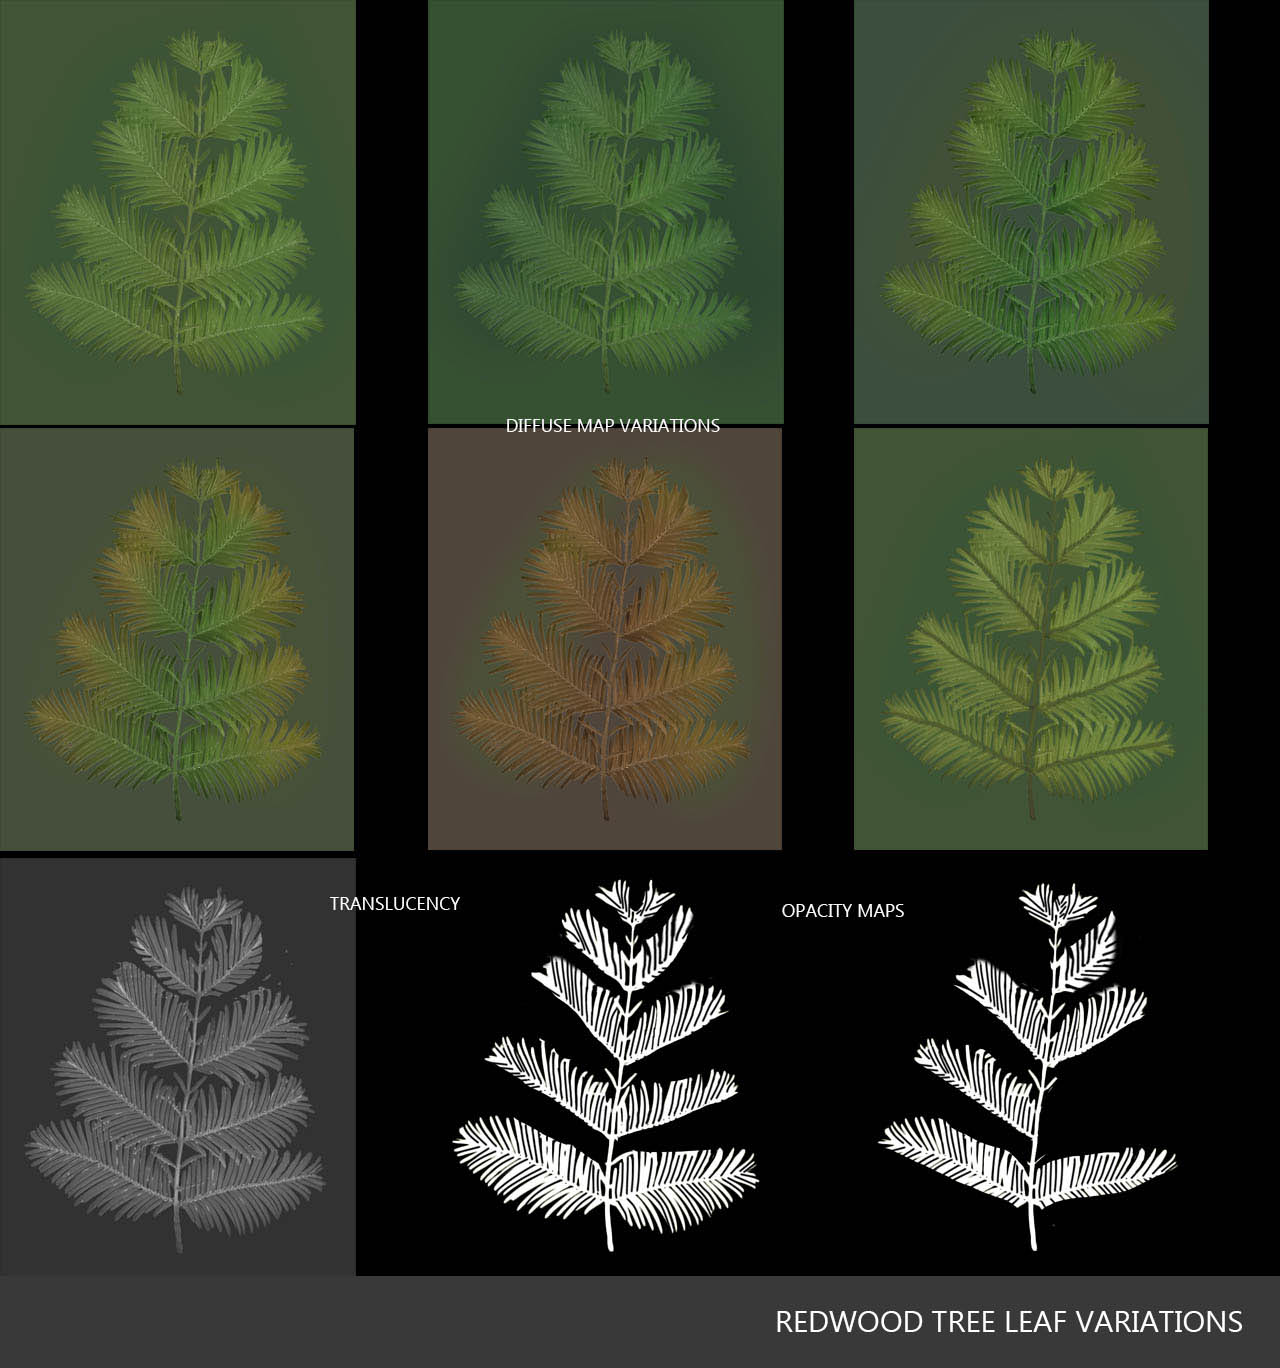
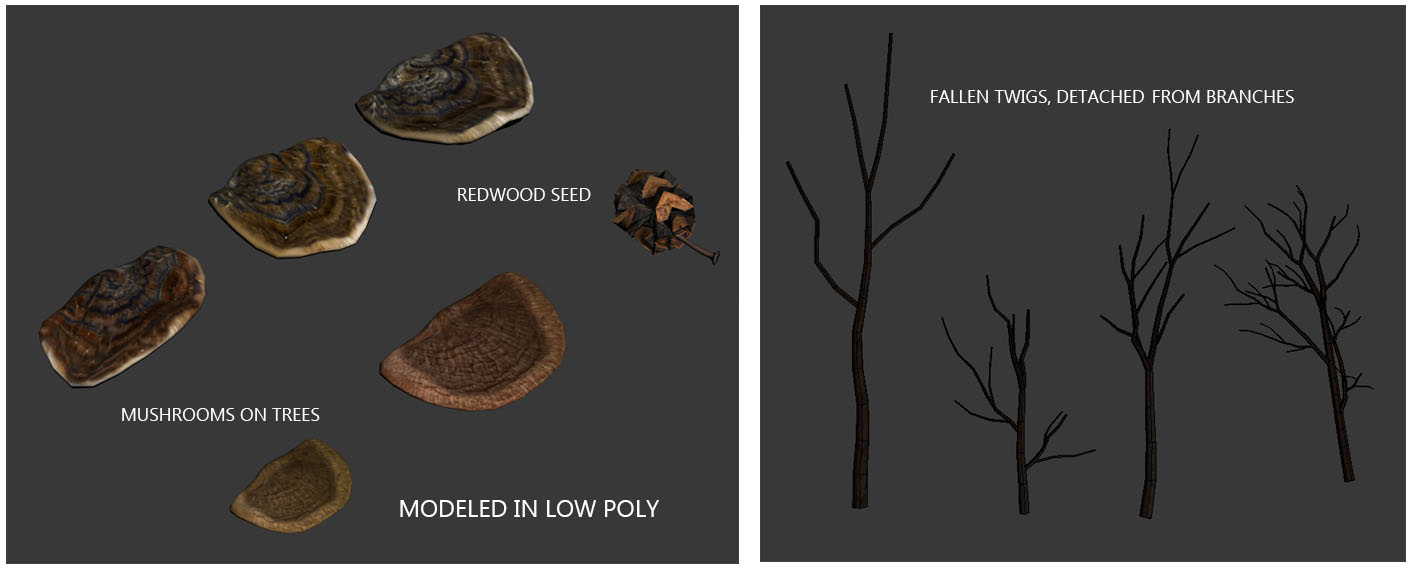
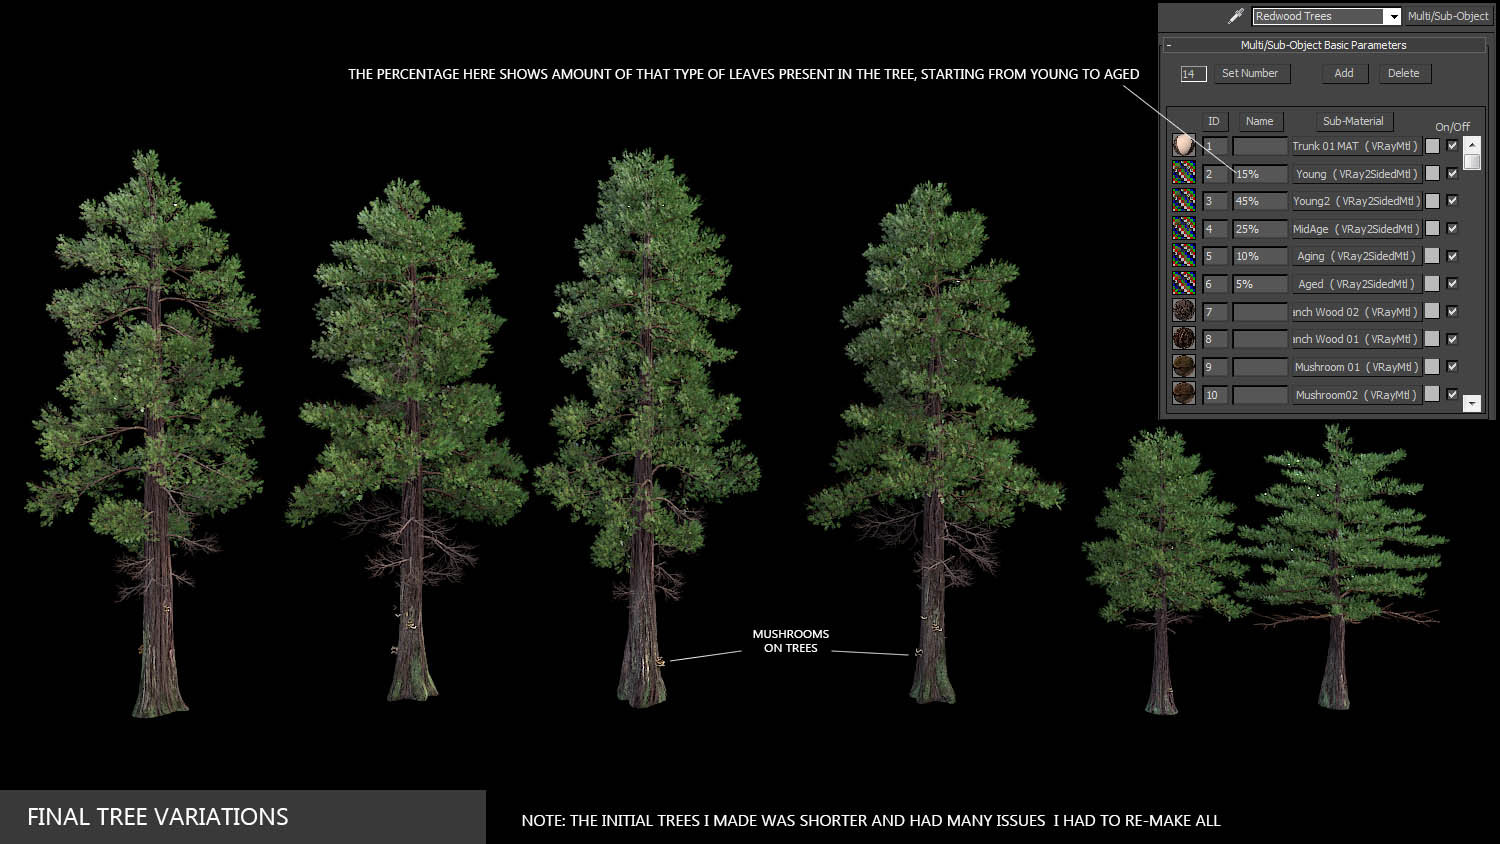
The branches and leaves that came with the original model were used as they are. Only that I completely re- textured them to suit my scene. 5 variations/hue of leaves for different ages were made. Also different opacity maps were used to create the variation. Other related props like mushrooms, redwood seeds were also modelled and unwrapped. I detached some branches from the real mesh to be scattered at ground. Please see the images.
The 5 types of leaves were scattered at random percentages using a script called ‘Random Selector’. [Thanks to the maker]. You can find it at scriptspot.
The set of branches and leaves were duplicated and rotated to place to cover the entire height of the tree. The main trunk was then attached with the branches, leaves, and mushrooms and converted it to proxy. I had to try different diffuse & opacity maps and textures to refine this for the desired output. See the final few trees I used.
Tip: I made sure to apply the same material slot to all the 6 trees. A multisub object map worked perfectly. This allowed me to change all trees [textures] scattered in my scene from a single place. See the images for details of the trees made.
SURROUNDING AREA
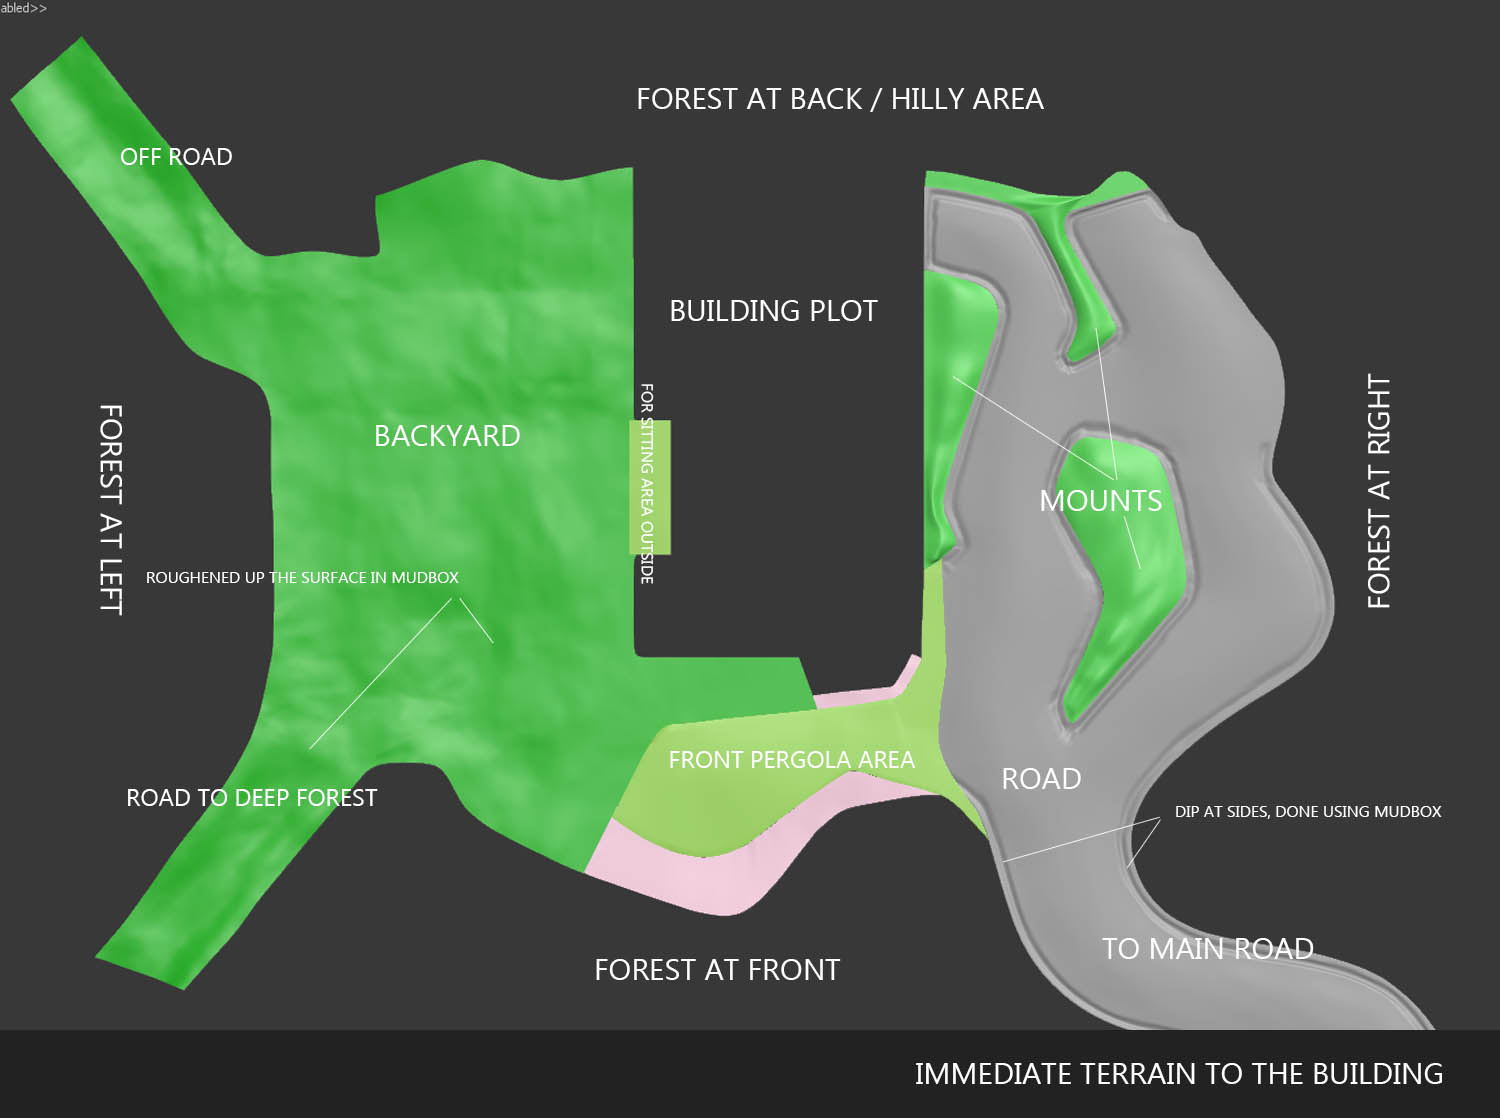
With the trees ready, the terrain around the plot was next in line. There were two areas to consider, one was the immediate areas to the building and the other was the forest on all sides. I made a rough boundary for the immediate area, split them into three parts; the front approach area, the backyard lawn and the front area. Patch modelling was used to model since it was easier for making curvy surfaces and the mesh was very light. Once I made the low poly base, it was taken to Mudbox to roughen it up a bit. Did some basic texturing in Mudbox and left it there. This was about getting the areas correct so that with the boundary in place, I could work on the main forest area around. The final texturing for these areas were done later using Megascans [explained later in the article]. The immediate terrain to the building is shown in the image.
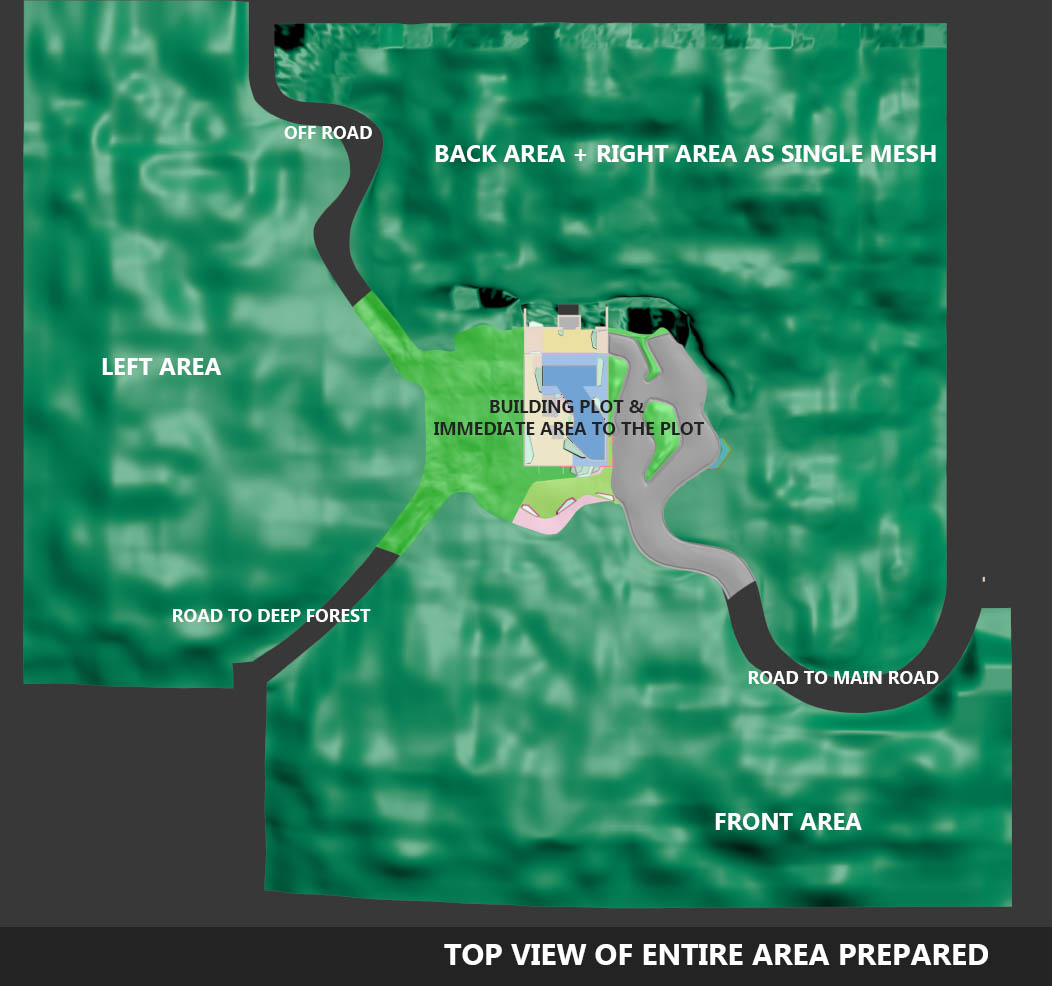
The surrounding forest was split into 3 meshes. Combined back and right area formed the first mesh, since most of my shots came facing this area. Also it was better that this was a single mesh for the fact that while using Multiscatter etc. I could associate it with a single entity and finish all details in a go. We will look at one area; rest two were done the same way. The image shows the entire area from top.
I started modelling the back right area first, patch modelling proved very useful. I had the boundaries of all the immediate areas correct; but the part at which the building joins with land at back was to be figured out. So the building was merged in for reference to get the boundary correct at the rear side. The base mesh thus correct to details was unwrapped and exported to Mudbox.
More than modelling tis time; Mudbox solved the problem of texturing such a huge area which otherwise was difficult to be textured. It helped to custom paint areas correctly. From the references I collected, the ground with fallen leaves formed the major brown part; the other patches that were painted were small rocks, big rocks, ferns, and clovers, all of them in multiple layers
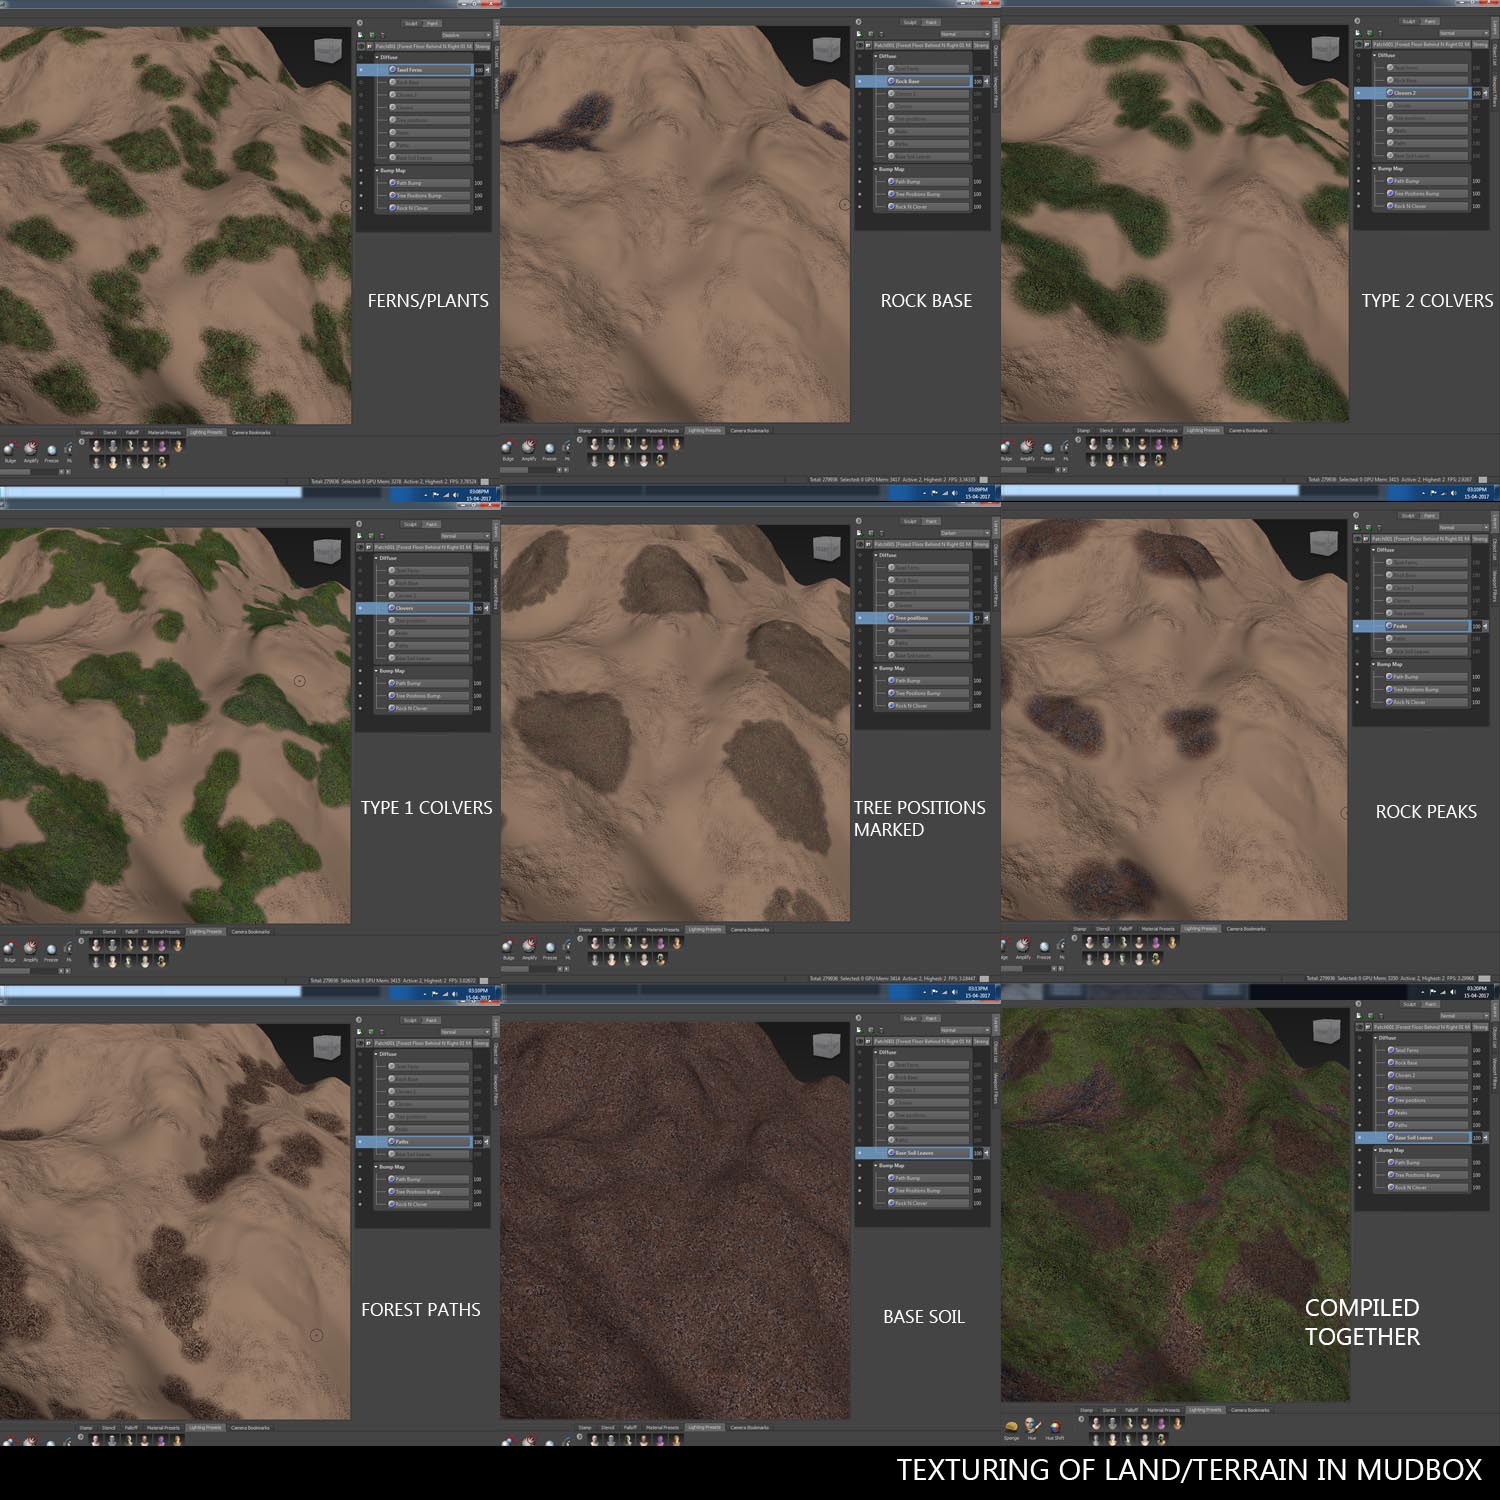
The textures were at 4K resolution since the area to be covered was huge 130 by 130m to be approximate. Textures of this the size would slow down the renders, but it did the job. The good thing was that it was not mixed in 3Ds max which could have slowed it down significantly I guess. Here there are only 2 maps; the diffuse & bump maps, they were sufficient as the areas were at a distance
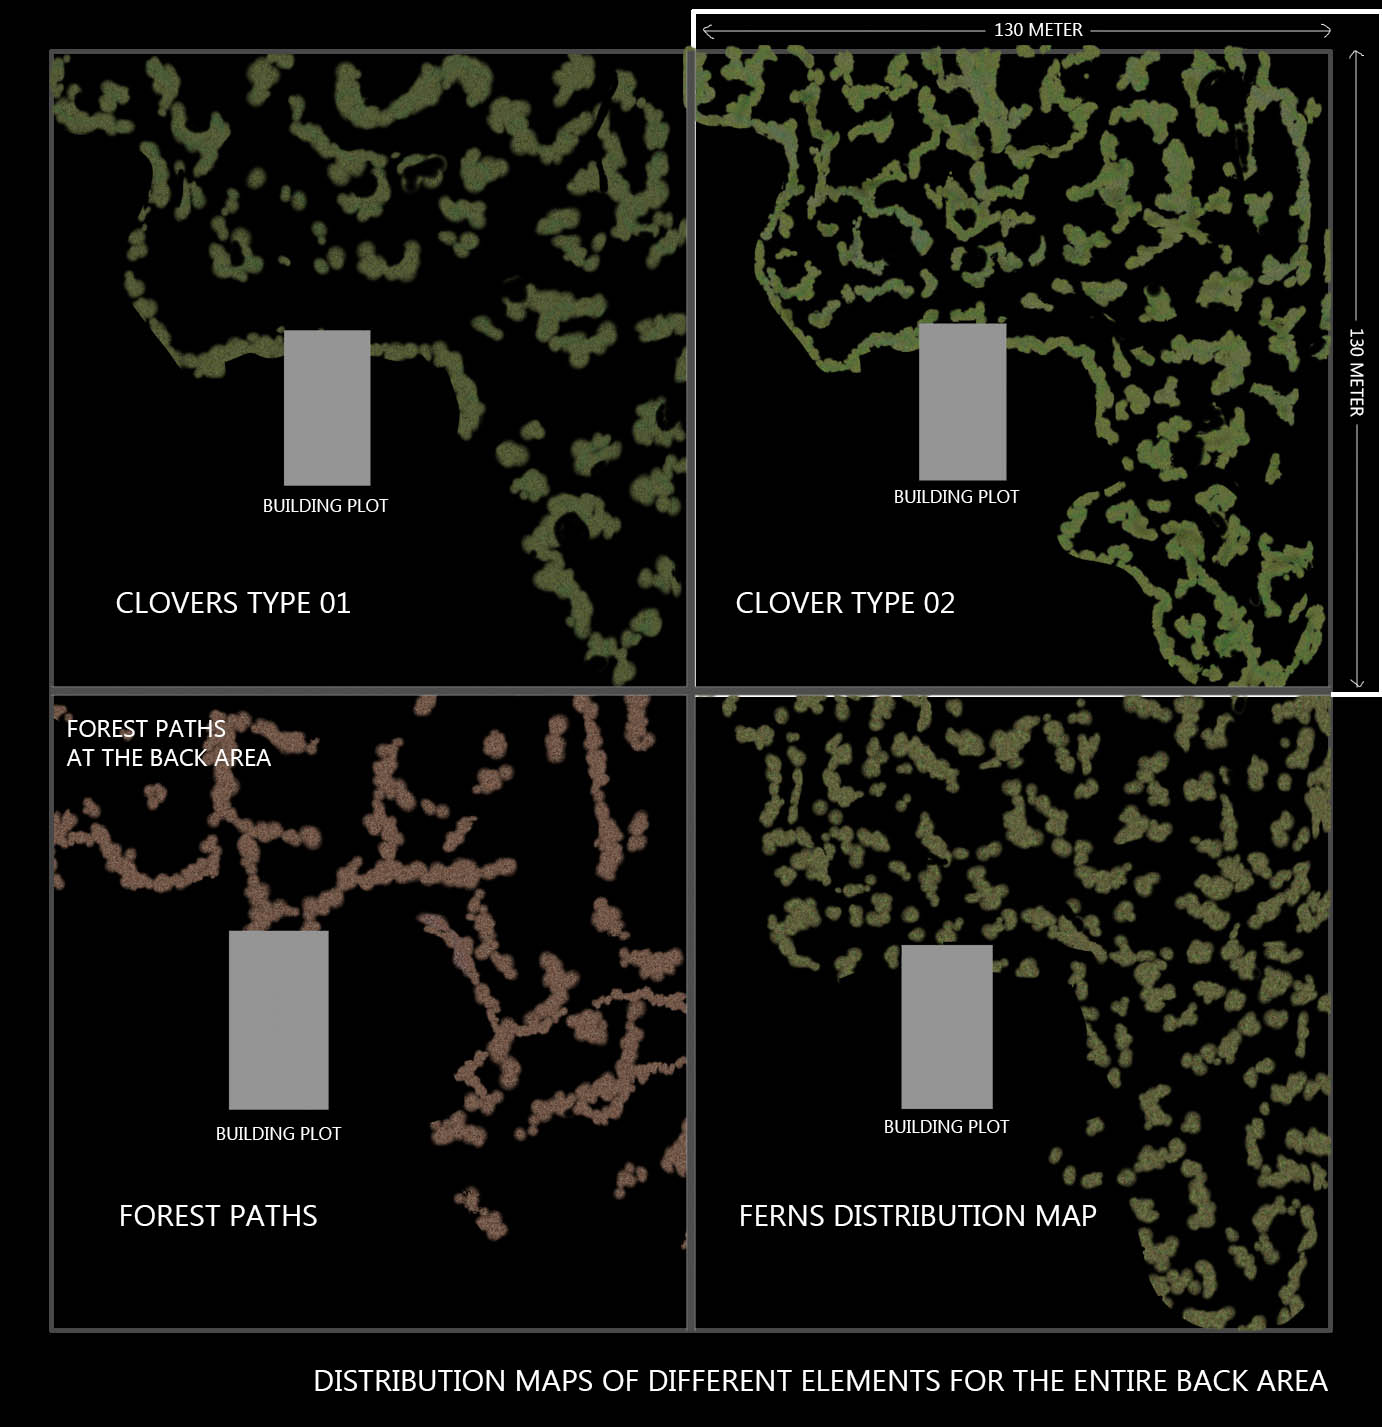
Tip: I used Mudbox tools to paint maps to be used as masks with Multiscatter while distributing objects. [I made a black and white version of the respective layers using Photoshop and used them]
Image shows a few of the distribution maps generated from Mudbox; which I finally used as masks. There was not much overlap of the scattered maps since I could easily see & control it in Mudbox.
The same procedure was repeated for the other two areas.
Here are a few brushes that were used in Mudbox for texturing the terrain.

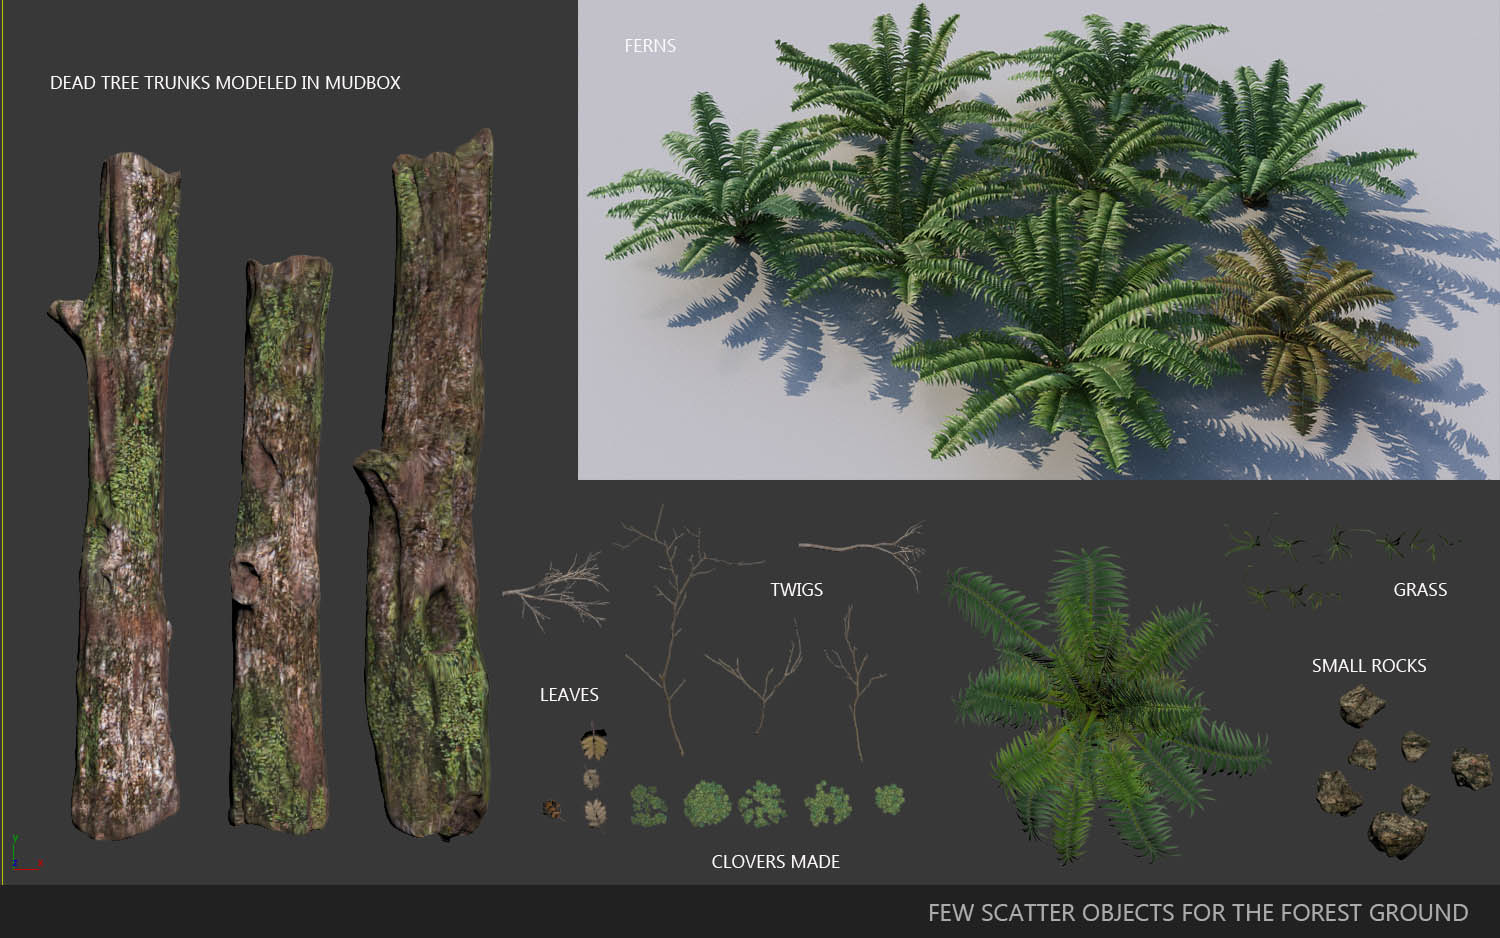
Next was modelling the scatter objects for the forest ground. Clovers 10-12 variations were made with 3-4 hues to them; further they were attached to form small and big groups. There was one fern in the library that was re worked and made 5 variations were made from it. The random selector script proved very useful to randomly select the leaves and assign different tints/hue of leaves from the different textures prepared and kept. 3D meshes of twigs I bought from Megascans, redwood seeds, a few rocks, fallen dead tree trunks [made in Mudbox], some fallen leaves etc. were scattered using Multiscatter. See the image for the scatter items for the forest floor.
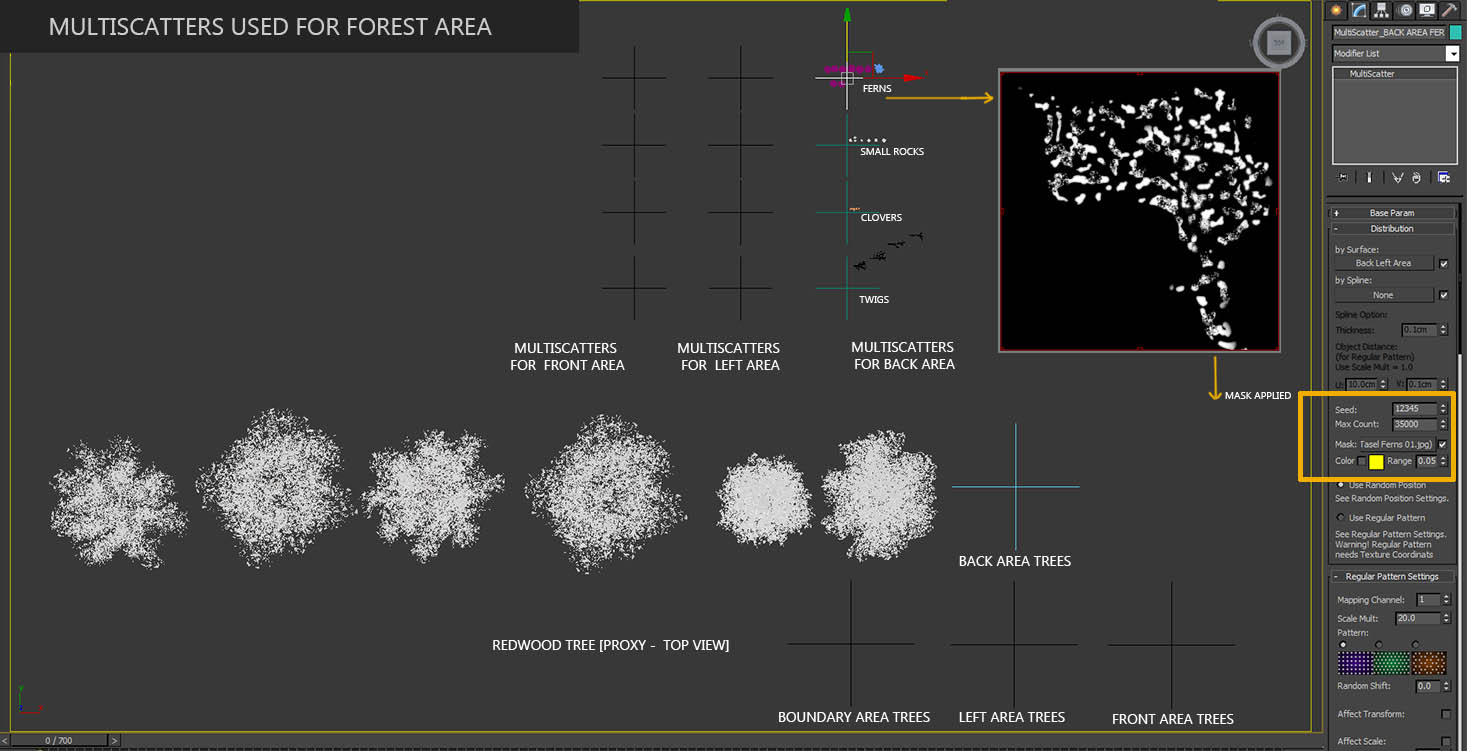
Normal settings were used for Multiscatter for distributing the, only that the afore mentioned maps were used as masks to control each scatter item correctly. Also the Multiscatters were kept in groups and named to facilitate easy switching on and off according to the camera. The image shows the Multiscatters used for the forest area.
The next task was modelling the huge rocks at the back of building. I started with a cube with enough segments in 3Ds Max, made a basic shape and unwrapped it. The adjacent rocks were also made similarly and took them together to Mudbox since it was a natural formation and during sculpting it was important they all merged very well with each other. There were initially around 14 rocks which formed the wall like formation. [To avoid re-work of unwrapping each of them I used same cube to make all rocks.] To avoid confusion each rock had a code that was preserved from modelling to texturing. I mainly used projection brush in Mudbox to coat each rock with multiple layers in the diffuse channel. Each rock had a base coat rock texture followed by mosses, followed by fallen leaves at top and other coats of mosses growing on it. See the image of the steps in making the rocks.
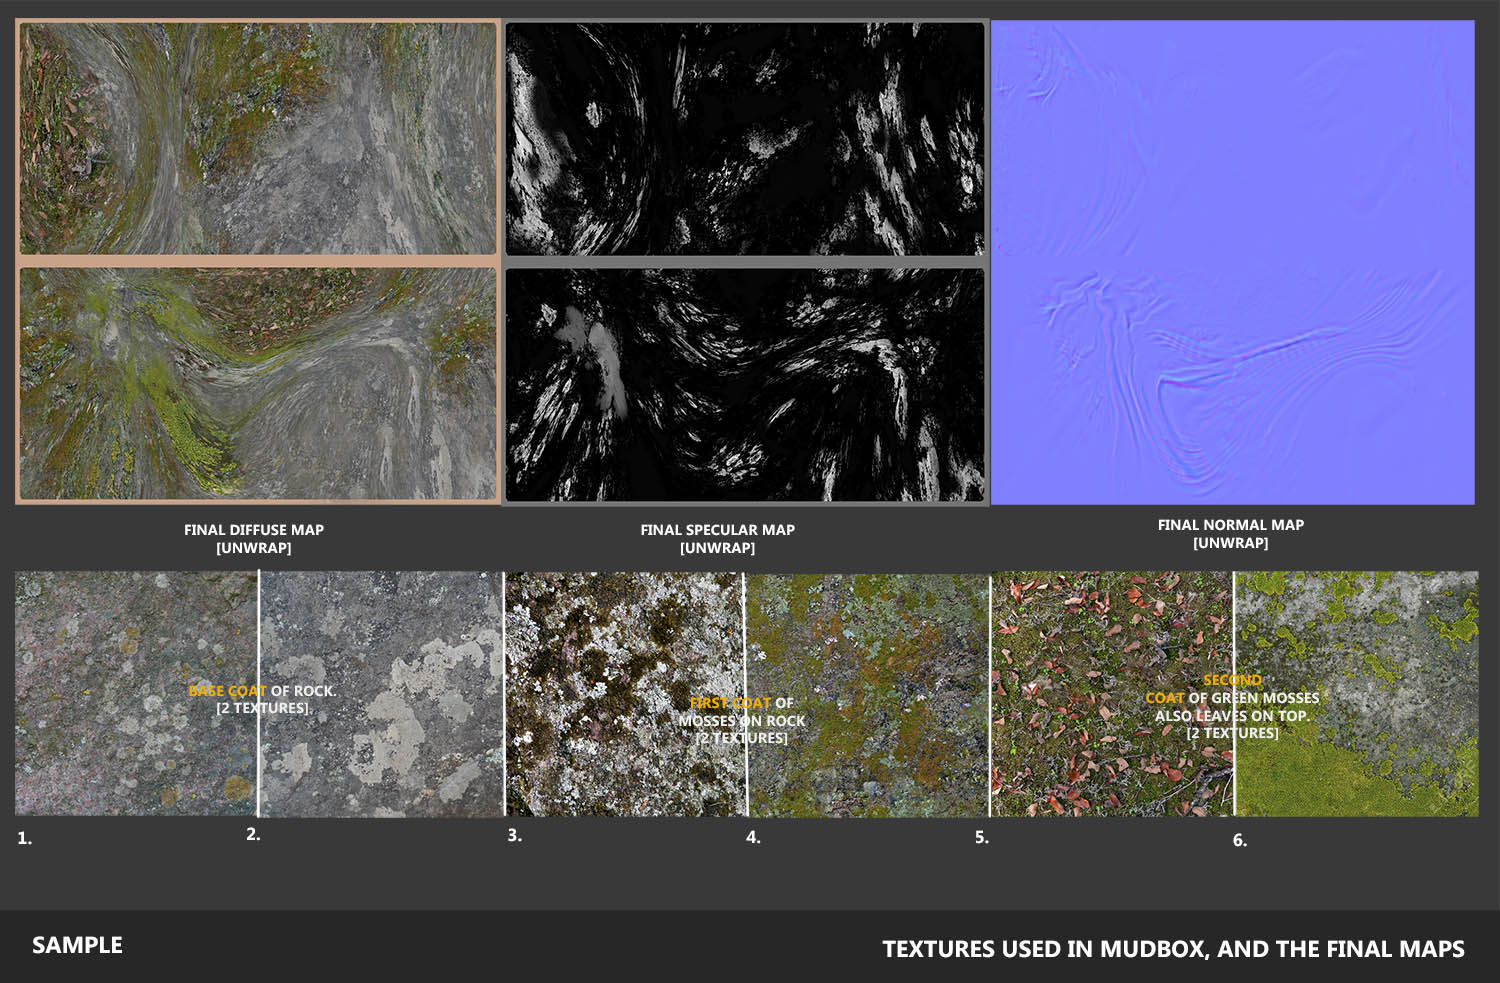
Later some were substituted with meshes I bought form Megascans. Shown in the image is the textures used and final unwrap generated in Mudbox for one such rock.
BASIC LIGHTING SET UP
I used the linear workflow for this project. Going into details of linear work flow would make this article too long. There are plenty of tutorials out there, here are a few I referred to. Thanks to the respective authors!
https://www.youtube.com/watch?v=iSwnXjADO9U
There is a useful script I came across to set gamma to all textures in a go. It is called Pixamoon Gamma Organizer. It is available for free at ScriptSpot.com. Just run the script and select the objects/select the whole scene and change gamma settings for the textures used. It is pretty simple.
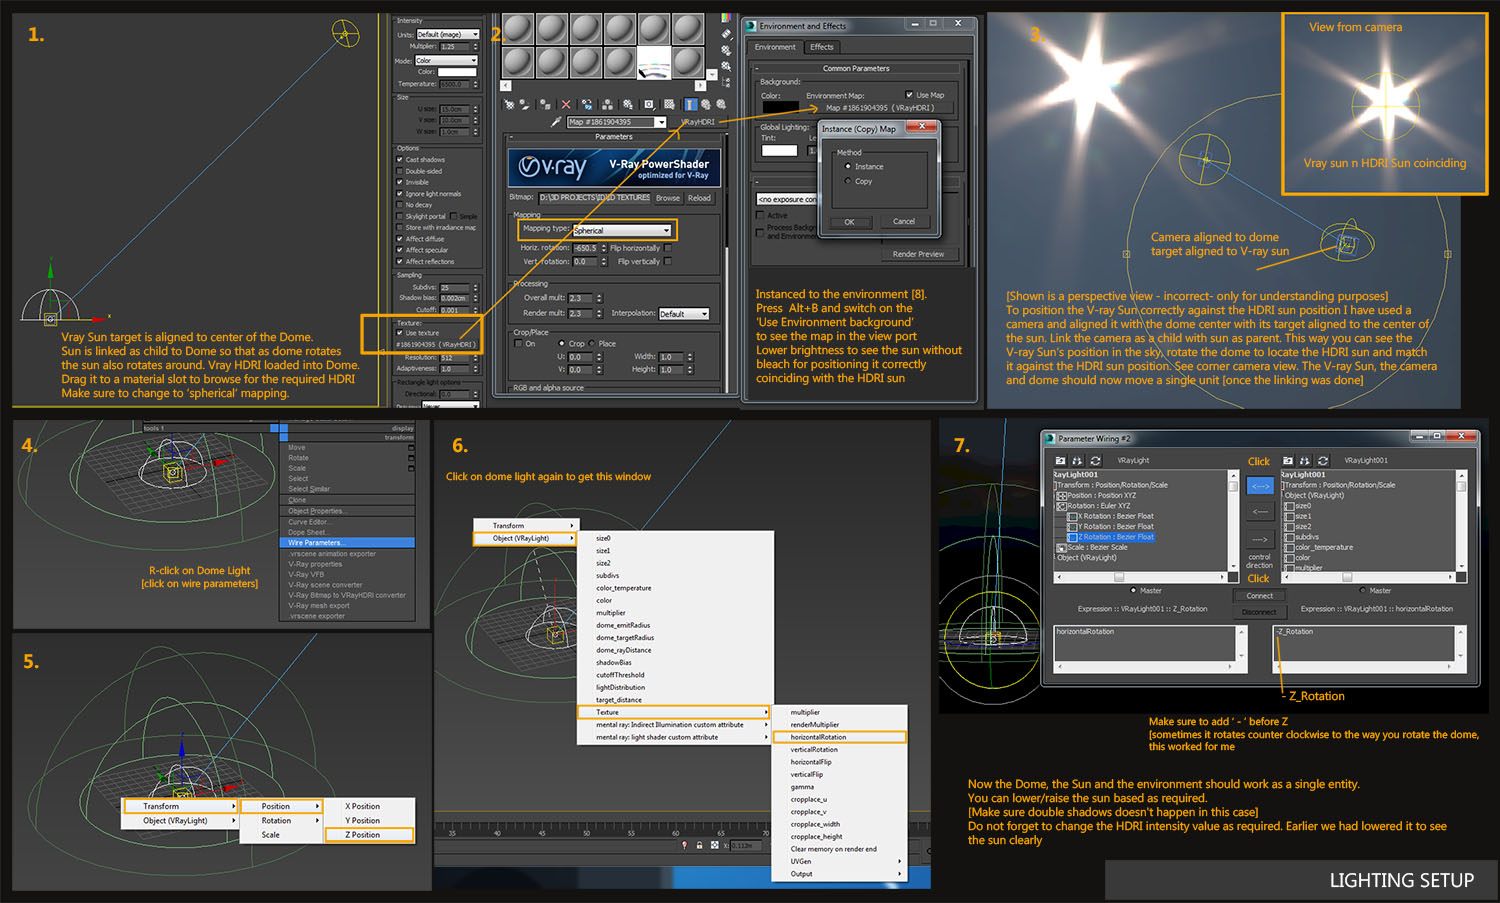
For lighting the scene, the V-ray Dome with an HDR loaded and V-ray Sun combination was used. I wanted soft shadows and a slightly cloudy feel to the scene. The technique used here I had learned from elsewhere earlier; credits goes to the original author. Here is link to a tutorial. Thanks to the author!
https://www.youtube.com/watch?v=zTOHVtEyofY
I have included an image explaining in brief the lighting setup in my scene.
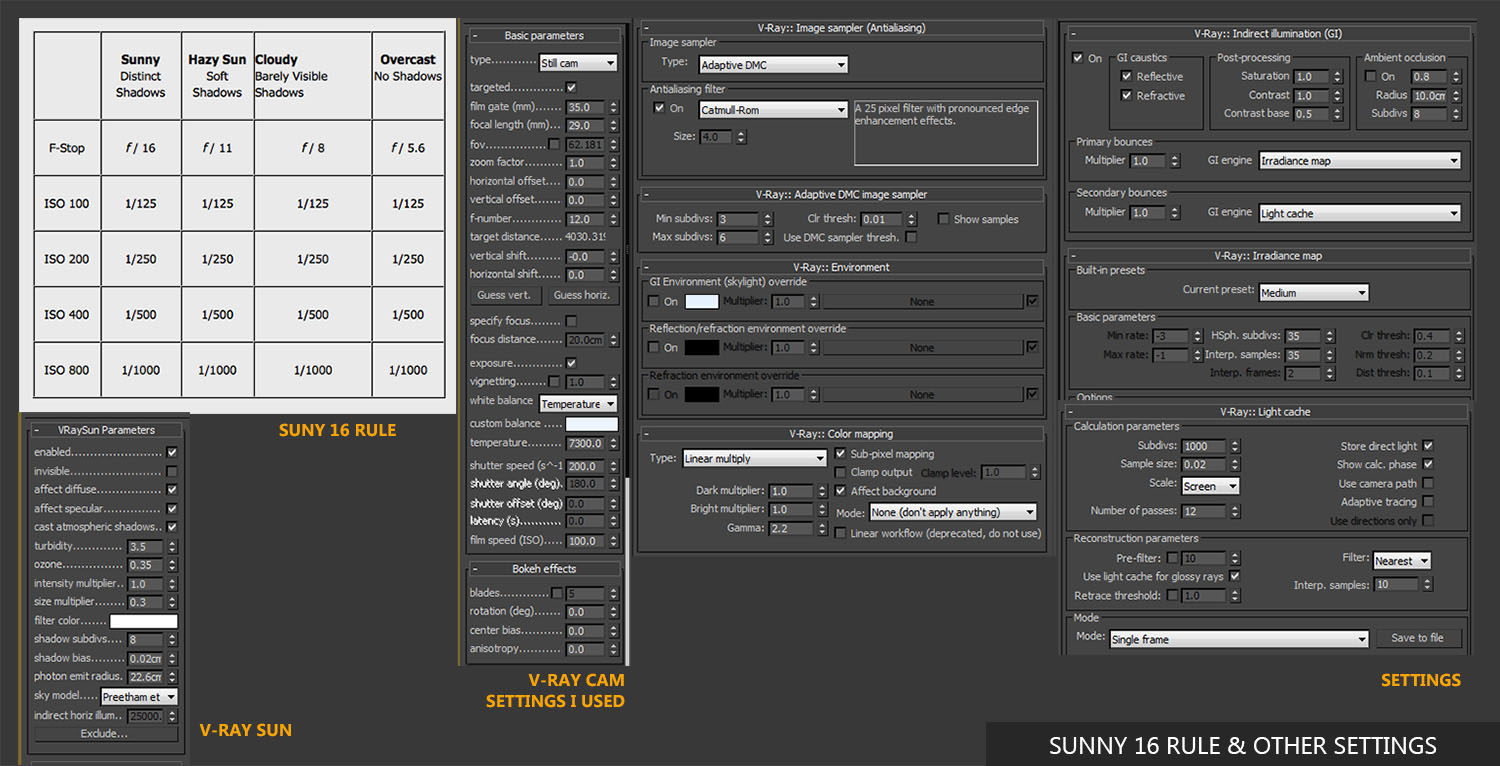
Being a photographer I had used DLSR’s and the settings works quiet the same with the Vray camera. So I used the Sunny 16 rule for setting up my camera. This rule gives you values of F-number, Shutter speed and ISO used under different conditions. You can play with the settings as you like/tweak them. I had to play around a bit to look on the final values. What I have presented here is the final settings of the scene. It is not much different from the setting I used at this point.
With everything set from what we have explained till now the image looked like this. This formed the first milestone render of the exteriors.
The road you see here was textured in Mudbox similar to the other models explained earlier. Some leaves to be scattered on top to give the natural look. You can also see the big rocks, the dead trunks, the ferns, the redwood trees, the clovers, twigs etc. scattered to give the look I needed.
The forest here is made of 8 textures for the ground, 40 plus scattered items on the ground, 6 trees [6 different leaves], 6 different mushrooms on the trees, 7 big rocks [6 textures per rock] and the main terrain mesh. As an addition I used multi painter to paint some bigger mosses growing on the big rocks you may notice in the image.
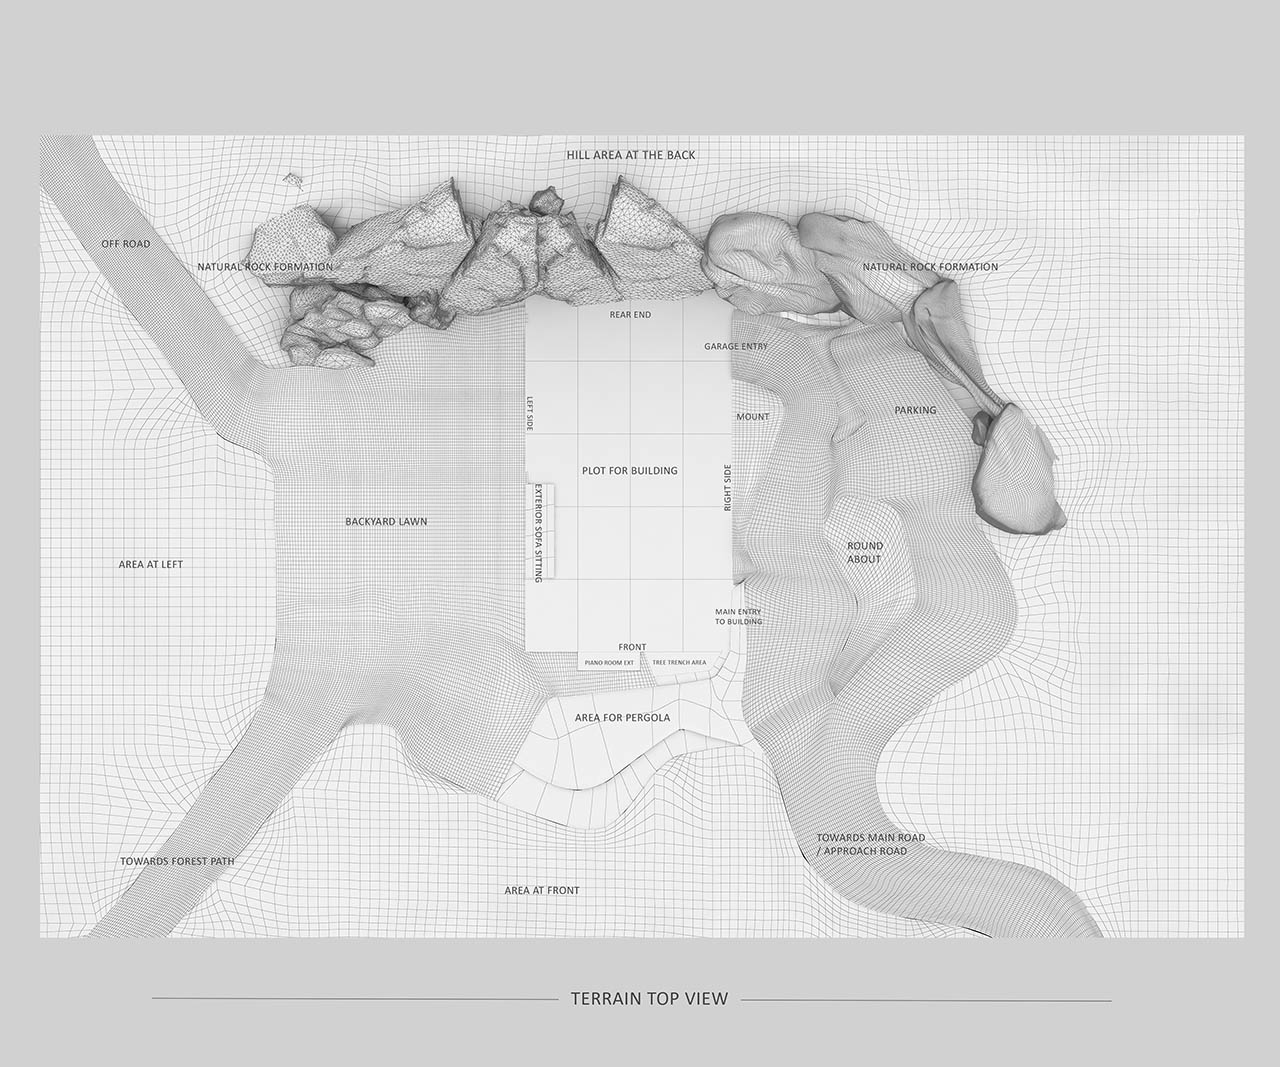
Here is the terrain top view. I have marked all details and areas to completely understand the terrain I prepared. Please see in detail to understand; since this is the base image in which the areas marked will be referred to later in this article.
TEXTURING
As seen earlier the forest and related props were modelled & textured with the help of Mudbox; the remaining areas were to be textured. [Mari is a nice and advanced texturing software you can try instead]. Next in line was the building. The building was merged into the file to see the fitting with respect to the areas that were made around it. Here is another of my early work in progress renders taken from the left side of the plot.
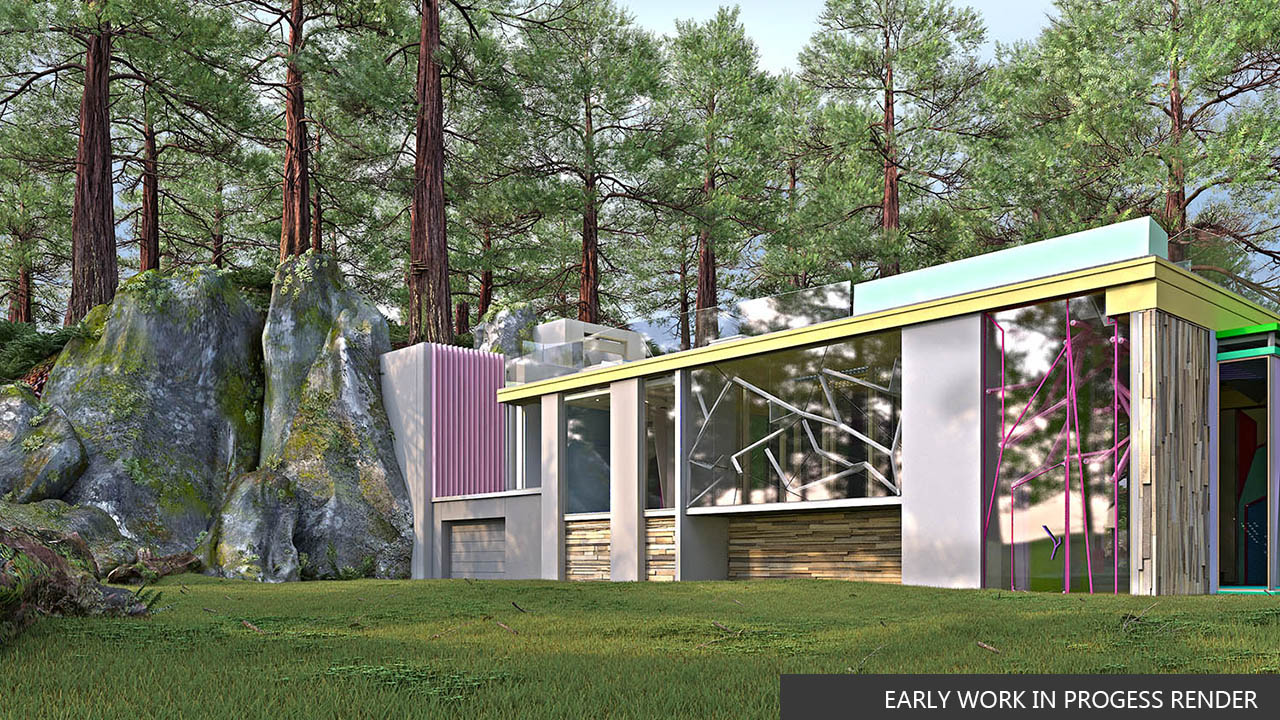
The rocks at this left side were bad, the grass was not at good enough, the trees in this view are the initial trial ones I made, it lacked height and did not look good as well. I understood the issues but point was it started to take shape. After correcting a few issues, the building was taken out for texturing in a separate file. I studied more about how materials were made apart from the usual way I used to texture.
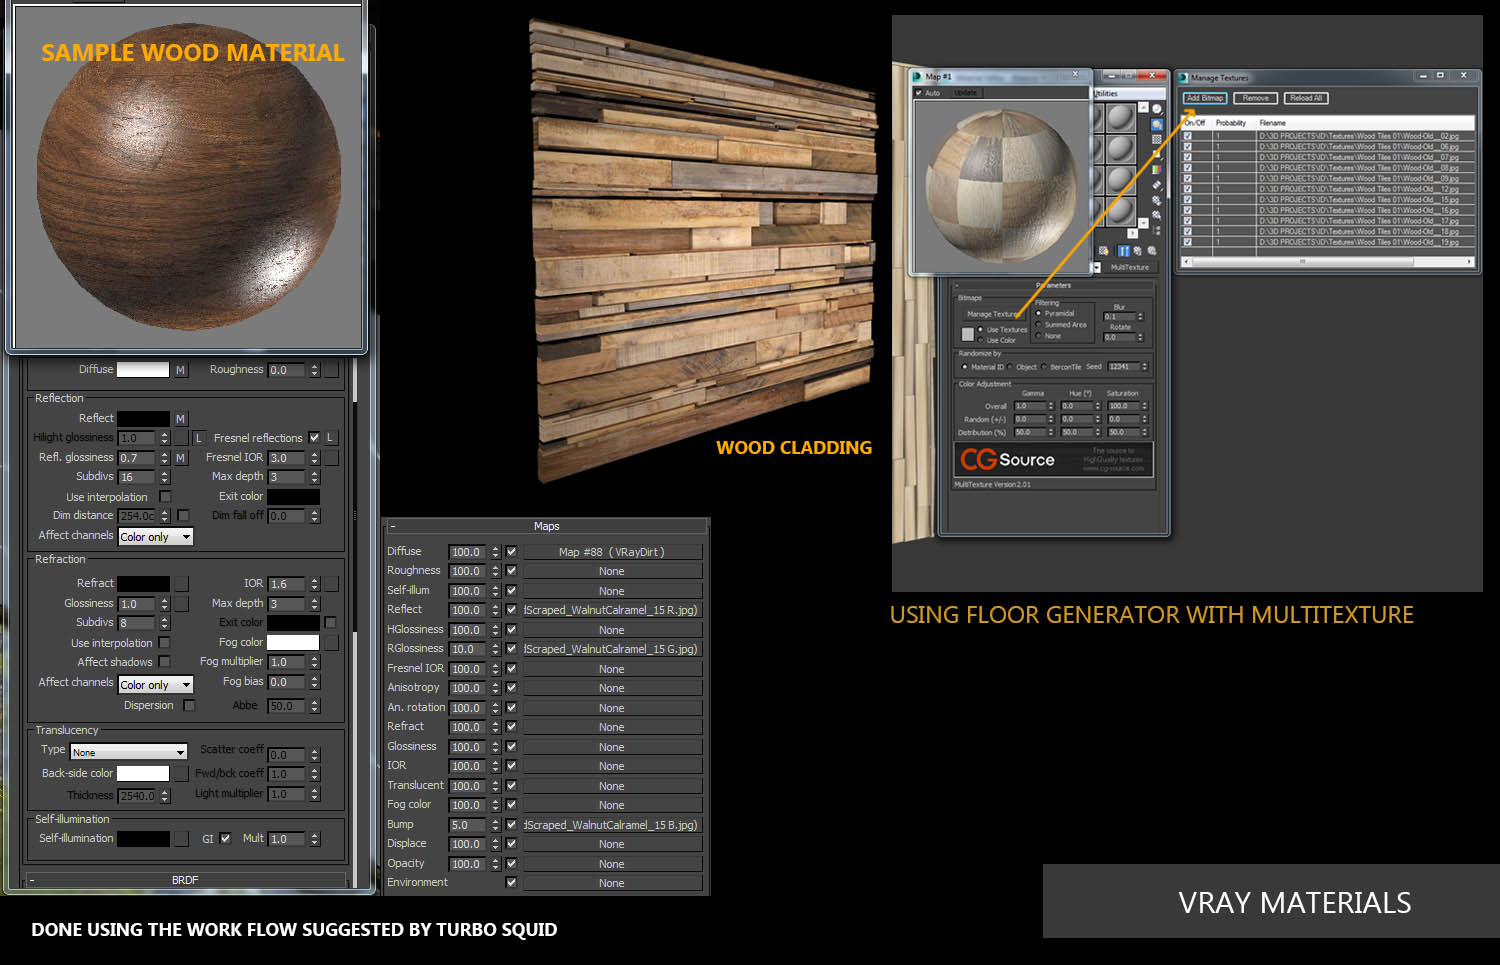
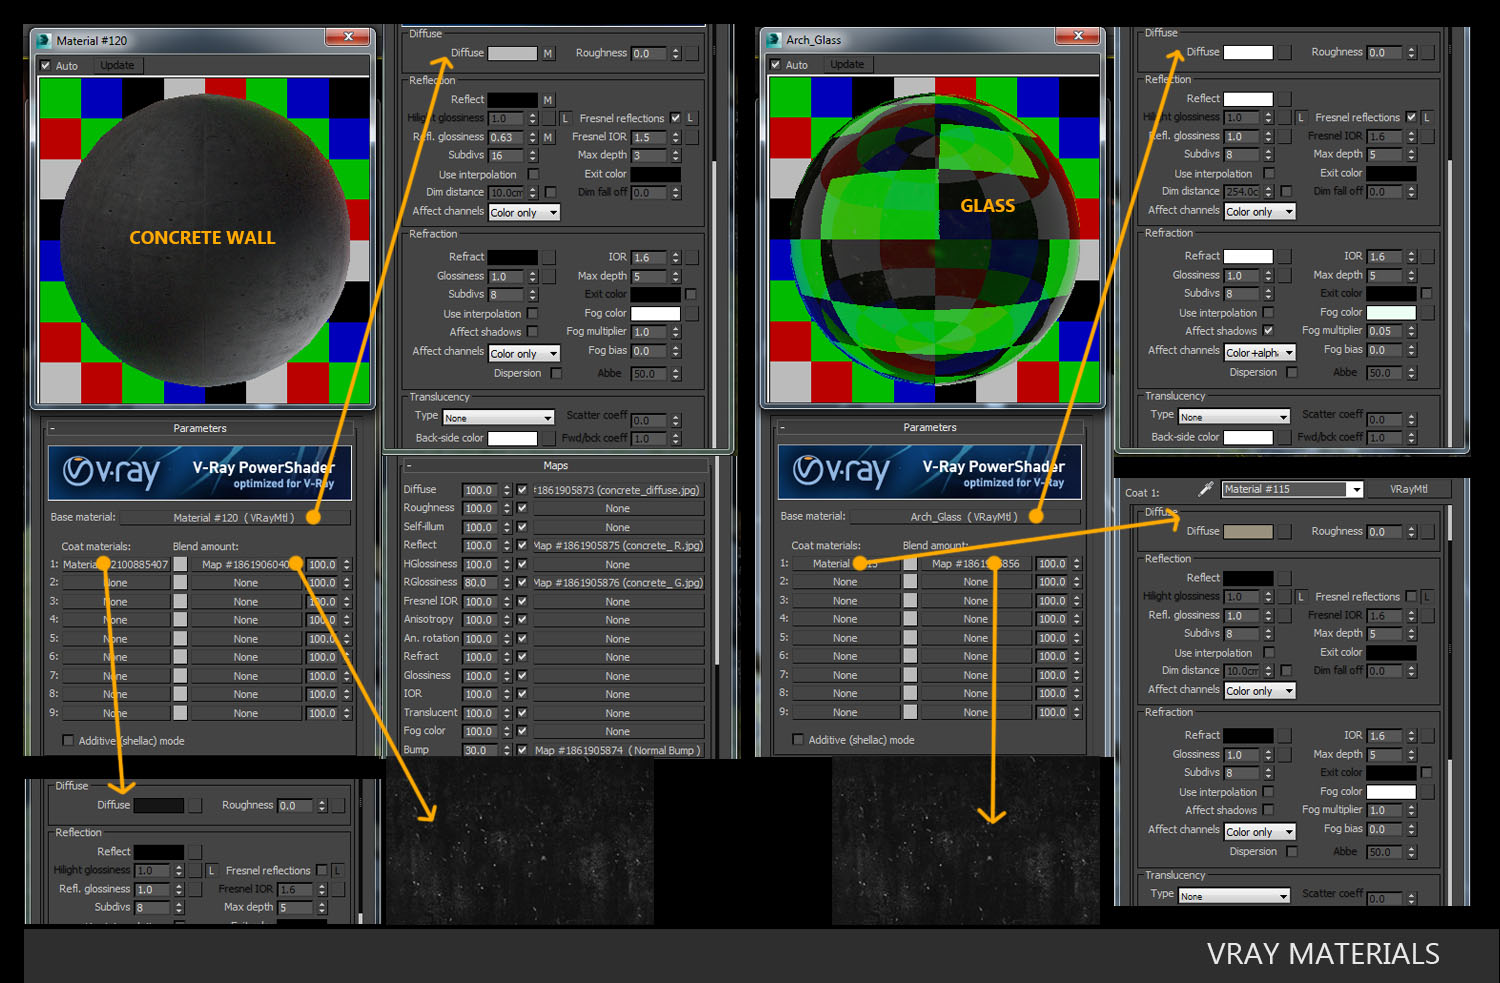
Any scene will have a few materials that are most commonly used. Glass, water, steel, aluminium, copper etc. are some them and mostly did not use any maps. So they were the starting point. I already knew about http://www.vray-materials.de/. I downloaded a few of them, and with my experience I tweaked the materials which I downloaded room vray-materilas.de to suit my scene. My main motive was to look for a work flow in texturing. The guys at Turbosquid provided some great help with an amazing tutorial that explains the texturing workflow. I have followed this to make almost all materials when it came to texturing of the house. My sincerest thanks to them!
https://blog.turbosquid.com/2014/05/05/turbotips-v-ray-material-part-5-workflow/
V-ray Dirt by the amazing artist Peter Guthrie
http://www.peterguthrie.net/blog/2009/10/vray-dirt-tutorial
I used the Floor Generator script for making wooden cladding on the building and for making flooring for the different areas inside the building; using Multitexture plugin the texturing was done. Here are a few examples.
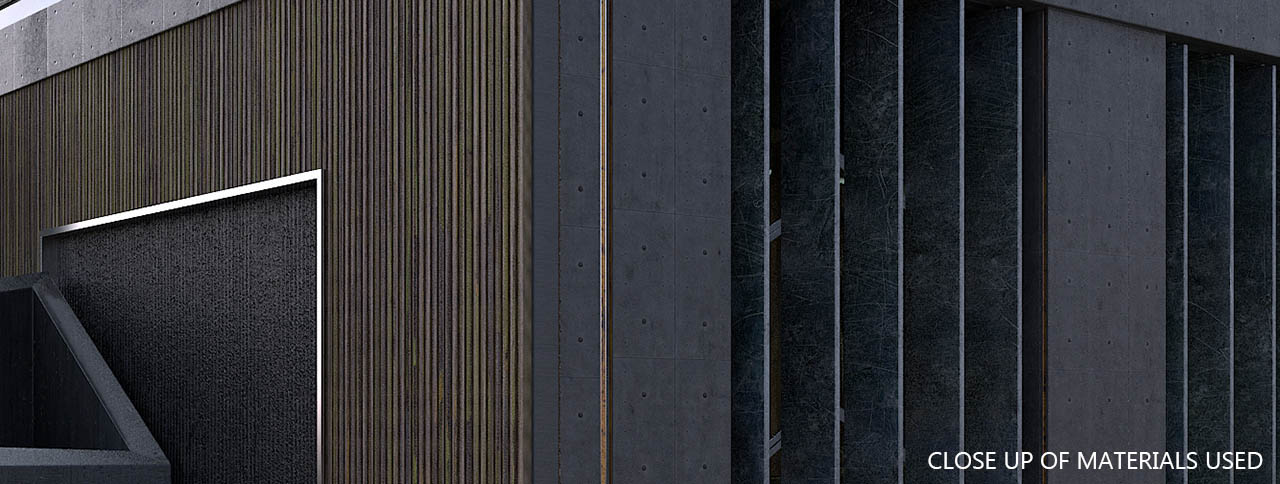
I guess my experience also helped in making the materials but most of the materials were based on what I learned from great artists like Peter Guthrie, Grant Warwick etc. I am extremely thankful to them for sharing it with the community. Now the tough part was deciding which textures to be used, and the combinations. I went through lots of references which helped me a lot in finalizing them and understanding the look and finish I needed to achieve. The image shows a few references for texturing I picked up.

The basic idea was that, for the building to be textured; it needed steel, aluminium and copper as metals, 4-5 types of wood materials, 3-4 concrete materials, 3-4 flooring materials, 2-3 plastic materials, a few plane surfaces & water. Once they were made using the work flow shared earlier, it was easy. Having made the building myself I knew where what had to applied. Except for a few places where some research was required to make that difference! For example the pool area was one of them.
Awesome Bump is free software that was used in the project for generating normal, displacement & bump maps and it was very useful! Once the first phase of texturing was complete the house looked somewhat like this.
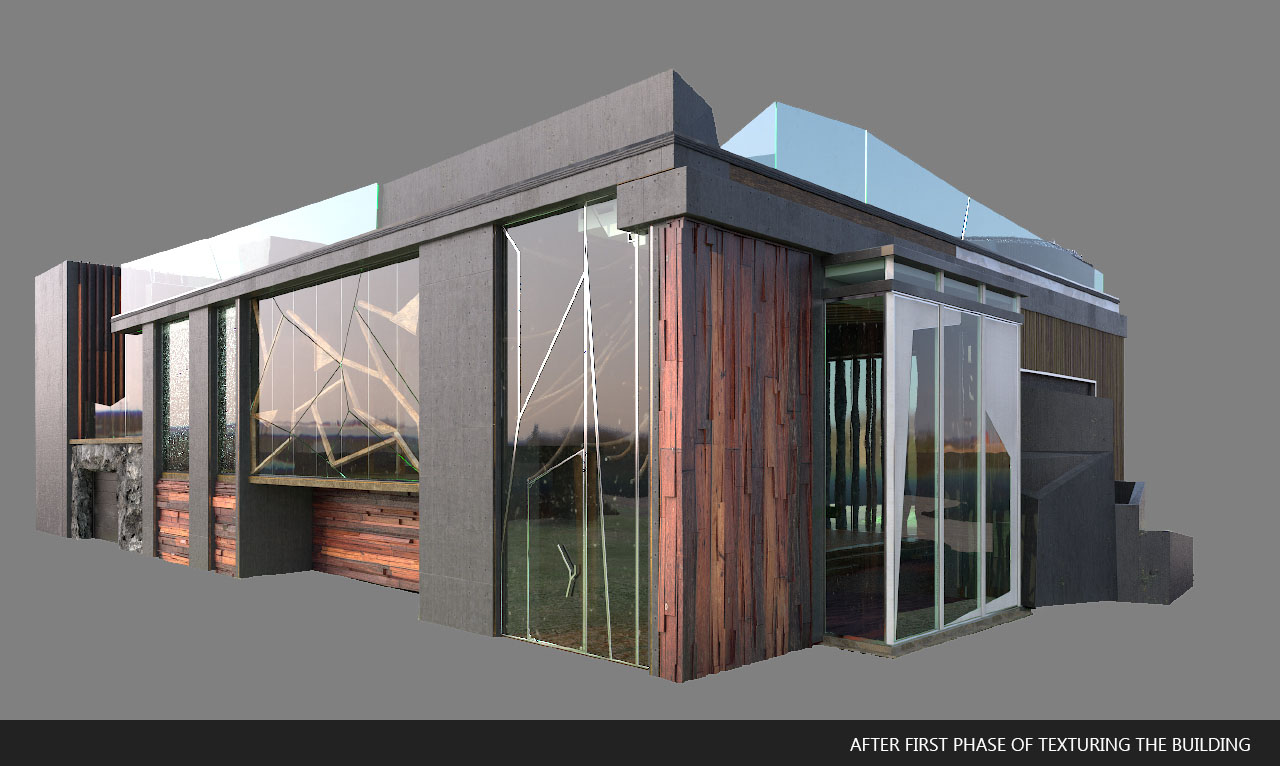
Few refinements were done later during rendering.
TEXTURING OF THE IMMEDIATE AREAS TO THE HOUSE
The immediate areas as discussed earlier lying next to the house are; namely the backyard, the right side road and mounts & the area directly at front of the house. [Please refer to the earlier image]. Basic texturing was done in Mudbox but it was not so great; since these areas came very close to the camera, and they needed to look best. I had to find a new way to texture them that Is when I came across Quixel Megascans.
QUIXEL MEGASCANS
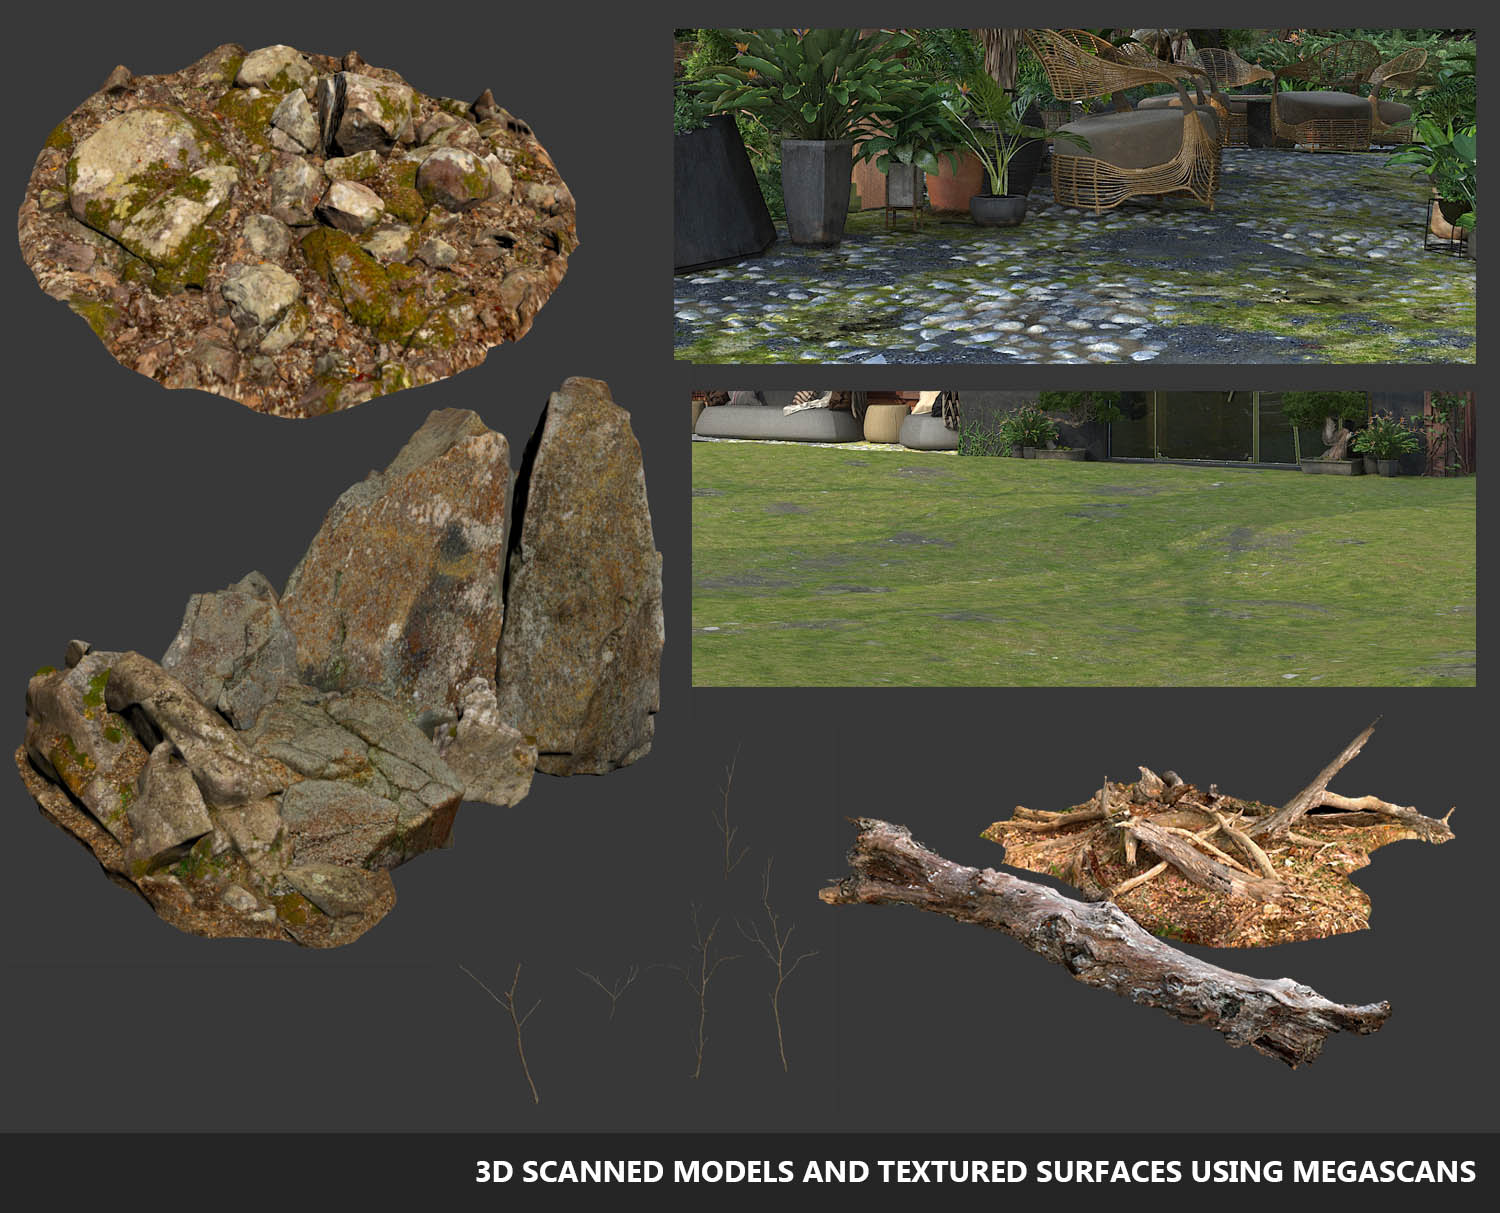
They mainly have two things to offer; one is scanned 3D models from the real world; like rocks, tree trunks, stones etc. with maps for all channels. The other thing was scanned textures of surfaces like stone, concrete, grass, earth, pebbles, a vast library to select from.
With a month’s subscription textures and 3D meshes were carefully selected and downloaded. Here for the pebble floor 5 textures were mixed. Starting with the earth/soil, followed by pebbles, grass, some sediments/dirt, and some mud. I choose a 6 by 6 metre surface to work with in the Megascan Studio. Settings in this software allow mixing multiple maps as you want and creating varied maps. The image shows step by step creation of the texture that could be ultimately mapped on a 6 by 6 m surface, note you will have to play with the settings to make it look seamless. Each texture has its own individual size in metres. It worked pretty good for me.
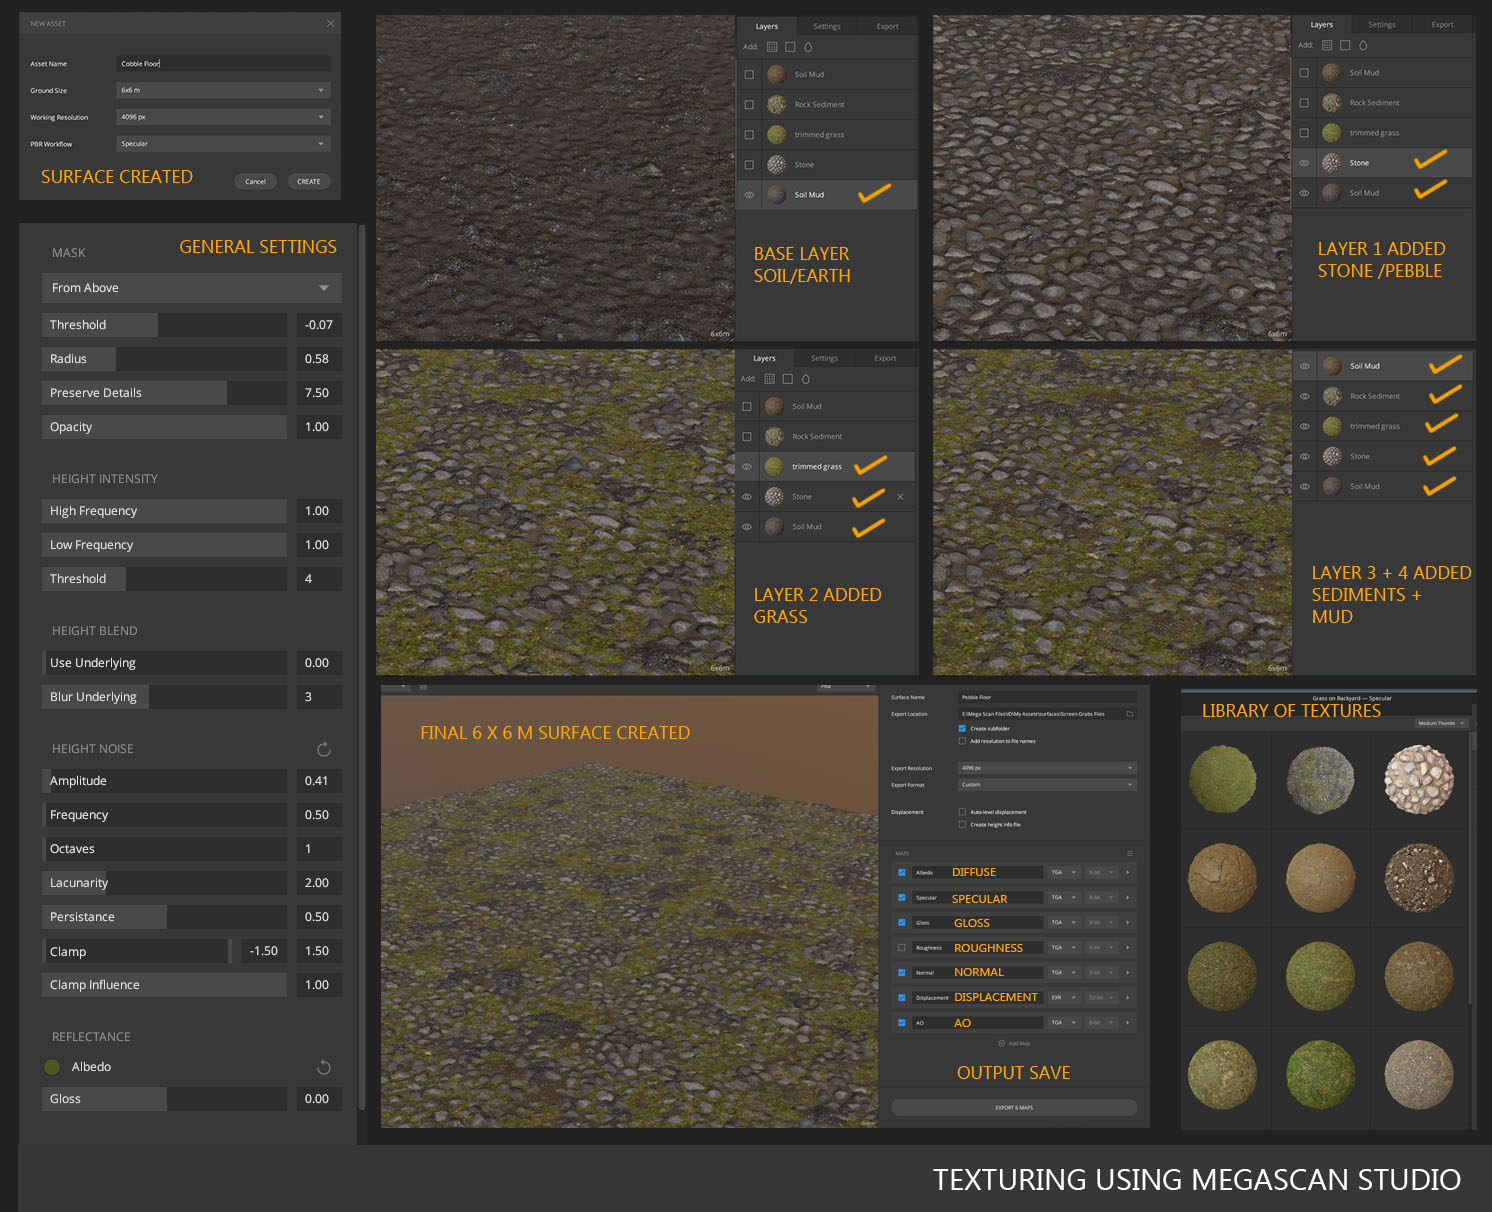
The 3d scanned models did a great job in bringing the scene together. The only thing I wished they had is a separate license for the software; once the subscription ends no new custom maps can be made, you can still continue to use the 3D models which can be directly exported to your favourite 3d program through Megascan Bridge. In the image below you can find a few 3D scanned models and textured surfaces.
GATHERING MORE MODELS
There was a still lot of empty space left in the scene that needed to be filled with plants, furniture to be placed and they had to be carefully selected. Before purchased I had to think if they would suit a particular area, and possibly use them at multiple areas to save money. I got some free quality models from sites like 3D Sky, Ronen, AXYZ, Vargov 3D, textures from Wild Textures etc. I am extremely thankful them. In any case a lot of re-texturing/ sometimes re-modelling & mixing was done to make it suitable for the scene.
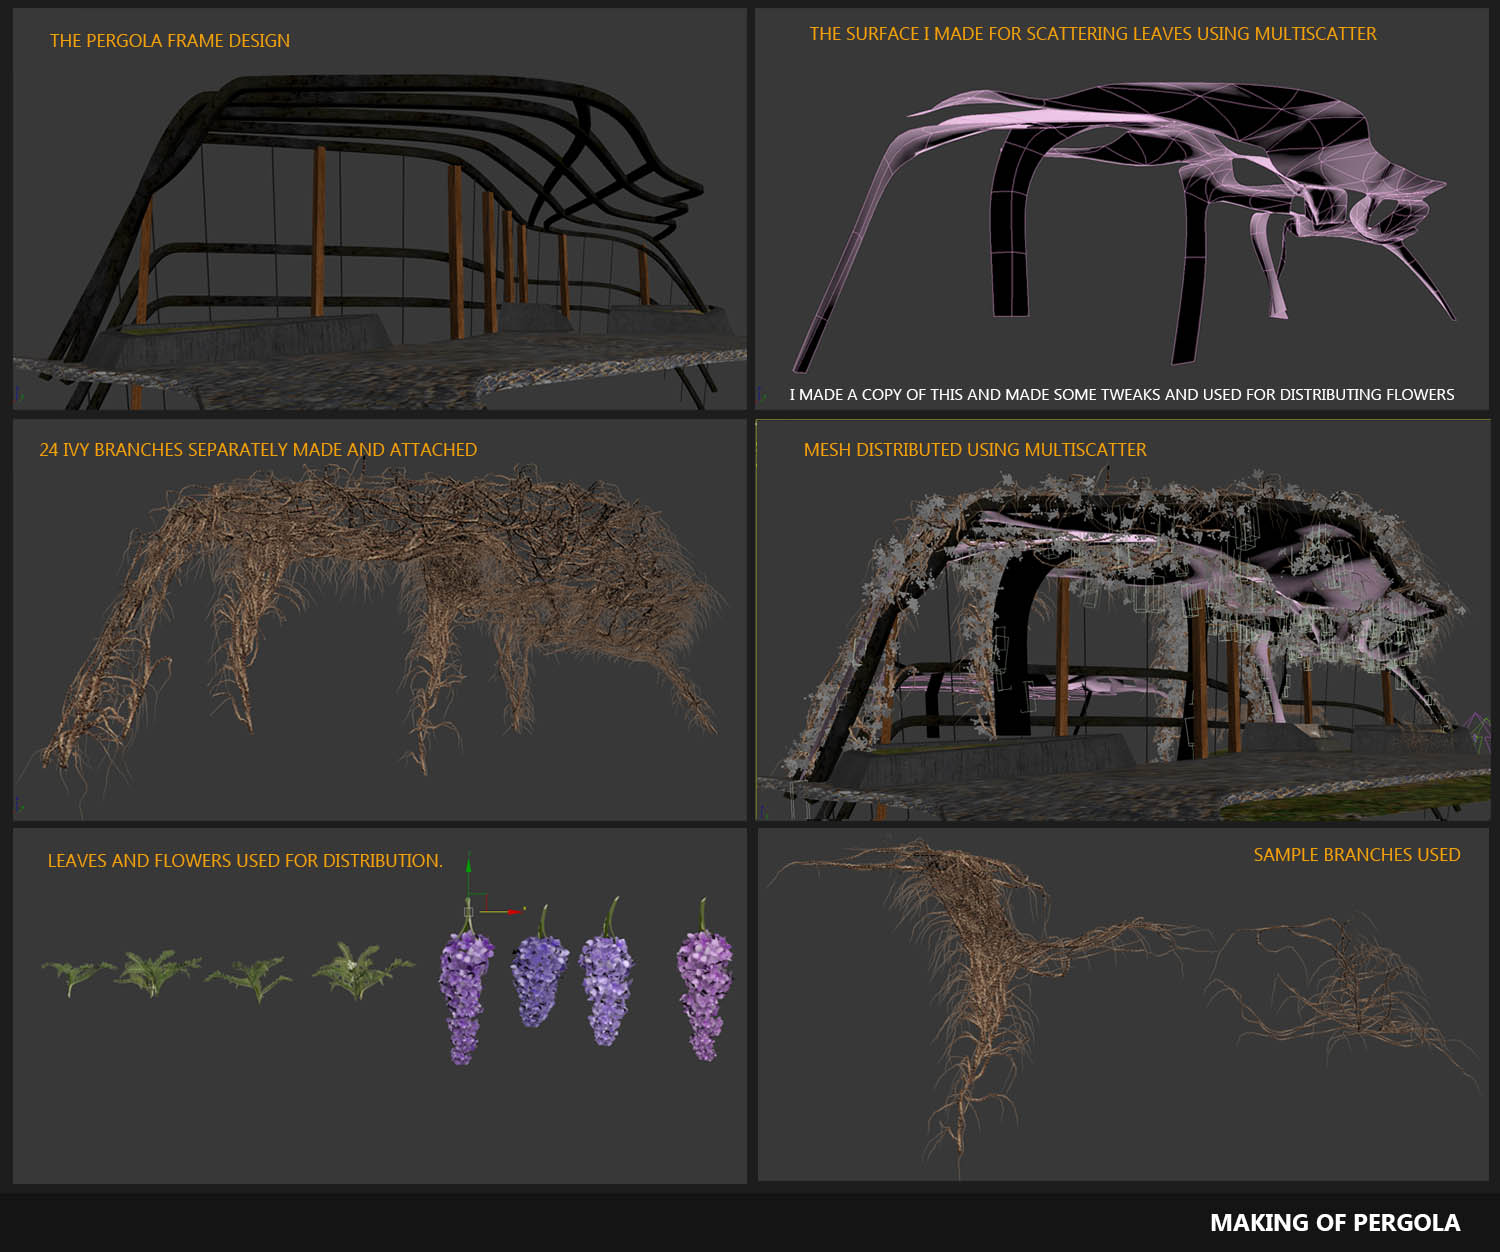
A few custom elements were modelled, like the front and back pergola with ivy, the water curtain & the pool etc. IVY Generator was used for making the IVY on the pergola & roses climbing up on the building. Let’s look at the pergola with ivy first.
First of all the frame of the pergola was designed. With Ivy Generator to make the ivy grow the way I wanted it was slightly difficult; since the frame of the pergola was bars and you need a flat surface for the ivy to spread properly. To solve this, surfaces were created in the shape of the frame using patch modelling; and then used IVY Generator on that surface to form the branches. I used a copy of the surface, which was re-modelled here and there to distribute flowers hanging from them and controlled it separately. 20-25 different IVY’s braches were made to completely fill the pergola. Once the branches/roots were made, they were attached together and Multiscatter was used to distribute the leaves in bunches on it.
The roses climbing up the building was done in a similar way; only that the IVY Generator was used to distribute the meshes and leaves. It is more of a trial and error using the IVY Generator till you achieve. Image shows settings and a few meshes made using the Ivy Generator.
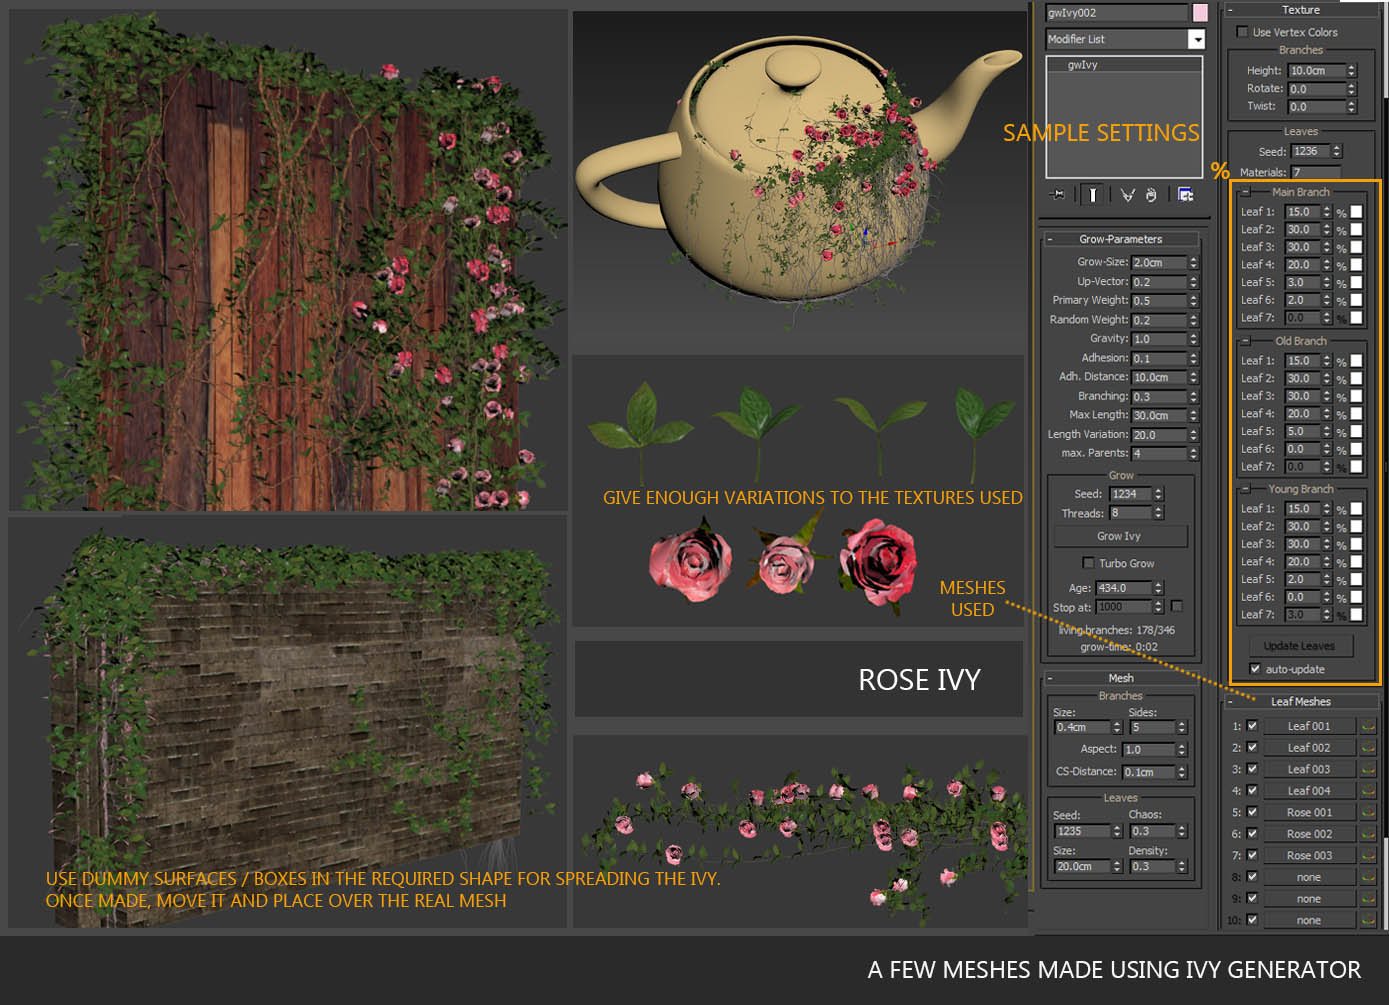
Image shows a few other detailed meshes that were made with Mudbox and Realflow. I managed to make the water curtain and pool flowing out, in Realflow. I do not have much expertise in Realflow so I guess I cannot explain much in detail about it here.

The area around the entry to car garage was modelled in Mudbox to give the rock finish. The terrace wooden plank floor was made manually using splines to get the detail required. A lot of ivy/creepers were made with IVY Generator with custom meshes scattered and can be seen distributed at many places in the scene. Also there are many models were created for interiors which is not covered in this article. I look forward to use them in my next part of this project.
Following image shows a work in progress using the above mentioned assets.
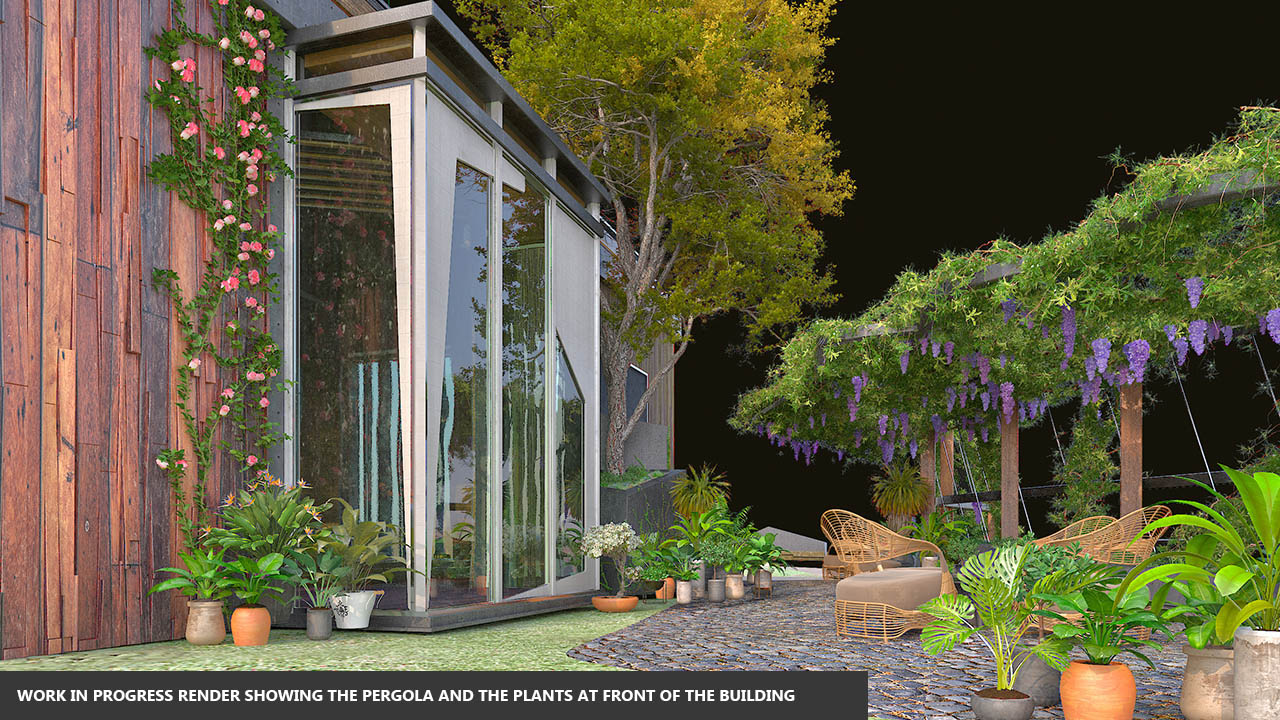
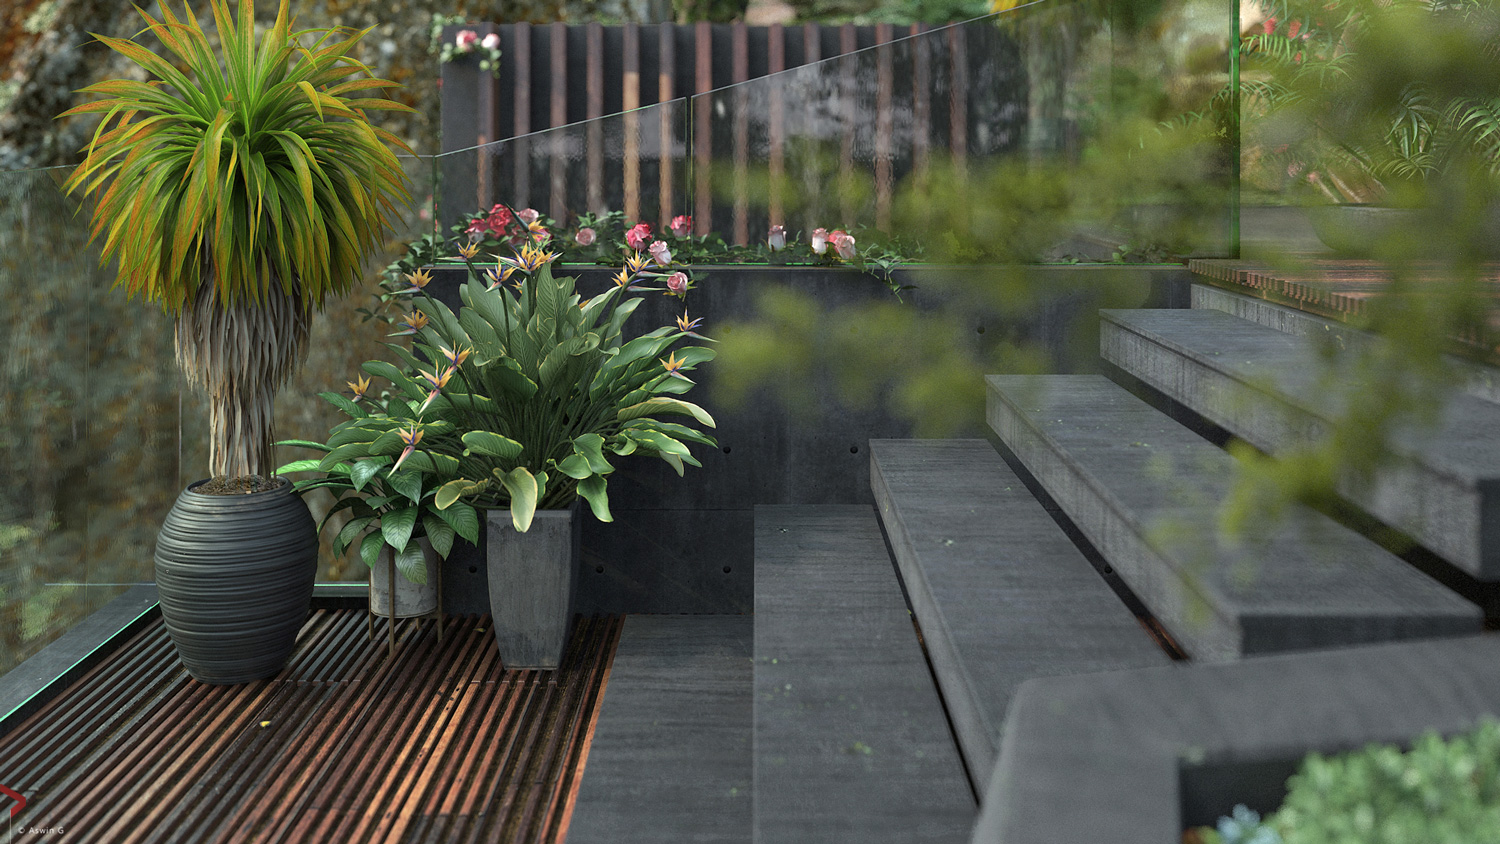
A different design was done for the pergola at the pool rear end. Leaves were scattered on terrace and the pool surface. The trenches / planters were filled with shrubs, dirt, and other ground covers with Multiscatter.
FILE OPTIMIZATION
This topic actually finds its roots right from the start of the project; and in fact it should have been talked about earlier as I kept on doing it from time to time to hold the file together. Here are a few things that was maintained from the start.
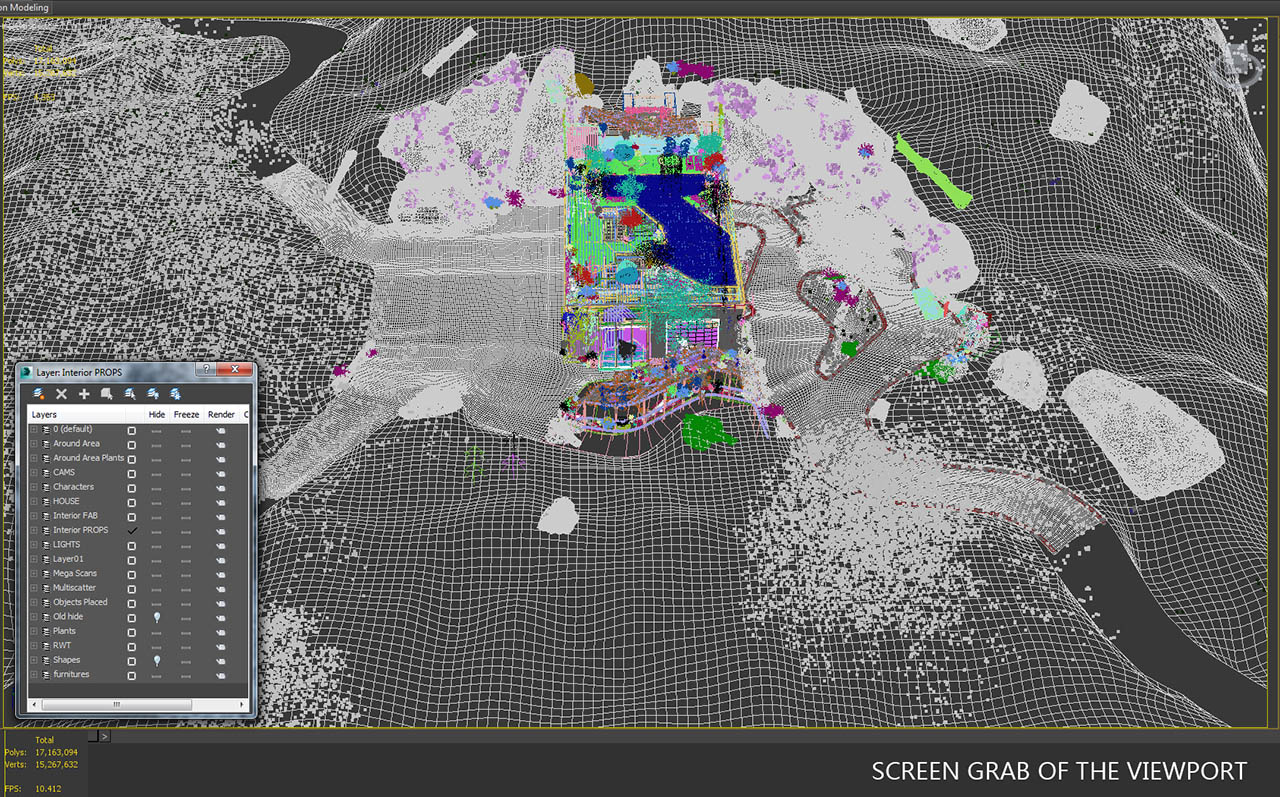
Mostly very object in my scene is named and has a code for similar objects/groups to facilitate easy selection. Importantly the layer system was used to classify all the objects in the scene. Almost all important objects have an ID that was set manually. The complex meshes were converted to proxies; instances were used at all possible places. Texture sizes [I have used some crazy hi resolution sizes] were optimized. Scene is properly asset tracked & checked for un-used, stray objects and unwanted maps cleared. The main file came around 110 MB containing all shots. Most importantly it is about knowing every nook and corner of your file. Each element was developed and tested in a different file before bringing it into the main file. Yes it handles well and good in the viewport. The image shows the screen grab of the viewport.
RENDERING
Having done a lot of detailing, I was looking forward to render as many views as possible. I had set some cameras while taking out the test shots which were fine-tuned to form my final frames. The test renders for each shot revealed things that had to be to fixed. There was not going on, apart from a few tweaks I did changing angles, fine tuning textures, adding a planter here and there etc. till I found things were good to go and I hit the high resolution render.
The lighting and camera settings I used are as explained earlier in this article. Not many changes were made except rotating the sun to compliment to the camera angle I was working on. Since there are many shots I will share a couple of them showing the final images work in progress.
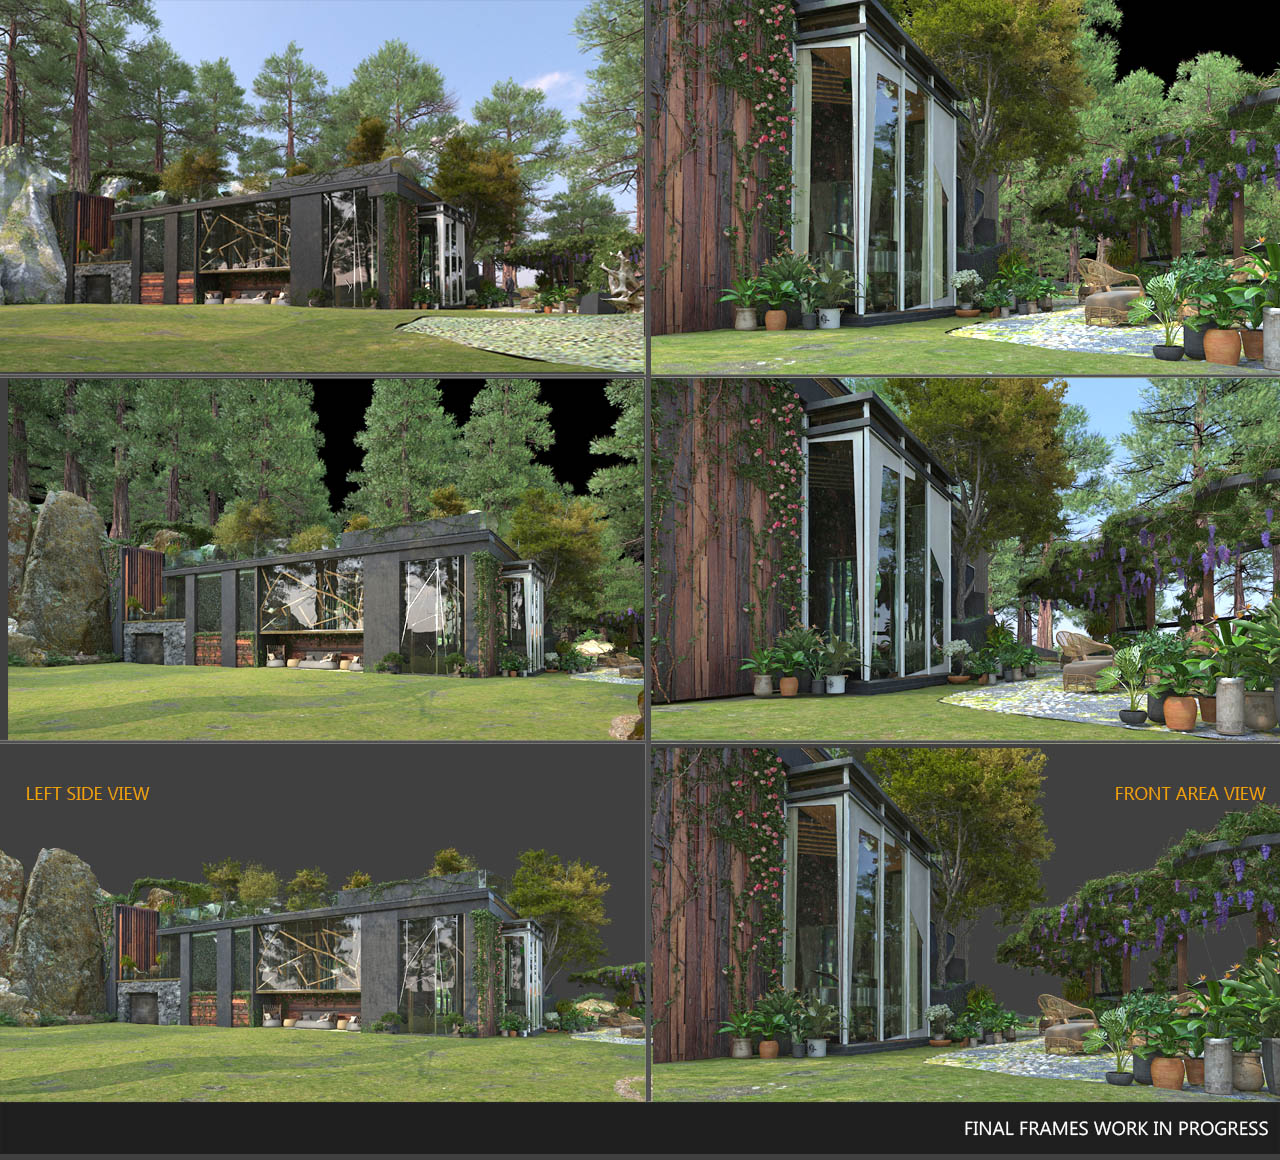
There were 12 main renders; I managed to contain all the cameras in a single file with all the improvements happening for each view incrementally saved.
The image shows some settings used. [It is similar to the earlier settings shared in this article]
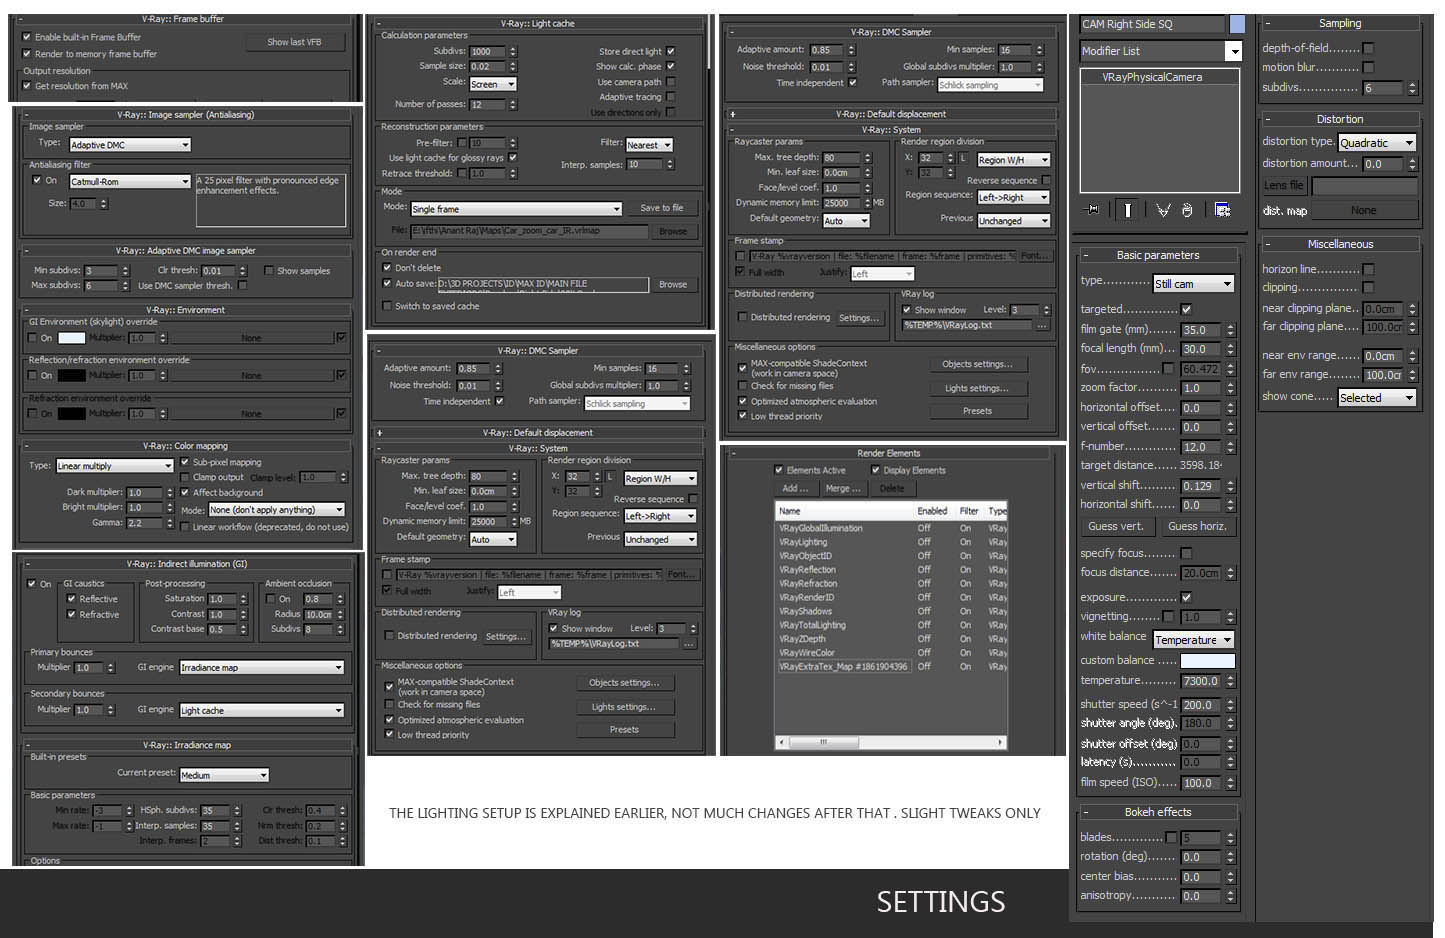
The render times were on an average of 8 hours for 3000 X 2500 frame with V-ray 2.4 and 3dsMax 2014. I know it is quiet high; but there are a lot of maps used most of them at 2K resolution, some at 4K along with displacement maps used on the ground everywhere. There were some system issues I faced so had to compromise a bit here and there. Both 8 bit and 32 bit images were saved as output. The editing was done in Photoshop.
EDITTING
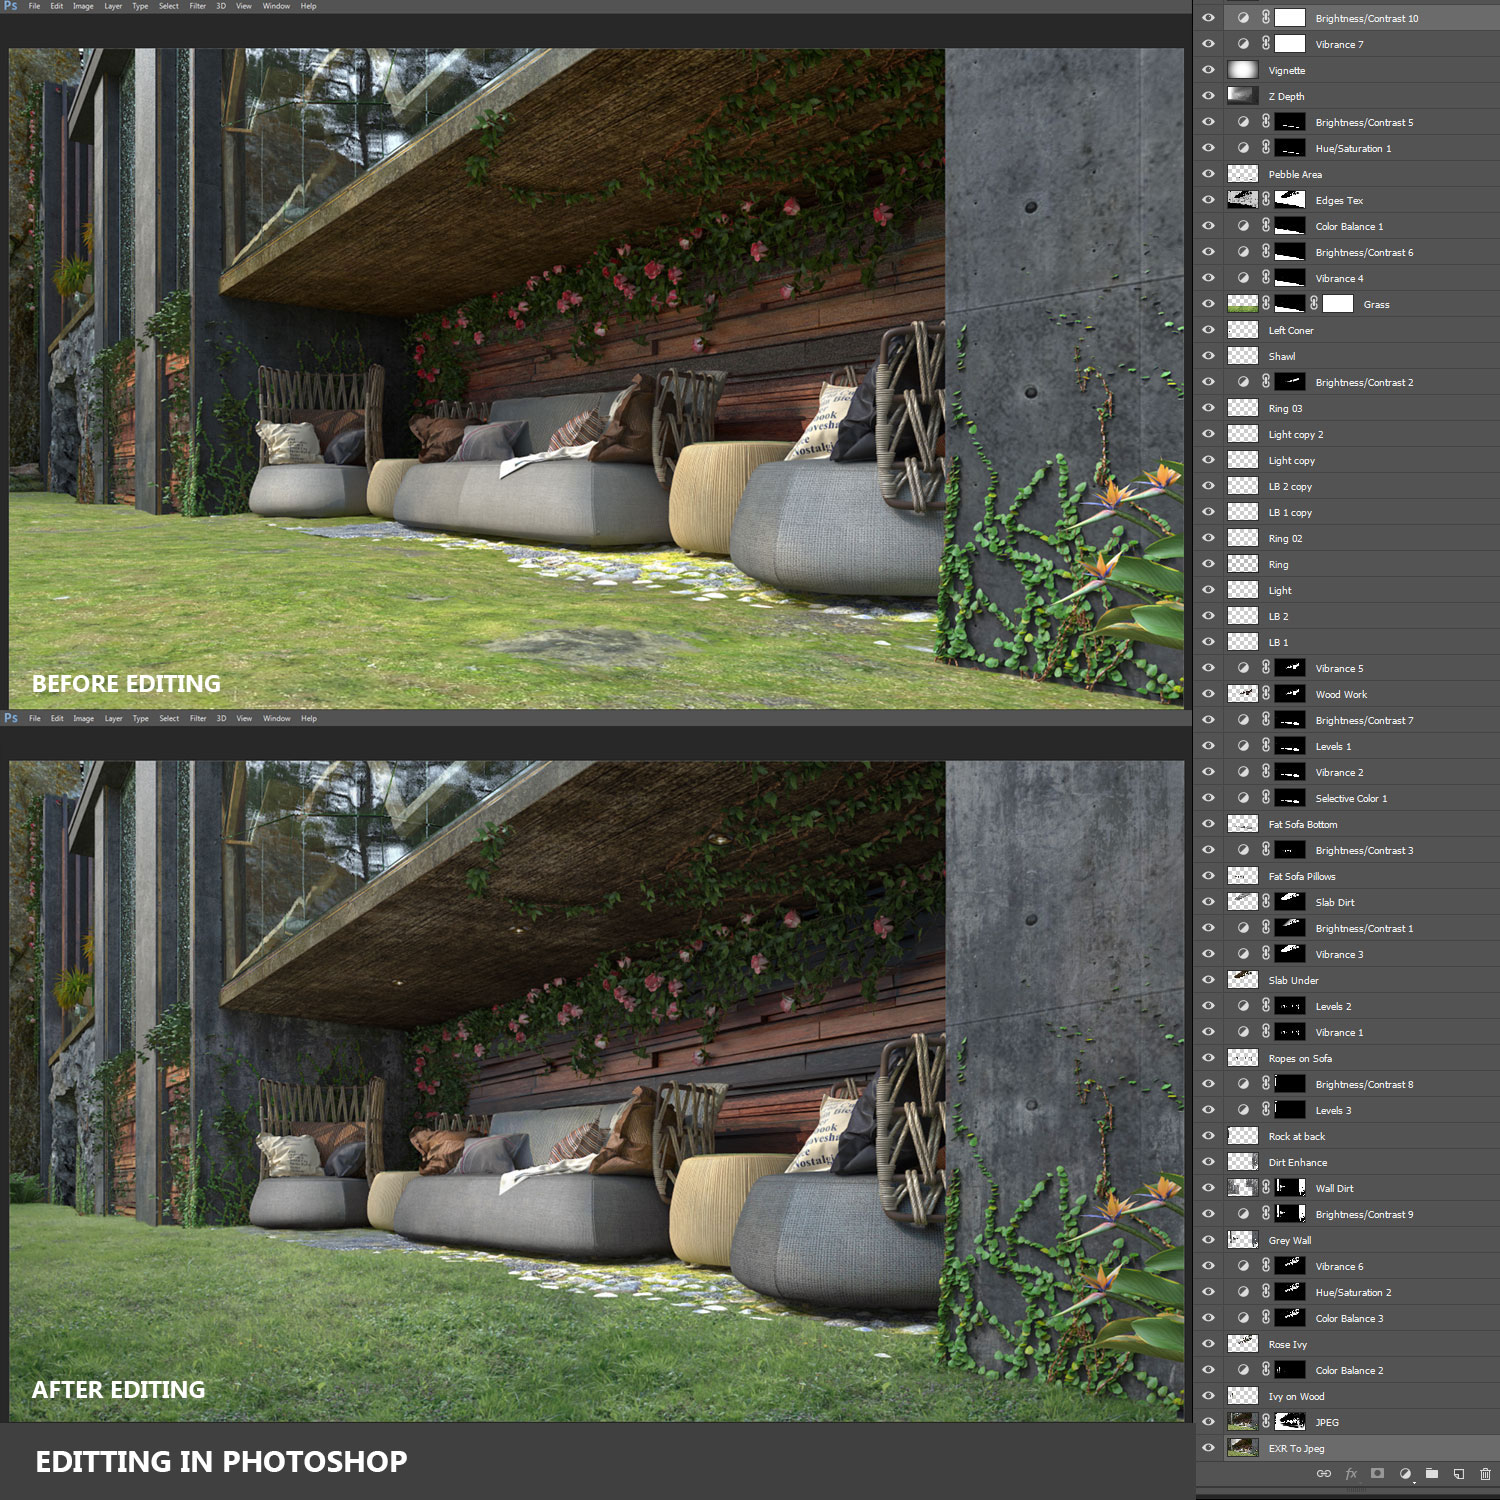
The raw renders looked fairly decent except the grass and background trees that were changed in many renders. Rest were mostly curve & level corrections. I did not use any extra plugins or anything. Mainly I had object ID’s with which I selected those objects that required correction; applied the corrections using a mask. In some cases like the main building wall I used some grunge textures in suitable mode to give some more dirt feel to it. Some dirt was also painted at places. Vray Lighting, reflection and refraction passes were mainly used, set to screen mode at the required opacity. Vignette layer and photo filters were also used to give the final touch to the image. The image shows a couple of renders before and after editing. Since it contains many layers of edit, not sure how useful the screen grabs would prove.

I guess more editing is possible; in terms of adding more drama or by using plugins and other effects. But I did not want them to be very dramatic, since the purpose was more about showing the details & design clearly. I do admit that I could have tried different lighting moods etc. but then, having spent months on the project and with so many renders at hand I chose to do it at a later time. Really looking forward to do a night shot of the scene and publish it along with the second part of the project that focuses on the interiors.
I do want to add one thing here; as I was not satisfied with the 3D trees, in the final edits I choose to use images for the background trees in a few renders; meaning there were multiple versions to most of the images. Here are a couple of them.
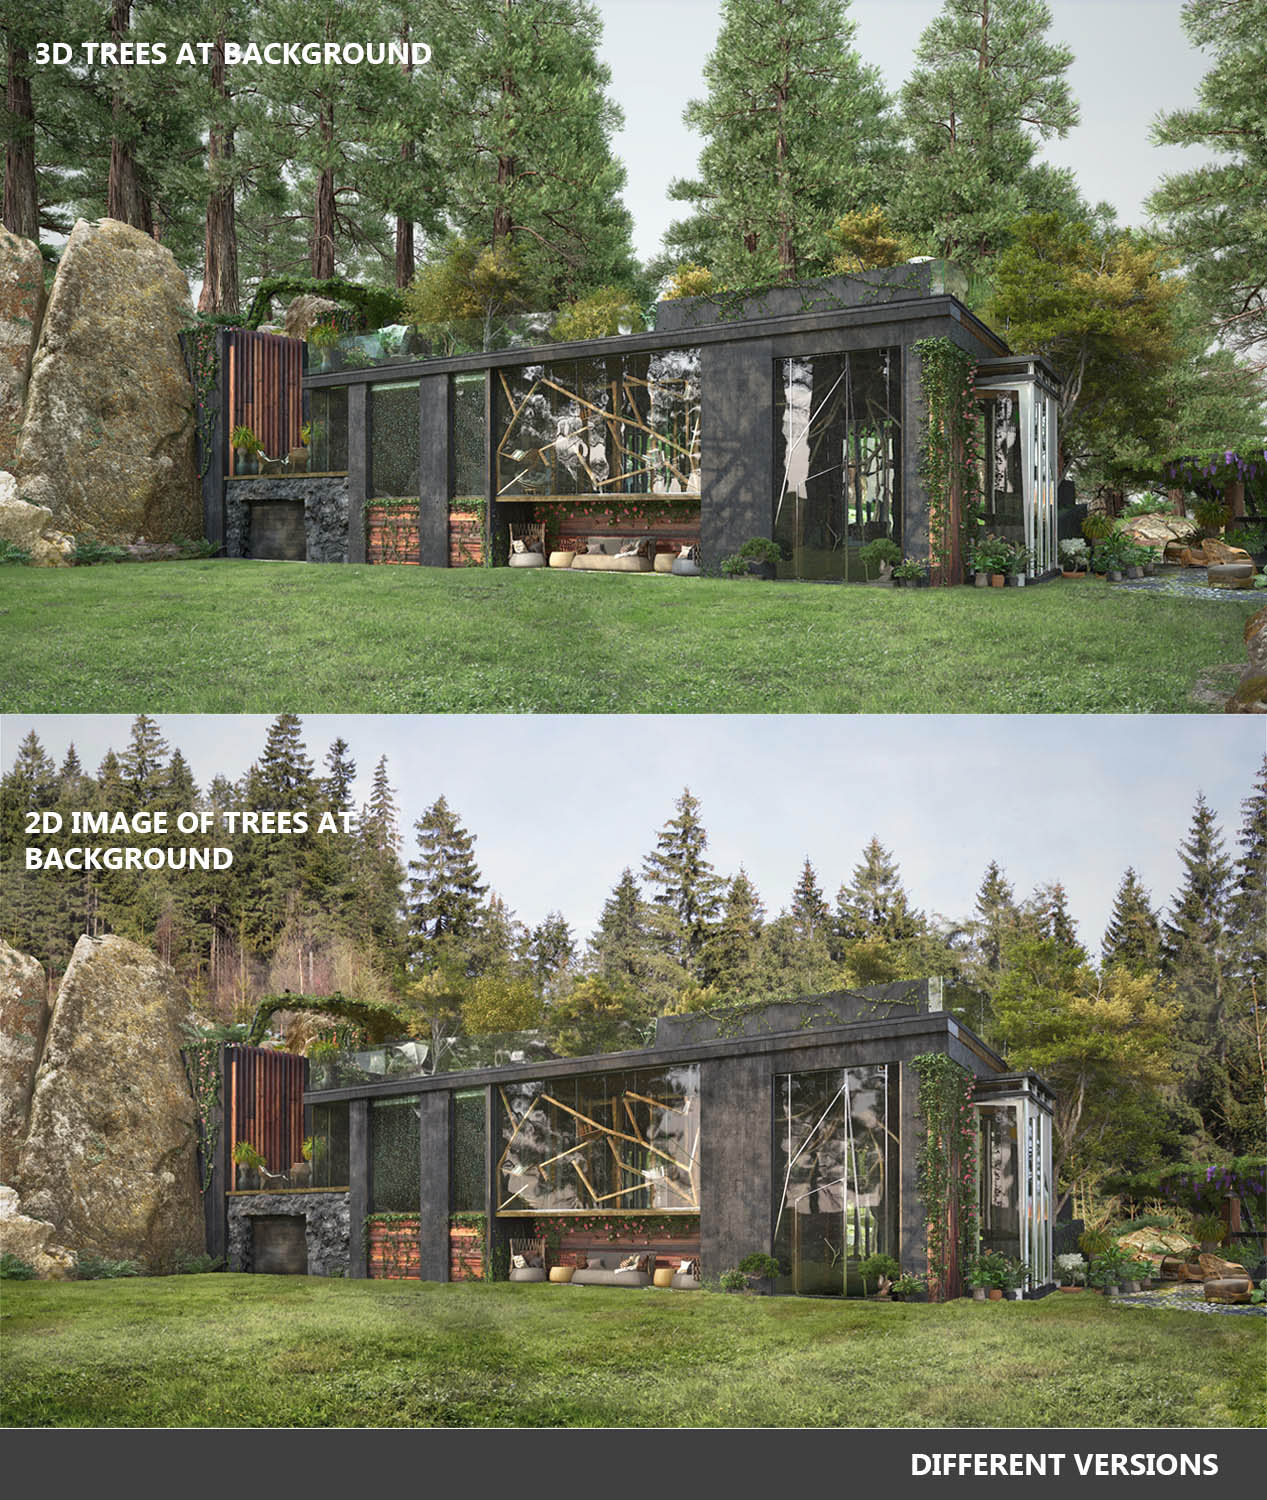
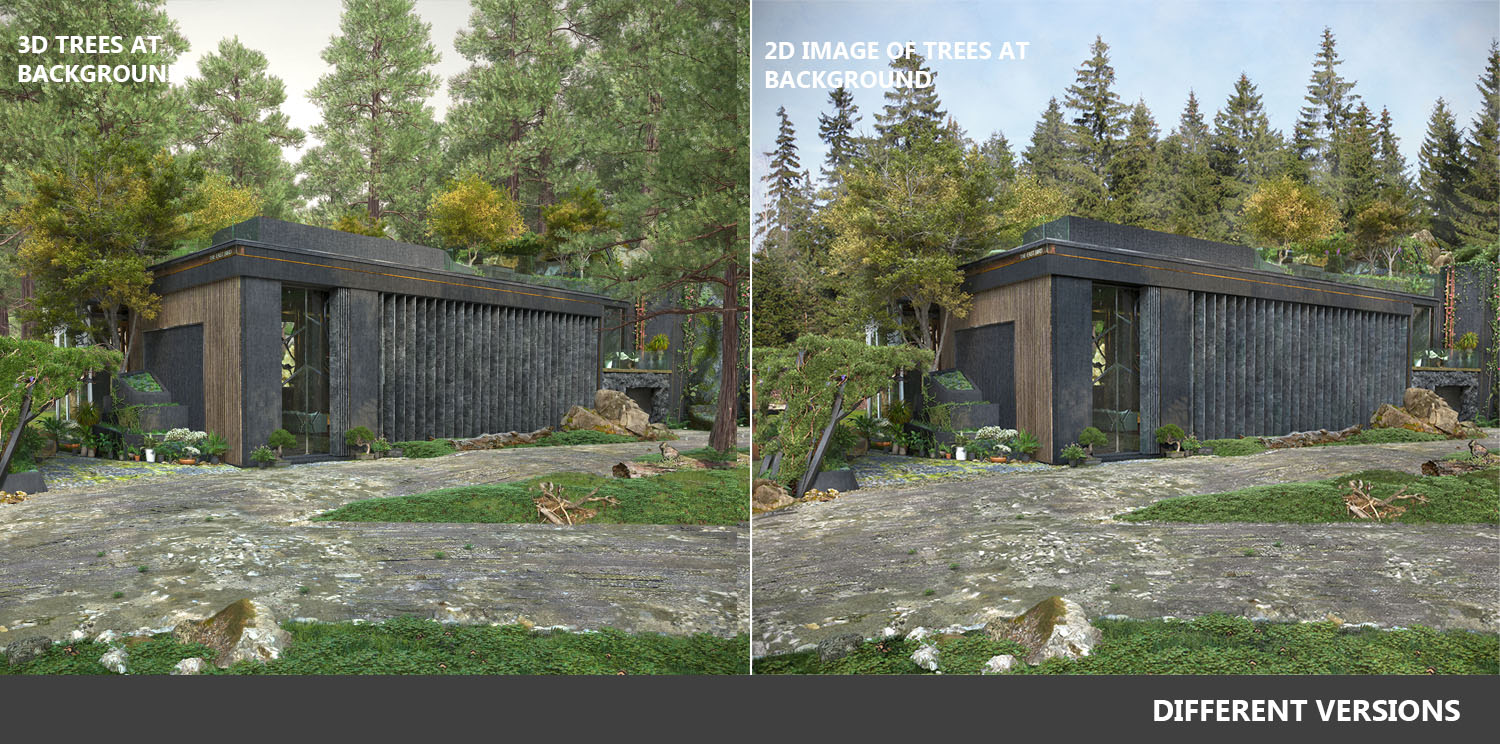
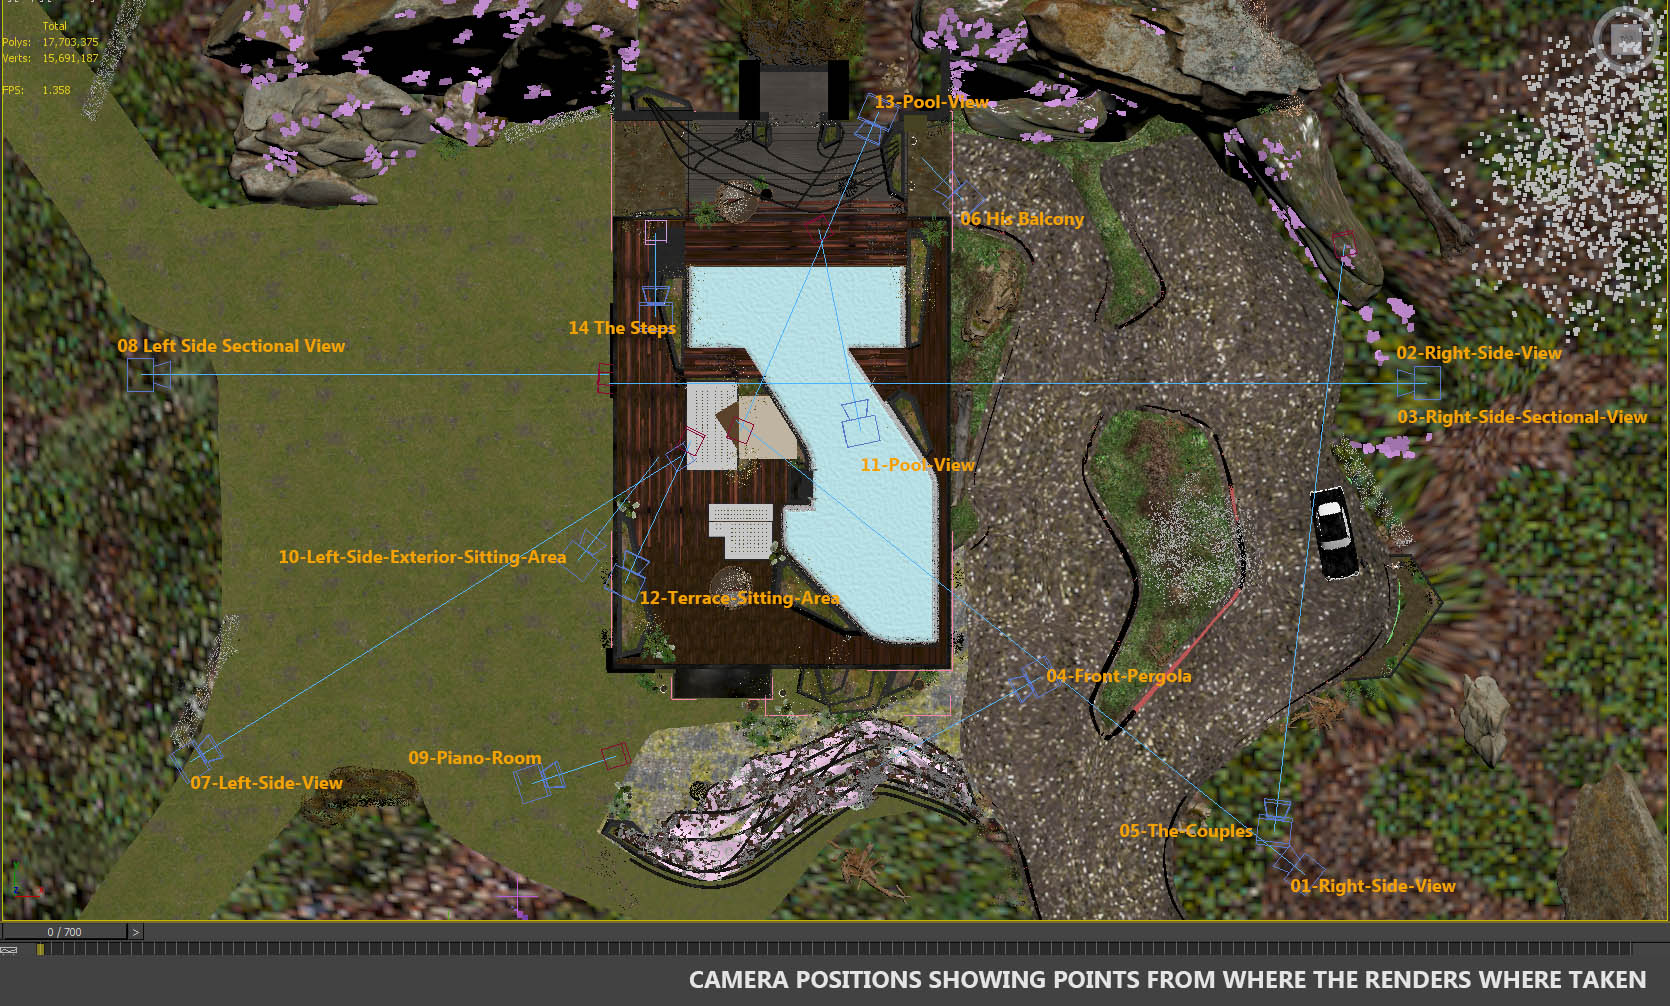
There were 14 renders including 2 DOF shots and 2 Cross sectional shots. So here the image shows the camera positions from where they were taken.
FINAL RENDERS
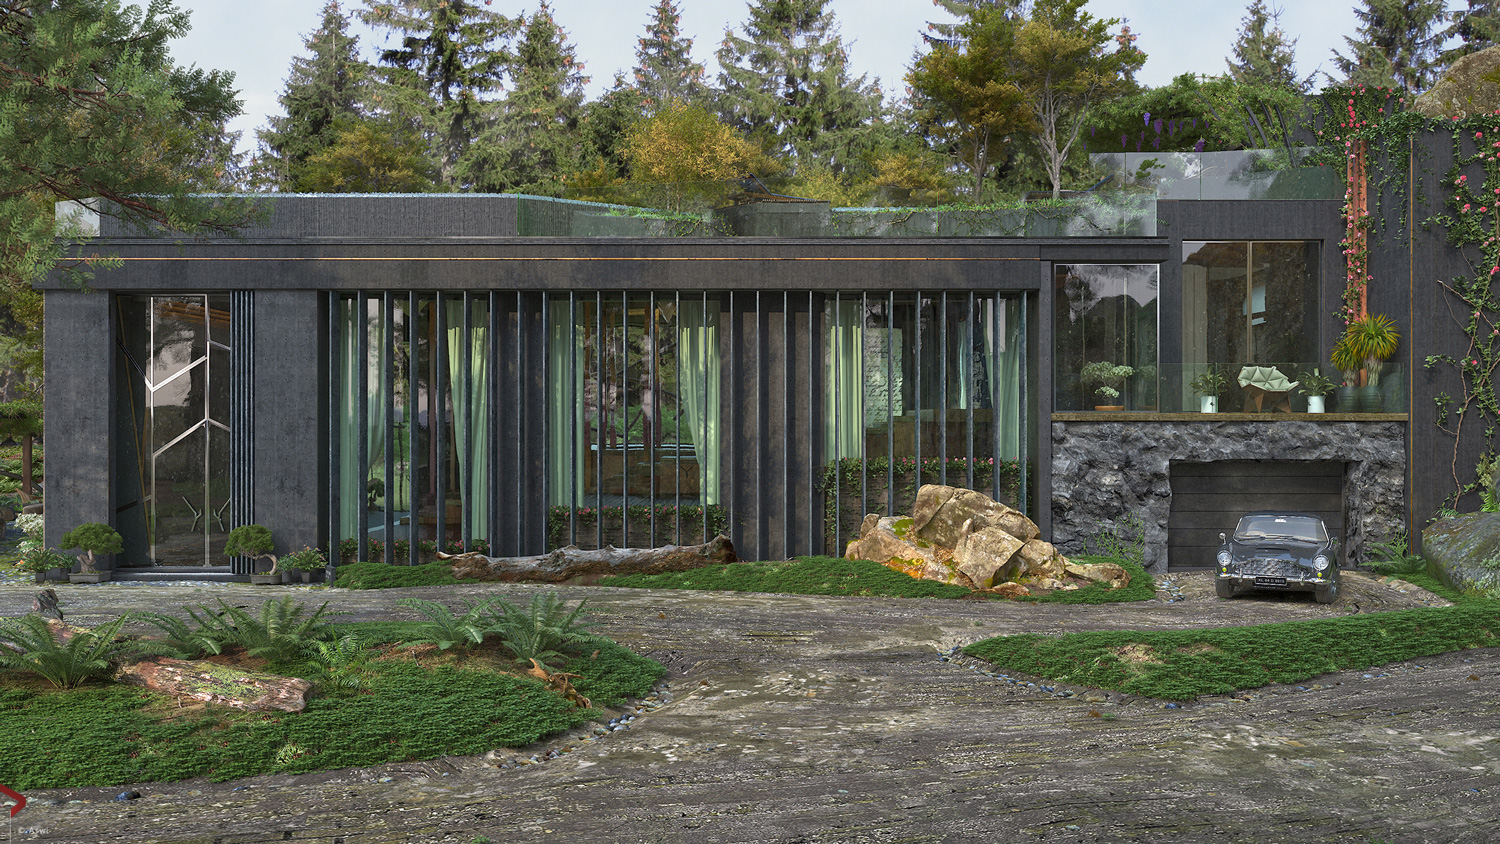
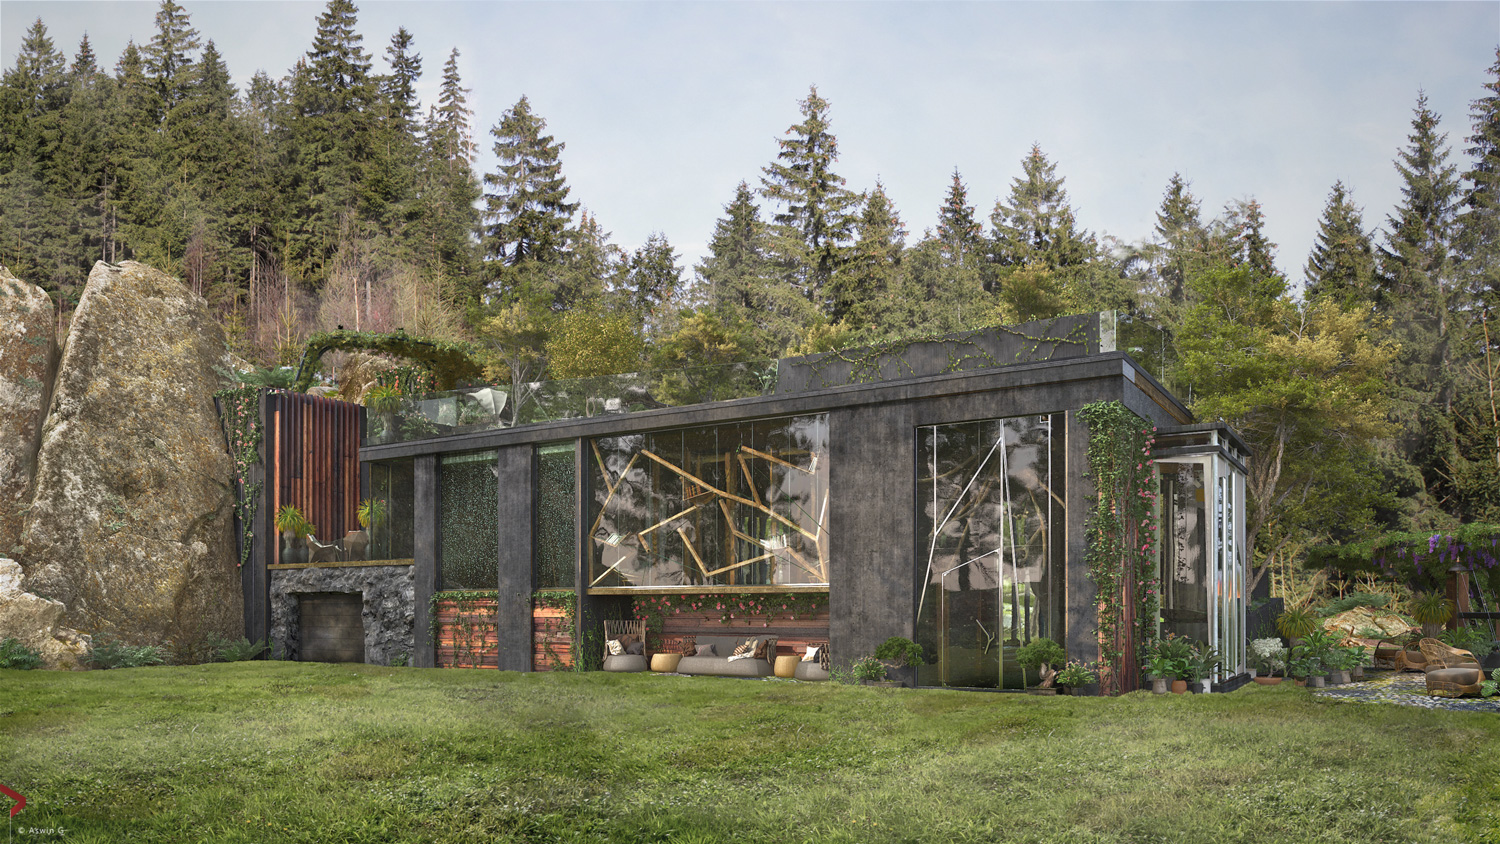
01 RIGHT SIDE VIEW
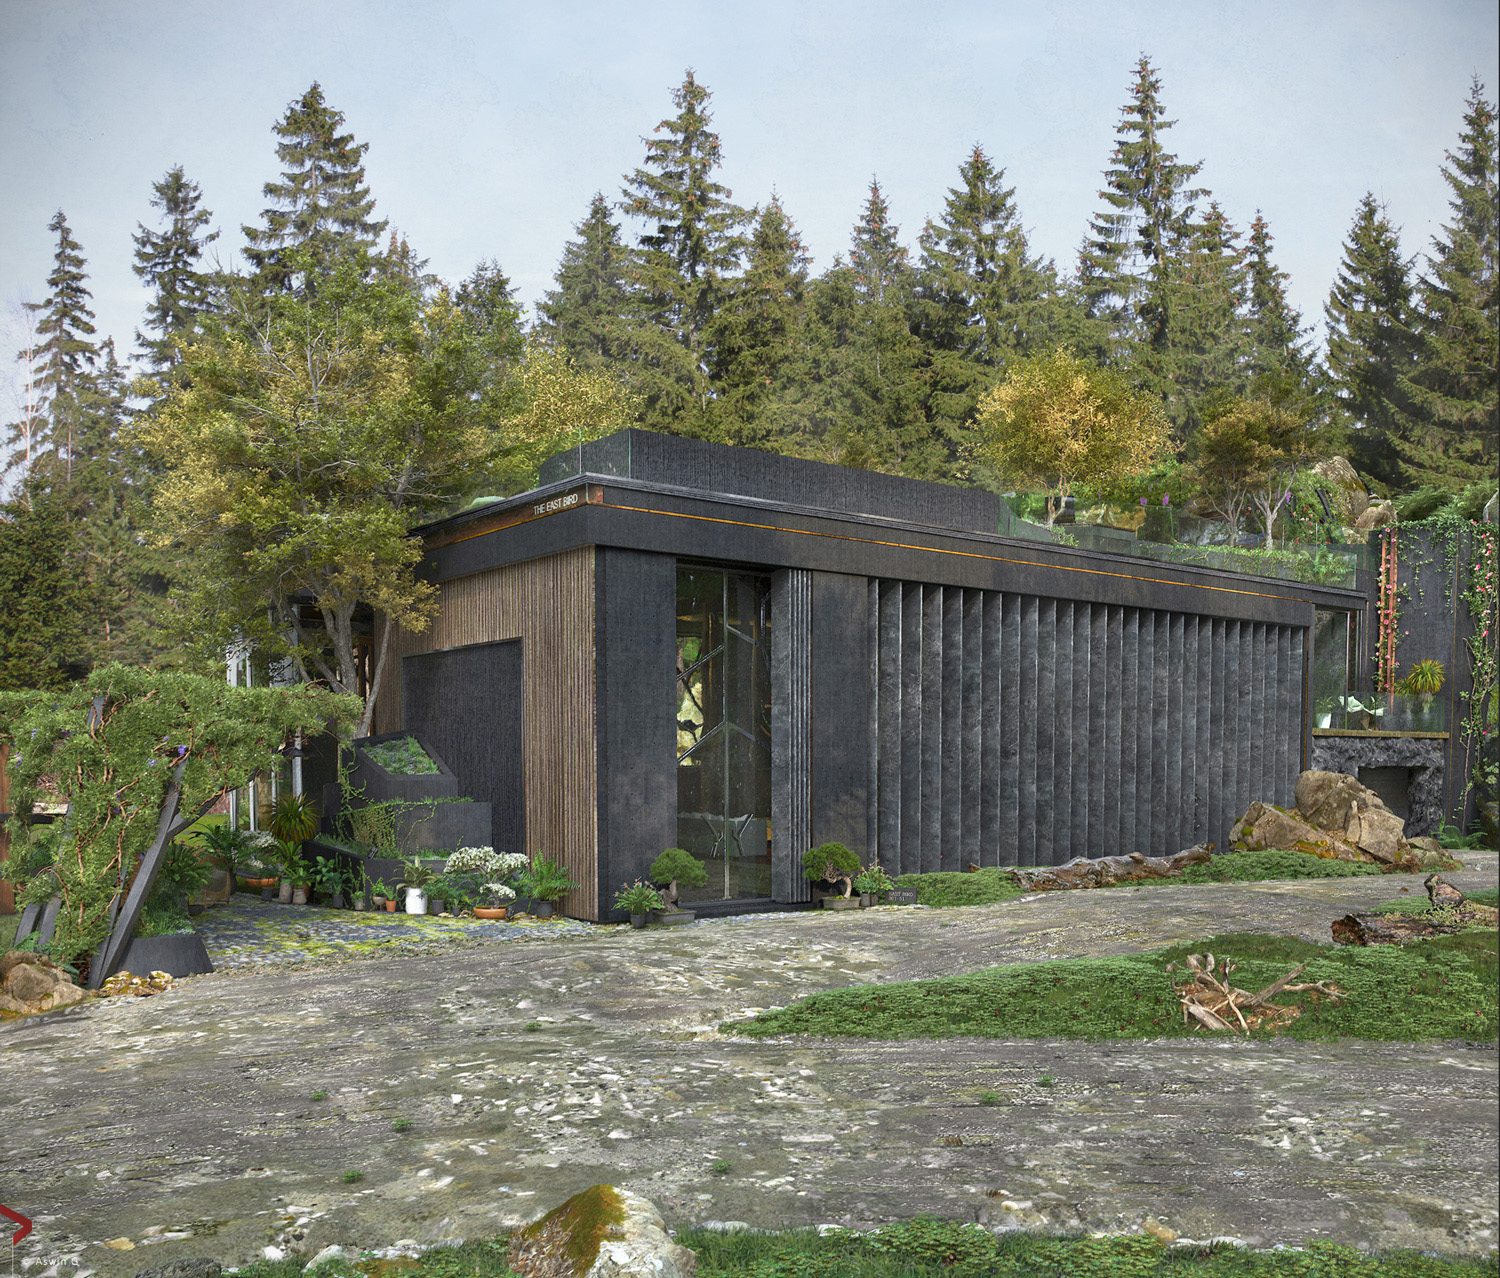
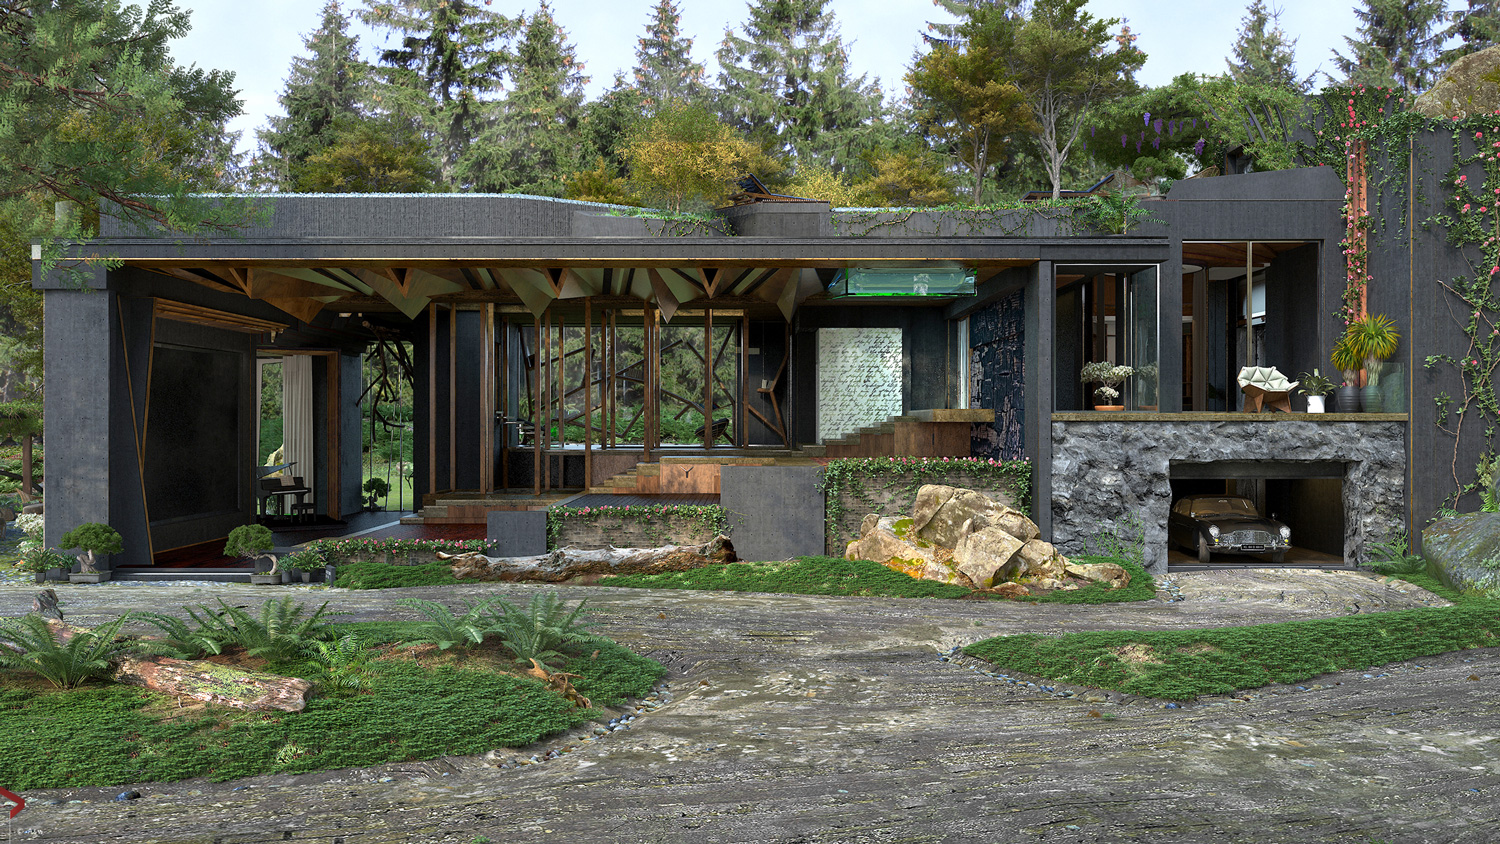
02 RIGHT SIDE VIEW
03 RIGHT SIDE SECTIONAL VIEW
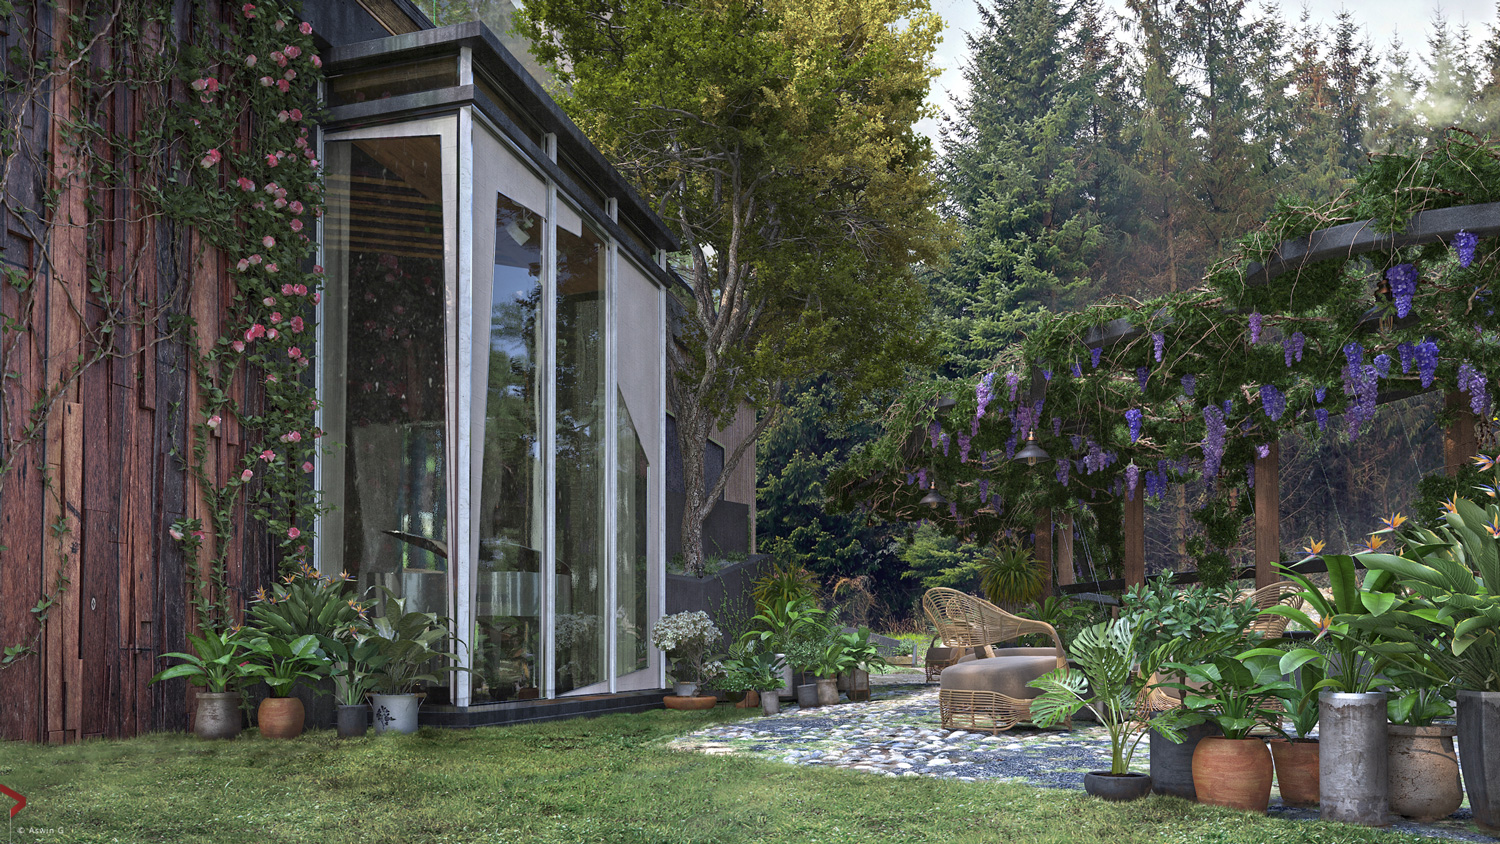
04 FRONT PERGOLA

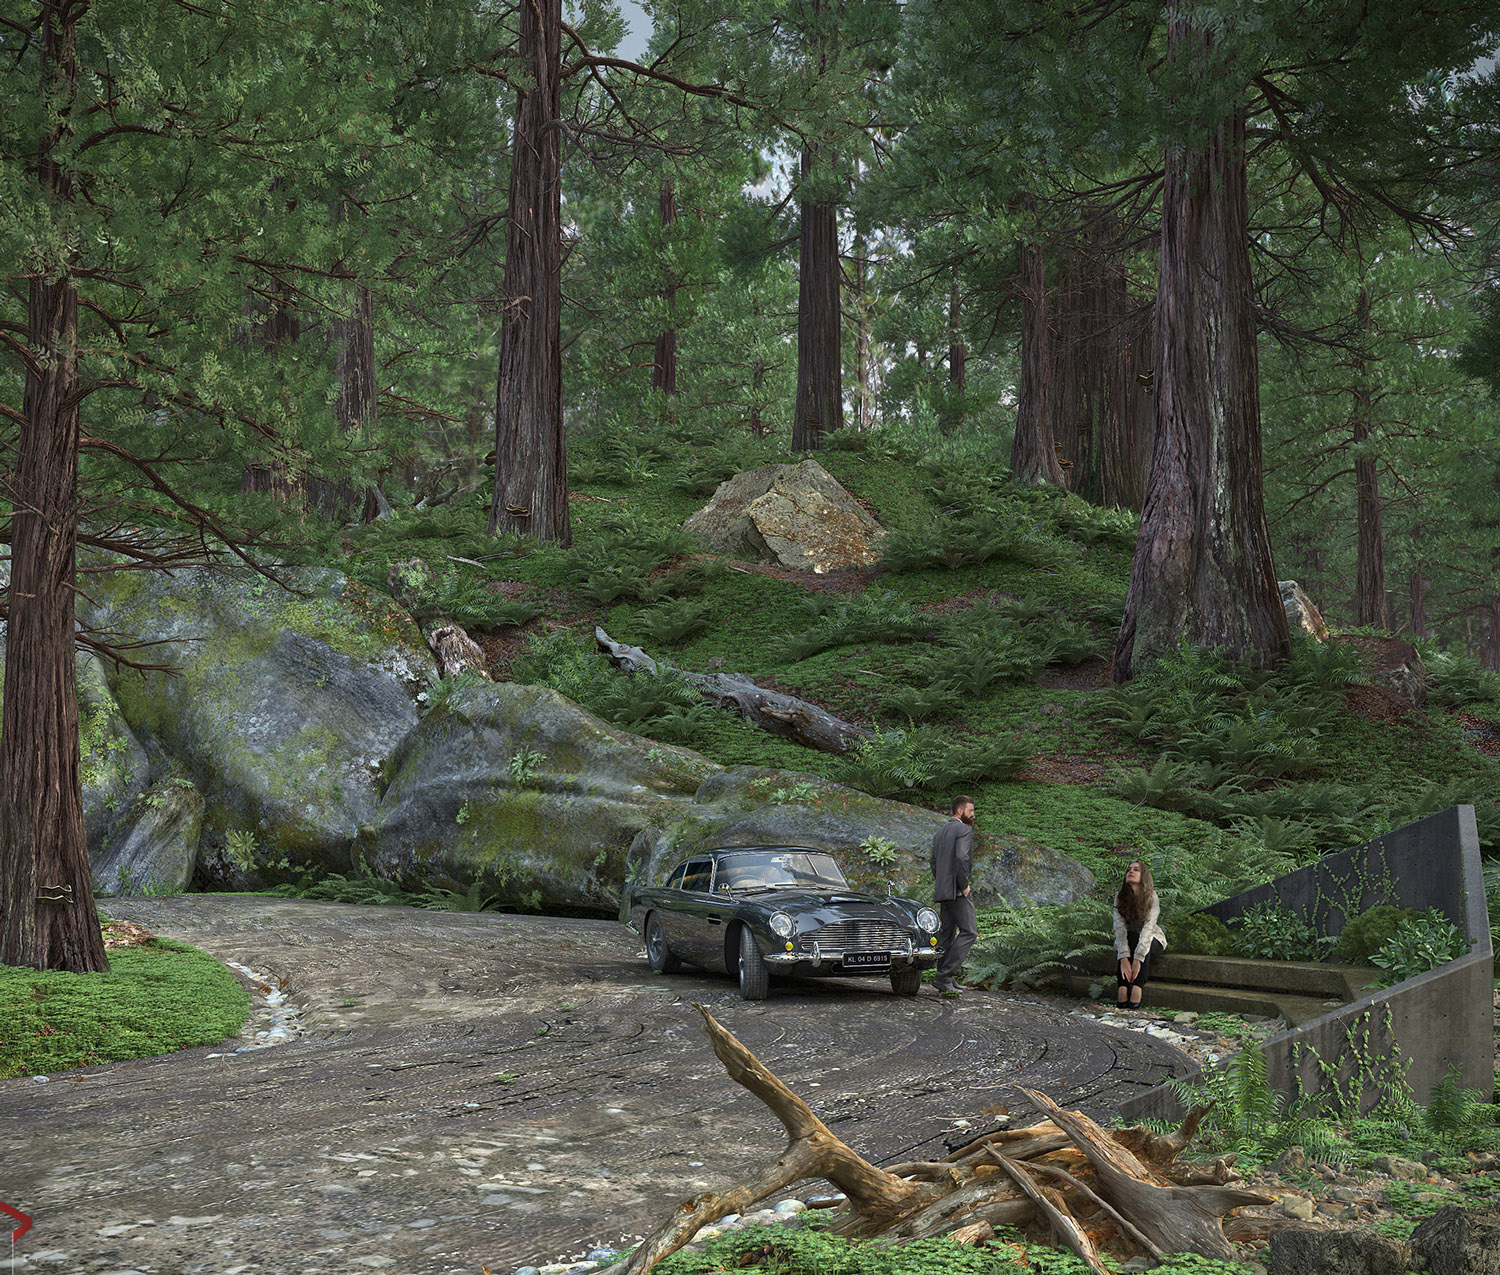
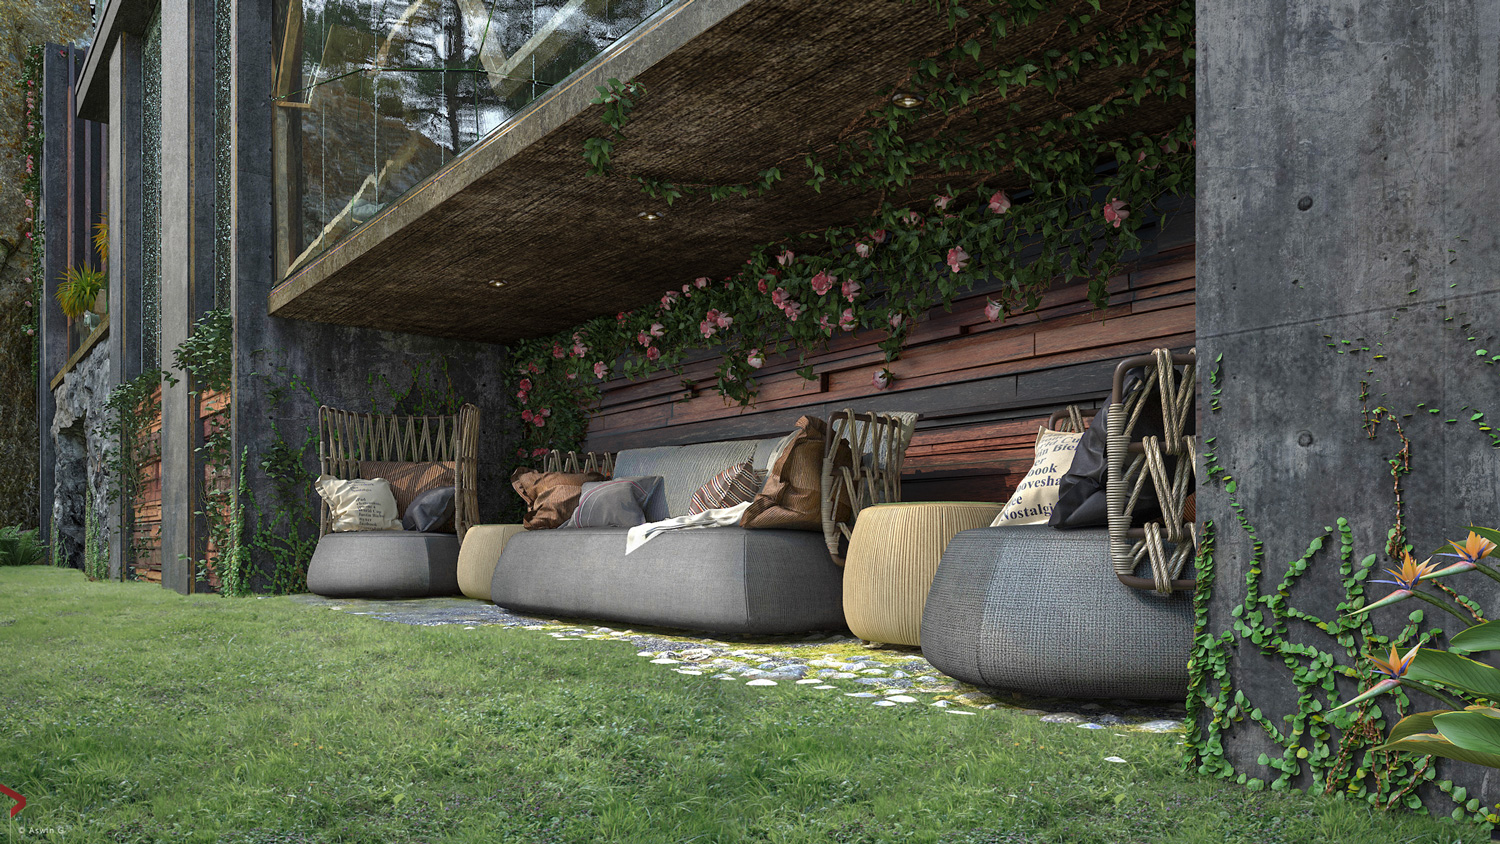
05 THE COUPLES
06 HIS BALCONY
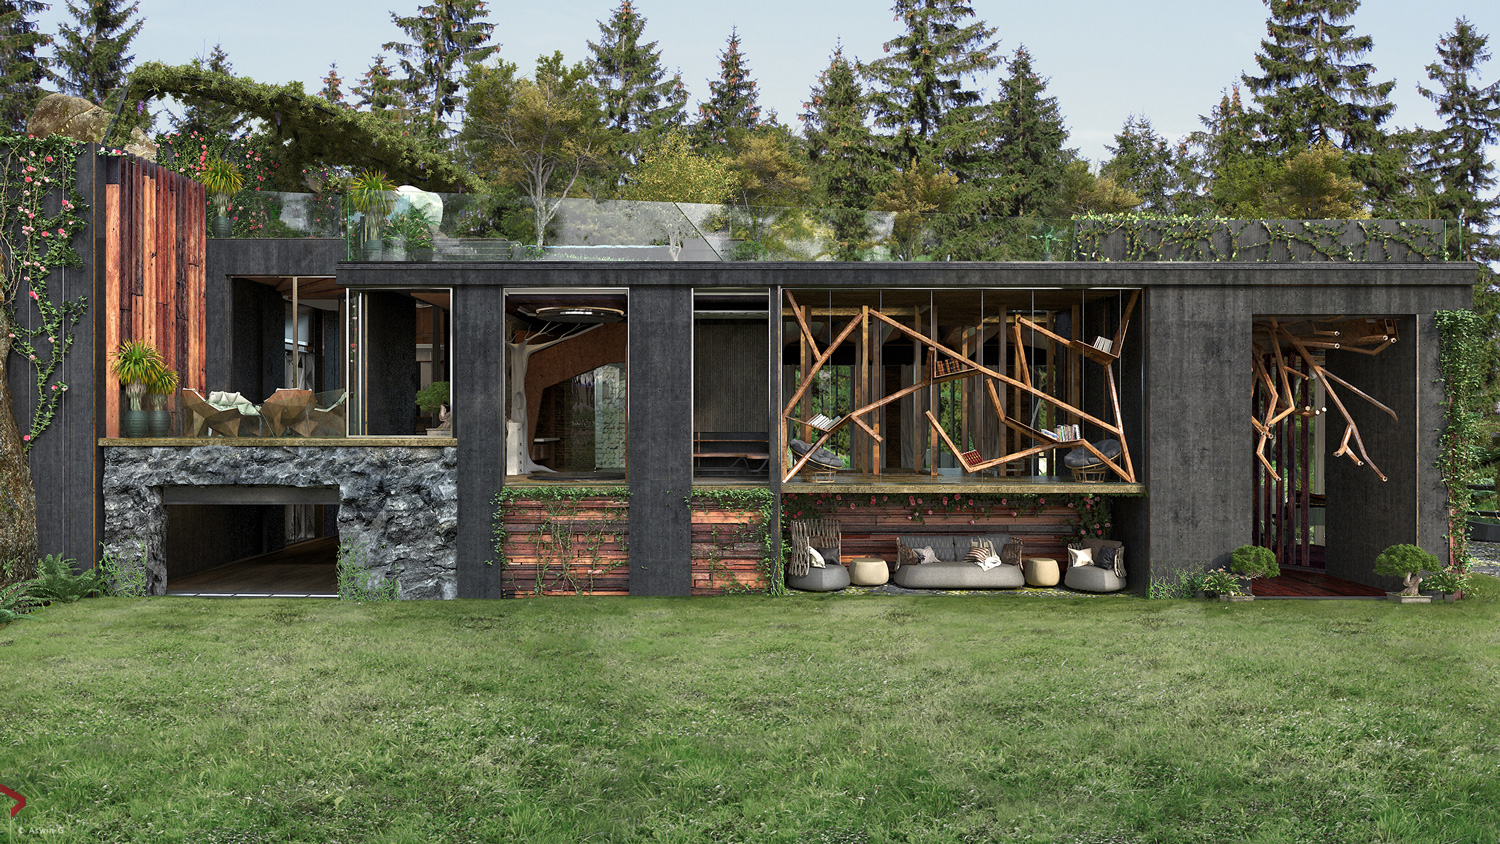
07 LEFT SIDE VIEW
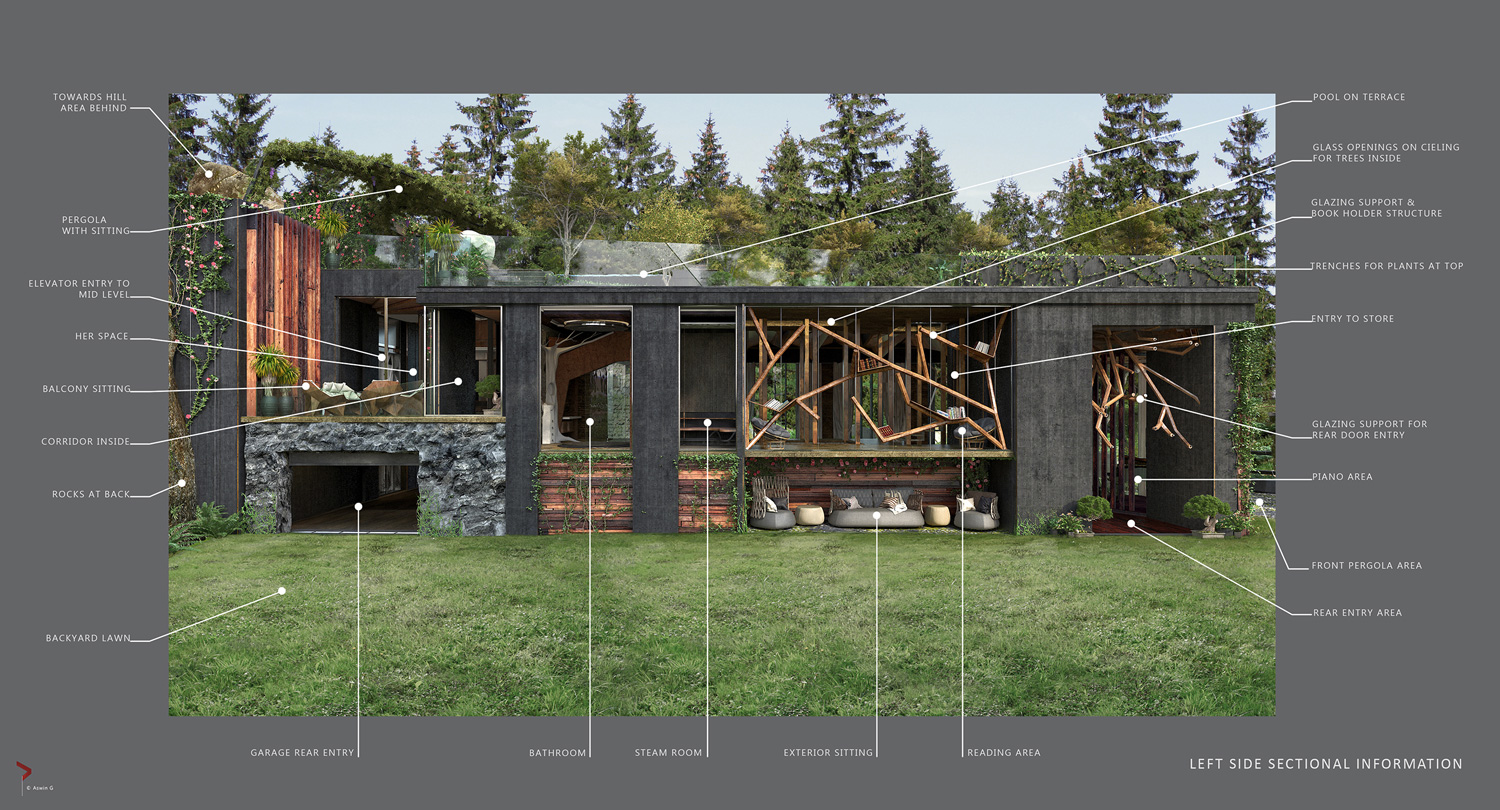
08 LEFT SIDE SECTIONAL VIEW
09 PIANO ROOMS
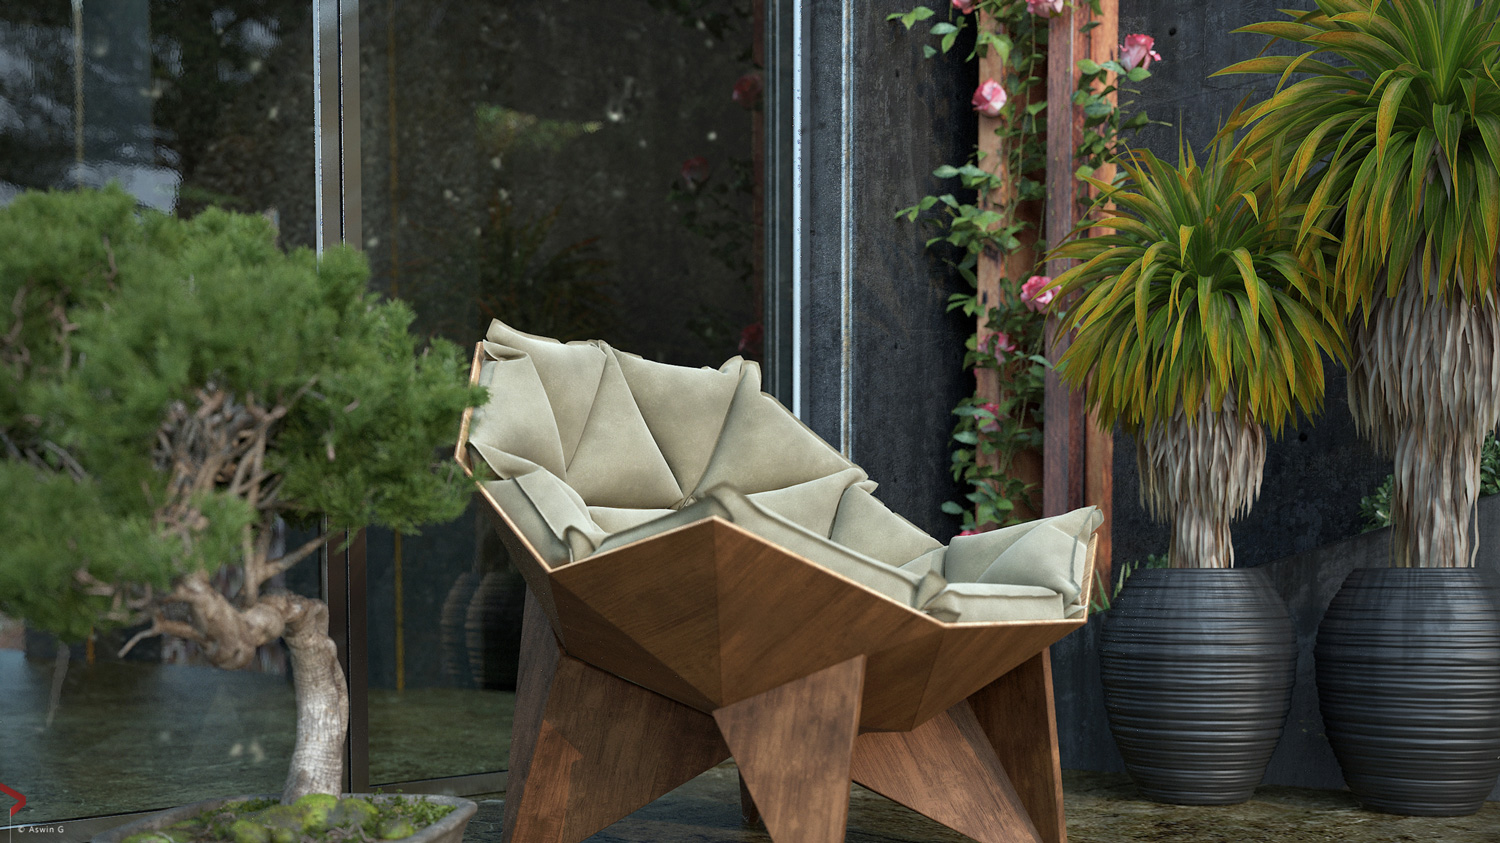
10 LEFT SIDE EXTERIOR SITTING AREA
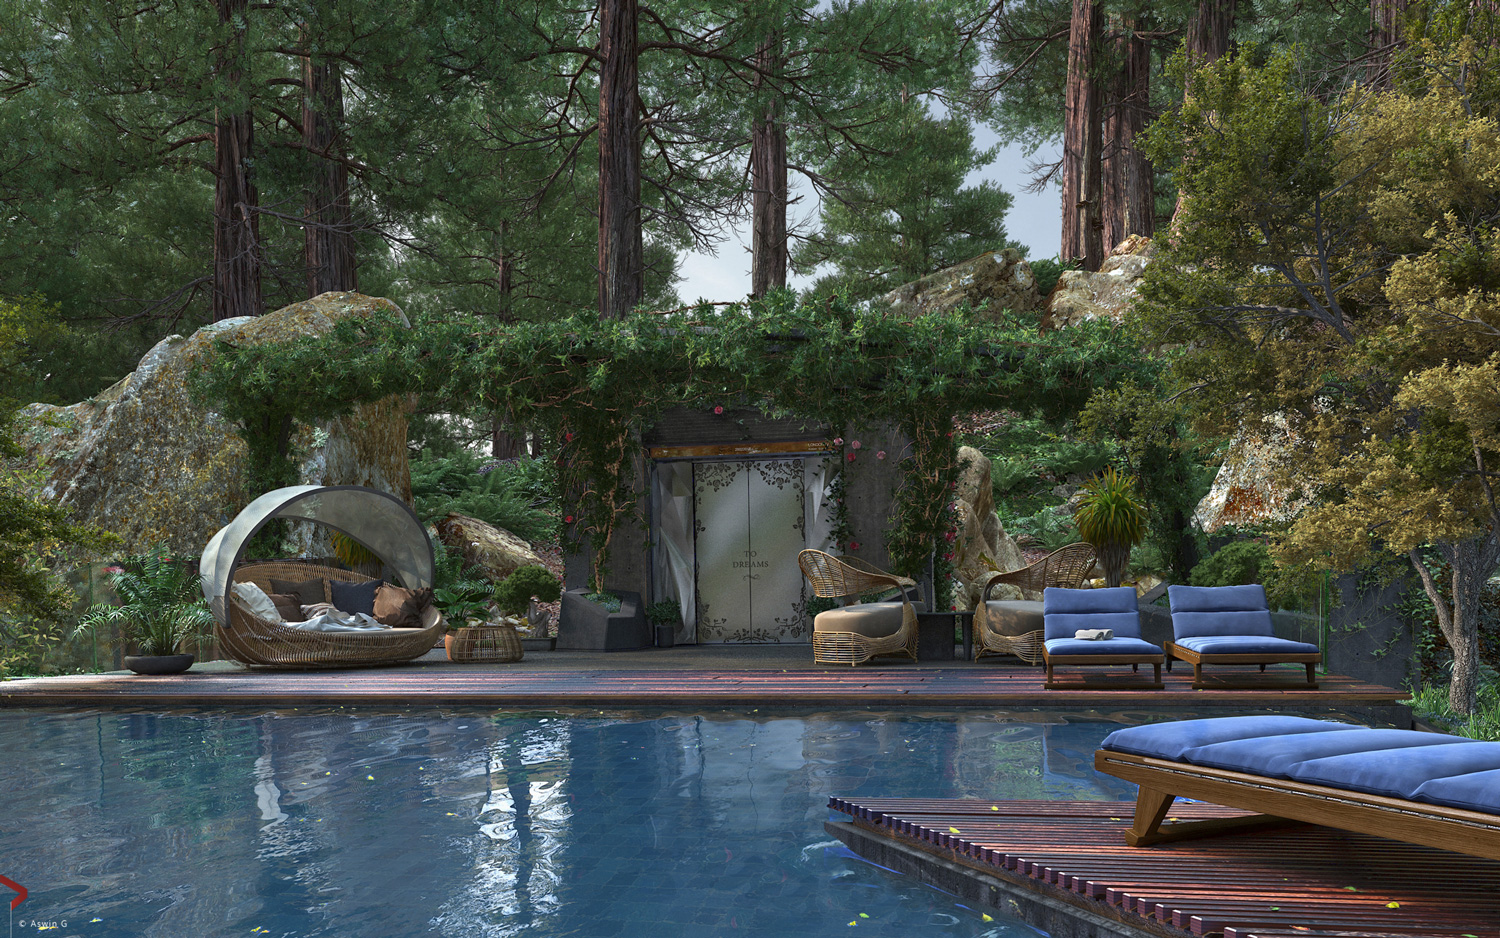
11 POOL VIEW
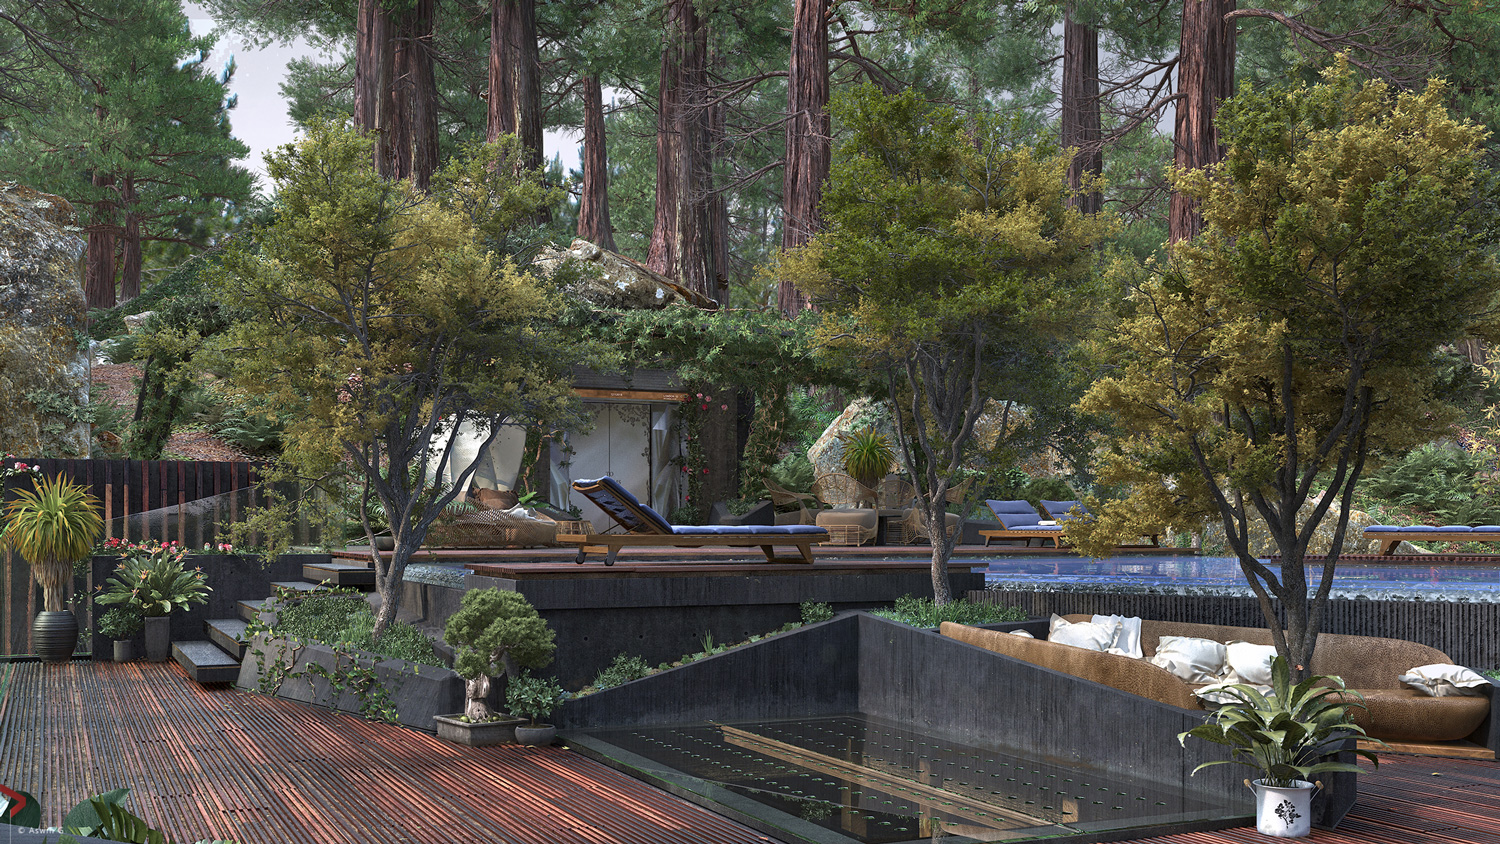
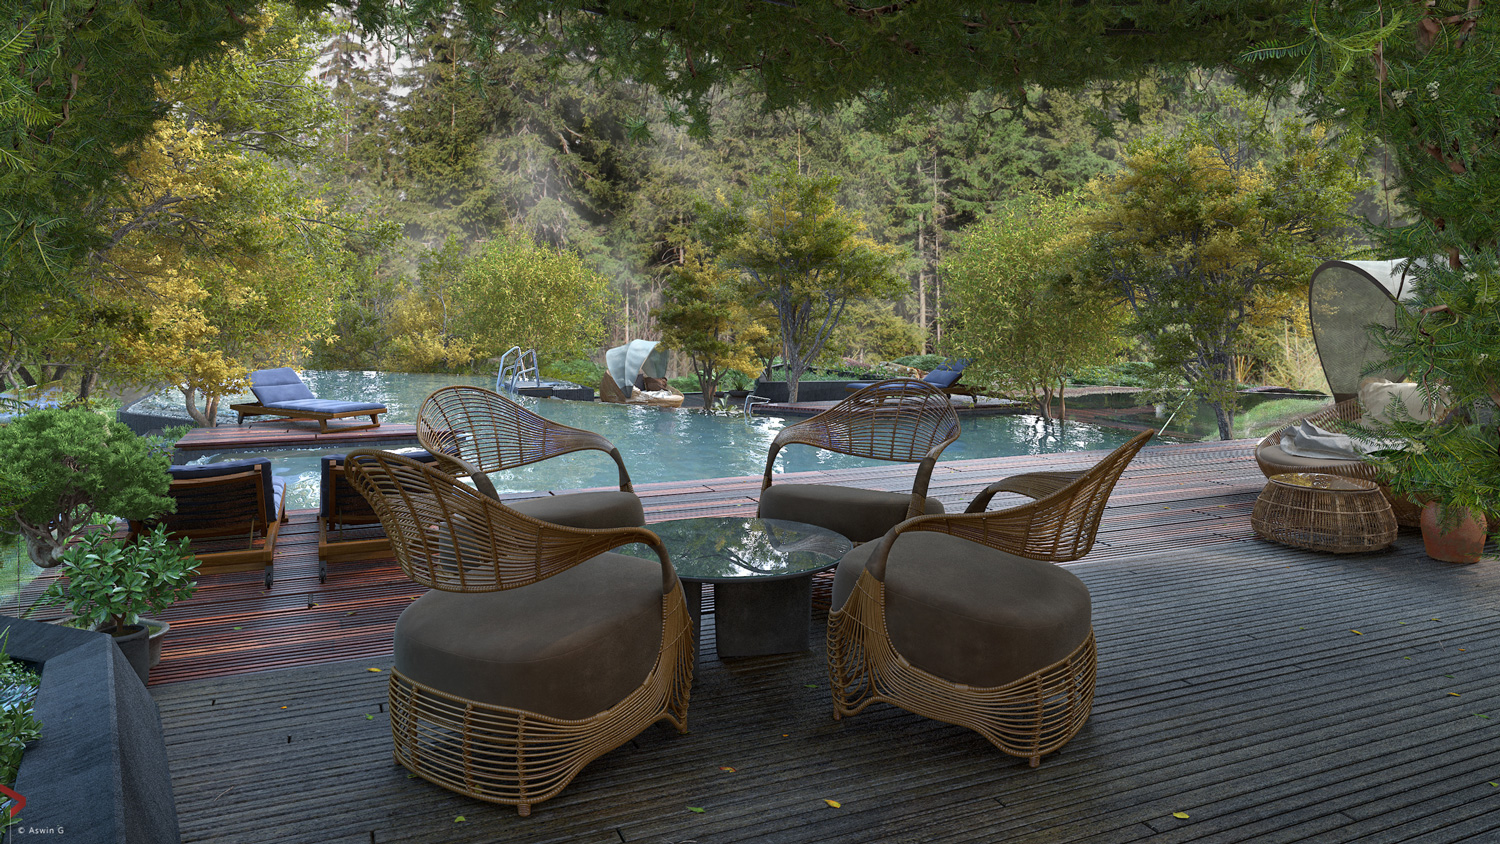
12 TERRACE SITTING AREA
13 POOL VIEW
14 THE STEPS
15 RIGHT SIDE SECTIONAL INFORMATION

16 RIGHT SIDE SECTIONAL INFORMATION
CONCLUSION
Due to the length of the article I could not include many more things; apologies if I have missed any part. Thank you for having the patience to go through my project and its making. I sincerely hope this has been of value and worth the time.
I am extremely thankful to Jeff Mottle for giving me the opportunity to publish ‘The making’ of the project ‘The Step’ through CG Architect. I am also thankful to all the artists and people who have shared their knowledge and expertise; because of which I could reach this far. To all the people who has inspired & supported me, and a mighty thanks to God almighty.
Please write to me at aswing111@gmail.com, if there is anything particular you would like to know or contact me about.
Visit my profile at
https://www.linkedin.com/in/aswin-g-aa30a59
https://www.behance.net/aswing303
SOFTWARE USED
AUTODESK 3DS MAX, MUDBOX, V-RAY, ADOBE PHOTOHSOP CC, QUIXEL MEGASCANS
NOTE* I will cover the interiors in detail in my next project hopefully with a lot of interesting stuff added! As you can see the structure is ready to bring in the interiors. I believe it deserves its own time to make. The design so far has been really a lot of thought and effort and I am happy that it all fit together and came out well and quiet practical. It is my dream that this can be made if someone approaches me to get it done in the real world and I can probably look at getting a new job profile.
You must be logged in to post a comment. Login here.

Aswin G
Report Abuse
Thanks Jose Gil! :)

Jose Gil
Report Abuse
Great work.
Aswin G
Report Abuse
Thank you so much for each word! Really feeling happy to read your comment here and the way we can connect! My pleasure to share and I guess this is my reward; hearing from people like you!

Igor Macedo
Report Abuse
Inspirational, motivational, a true state of art from the first word to the last image. I identify myself a lot with the way you view your work and what you love to do. Congratulations and thank you for sharing!
k
kishore mane
Report Abuse
great work sir
Aswin G
Report Abuse
Thank you! & thanks to Jeff who made it possible! :)

ArtMan Nabil
Report Abuse
First thank you so much for share, it's one of the best thinks of this web site : share and share ans share :) Bravo
ArtMan Nabil
Report Abuse
First thank you so much for share, it's one of the best thinks of this web site : share and share ans share :) Bravo
Aswin G
Report Abuse
Happy that you liked it. Thank you! :)
Aswin G
Report Abuse
:) :) Thank you! My Pleasure.
Aswin G
Report Abuse
My pleasure, really happy you liked it. Thank you so much! :)
S
Sandesh Kolhapure
Report Abuse
Great work Aswin.
thanks for sharing. :)
Aswin G
Report Abuse
Thank you sir for all your support each time! You have given a lot of inspiration. Thank you so much!
Sincerely

Shohol ebna Shad
Report Abuse
Thank You so much :) :)

Anshuman Singh
Report Abuse
Great Stuff! Now it looks even better with your inspiration image and the Inside concept. looking forward to interior images. :)

Simon de Jager
Report Abuse
Greatness..
Aswin G
Report Abuse
Thank you Ronald! Thank you so much!
Aswin G
Report Abuse
Thank you so much! So happy you liked it! :) yes it should pay off, waiting to see responses here which I really value!
R
Roland Zuniga
Report Abuse
Simply AMAZING!!....Very well done sir!
Gavin McGinty
Report Abuse
Love it, fantastic 3d feast to look at... Emence amount of work put into it, and most certainly has paid off!
Thank you for sharing!!!
About this article
The Making of The Step
visibility14.6 k
favorite_border19
mode_comment20


