

Making Of
The Making Of Cais das Artes
Hello everyone! My name is Ricardo Canton, I live in São Paulo and I have been collaborating with several architecture studios in the 3D visualization of their projects since 2005. Before starting this Making Of, I would like to thank CGarchitect for the opportunity to publicize my work.
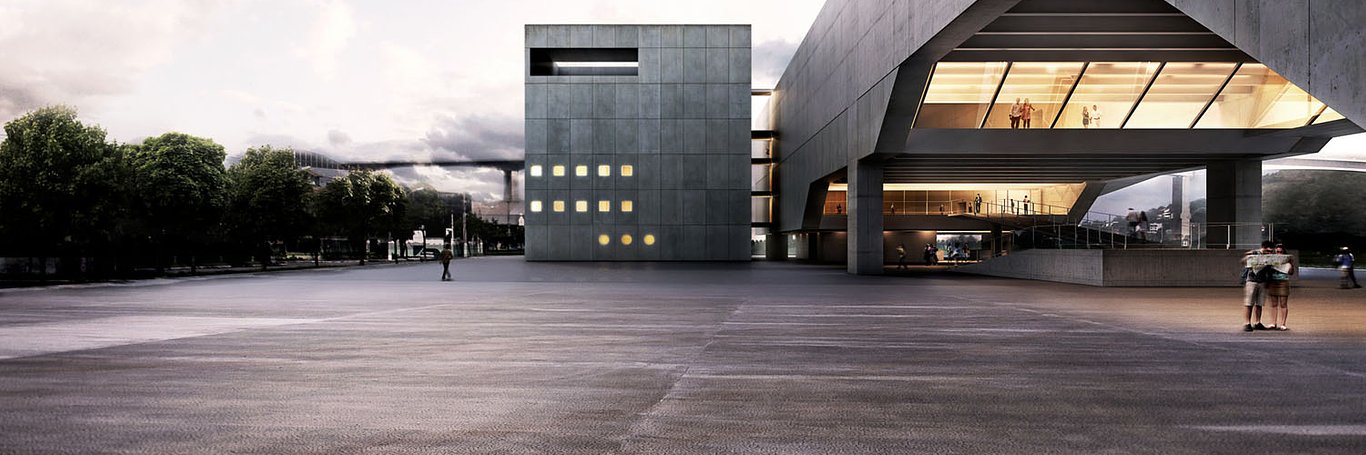
This image of Cais das Artes (Quay of Arts) was produced a little bit before the construction of the Museum started and served as illustrative support during the presentation of the project in lectures and publication in architecture magazines.
I will make a brief presentation of the Cais das Artes project: The Building, composed by a Museum and a Theater equipped to host large scale art events, was designed by Paulo Mendes da Rocha and Metro Arquitetos Associados. Located on the Suá Bay, in front of the canal that configures the island of Vitória (Brazil), the project has as a main characteristic valuing the landscape and the historical surroundings of the city. During the Museum visiting course, the vertical circulation through ramps provides crystal clear platforms that create porches for the appreciation of the natural surroundings. The new square shall be an attraction of the city’s cultural life.
In this project I used the following tools: AutoCAD for modeling, 3ds Max and V-Ray for texture and illumination and Photoshop for post-production of the image.
Modeling
Given that AutoCAD is still the most common architecture software used by my clients and because it contains all the design models, I still consider AutoCAD the main tool for modeling, because it perfectly fits with my needs. Only when the projects are more complex, have I combined the AutoCAD process with 3ds Max. In this specific project, simple commands were used such as: extrude polyline, box, union, subtract and slice. Following is the sequence showing the main stages and construction components of the building.


After finishing the modeling phase, the DWG archive was imported into 3ds Max. After that I adjusted the internal units of 3ds Max to meters.
Lightning and Camera Setup
The next step was to configure the lighting of the scene. To simulate the skylight a hemisphere was used in which a Vraylight material, with a JPEG texture of a sky, was applied.

In the internal lightning of the museum several V-Ray planes were used and orange tone color variations were applied.


Materials
The application of materials in this scene was quite simple, taking into account the fact that I did not intend to spend much time with tests and configuration. The color corrections and contrast were left to a later stage in the Photoshop phase. Among the few materials used are: a vray default material with white diffuse and a little bit of reflex in the beams, frames & cladding sheets, transparent glass, water, asphalt for the streets, and some variations of concrete textures for the slabs, pillars, pre-fabricated panels for the façade and the great gable of the museum. Several textures were found in internet databases, like CGtextures.


Rendering Setup
The rendering configuration has no special features and the parameters adopted were basic with low values. I have used the classic method: irradiance map and light cache, adaptive dmc and exponential for color mapping. In this project, I have not used LWF (Linear Work Flow), thus I have not changed the gamma settings in the 3ds Max preferences, even though I have been using this technique in my recent work. Here are the render presets:

Post Production
As you can see from the raw render, the image passed through a great transformation in the Photoshop until it reached its final result. To facilitate the editing process and work more efficiently, several folders were created to maintain the layer organization. The use of adjustment layers and layer masks also allowed non-destructive editing of the pixels. These tools are extremely important if you intend to easily recover any of the commands in future manipulations of the image.
Following is the Photoshop process:
The raw render

The Background was inserted (with some adjustments related to the lightning and saturation) below the folder (3D Base), containing the duplicated raw render.

In this phase, the idea was to reinforce the lights of the scene, mainly the artificial lights aminating from the museum. In order to do this, the layers of the render and the sky were duplicated, flattened and adjusted to linear dodge mode. After, with an inverted mask and a soft white brush, the effect was cautiously revealed.

In a new layer with the Screen blend mode, a white brush was used to highlight the lights of the annex.

The use of Orange filters served to attenuate the bluish tone of the original image and reach a warmer atmosphere.

Adjustments layers (curves, levels) were used to reinforce the shaded areas and highlight the lights.

Below the adjustments group a new layer which was created with the Color Burn blending mode.

The application of new concrete textures (overlay mode, with low opacity) added tone variations and a little dirt to the original textures.


To give life to the scene, I inserted some people and trees, adjusting their contrast and color.

To reach a more dramatic result, vibrant and with more color effect, I used the following blending modes: linear burn and overlay.

I have removed a little bit of the general saturation.

I made a new copy (blending all the layers below) and added a mask. After that, I applied Filter > Blur> Lens Blur to apply a very smooth blurring effect in the volume of the annex (center) and in the borders of the image.

A vignetting effect was applied through manual exposures. In order to do that, I used the ALT command and created a new layer. In the dialog box (New layer) I adjusted the mode to overlay (50%). The effect was applied with a smooth black brush (10%). A smooth White brush made the opposite, highlighting the areas of light.

The final image

That’s all. I hope that everyone that reads the tutorial will like the methodology I have used in it.

You must be logged in to post a comment. Login here.
Ricardo Canton
Report Abuse
Thank you to all for the positive feedback. I'm glad to be helpfull.
If you are interested to know a little more about my work, you can follow my facebook page:
https://www.facebook.com/arca3d
Best Regards,
Ricardo

Michael Brown
Report Abuse
Ah! I knew I remembered seeing your image before today. Just ran across them on the eVolo Blog. Nice to see your work getting some exposure Ricardo. Good write up.
http://www.evolo.us/architecture/raw-concrete-spectacle-cais-das-artes-in-vitoria-by-paulo-mendez-da-rocha-and-martin-corullon/

Toffer Caunga
Report Abuse
Very nice tutorial. Thanks!

Marcos Garcia
Report Abuse
Amazing! The end result is so realistic.
N
Nuno Moser
Report Abuse
Nice work!!
Thank you for the tutorial

carlos mendoza
Report Abuse
impresive
T
Thomas Edward Allen
Report Abuse
Very Nice, I had been curious about this image for a while. Beautiful lighting.

Leopold Kristjansson
Report Abuse
Great work!

behzad yazdani
Report Abuse
dear jeff merci for this tutorial

Sachin Mahajan
Report Abuse
Good work :)Thanks for the tutorial :)

Alfa Smyrna
Report Abuse
Hi Ricardo,
Nice and fun to watch your steps in Photoshop.
Cheers

CDN Design Studio
Report Abuse
Great effort !!! Really commendable talent...
k
keyur patel
Report Abuse
fantastic architectural concept and nice making of

Raul Alfaro
Report Abuse
Very nice job, specially Photoshop part. Very formative and clear tutorial for people with experience (professional or amateur).
EXCELENT JOB. Congratulatiosn from Barcelona.

Alpen Shiva
Report Abuse
Phantastic rendering and excellent Tutorial.
I loved your image when it was first published and I am happy now to see a making of.
Thank you!
Ricardo Canton
Report Abuse
Thanks everyone for the kind words!!! Really appreciated!!! ;)
A
Alejandro Aguilera
Report Abuse
Thank you very much for this great tutorial!
M
Marcos Martins
Report Abuse
Ricardo, tutorial fantástico, parabéns pelo trabalho!
Jung Lee
Report Abuse
Fantastic!
m
myrna figueiredo
Report Abuse
Muito lindo! Parabens!
About this article
São Paulo's Ricardo Canton showcases the Making Of his Cais das Artes scene.
visibility31.2 k
favorite_border38
mode_comment23


