

Making Of
The Making of Siek Box House
Rio Febrian | 3D Artist | Denpasar, Indonesia
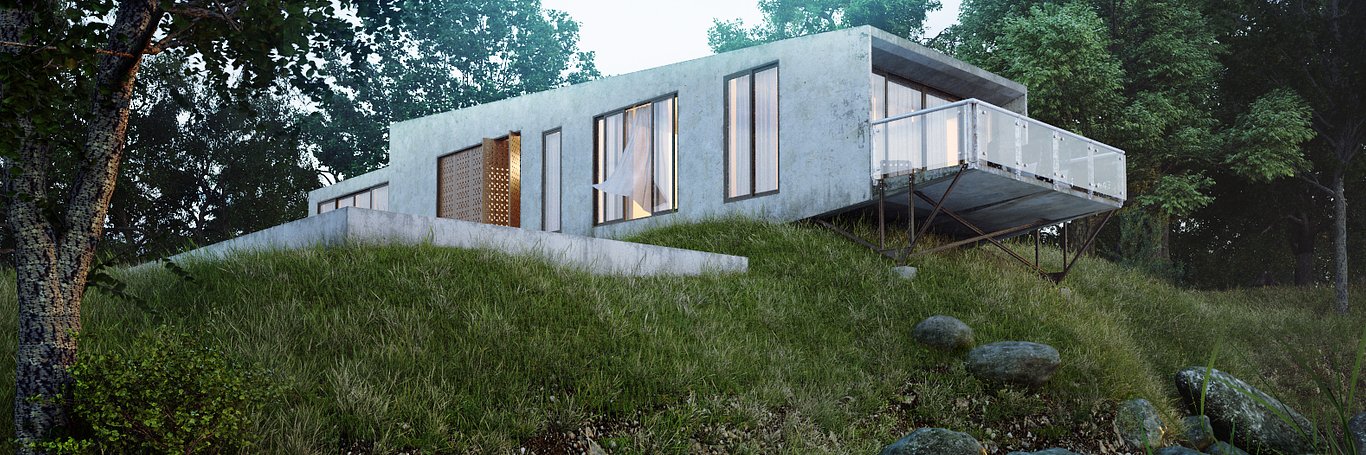
Hi all, thanks to the CGarchitect team for this great site and thank you for all who give comments, feedback and encouragement. In this article I will try to write the Making Of Siek Box House. This is my work for challenge the facebook group “3D Render Party”, and this box house is the 5th season of this group's challenges. The building model was provided by Arya Siek (the organizer/administrator of this group/challenge).


CONCEPT AND WORKFLOW
I believe that the preparation and planning step is very important in every visualization project. I was imagining which environment would be good for this box house. I had a simple picture in my mind about a silent river beside the house, with many stones on the river. I used Linear Workflow for gamma setting in my scene, and I turned the gamma to 2.2.

MODELING
As I mentioned before, this model was provided by the organizer of this challenge. But I remodeled this whole part of the house because I wanted to put some details with chamfered edges on every corner edge. I believe in reality most of the corner edges around us are chamfered, not sharp like a knife. I also made some details like screw heads on the railing.


TEXTURING
Most of the textures that needed dirt, like the concrete wall, the window frame, railing, back-wall panel, pool andconcrete, used the VrayBlendMaterial. I used VRayDirt for the 1st and 2nd blend amount. But you have to swap occluded color and unoccluded color in it. One of the V-Ray dirt is normal, and the other one is invert normal, to put the dirt on both directions of corner (inside and outside). The last blend amount is for the leaking part at the bottom of the wall, I used a leaking texture from www.cgtextures.com. Many of textures in this scene came from there. Here are my material setting for concrete wall:

I needed to put different map channels for the dirt, so here are my UV mapping for the wall:

I used the same method for the railings, pool concrete, window frame and back panels textures.
Here is the ground material where I applied the VrayDisplacement modifier:

LIGHTING AND GI
In this scene I only used VRay Sun for the lighting. To get this kind of dusk mood, I put the sun at a very low angle and I increased the size multiplier to get blurred shadows.
Next, we have to define the environment background and GI. I used two slots for the material, one of them for the background, and one for lighting (GI). Both were made the same, but just in case I needed to make some changes, I made them in separate slots. For the environment background and GI, I used a mix of material between VraySky and Bitmap. The bitmap is a 360° sky bitmap that I downloaded from www.cgtextures.com, I choose the dusk one. I did many tests for this to define the mix amount (which one is better, close to the VraySky or close to the bitmap sky). In the bitmap, I also brought the RGB levels up to get the right level. Here is the mix:


GRASS, PLANTS AND SCATTERING
I used models from iTree and Evermotion for the trees in this scene and of course I proxied them. For the grass I used models from iGrass, and then I scattered them using multiscatter and multipainter. I also painted some gravel on the ground. Here you can see the scatters I used:

Main grass:

Field big-grass:

Galium plants:

Gravel (I used the asteroid generator script to create many different shapes of stones):

RENDERING
I rendered this scene with V-Ray, my favorite render engine. Here are the render settings:

THE POST-PRODUCTION
In this post-production step, I used Photoshop and MagicBullet PhotoLooks. Actually this is not a heavy post production. I only did color corrections, added contrast, glow and fixed the saturation on grass. Here are the layer/steps:
Original render

Darker water and stones

Color correction and add contrast

Color correction and sharpening

More sharpening on the gravel and stones area

Reduce grass saturation

More contrast and sharpening on the left/foreground tree

Adding sky glow

Adding a little bit fog using Z-depth

Add darker part at the bottom of the stones:
As you can see, the post production for this scene is not complicated, it is only about adding contrast, color correction, and adding fog and glow. But the most important thing is to think creatively when we compose the image.
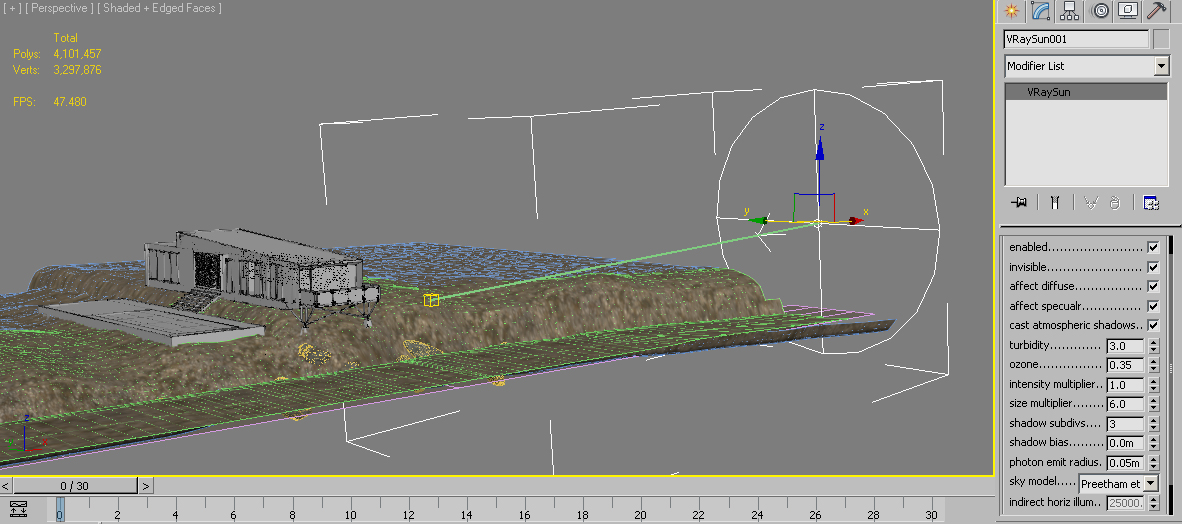
Here are the wireframes for every single view that I posted before:


Well, I hope you enjoyed this article, and may it help you in some way. Please feel free to ask if there are any questions.
You must be logged in to post a comment. Login here.

Rio Febrian
Report Abuse
You are welcome, sukses juga buat mas Dody :)

dody ardiansyah
Report Abuse
Makasih banyak buat sharingnya.... sangat berguna nih om. sukses selalu
Rio Febrian
Report Abuse
Hi thanks Anh Hai. iTree and iGrass is 3D models of tree and grass, they are products from R&D Group.
A
Anh Hai
Report Abuse
Awesome scene and modeling... but iTree and igrass ??? what are they???
Rio Febrian
Report Abuse
DP Studio 3D: Thanks, best regards :)
Jose Luis Romero: You're welcome, Jose :)
Reinaldo Handaya: ampuun guruu ^_^
Rio Febrian
Report Abuse
Mbamkaikato: I used VrayPhysicalCamera, and actually I used default parameter of it. Just changed the focal length to 28mm (to get the wider angle), changed the f-number to 5.0 and adjust vertical shift by clicking "guess vertical". The other else is default. And if the exposure still not correct when I test render, I just changed the f-number or shutter speed to get the right exposure.

ReinaldoVanguard
Report Abuse
cadas, ini guru ane nih

pep romero
Report Abuse
Nice images and very detailed tutorial, thanks and keep the good job!!

dp studio 3d
Report Abuse
simply amazing, great job
best regards
M
Michelle K
Report Abuse
what kind of camera are you using? can you upload a screenshot of it's settings?
Rio Febrian
Report Abuse
Vu Pham: Thank you
Gu Wen: Which documents do you mean?
g
gu wen
Report Abuse
You can share your documents?
Rio Febrian
Report Abuse
Patricio Viale: Thank you bro.
Dorklord: Thank you, I just used VrayLight sphere for the interior :)
D
Dorklord .
Report Abuse
i like the lights that illuminate the interior of the house. can you talk about your lighting process for the interior? nice effect!

Patricio Viale
Report Abuse
Very good work !
Rio Febrian
Report Abuse
Thanks bro Dhani :)
D
Dhani Ramadhan
Report Abuse
keren bro...
congrats !
Rio Febrian
Report Abuse
Thank you Julien. I've sent you an email :)
J
Julien Lomessy
Report Abuse
Hi Rio Febrian,
Great work!
We're a French Parisian company specialised in architectural renderings. www.morph.fr
We would like to get in touch with you in order to discuss a possible collaboration.
Please revert to me on the office e-mail (contact@morph.fr)and I'll get back to you shortly.
Best regards,
Julien
Rio Febrian
Report Abuse
thanks you, I hope will be better next time :)
About this article
Indonesia's Rio Febrian provides an exclusive detailed breakdown of his Siek Box House scene.
visibility80.2 k
favorite_border99
mode_comment98


