

Interviews
Interview with Jan-Ruben Fischer

Interview with Jan-Ruben Fischer winner of the 2003 CGarchitect.com/ART VPS Scholarship
Jan Ruben Fischer is the 2003 winner of the CGarchitect.com/ART VPS Scholarship.
CGA: Please introduce yourself to our readers
JRF: My name is Jan-Ruben Fischer and I am a student at the University of Karlsruhe. I am 27 years old and I am passionate about everything dealing with 3D.
CGA:. Can you tell us about the program you are currently enrolled in at University?
JRF: I am enrolled in a major for architecture at the University of Karlsruhe. I like to experiment with digital media in order to find shapes and concepts for my projects. I am also interested in finding out how these techniques influence the way of generating architecture and how much control is left to oneself.
CGA: Why did you choose Architecture as your field of study?
JRF: I always wanted to do something creative. I am also fascinated by all sort of technical things. So I hoped to gather my interests in the field of architecture where you can work with design and combine issues of technical feasibility.
CGA: As many already know, you are the recipient of this year’s CGarchitect.com/ART VPS scholarship. Could you tell us about your entry and how you became involved with this project?
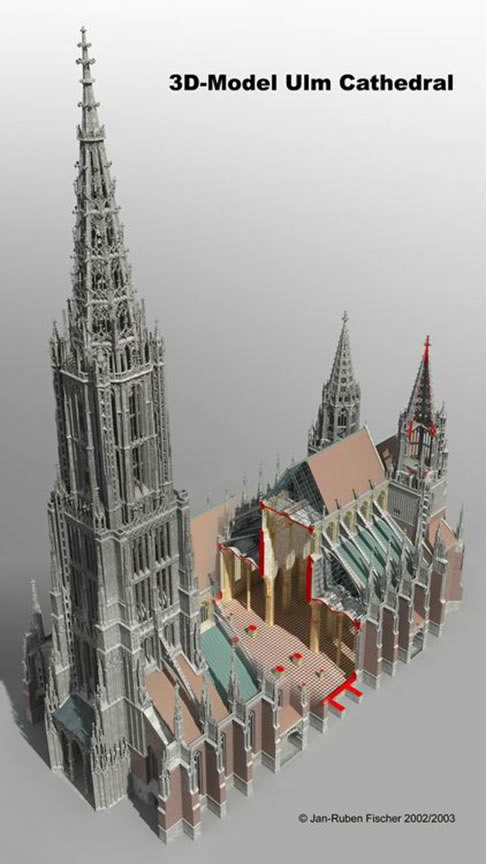
JRF: In fall 2000 the responsible architect of the Ulm cathedral Mrs. Rommel, PHD asked me to create a drawing of the cathedral. The Ulm Cathedral is located in Germany and is famous for being the tallest church in the world (161m/530ft).
The aim was to create an image for a poster which should explain the specific characteristics of the gothic architecture represented by this particular building.
I accepted and worked out a concept. Looking at an example-drawing I discovered a few drawbacks. Since it was a hand drawing the artist probably decided to choose an orthographic view because it was easier to construct and sketch. Additionally with the partially wrongly set cross-sections it confuses the viewer. A lot of details had to be simplified or even left out because of the tedious task drawing by hand. Although it is colorized it is still hard to get a feeling for the parts of the building and its cubature.
So I came to the conclusion that for this task the creation of a 3D-Model would be the better option. It provides endless possibilities on perspectives and camera angles to create it as viewer friendly as possible. Additionally you can control the level of realism just as you need it and the cross-sections are physically correct therefore better understandable. Of course the 3D-model is not restricted to that one photo shot. It can be reused for all kinds of media and animations.
CGA: Can you walk us through the project and the steps you took to achieve the final model and renderings?
JRF: Due to the fact that I was in contact with photogrametry in my father's business from a child I had the intention to combine the scientific accuracy of photogrametry with the tools of 3D Visualization. So I used 2D photogrametrical plans and 3D photogramatrical CAD data of the building parts as reference-material where a surveying has taken place. Where there has no photogrametry been applied yet historical etchings and section plans where used as reference. Additionally an uncountable number of digital photos proved to be very useful for construing 3D-geometry. This assured a high level of precision and realism.
The creation-technique used in most cases was polygonal modeling. The most valuable tool turned out to be the lofting command which could be utilized in most cases where complex organic geometry had to be created while maintaining control on resolution and polygon count.
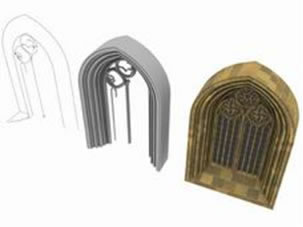
Modeling a gothic window with the loft command: First you have profiles which get extruded along splines. Finally the result can be textured with procedural bricks
Because of the fractal depth of the building parts, a level of detail had to be set. So I defined a small gothic crocket as the smallest part to be modeled in the shape of a smoothed cuboid. This helped to prevent getting lost in too detailed modeling during creation process. After all the polygon count of the entire 3D-model exceeded the 5 million which made it impossible to have the entire model opened at once so the project was modeled in 12 single parts and later rendered in several single image files. Most of the entire 3D-geometry is substantially modeled and not texture mapped which keeps a high level of flexibility and reality. All stone-materials are procedural to prevent repeating patterns on the textures.
Camera setup was tricky because you could not try any position with the model itself due to memory issues. So the solution was to model a 'dummy' cathedral with the same dimensions and proportions but with a very rough geometry. I wanted to find a perspective which allows a good overview of the complete building structure but at the same time providing an exciting camera angle. To meet these oppositional demands required a compromise.
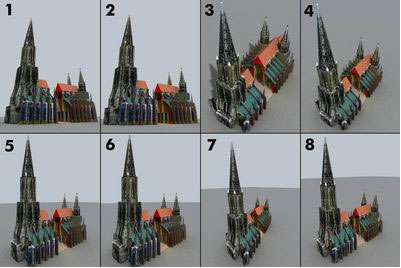
Test renders with the dummy cathedral trying different camera positions:
1 and 2 are from a viewer on the ground, familiar perspective, bad overview
3 and 4 bird's eye view, the sidewalls appear too short
5 and 6, all vertical lines are parallel, less dynamic but good overview
7 perspective too strong, unnatural angles
8 good overview, natural perspective
The target of rendering and lighting was to create realistic lighting conditions where you should get an appropriate feeling for the complex forms without hiding too much geometry in shadow regions. As a direct light source I used a sunlight system for a physically correct positioning of the sun. I used soft raytraced shadows to be as realistic as possible. For the ambient lighting I tried different HDRI-images and combined the one with the best contrast and effect with the direct light.
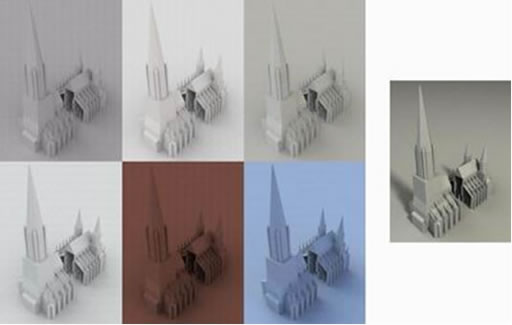
Test renders with the dummy cathedral and different HDRI-images
I finished this project by importing the single renders into Photoshop and assembled the different pieces into one image-file. The final poster is not finished yet, however the 3D-model is and has a total size of 3375 X 6000 Pixels. For the realization of this project 3DSMAX was used extensively in combination with the alpha and beta version of BRAZIL r/s. The final result and the entry for the CGarchitect.com/ART VPS scholarship you can see below:
To show you some of the workflow I have a sequence of screenshots included:
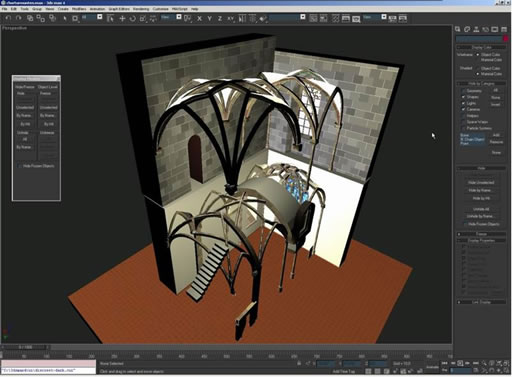
This is a screenshot of the working environment and shows parts of the textured 3D model
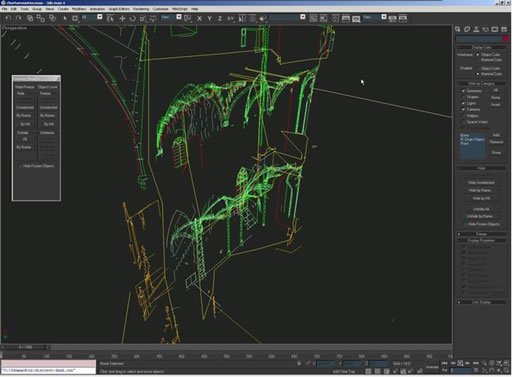
This is the same view as before with the photogrametrical 3D-data visible
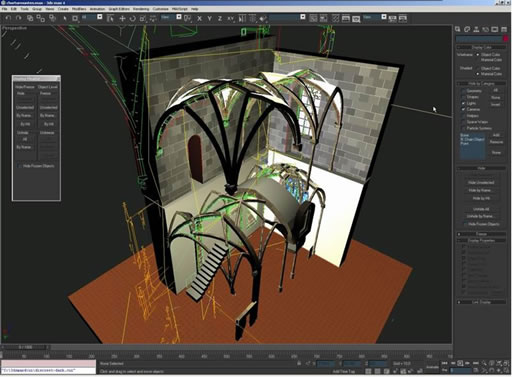
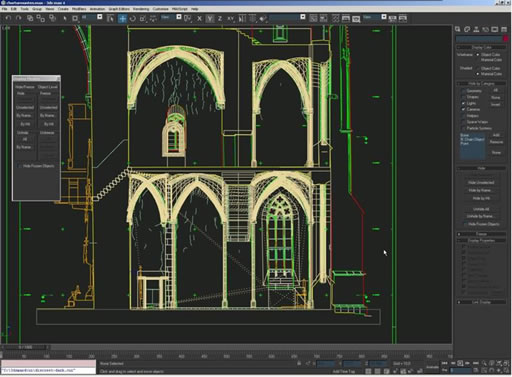
Here are the 3D model and the original CAD-data combined
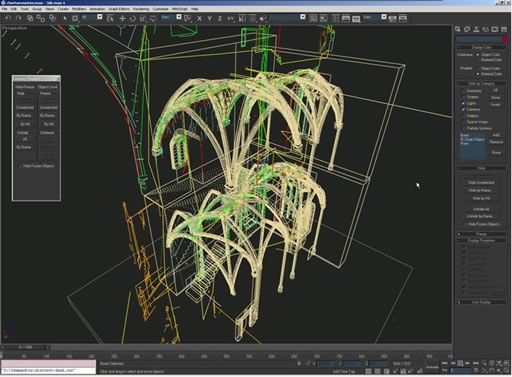
Here are the 3D models wireframe and the original CAD-data combined

In this one you can see the entire CAD-plan in the 3ds max working space
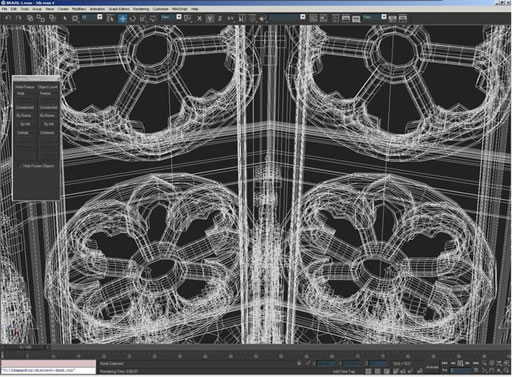
A closer view unveils more details
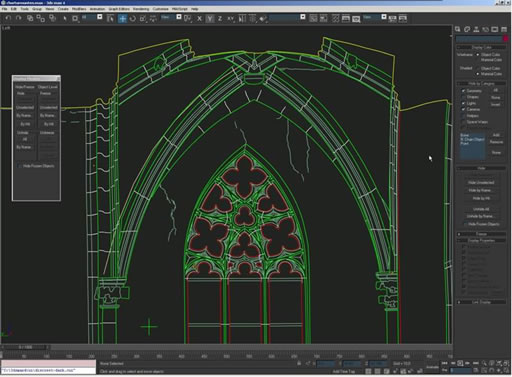
And even closer…

…and combined with the wireframe model
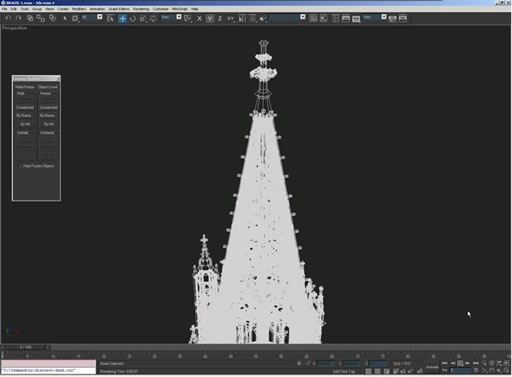
This is a wireframe view from the spire…
…and a close-up view with good visible cour onnements,
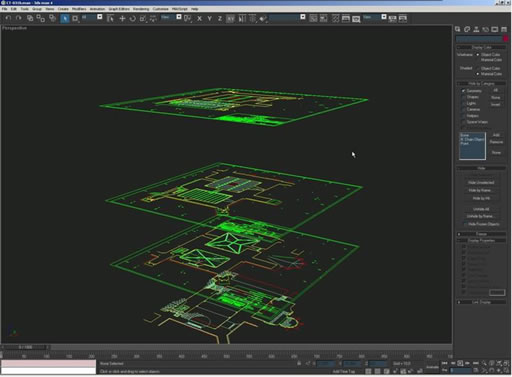
the different level floor plans in their real height positions
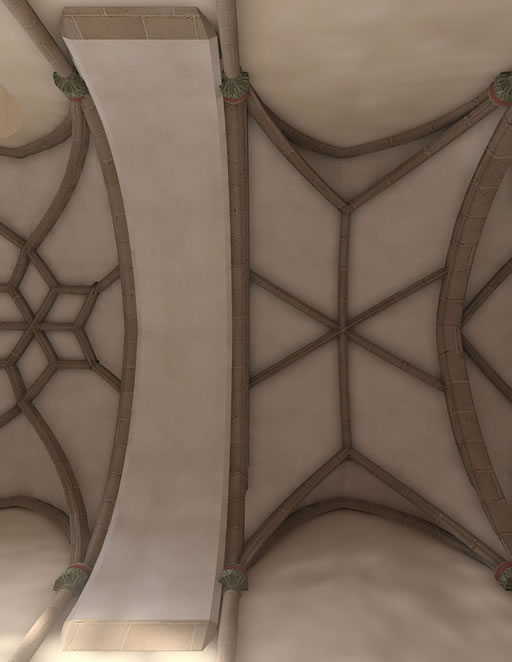
A final rendering of the first levels vault
CGA: Having used photogrametry to model the Ulm cathedral, can you explain the process of capturing data and how the technology works?
JRF: Photogrametry uses on the one hand stereo photographs as data source and on the other hand surveying points anchoring the photos in a coordinate system. In order to maintain as little distortion as possible special cameras with planar film instead of roll film are used to expose. The point of view must have little perspective distortion as well so on tall buildings a tail-lift must be used. There are always 2 pictures per viewpoint taken in order to achieve a stereoscopic effect. Later the operator defines in virtual 3D-space points on the surface of the building. With a cursor which is movable in 3D-space he can sample the surface generated by the stereo photographs. The result is 3-D CAD-data which allows sections and different views of the building as desired with an unbeaten precision.
I imported this data and used it as reference in order to generate surfaces because the CAD-data is completely spline based.
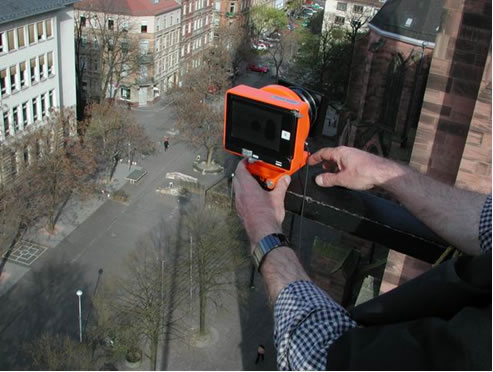
The camera on the left “eye” point of view
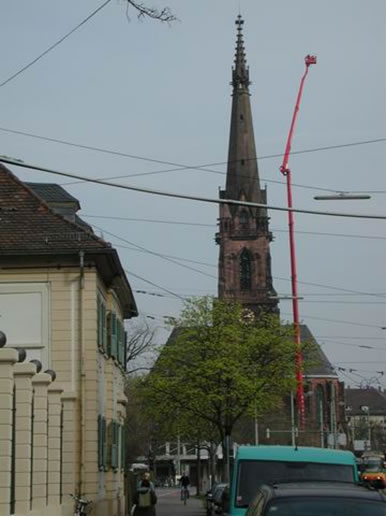
The tail-lift in withdrawn position
CGA: Do you see photogrametry as a dying or growing technology?
JRF: As with other professions there are major changes undergoing in photogrametry due to the fast technology evolution. The basic principle of extracting 3D-Data from photographs will still persist. I believe in future digital cameras will replace the analog cameras and more and more advanced software will enhance the workflow and possibilities you have with photogrametry.
CGA: Can you explain some of the images that you created for this project and tell our readers about their significance?
JRF: The primary image to be created was of course the total view of the cathedral. The other images are just intended to show the complexity of the model and the many facets the project has to offer.
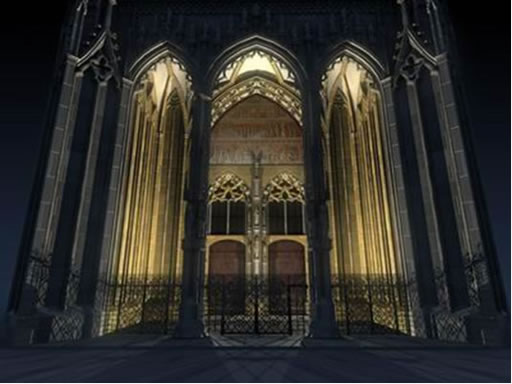
This is a rendering of the main portal of the cathedral which is itself 18m (60 ft) high. I wanted to create a slightly dramatic illuminated night view.
This is the major “Martins” window in context to the whole. It is the window used in the lofting-example. This picture is HDRI lighted only.
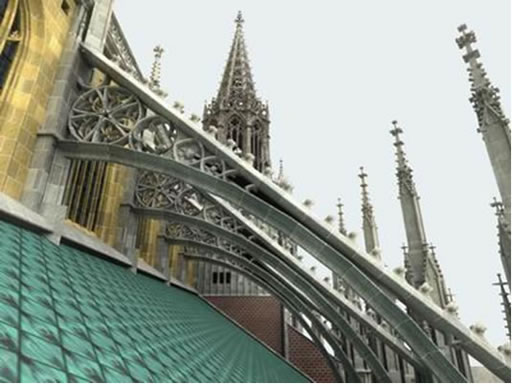
A perspective view through the flying buttresses with the southern choir tower in the background. This picture is HDRI lighted also.
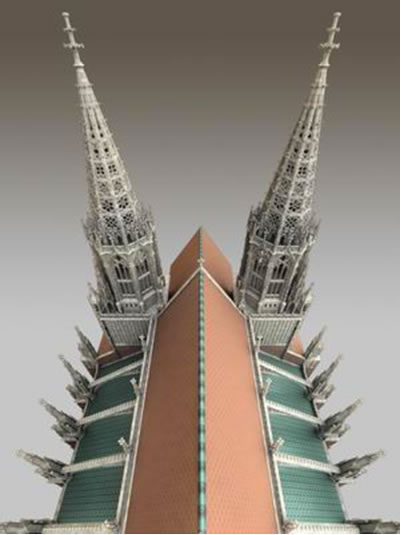
An unusual view on the roof with the two choir towers. It is experimental but I like the symmetry in the picture. Again: Entirely HDRI lighted
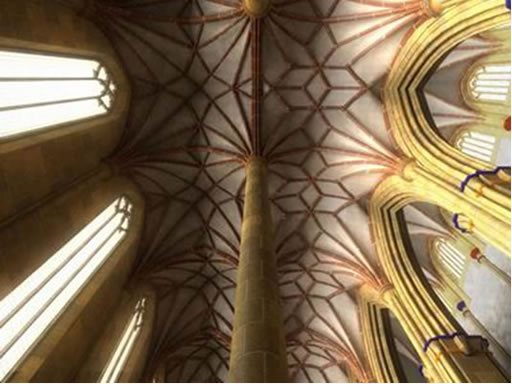
This is a rendering of the vault in the south aisle. The arches are loft-modeled and the cells are nurbs patches.
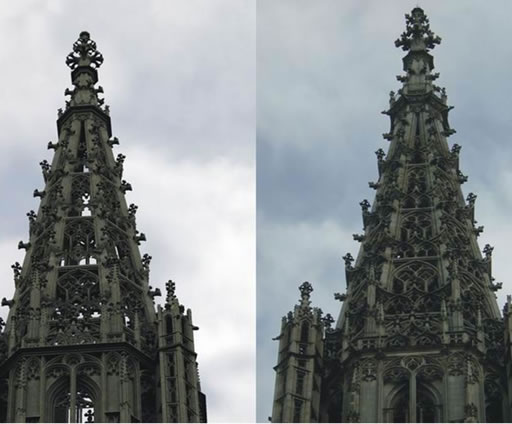
This one was rendered with the first alpha version of brazil R/S it took 70 hours back then and is illuminated with skylight only (It is much faster now!). The one on the right is the reference photograph.
CGA: What was the most challenging part of this project?
JRF: The most challenging part of the project emerged by keeping the polygon count down as low as possible without losing the richness of detail which is one typical attribute of gothic architecture. So I had to make compromises and had to overcome a lot of obstacles.
CGA: How long did this project take?
JRF: Since I was working alone and it was my first serious contact to 3D the creation process of the 3D-model took me about six months.
CGA: What was the most important piece of information you learned from doing this project?
JRF: Make a lot of Backups! Save your work every half an hour! After having lost a whole week of work due to lazy backup attitude I learned my lesson in making backups.
CGA: When you graduate what are your plans for the future? Will you follow in your father’s footsteps and pursue a career in photogrametry?
JRF: I will not be able to take over my fathers business as I am not majoring in Geomatics (I think that is what it is called at present). I think after graduation I will be seeking employment in the field of architectural 3D-Visualization. Up to then I want develop my skills further more in the field of 3D and architecture.
CGA: What are your favorite links to visit on the web?
JRF: Mostly I use www.google.com to start of with. Since I am interested in movies I visit http://www.imdb.com/ very often for it has every imaginable movie and actor in the database. I visit www.archinform.de (.net) in order to find information about architects and buildings from where I can investigate further.
You must be logged in to post a comment. Login here.
About this article
Jan Ruben Fischer is the 2003 winner of the CGarchitect.com/ART VPS Scholarship.
visibility5.81 k
favorite_border0
mode_comment0


