

Reviews
Boujou Bullet Review

Boujou Bullet
by Jeff Mottle - CGarchitect.com
A few weeks ago I was invited to present a small segment at the Drawing from Providence conference in Providence, Rhode Island, hosted by the ASAI (www.asai.org). The purpose of the panel I sat on was to present emerging technologies for small design offices. A variety of technologies were presented, but my presentation surrounded the use of camera tracking technology to make more dynamic and compelling architectural animations.
There are almost a dozen camera tracking softwares on the market today ranging in price from about $500 upwards of $10,000 US, but the software that caught my eye at this year’s SIGGRAPH was 2d3’s Boujou Bullet. As a result, it was my software of choice to illustrate how easy this technology has become to use in any size visualization firm, and is the topic of this review.
For those that may not be familiar with Camera Tracking and how it works, you might be wondering why this is useful. Most of us at some point have composited a CG building onto an actual photograph. Sometimes it was trial and error adjusting the CG camera in your 3d application until the perspectives matched, but usually you started with a bit of information like the focal length of the real camera, the actual location of the camera in relation to known elements in the photograph, and in some cases even survey data. This works well for still images, but what happens when you need to composite a CG building into animated footage? Enter Camera Match technology.
Whether you have filmed footage from a film camera, or a DV camera, how does one composite CG into filmed background footage if you don’t know the actual camera path, the focal length of the lens, and even more importantly the details of subtle nuances like zooms, pans and camera shake? Boujou Bullet can do this for you by analyzing the footage and generating a camera and camera path for you, taking all of the guess work and tedious matching out of the equation.
Anyone that has seen a Hollywood special FX movie has seen Camera matching at work. However there are people that have made very successful careers out of camera tracking footage and getting solid results. As most visualization artists have many hats to wear you likely don’t have time to become a proficient matchmove artist and learn all of the subtle nuances of this technology. Boujou Bullet has taken the same core technology used in many of the best camera tracking softwares and created wizards to help guide you along the way and make the process of getting solid results a quick and easy one.
Those of you that are already familiar with 2d3’s product offerings may already be familiar with their earlier Boujou2 software. Boujou Bullet borrows all of the same technology and functionality that was available in this release and adds to it the troubleshooting and guide wizards to make the process easier to implement into a production workflow. It is also worth noting that the full manual functionality is still there as well, so if you want to dig into the nuts and bolts, to make refinements to your tracking solution you can.
A completely new interface adorns Boujou Bullet with simple workflow oriented menu buttons and straight forward toolbars.

Boujou Bullet Interface
Upon opening Boujou Bullet you are prompted to either load an exiting project or create a new one. You then choose the footage you want to track and enter in which frames you want to work with. Options range from compressed video files like AVI or sequential animation frames. You then choose the type of camera used from the list it guesses for you, indicate the type of camera movement (freemove or a nodal pan), and then indicate if there are any moving objects in the shot you want to track, and finally if the footage is interlaced and if so how. All of these questions are prompted one by one in simple dialog boxes.
The last step then prompts you to choose whether you want the software to track the footage or to prompt you for the more advanced wizards to enhance the probability of a successful track.

If you choose to move forward with the more advanced wizards, you will be prompted to answer how much parallax there is in the shot, if there is any motion blur, any focus changes, if it is a bluescreen shot with tracking markers, if there are trackable features, if there is a changing focal length, how much 3D depth there is, if there is any lens distortion present, and finally if the camera is stationary. Again each one of these questions appears in its own dialog box with an explanation of what it’s asking and a small graphic to illustrate it. Depending upon what you answer along the way you may be prompted for further input. With a very basic level of knowledge you will be able to get a successful track.

Example Dialog box from Wizard
Once the wizard has enough information from you it starts the feature tracking process. This process involves picking pixels to track from the first frame and tracking those pixels into subsequent frames to analyze the movement of the camera. The tracking progress dialog gives you a progress bar as well as the predicted time it will be complete. This can vary from shot to shot but in my tests took anywhere from 5 min to 1 hour.
Feature Tracking in progress. Red point indicates point being tracked. Yellow path indicates the path that pixel has taken across the previous frames.
Once Boujou Bullet completes feature tracking the footage it starts to solve the camera and camera path based upon the tracked features. At this point the wizard continues and asks if you are happy with the results or if you want to look at the results in more detail. If you were familiar with the application and the manual refinement capabilities, you could exit here and start doing more tests to see that the results were what you wanted, but for the purposes of this review we will carry on with the wizard.
The next dialog in the wizard asks if the camera path is smoothe, noisy or broken, it then asks how the structure of the tracked points look, how the prediction points look, if you want to add a test object, if there are errors in the prediction points, if you want to add scene geometry and finally prompts you to export a camera to your 3D application.
Some of the above questions might seem a bit foreign, but if you complete the included tutorials before you start your first track, most of them will be relatively easy to answer. If you are ever unclear about a question the help dialog at the right side of the screen updates automatically with a full description of the current feature it is asking about, as well as the directions to manually access this feature down the line should you need to manually refine this part of the process later. At any time you can also access the troubleshooting wizard to help guide you to correct any problems you see visually with the tracking it performed.
As you can see almost nothing is left to chance using the new wizards in Boujou Bullet and it is really easy to get a successful track in less than hour. While there are many features within the application that the wizards cover, I wanted to touch on two steps that you will use most often. They are inserting a test object and defining an axis. To give a very brief overview of where they fit in, I have listed below the steps that take place.
Import footage Feature and Camera Track Footage Set up an Axis Insert a test object Export your camera
Obviously this is very simplistic view of the software and there are many tasks that can take place at each step, but for all intents this is really how easy it can be.
Once you have tracked you footage you need to define an axis. Before you can export a camera to your 3D software an axis needs to be defined so that the imported camera is properly aligned to your existing scene. The process of setting up an axis is really quite simple. By scrubbing the video footage that is overlaid with the prediction points, you simply choose a group of points that all lie on the same axis. In the example images I have been showing in this review, I chose a group of points that were all in the farmer’s field. With the points selected you just indicate they exist on the XY plane and your axis is set. In other scenes these might be the street, the sides of other buildings etc.
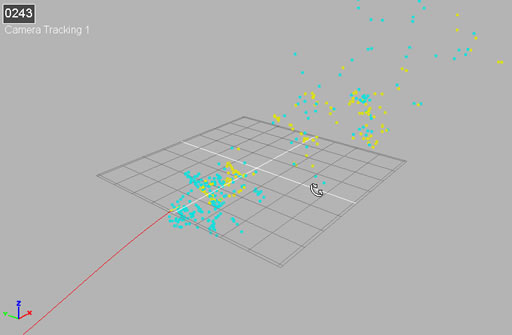
3D Mode of a feature and camera tracked shot. Red line is the camera path, cyan and yellow points are tracked points.

Selecting predictor points to set up an axis
Once you have established an axis, you will want to check that the track is ok before you export your camera. You can do this by inserting any one of the available 3D primitive objects in the scene. Once a 3D primitive is placed, and aligned to your scene, you can scrub the video footage to see how well the 3D geometry “sticks” to the video footage as it plays.
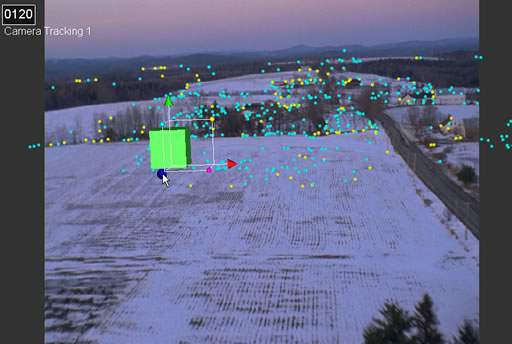
Inserting a primative to test the tracking

The most common side affect of a track that is not accurate is geometry sliding around. For example, if I were to place a cube on the ground plane and as I played the footage it did not appear to stay in one place, you would need to use the troubleshooting wizard to resolve the problem before you export your camera.
If after inserting the primitive and playing back your footage everything looks ok, you can proceed to the final step of exporting your camera.

The export function supports a variety of different 3D applications, but the most common used in our industry that is supported are 3dsmax, Combustion, Lightwave, Maya, and XSI. For the purposes of this review I will focus on the 3dsmax export.
The export utility exportes a maxscript file that when run in 3dsmax will automatically create an animated camera that matches the tracked footage as well as all the prediction points that were created in Boujou Bullet.

Camera and Prediction points imported into 3dsmax
Once the camera is imported you can load the animated footage into your viewport so that as you scrub the animation the viewport updates with the filmed footage.

Prediction points and viewport with animated sequence
So you have the camera and the film footage in 3dsmax, now what? Well depending upon your scene you may be able to simply drop in your building and composite the 3D and video together, but you more than likely will want to add your geometry to a specific part of the video footage or even extend a façade on a building etc. The trick here is to have made sure that you created some custom trackpoints back in Boujou. If for example you needed to align your 3D geometry to the corner of an exiting building or some survey pegs in the ground, you would create additional track points in Boujou on these points and then line your geometry up to those points in 3dsmax. As a mentioned earlier the export script also imports all of your tracked prediction points.
With your geometry created and inserted into the proper locations, you can then composite your shot the same way would a regular still shot. Typically for animations you would use an application like Premiere or Combustion to do this.
Conclusion
So how well did it work for me? In the several shots I tracked, I was able to get solid results every time. Some scenes required more attention than others, but in each case I was able to get a result using the wizards to help correct the problem.
There were a few areas that were not altogether clear, even with the documentation and having done the tutorials, but I managed to get what I was looking for by trying different variations. The documentation for the most part is pretty good, but is not the best I have seen and lacks any sort of images to help explain the concepts. I think a bit of work still needs to be done here. Especially considering that a support contract will run you $2000/year or $200/mo!
The interface itself also lends itself to a very high resolution monitor. I had mine set at 1600x1200. Because of the fixed size buttons (rather large ones), smaller screen resolutions tend to limit your workspace size. You can close all these toolbars and access everything from the file menu at the top, so it’s not a huge deal, but I think the buttons could stand to be a bit smaller.
The one thing that I did notice that seemed really odd to me was trying to open multiple files within Boujou. Typically when you open a new file in other applications they open quite quickly because the actual application itself is already loaded. Boujou on the other hand seems to need to load the application and the file each time a new scene is opened. Definitely something that should be addressed to speed up workflow.
Finally I wanted to comment on a scenario that some of your might have already been thinking about. What happens if your 3D geometry needs to be occluded by something in the video? For example, an aerial flyby of a city center where your building is always partially occluded by surrounding buildings. This is another step that needs to take place in your compositing and 3D package. In an application like Combustion or Premiere you will need to build mattes or you could use the tracked points in Boujou for those building that occlude your geometry and build actual 3D versions. You could likely use some sort of camera mapping to pull this off. The process of getting the camera path will likely be the easiest part of the process, creating mattes and doing some more advanced compositing is where you will need a bit of expertise.
Overall Boujou Bullet is a fantastic application that makes camera tracking very accessible to the masses, without the need to manually configure every setting. Having used other camera trackers in the past, I can definitely vouch for ease of use. For anyone thinking about trying to make their next animation more dynamic, I would highly recommend Boujou Bullet for price, functionality and ease of use. At $2500 US for this type of application you can’t go wrong.
For more information about 2d3’s Boujou Bullet you can visit their website at www.2d3.com
To view a sample of an actual project camera tracked and composited with Boujou technology, go to the Smoothe website. www.smoothe.com
Film and Motion -> Jumeirah Beach Residence and the Beach at Carylon Bay
If you would like to post comments or questions about this review, please visit our forum
You must be logged in to post a comment. Login here.
About this article
There are almost a dozen camera tracking softwares on the market today ranging in price from about $500 upwards of $10,000 US, but the software that caught my eye at this year’s SIGGRAPH was 2d3’s Boujou Bullet.
visibility2.07 k
favorite_border0
mode_comment0


