Studio Lighting Setup
You must be logged in to post a comment. Login here.
A
Ano Nymous
Report Abuse
Thanks for the refs. Like I said I got the reflection. It doesn't blend out that nice but I'm satisfied with it for now. If you look closely to the examples, you will see it only uses one vraylight, instead of the 3 lights in your example. Not that it's bad but it is not my purpose, a HDRI-setup also isn't. Although I think it's not right for a studio, I use a skylight to lighten up the left part (any better ideas to create a simillar effect?).
I still think the chairs look dull. The left chairs got a lack of contrast, which I also can't get better. Any tips to better up the quality like the little example in my previous attachment? (It's been quiet out here the last days)
(@the owner of the examples: Just to be clear: I don't copy your work, it's just for comparing reasons that I temporarily place the chairs in the same position etc..)
[ATTACH=CONFIG]41133[/ATTACH]

Love Chaurasia
Report Abuse
i have attached 2 images as refs to add reflection on the floor with the help of gradient ramp and also u can use this type of studio setup, u can also add hdri file as reflection map in vray render setup :: Vray enviroments to enhance the reflection on the product..
I
Ismael 1-1
Report Abuse
I got encouraged to try and match your sample image. Not that easy but I like it...
A
Ano Nymous
Report Abuse
Thanks for your help, those are usefull tips but:
1. The edge does got a little chamfer, but maybe I should make it bigger. It's hardly to see but in the little example they'll also use a guite hard corner so that's why I set it just like that.
2. Maybe the attachment wasn't all clear, but the material at it is only used on the floor/background. I allready use a separate material for the chair (with 1.0 glossiness).
3. The environment background is allready black.
4. The lights are allready in my scene? The white part on the right is the bright light coming from a vraylight + it's blurred reflection.
I build out further that testscene and now I do see the reflection of the chair but I (still) can't get the brightess of the light to smooth out that nice like in the example.
I also checked some video's for studio lighting setups but it's hard to find the right setup (the videos are mainly about 3 point lighting, portrait setups, funky car-vids etc).

Alexander Al-Hamdan
Report Abuse
Ok, looking at that image, your settings, and the goal you are after, here's some advice:
1)fillet that edge where your wall and floor meet. If you look at a photographers studio lighting setup, they always do that to create the illusion of an infinite plane.
2) your reflection glossiness should be at 1 or .9 so you get crisp reflections on your chairs, but your floor / wall materials should not be the same material. Set up a separate material for the floor / wall and give it a reflection glossiness of .6 or so.
3) make your environment background black
4) position your lights in your scene so that they actually show up in your reflections.
In general, I think it would be of great help for you to do research on how photographers set up their studios, then emulate those processes in your 3d model. I hope this helps!

Thomas Arici
Report Abuse
0.5 refl glossiness is really slow; try with 0.75/80.
A
Ano Nymous
Report Abuse
Thanks for the link. I configured the gamma settings allready the same as the bottom part (burning the gamma in) of that tutorial. Also the gamma mistake I made is explained there.
By setting up the correct gamma setup it looks like my materialproblem I talked about earlier is gone. But I still struggle with the other two (lighting + reflection). Just to be clear, I did some explanation trough the attachment.
So if you check it, all I'm trying to get is a setup like the example in the bottom right part of that image. If I get that, I guess the earlier close-ups of one chair are fixed too. But with some reflection the scene gets darker and I still can't see any reflection. It is visible when I turn up the reflection but then the scene gets too much like a mirror and of course also darker. I also can't find any tutorials to make a studio lighting WITH the nice reflection. Is it that hard to achieve??
[ATTACH=CONFIG]40998[/ATTACH]
Alexander Al-Hamdan
Report Abuse
hmm... usually your first render after setting up LWF will look brighter and desaturated. This article was one of the more clear LWF tutorials I've seen. Go through that and see how things start looking afterwards.
http://www.davidfleet.com/tutorials/linear-workflow
A
Ano Nymous
Report Abuse
I'm not very familiar with that linear workflow thing. But I checked it again by reading a tutorial and I saw a mistake I guess.
I got the gamma in vray's color mapping set to 2.2 while rendering with max's own frame buffer (other settings in 3dsmax's preferences were correct). But that setting should be 1.0. Or I had to render with vray's frame buffer and the gamma in the color mapping set at 2.2, am I right? I thrust the tutorial to be correct, but now my image got darker and I can start all over again.
Alexander Al-Hamdan
Report Abuse
One question that I don't think has been addressed: are you using linear workflow? I find that in situations like this, making sure you're using LWF properly from the start is extremely helpful; it prevents you from overcompensating your lighting to the point where too many variables are affecting your quality.
A
Ano Nymous
Report Abuse
Thanks for another link again. But it would be nice if I can finish this studio first. I thought I could make it in one or two days but I'm working on it all week now. Here is my latest render (check the attachment).
I still can't make the background lighter wouthout lighting the chair too much. Does someone got any idea which color mapping is used in the example?
I also want that reflection on the floor but I can't get that done. I tried another white/or transparent-reflective plane slightly above the top of the floor but that affects the whole lighting, thus the black environment reflects too. There must be another way to get a better result? (I got the plane invisible in the attachment-render)
Point three is the chair-material. I can't get the gradient reflections the same as the example. I thought a fresnell-falloffmap in the reflectionslot would do the trick but I can't get it to look better than this. The difference is easy to see in the bottom part of the chairs, where the example got more contrast in it's gradients.
Can anyone point out some technical tips to improve the above three points? (links are nice to experiment with sometime but it doesn't help me to get the scene I want to achieve right now)
[ATTACH=CONFIG]40950[/ATTACH]

erick gustafson
Report Abuse
I'd also suggest you check out e-interiors. They have some nice models of unique furniture to mess around with. You can find the site here: http://www.e-interiors.net/
Can you post where you got the address where you got the free studio HDRs that Nic was talking about?
E
A
Ano Nymous
Report Abuse
Okay, I'm not so familiair with turbosquid but I'll go check it out better shortly. About the lights: I get your point. I stick at just two lights but I positioned them in many ways to get the effect of the example, too bad still without the result I prefer.
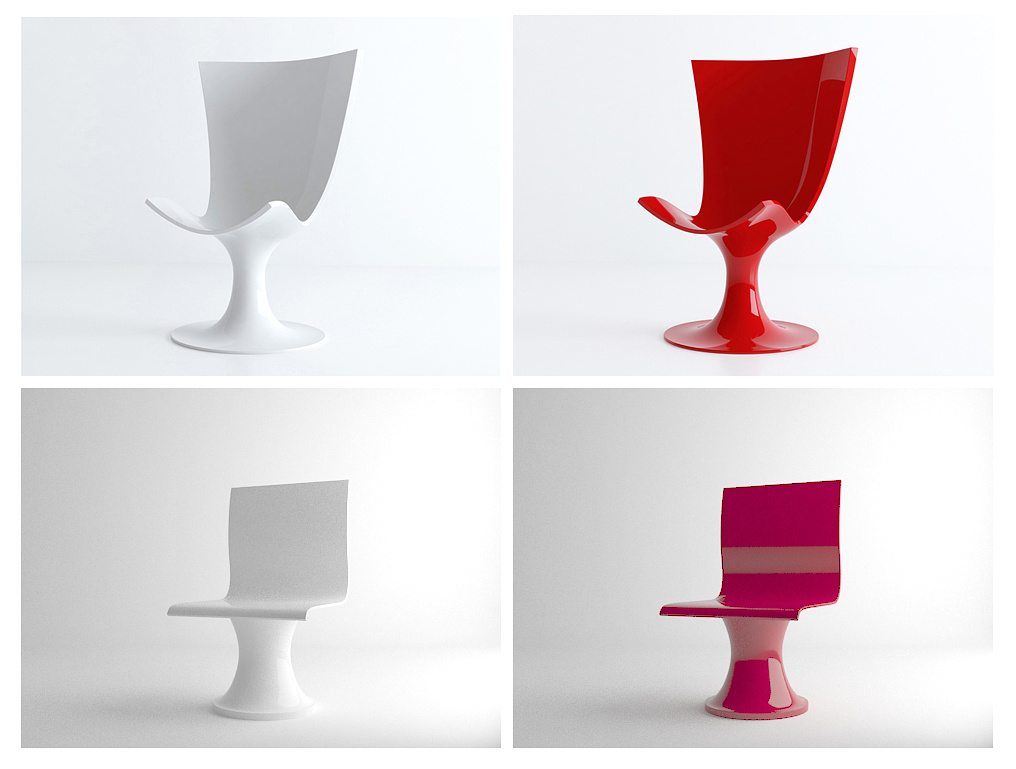
@nicnic: The example-chair is not mine (else I didn't got this problem). The chairs in the bottom are mine and yes I have to agree they are ugly but I can improve those later. My point is just to get a good studio lighting setup like the setup used for the example chair (upper image) which I do like. Imo it looks quite easy to rebuild so it bothers me I can't make it on my own.
I also found the HDR-examples you talked about (thanks). I will go experiment with that sometime but first I really like to get this studio done.
Nic H
Report Abuse
looks too bright to me but the thing that sticks out most is how ugly the chairs are.
did you make them up?
try studio lighting setups on a more complex detailed model with at least some material on it imo.
there was a free set of 'studio HDR' images given away on cg society a while back - they are basically spherical floating point renders of various softbox setups that would be worth looking at.
R
Robert Costello
Report Abuse
turbosquid has lots of free content that is very good and lots of pay content that is also very good-
whether you get a project file (with lights, etc) or model file depends on the author of the content--
25 lights is a lot--my point was that there are many ways to achieve a certain effect--
i usually wait until I make a "mistake that works"
A
Ano Nymous
Report Abuse
Thanks all for the comments. I tried to improve the lighting so check the attachment. I got the colors of the background allmost the same, so I think it gets better but I still think the example somehow looks more professional. Also the white example gets over-exposured with this settings but I first try to get the scene correct for the red one.
@ 1d2d..: Does turbosquid also got free examples? Also the idea of 25 lights don't sound very efficiënt for this setup, and I think this scene don't need more lights (if you look to the reflection in the example you see also just one light).
[ATTACH=CONFIG]40908[/ATTACH]
R
Robert Costello
Report Abuse
i think the thing is to keep adjusting all your setting until you are satisfied--
sometimes you have to "cheat" a shot in order to get a good result--
by "cheat" I mean dont use the conventional wisdom--if you think your light is too bright maybe make it grey ----or add more fill lights if needed or change the environment--or move the objects and light around, position makes a huge difference--
if you look on turbosquid you might find some furniture models to download that already have a backdrop and lights set up---I one downloaded a model that had 25 spotlights all set to like .05 multiplier, i downloaded another than only had 1 omni and a backdrop positioned in such a away that it did almost the same thing---
Andrew Walker
Report Abuse
totally agree if you try and recreate the chair you would probably see it yourself.
Antoine Desjardins
Report Abuse
I think you're there.. their subject has more interesting geometry and I think that's why their's looks more realistic. Also, It could be your material. I'm not too familiar with the shaders in V-ray so I can't help you too much in that area.
The lighting is pretty good though.