

Making Of
The Making Of Snowy Night
My name is Adam Zollinger, and I am one of four in-house 3d illustrators working for FFKR Architects in Salt Lake City, UT. I am excited to share a little "making of" for the Snowy Night project we recently completed.

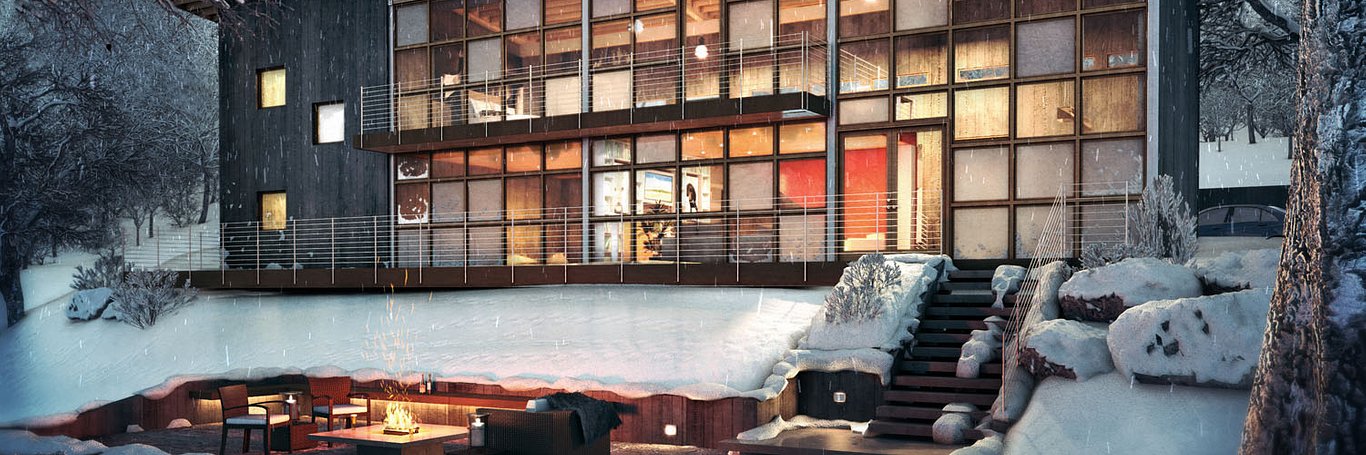
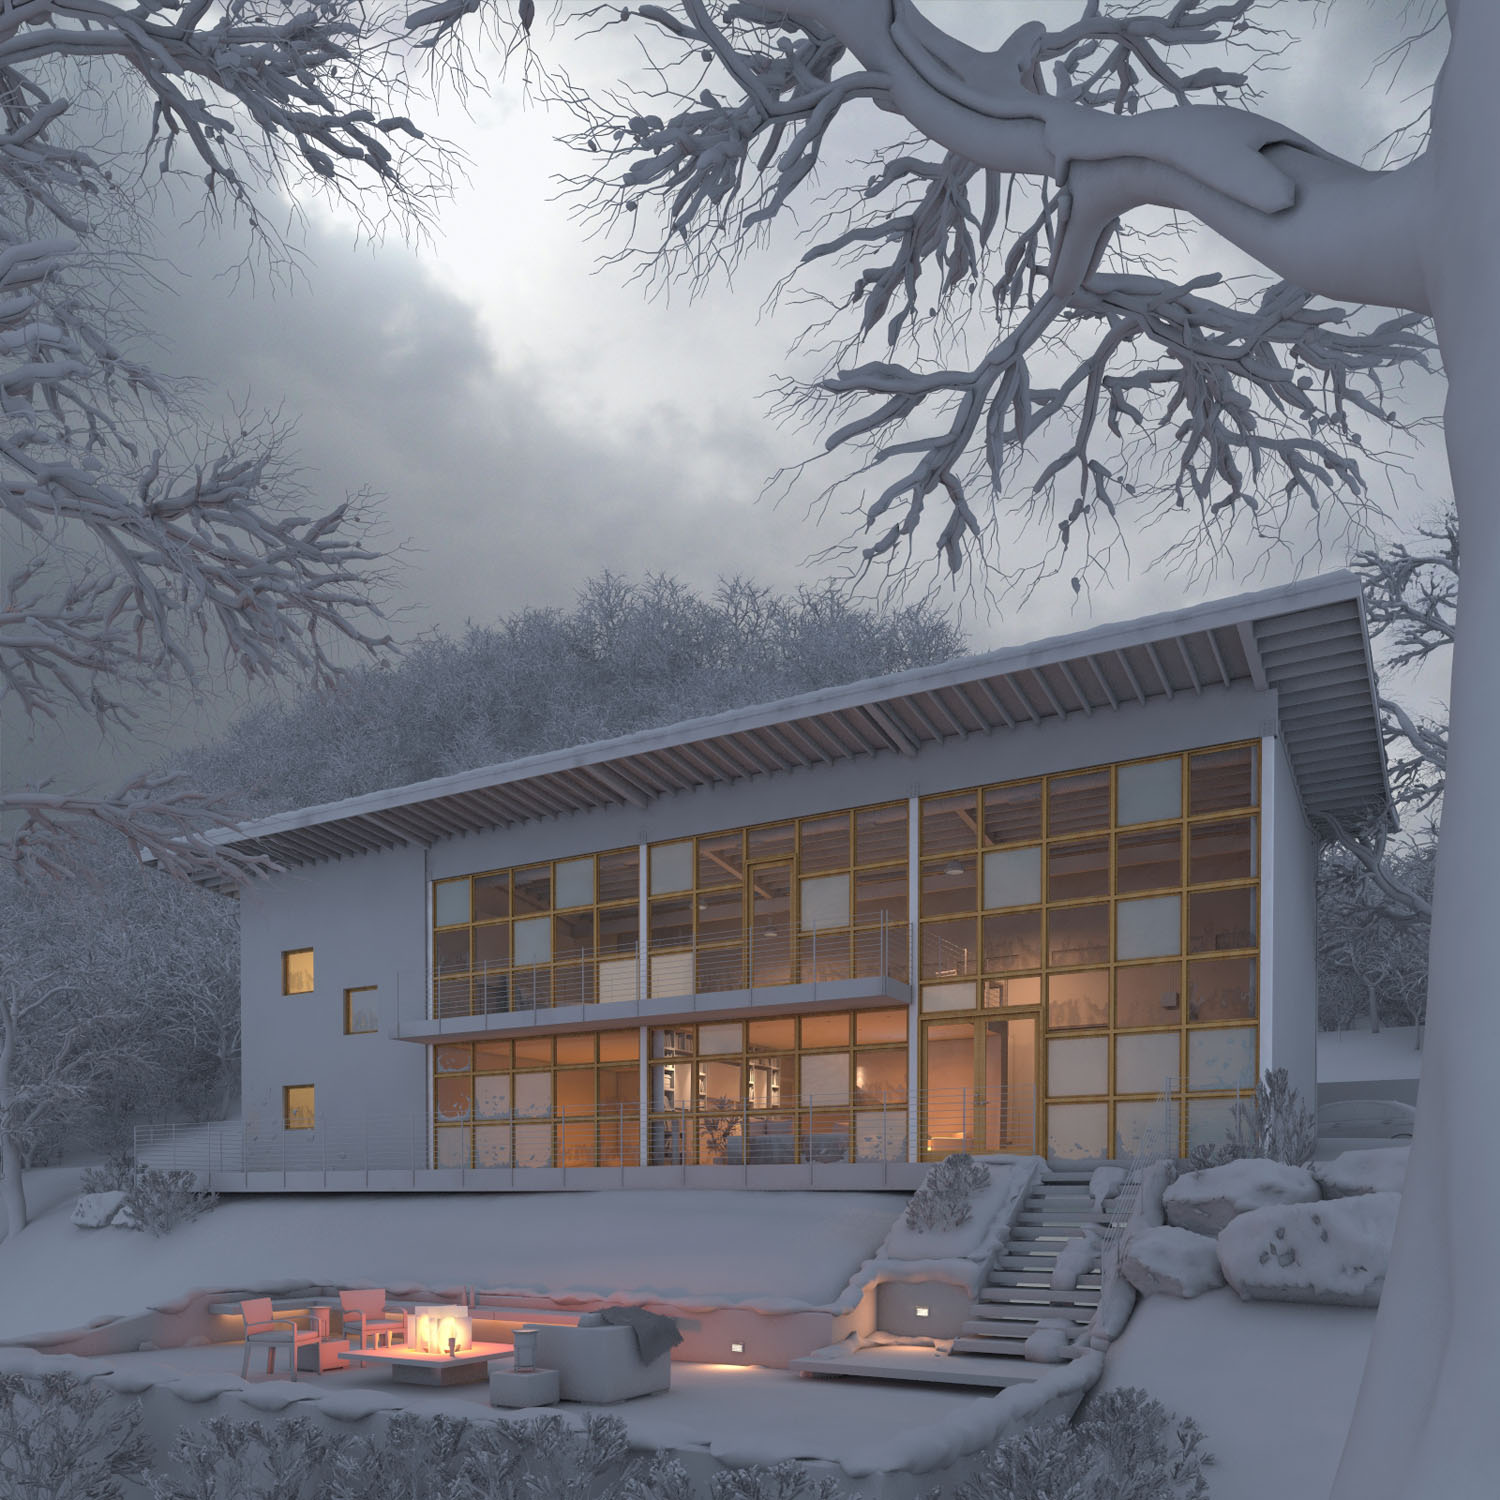
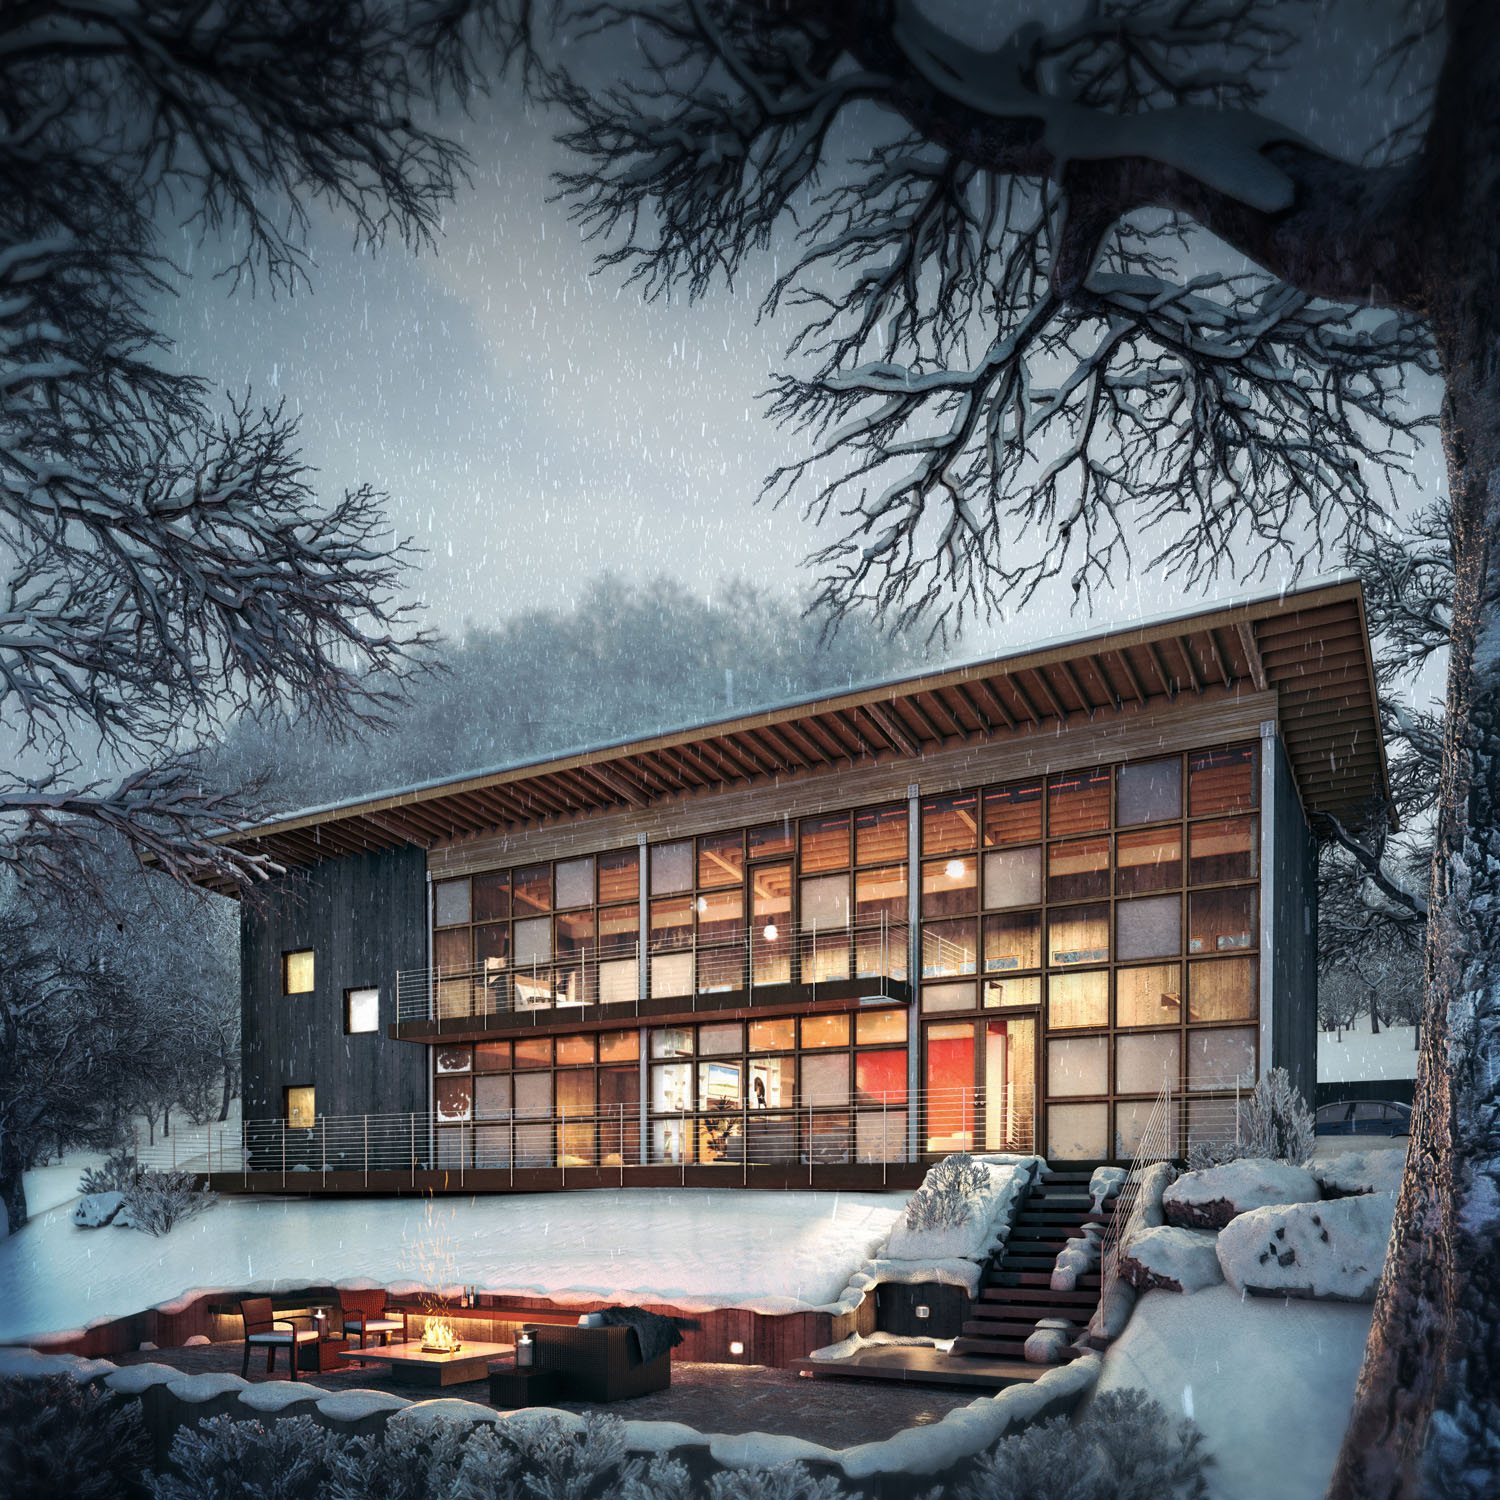
This is how the finished image came out. The architecture is not something we actually designed here, but it is more of just a concept that we had and wanted to use to explore 3d techniques. The modeling of the building came directly from our heads, so there aren't any sketches or CAD. There is some modeling here that might be of interest to people though.
Modeling
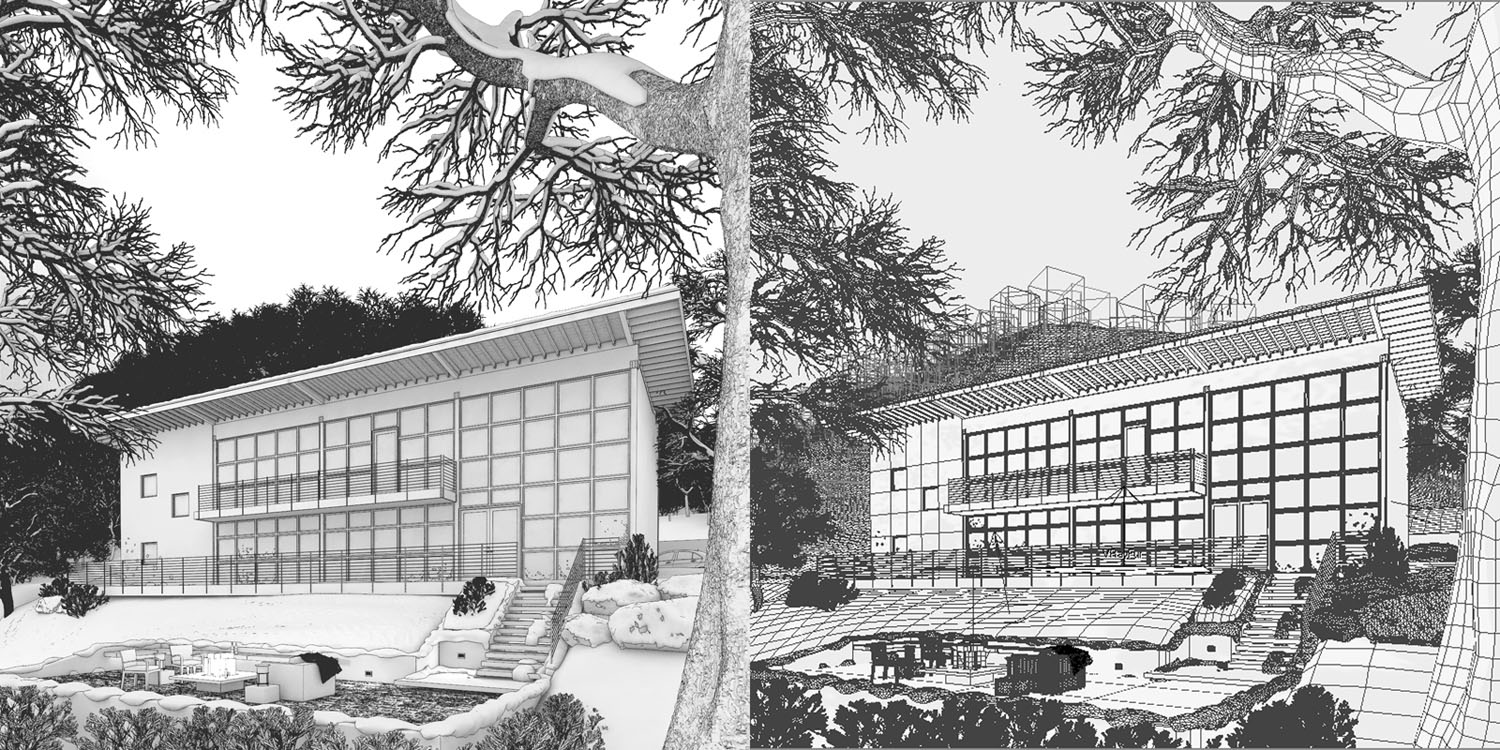
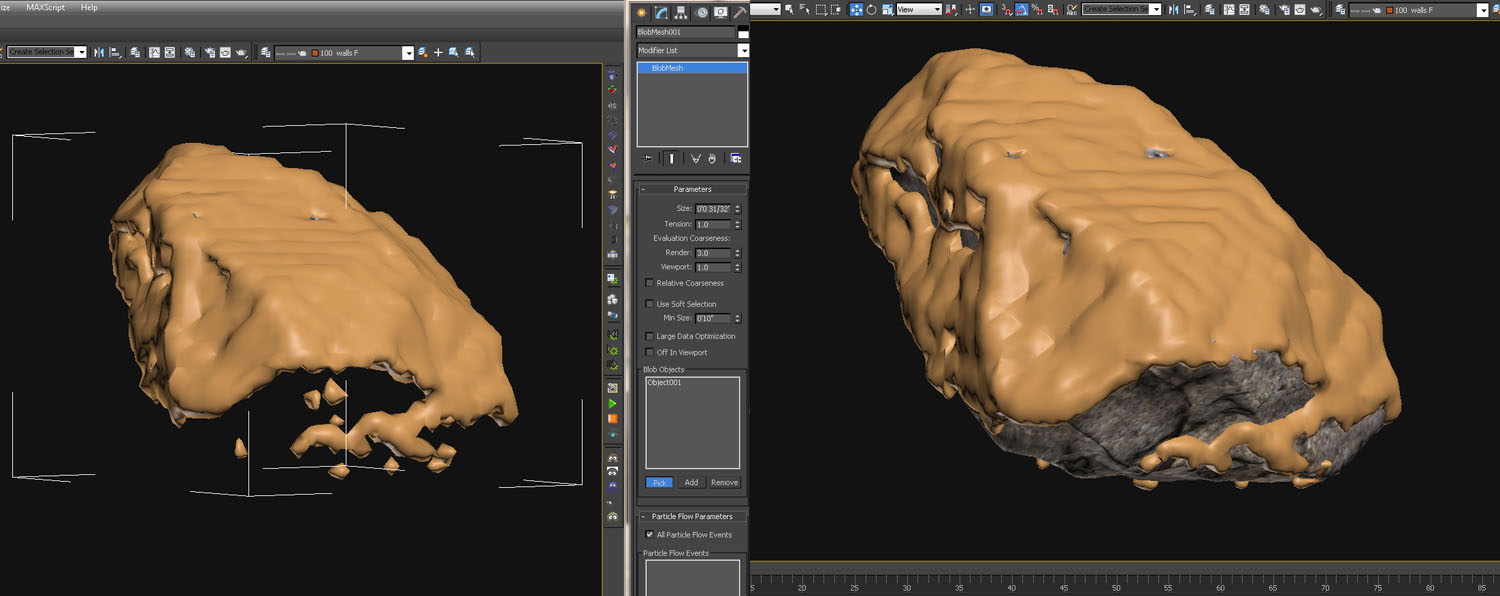
These images above help to show what the model was like. It became pretty heavy on polygons (about 10,000,000) so there was a lot of proxies, and displacement maps being used. One modeling tool that we used heavily for this project was BlobMesh. This is how we created most of the snow that is sitting on top of objects.
The steps for doing this are as follows:
- Isolate the object you want to put snow on.
- Make a copy of it and convert it to an edit poly.
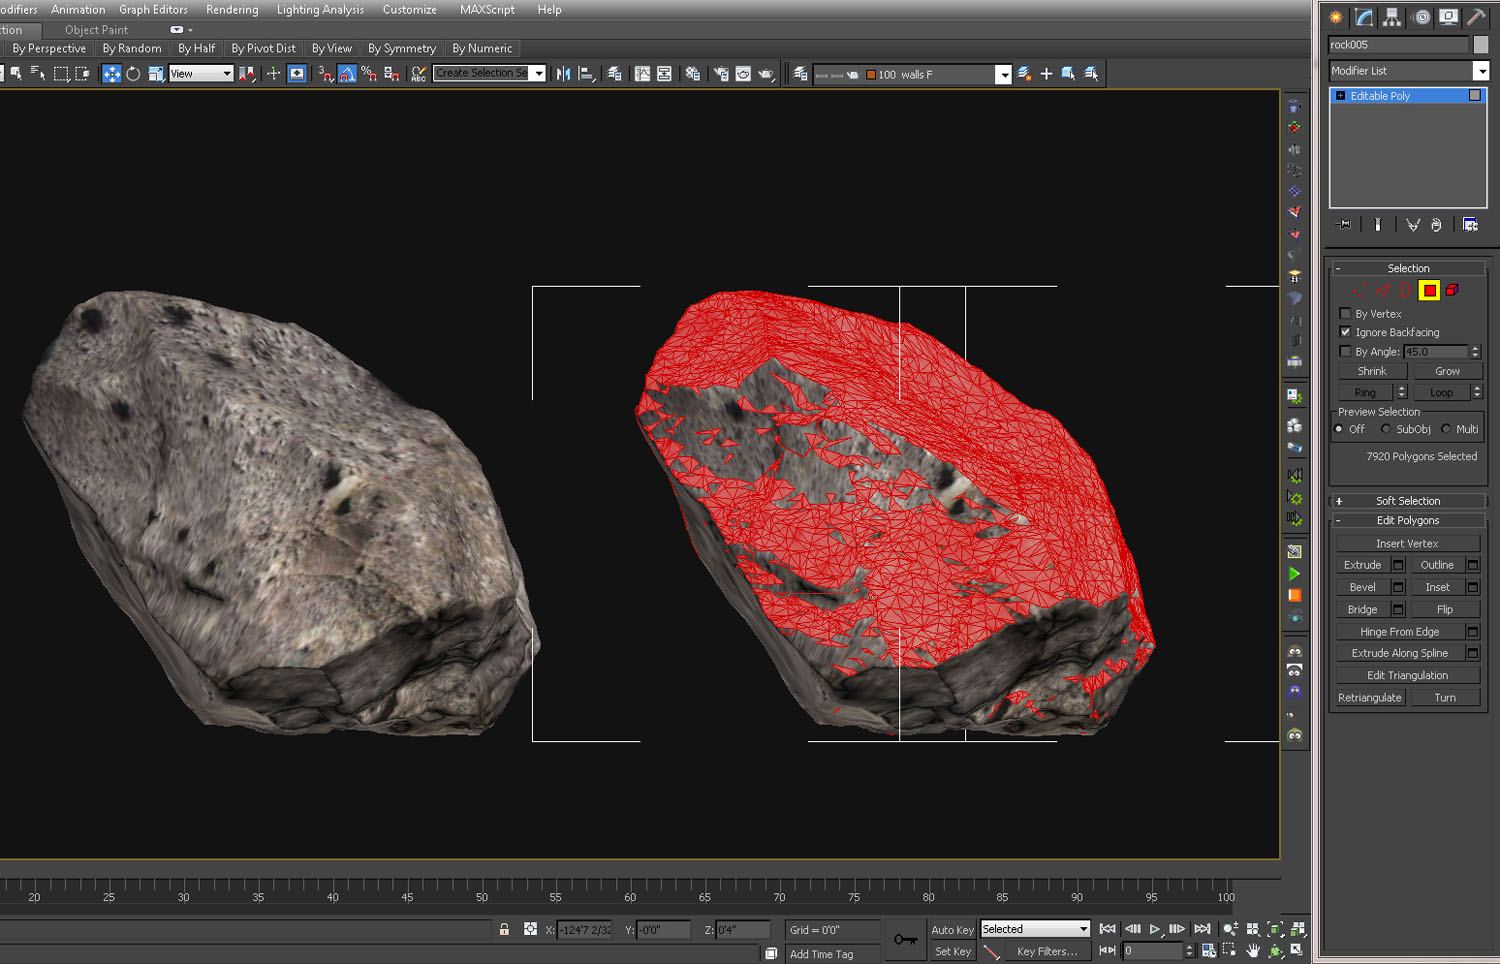
- In "face" sub-object mode, go to the top view and select the whole object with "ignore back faces" checked.
- You should get something similar to the image below, where only faces that would have snow on them are selected (you may have to go in and clean up the selection a bit).
- You can then delete everything but the selected faces, which will give you a good base for your BlobMesh.
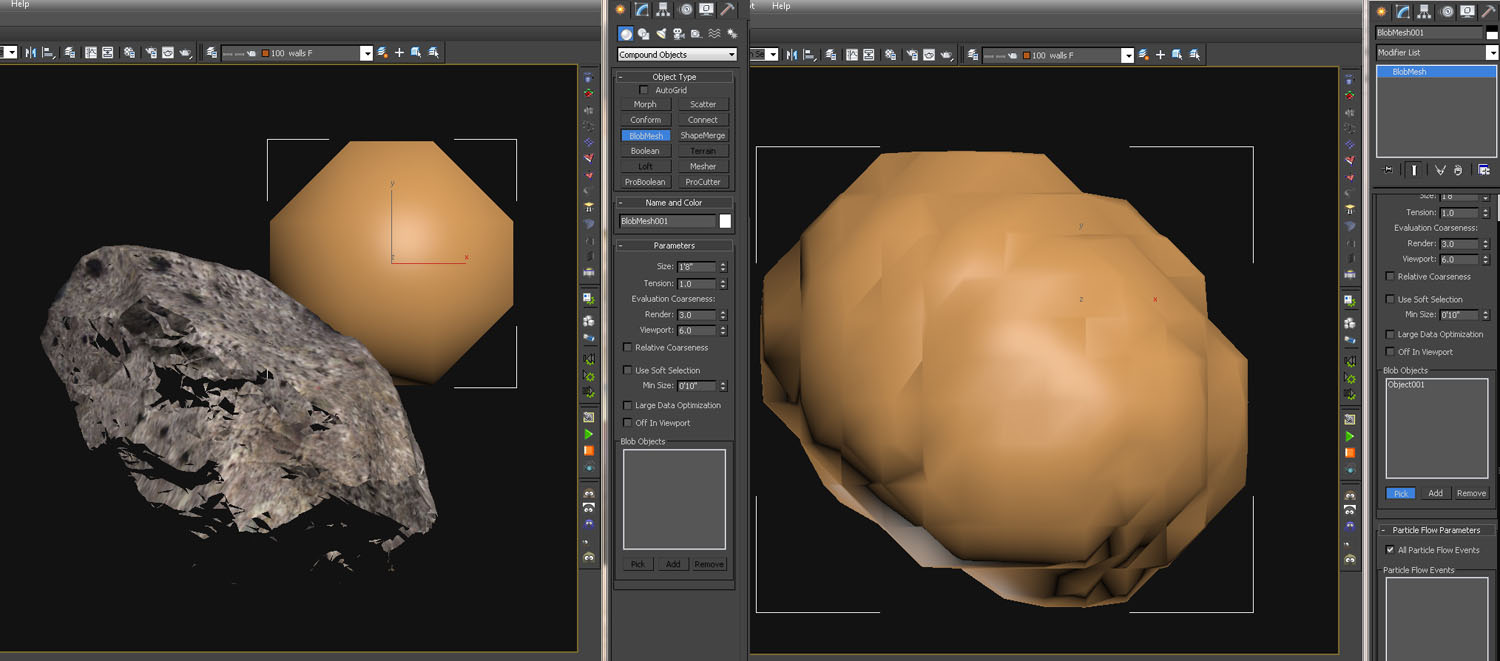
- Next go to create>compound objects>BlobMesh, and place a BlobMesh in your scene.
- Then go into the modify panel for the BlobMesh, click on "pick blob objects" and select the shape you made.
- From here, you should be able to tweak the settings until you get a nice looking layer of snow to place back onto your object.
- To further modify the snow you could use noise modifier, turbosmooth modifier, FFD, etc. Keep tweaking till it looks right.
At this point I would recommend collapsing the BlobMesh back to an edit poly, and possibly making a proxy of the object and snow together. For our project, we made several snow covered plants, rocks, and trees using this method, and then used them in various places throughout the scene. Once you build up a nice library of snowy objects, or chunks of snow, the process should become much faster.
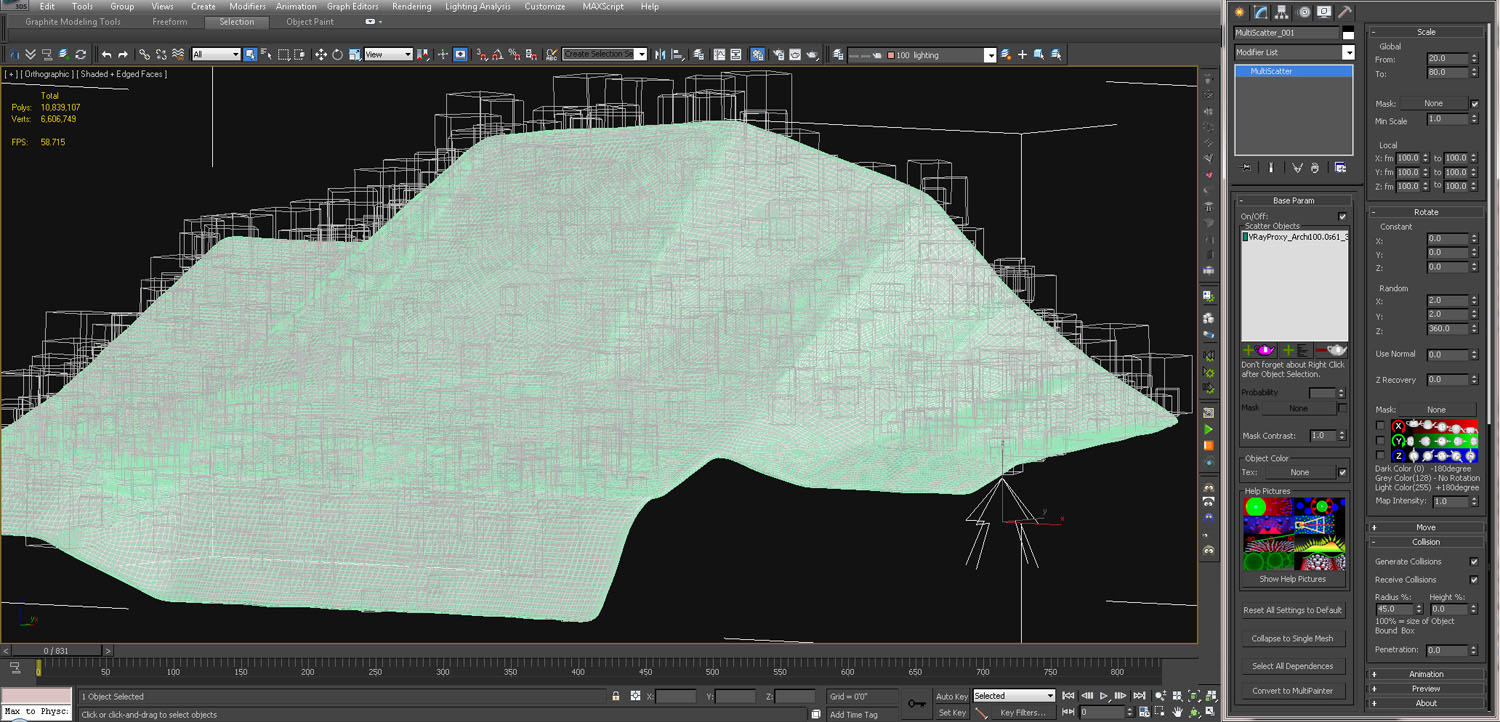
The only other modeling "trick" we used is Multiscatter. It can be a little bit finicky, but when it works it is very handy. For the background we made a huge plane, pushed faces up and down to make a mountain, and then multiscattered one of our snowy trees all over it. Below you can see the mountain, plus the essential multiscatter settings. In this case they were scale, rotate, and collision.
Lighting
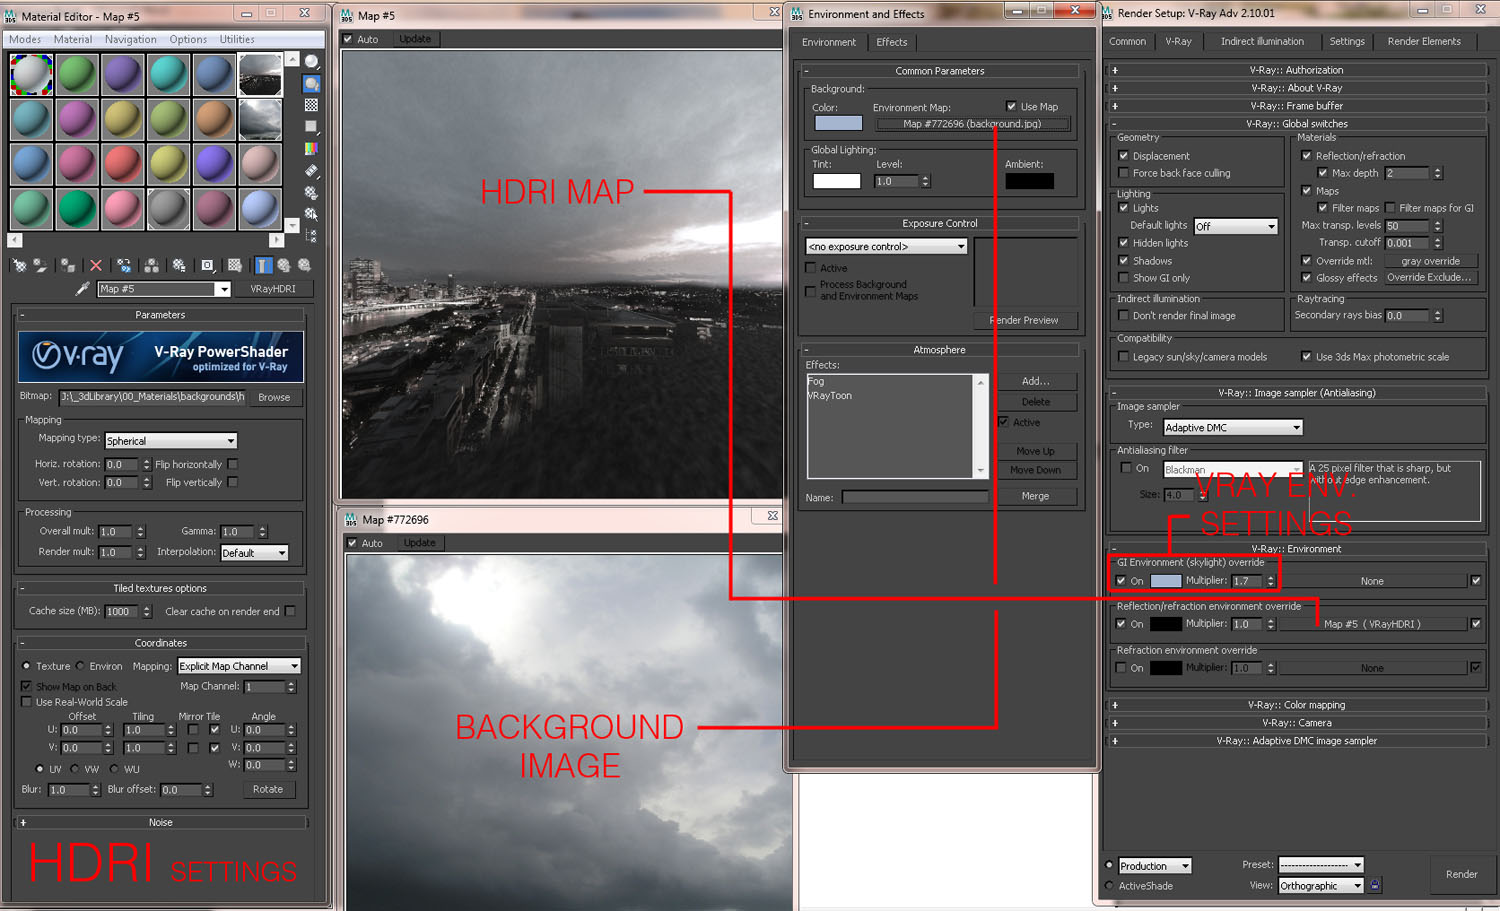
There is no sun in our scene. The lighting is mostly generated using the V-Ray environment settings. The background is also rendered with the scene, so it is in the environment slot and set to "screen." This can cause weird reflections to occur, so we used the V-Ray settings to do a reflection override. This is where we used an HDRI set to "spherical." Maps set up in this way will give proper reflections. Another option would have been to simply place the HDRI in the environment slot, and composite in the background later. Here is the lighting setup:
The interior lighting is all standard V-Ray lighting that is exaggerated some to make the windows really glow. Below you can see what the image looks like with just the lighting, and override material, and no displacement. Much of the lighting will be enhanced later during post-processing.
There is also a simple fog effect going on. Here are the settings:
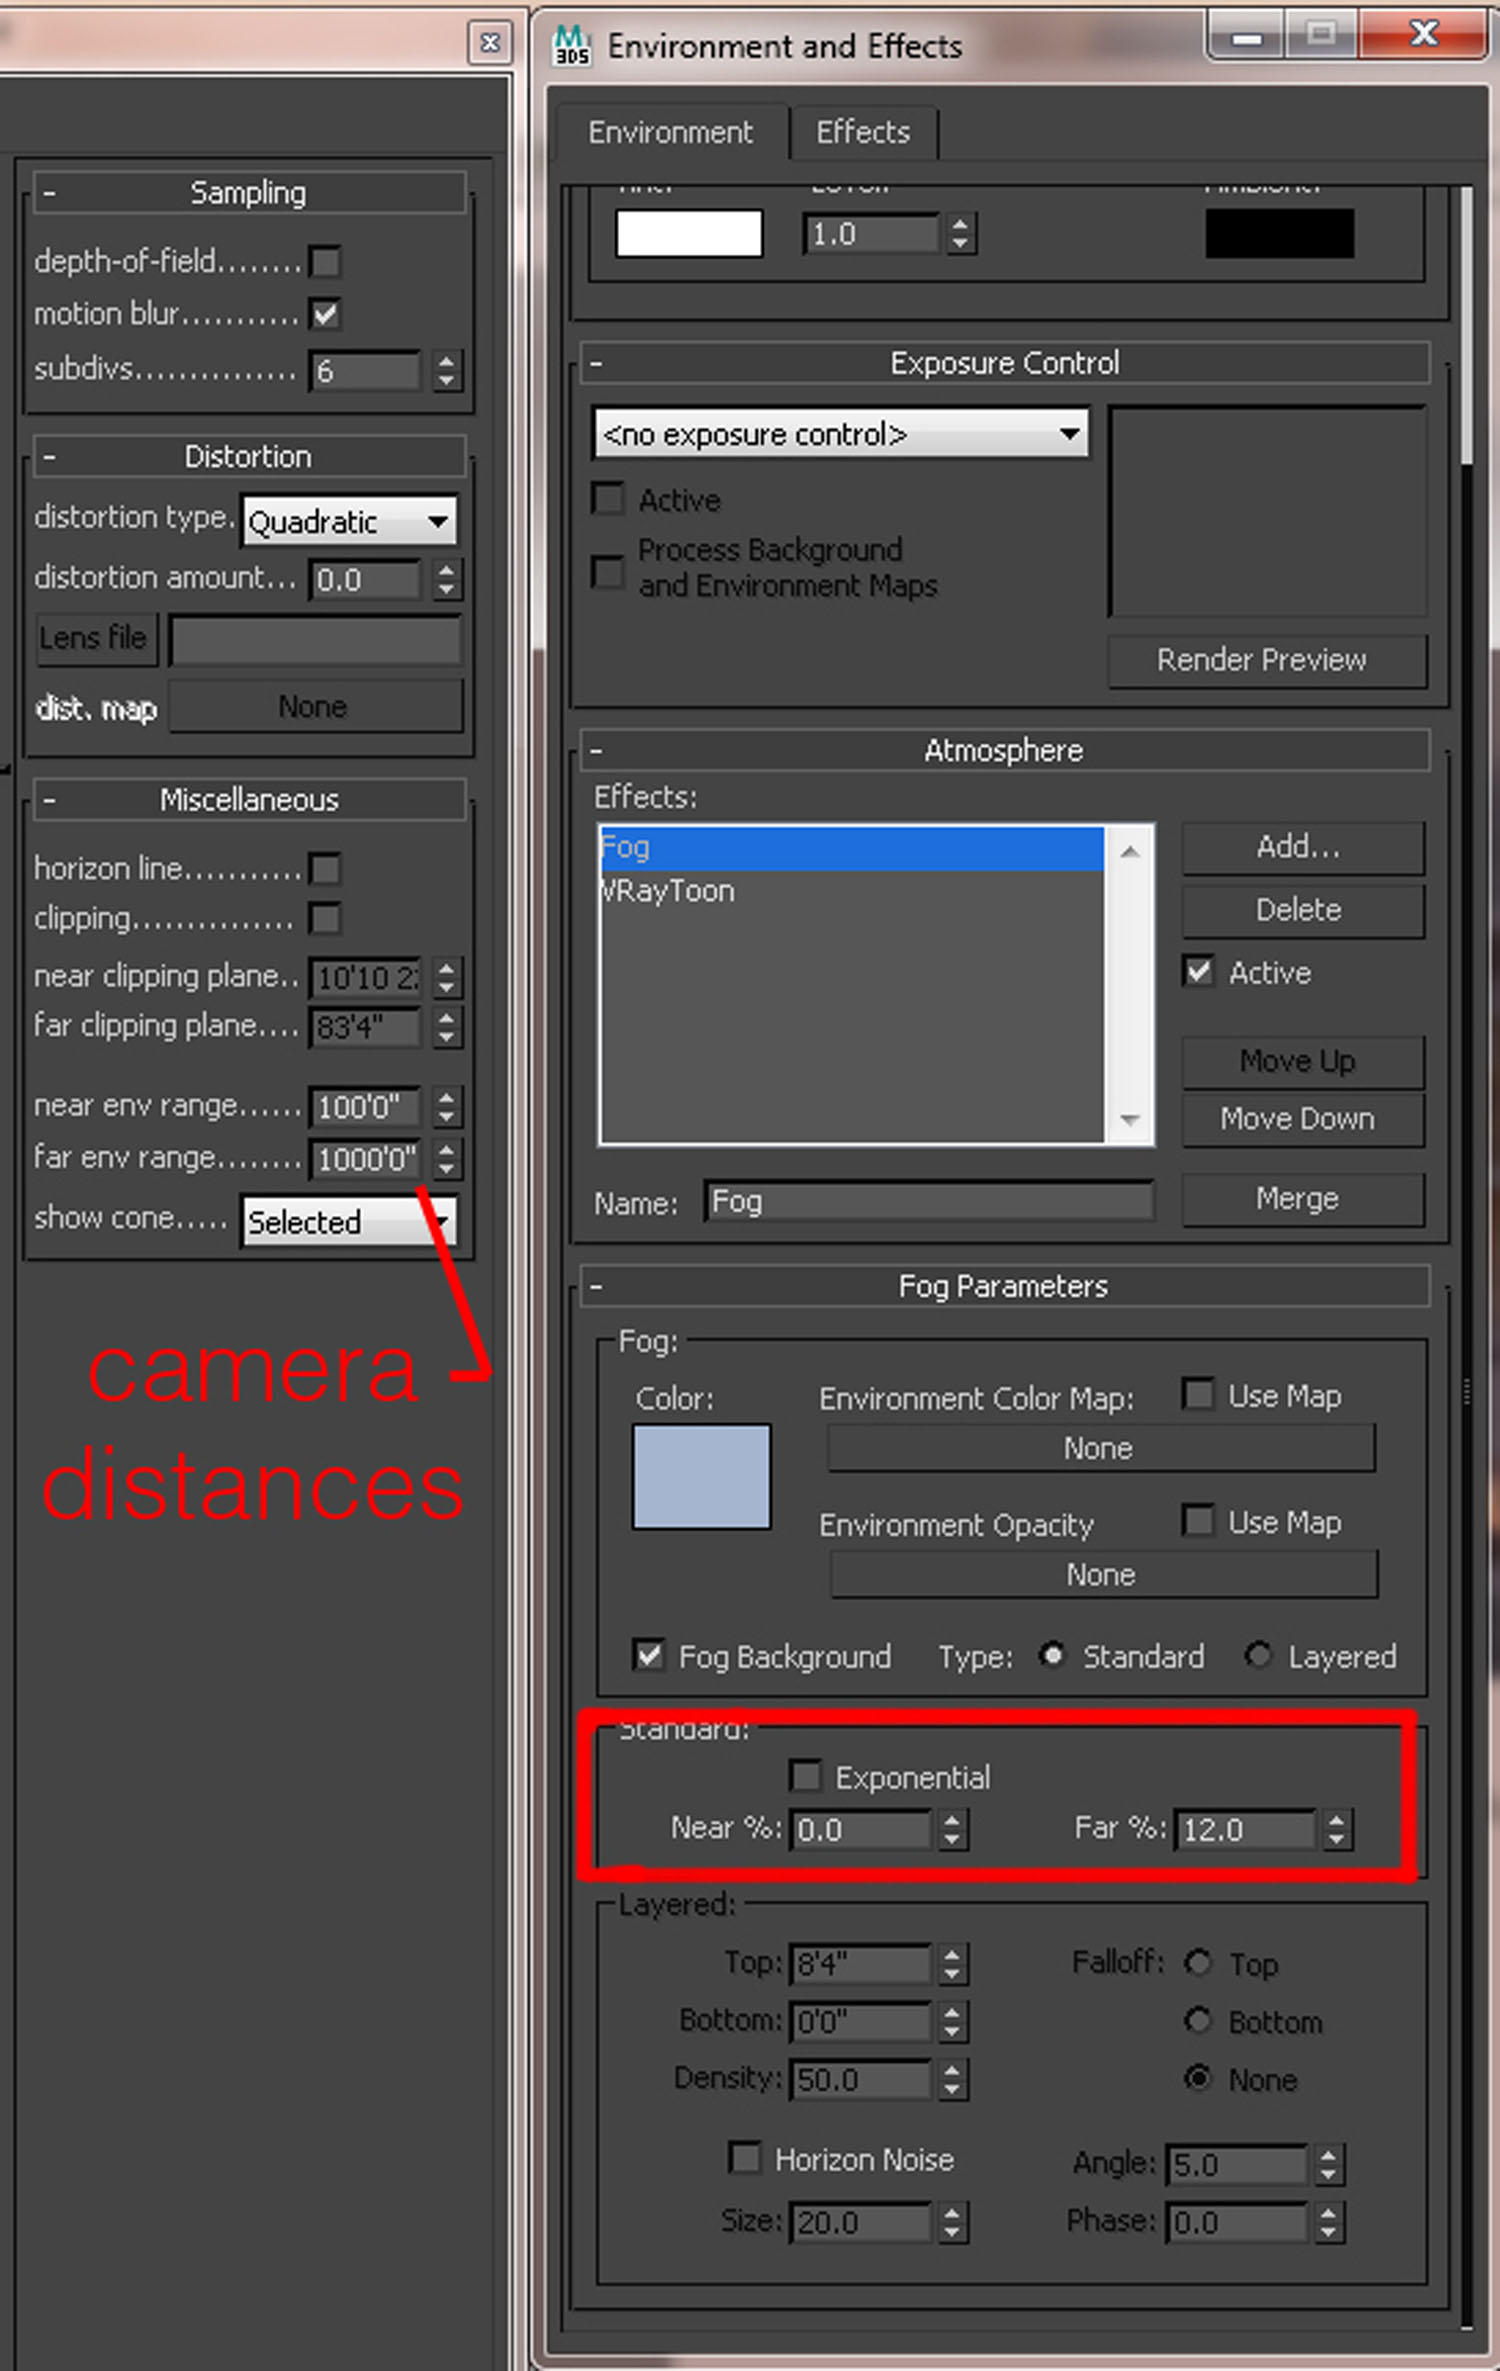
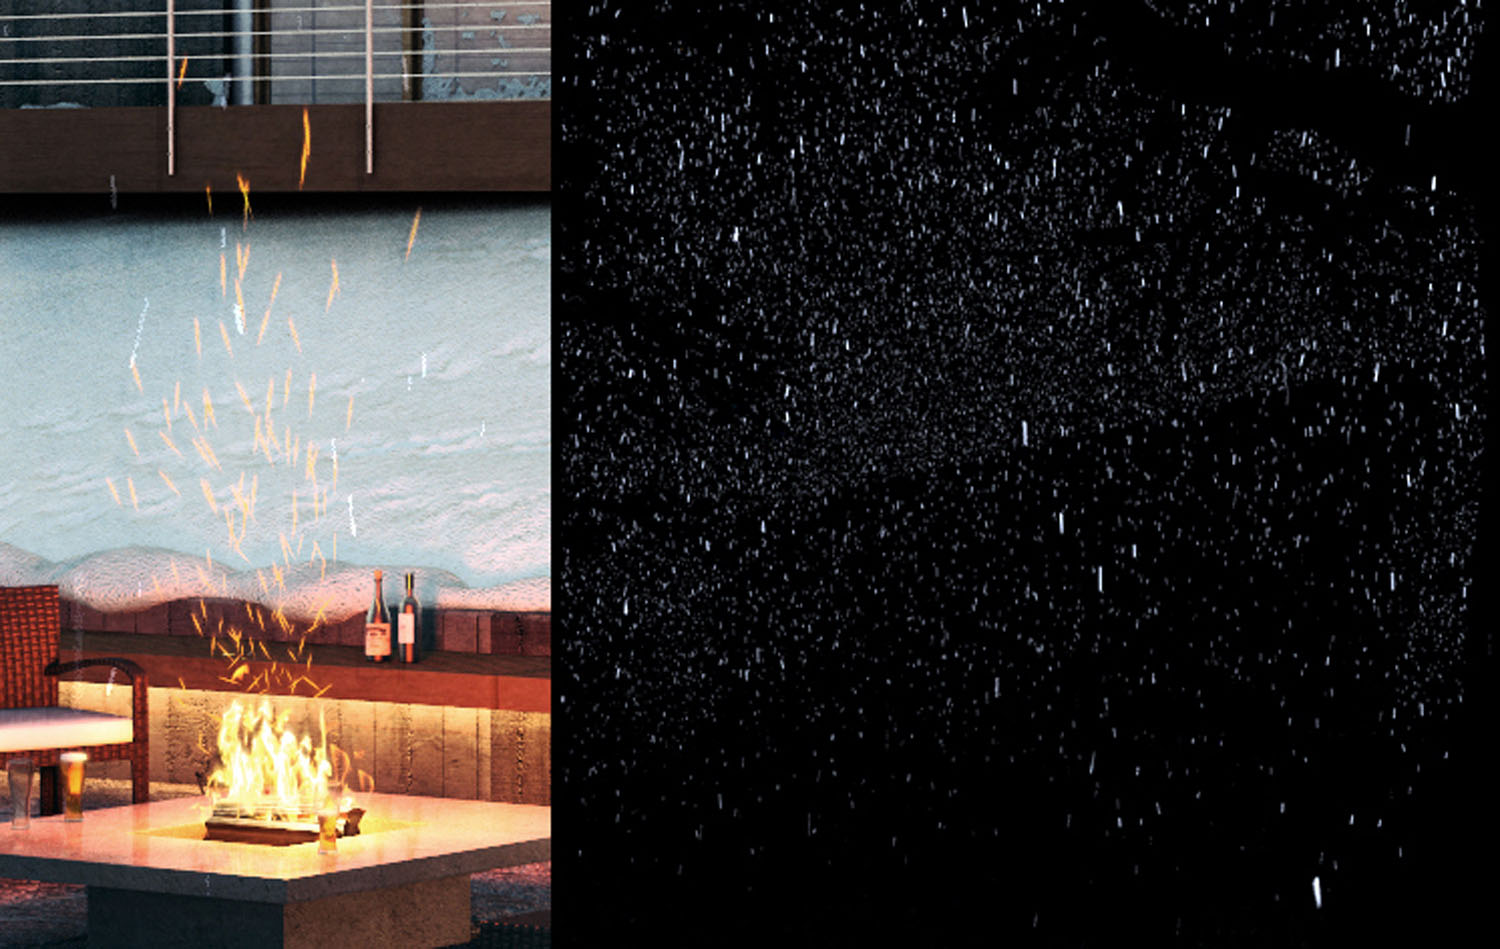
Particles
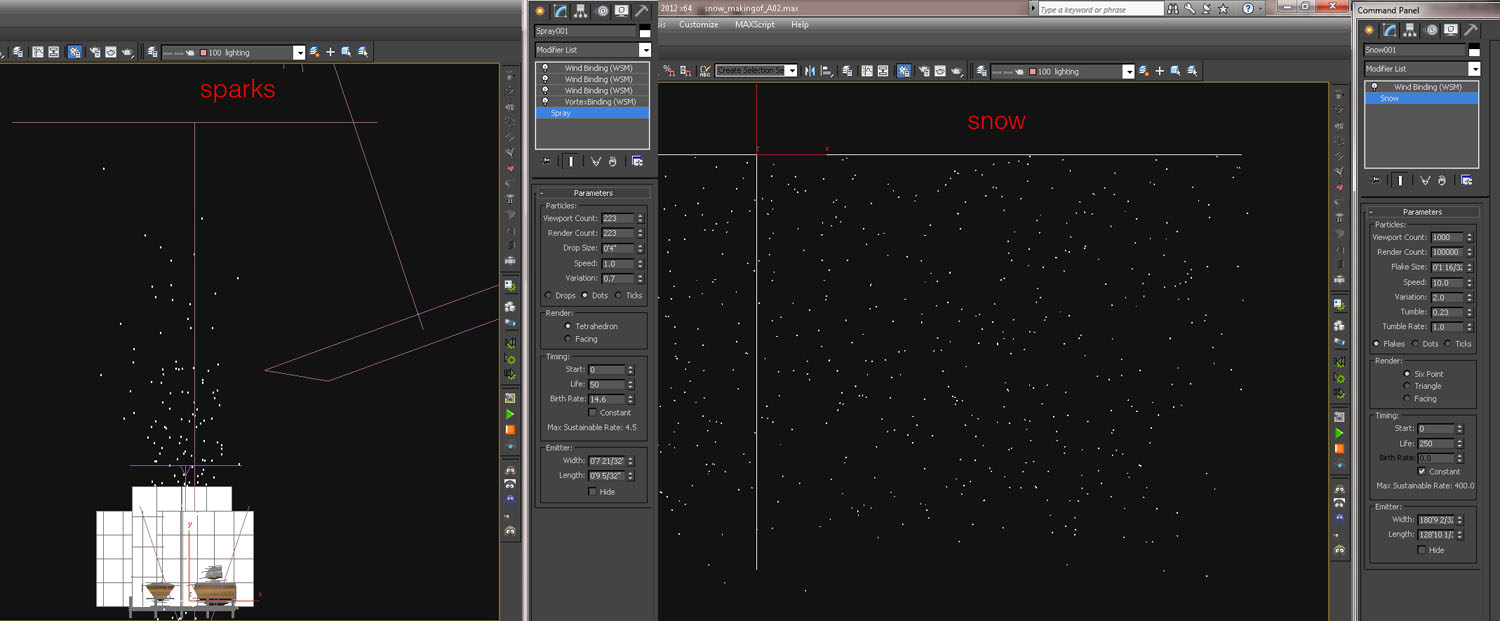
There are two different particle systems in the scene, used to add a few nice touches. There is the sparks from the fire, and then the falling snow. The sparks are rendered with the scene, and as you can see motion blur is used with the camera in order to show the speed / movement of the sparks. The snow is rendered as a separate pass. To do this we turned everything in the scene, except for the particles, to a matte object. We changed the background to black, turned off the fog, lighting, etc., and then rendered.
The settings for these particle systems are also very straightforward. For the sparks there were a few additional forces (vortex and wind) that were affecting the particles.
Materials
The most important material to the scene was the snow. It's shader is actually quite simple. It uses only falloff maps and a noise map. In some areas a V-Ray Displacement modifier was applied to it to give it a more uneven look.

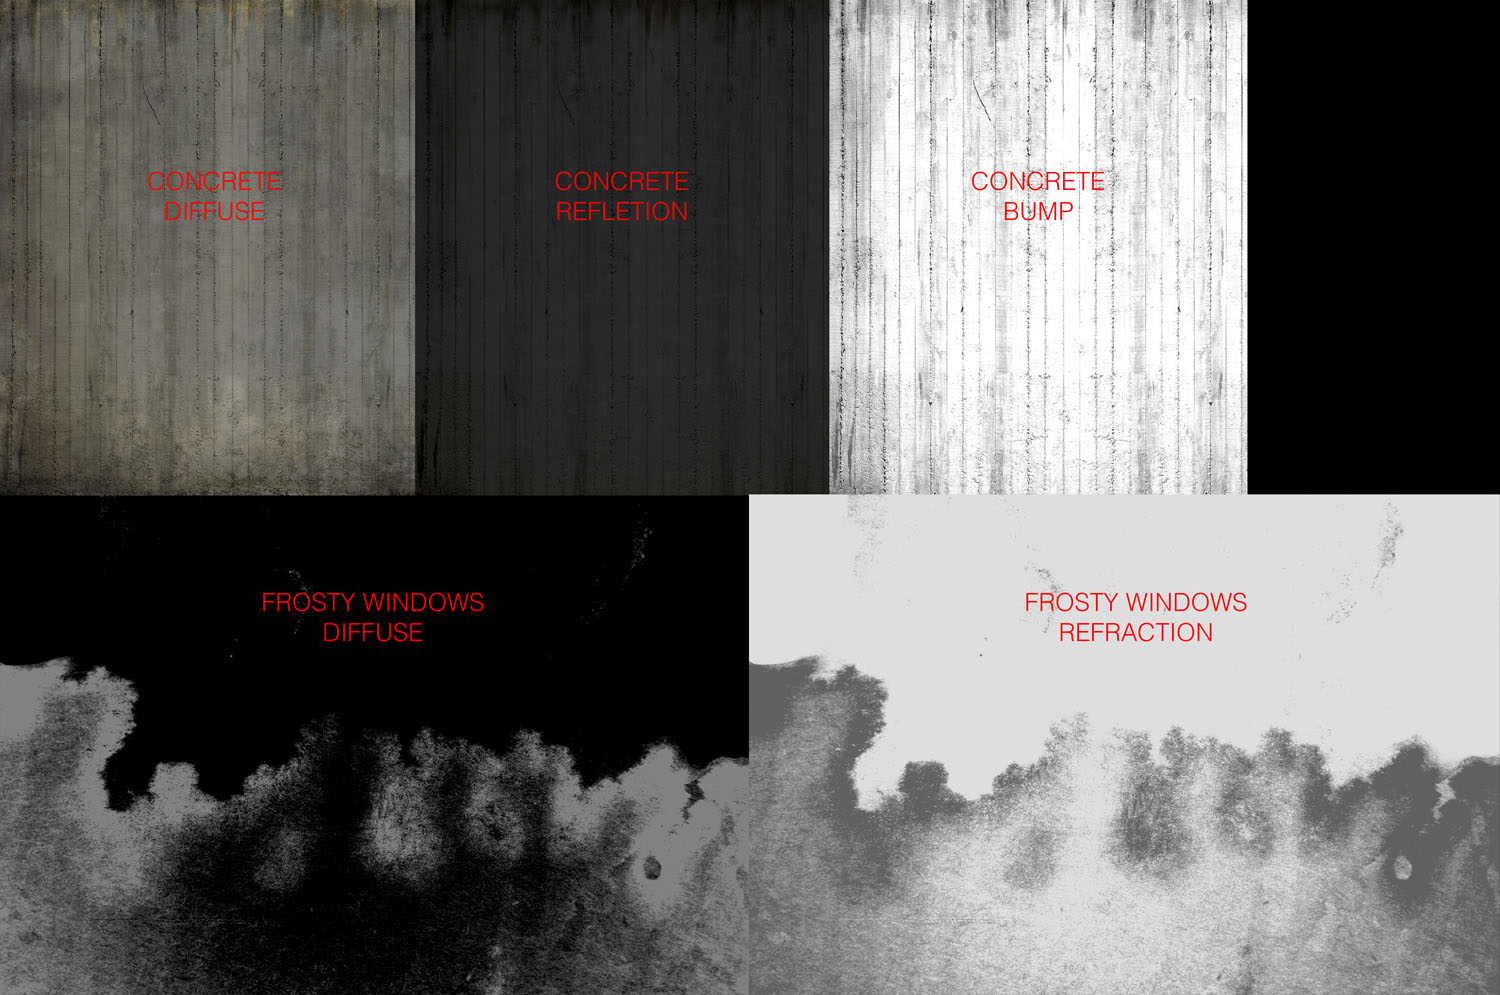
Many of the other materials are basic tileable, or procedural textures. There are a few custom painted maps for some of the more important elements of the scene. Below are a few examples: One is for the large concrete wall, and one is for the frost on the windows (which you can see if you look hard enough). Some windows are frosted glass, some have snow on them, and some just have some frost on them.
Post-Processing
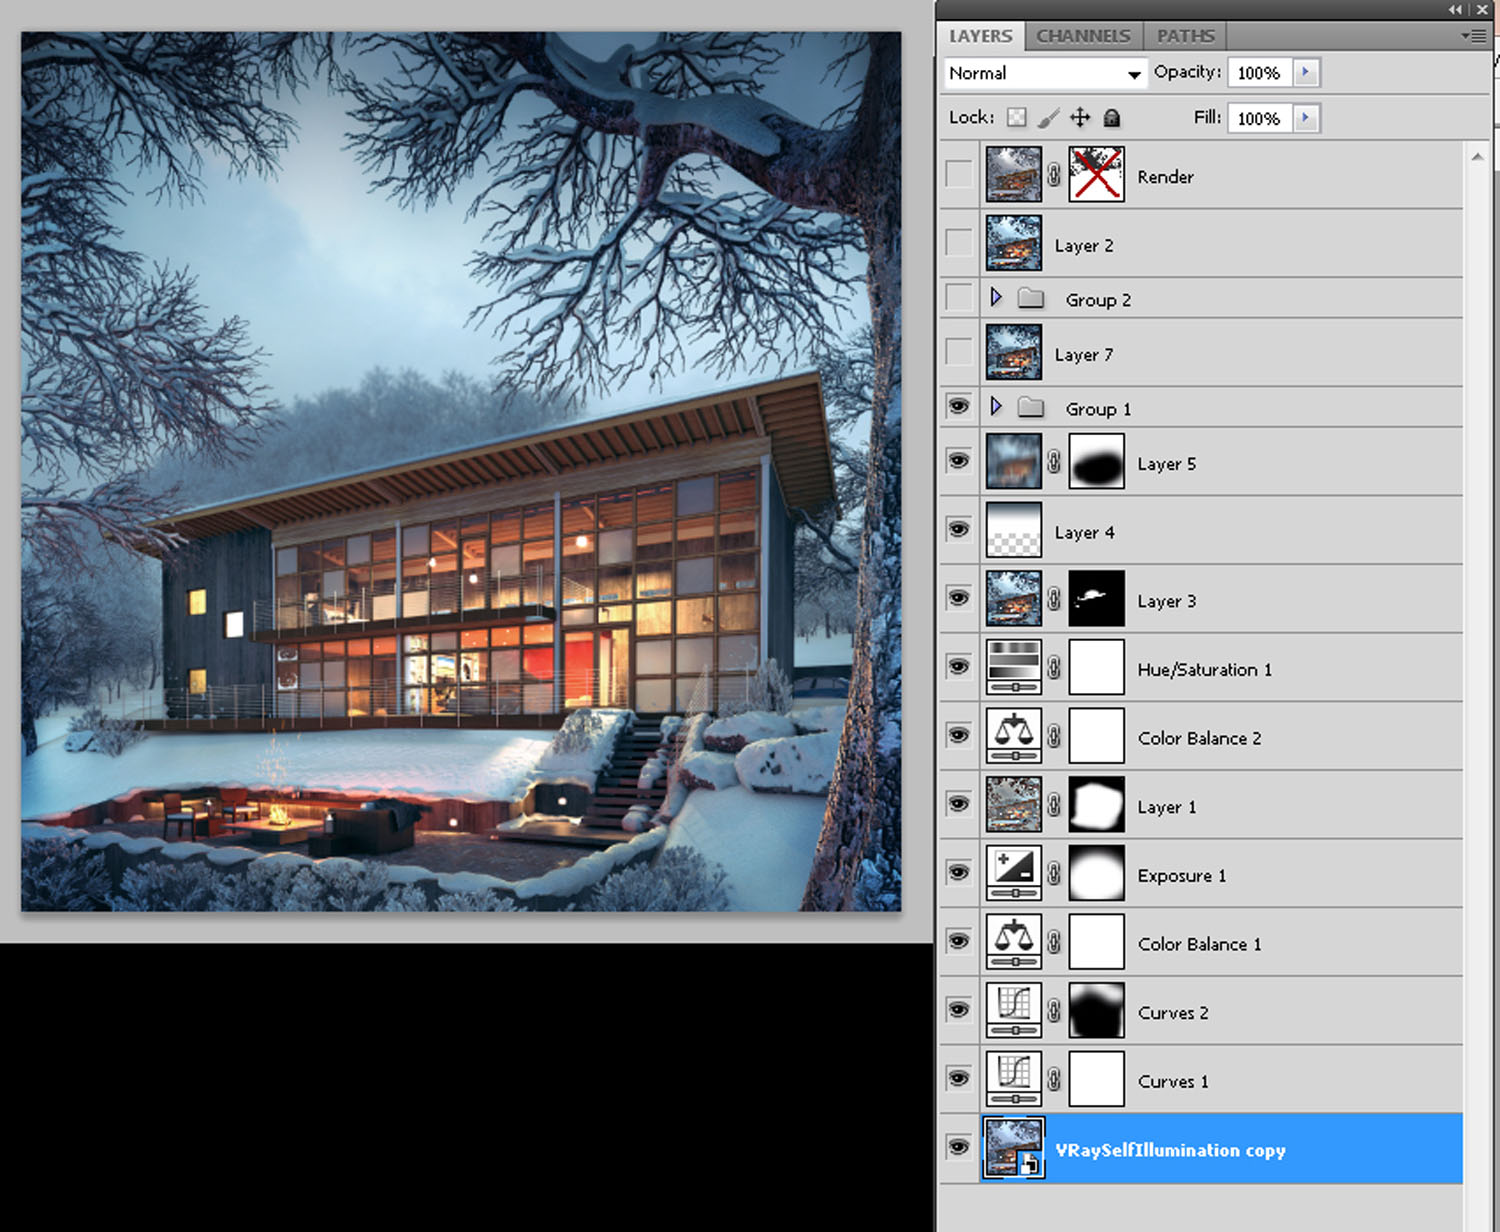
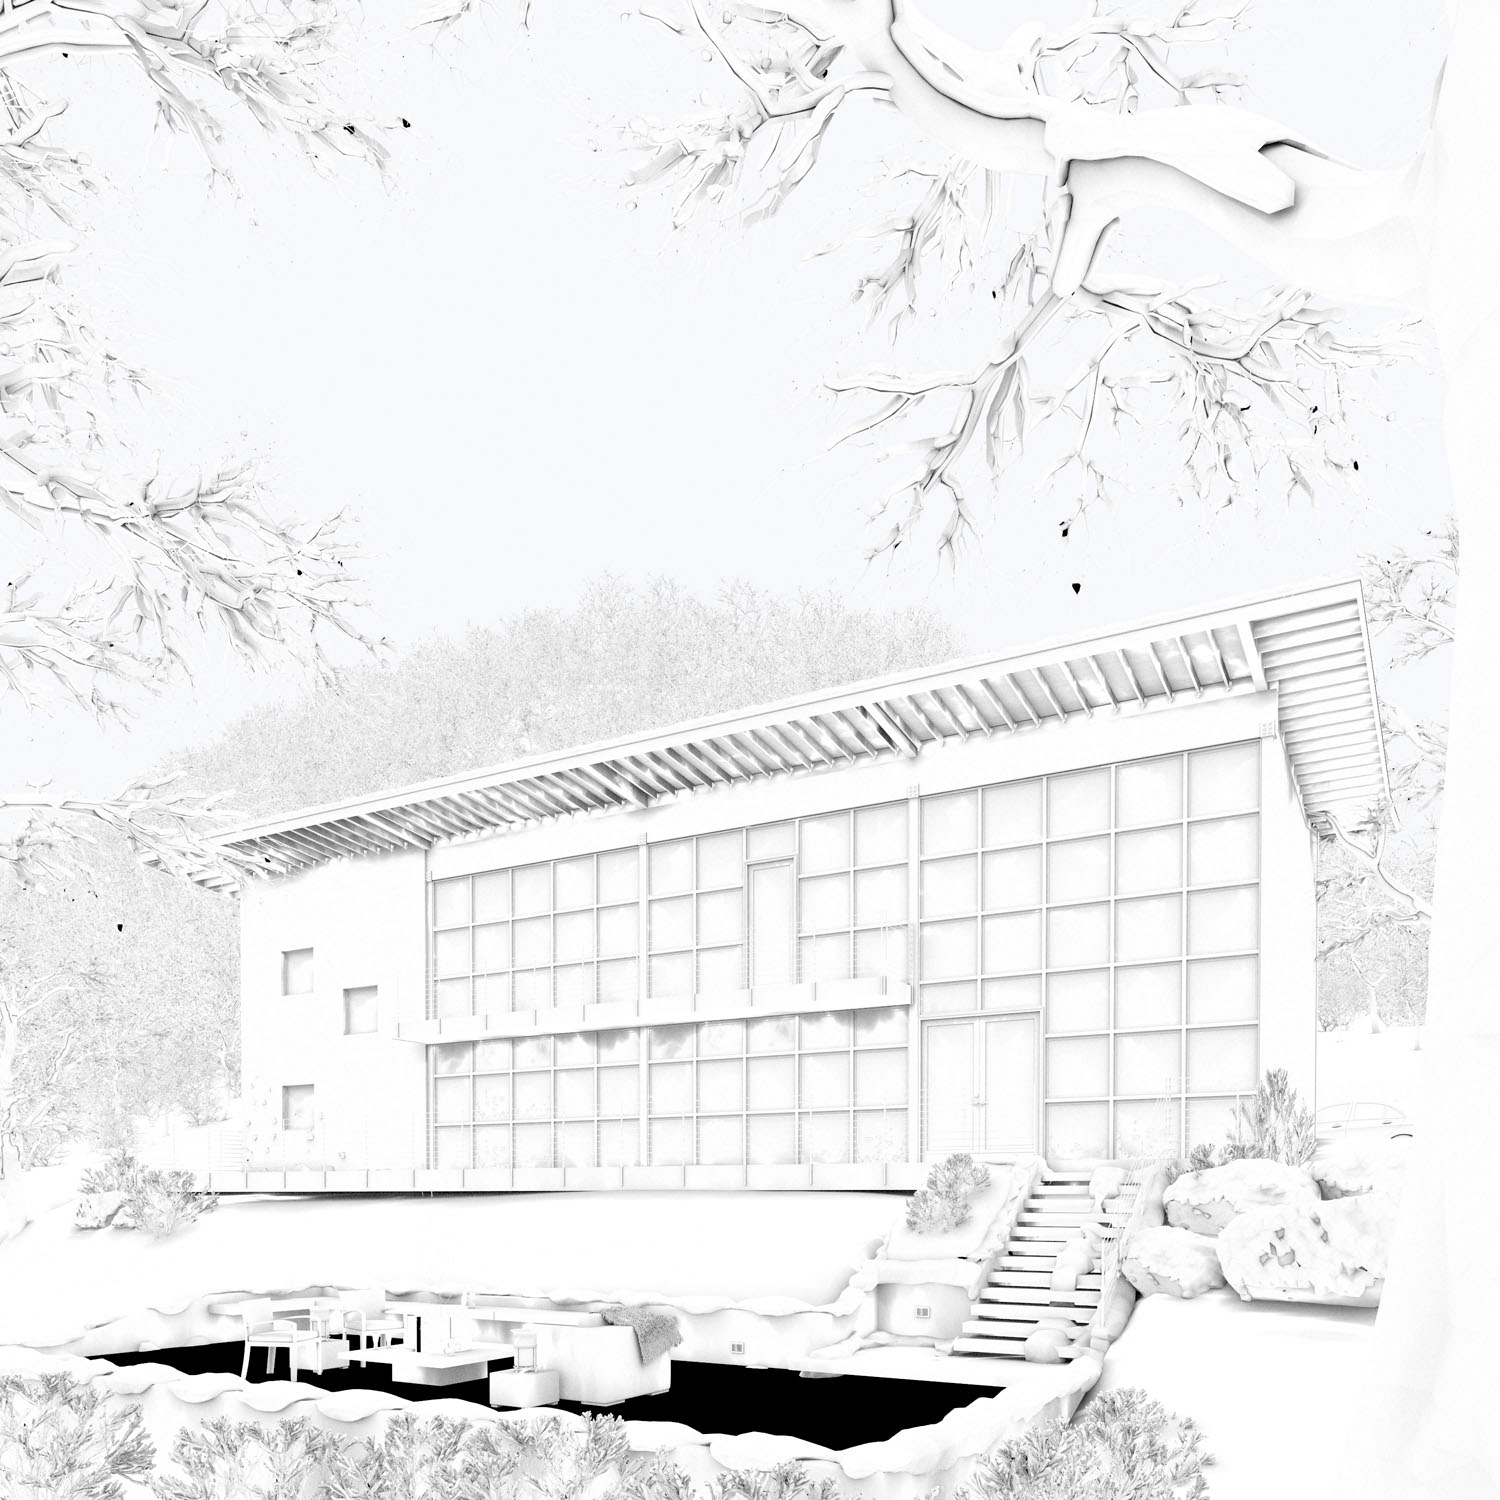
Much of the reason that we created this image was to explore some post-processing techniques. We wanted to experiment with compositing using 32 bit .exr images. You can see from the images below the rendering result, and then the final result after Photoshop.

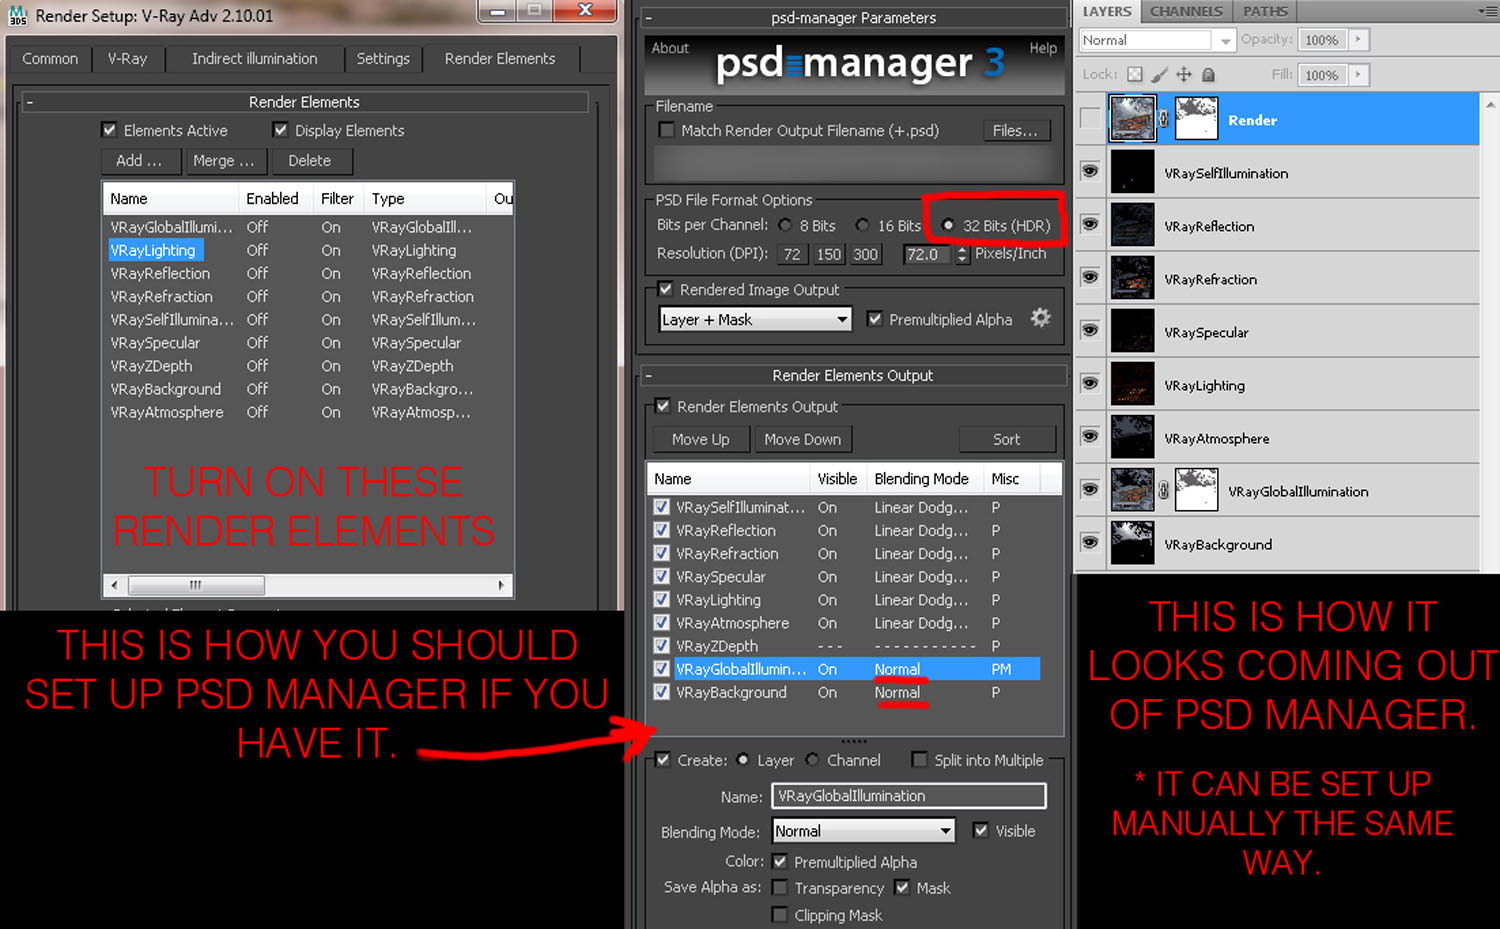
Much of the reason that we were able to so dramatically change the look of the image is because we composited using separate render channels. Using this technique, we were able to accentuate things that we liked, and masked out things that we didn't. One tool we used here to help us with the compositing process was PSD manager. It is not entirely necessary, but it does streamline the process. Below I will outline some of the essential parts of this workflow.
First we set up our file for proper render output, making sure to set up the render channels properly.
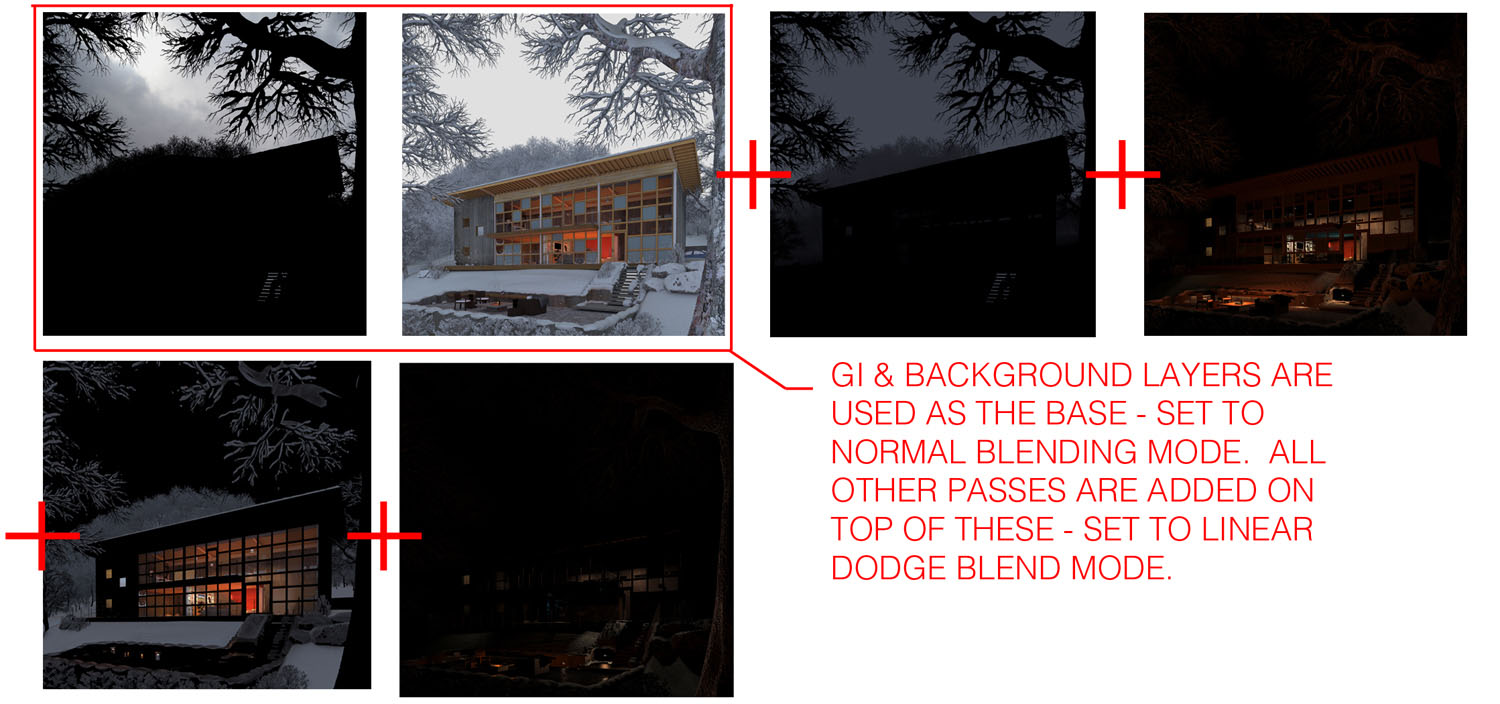
This is how we composited it together.
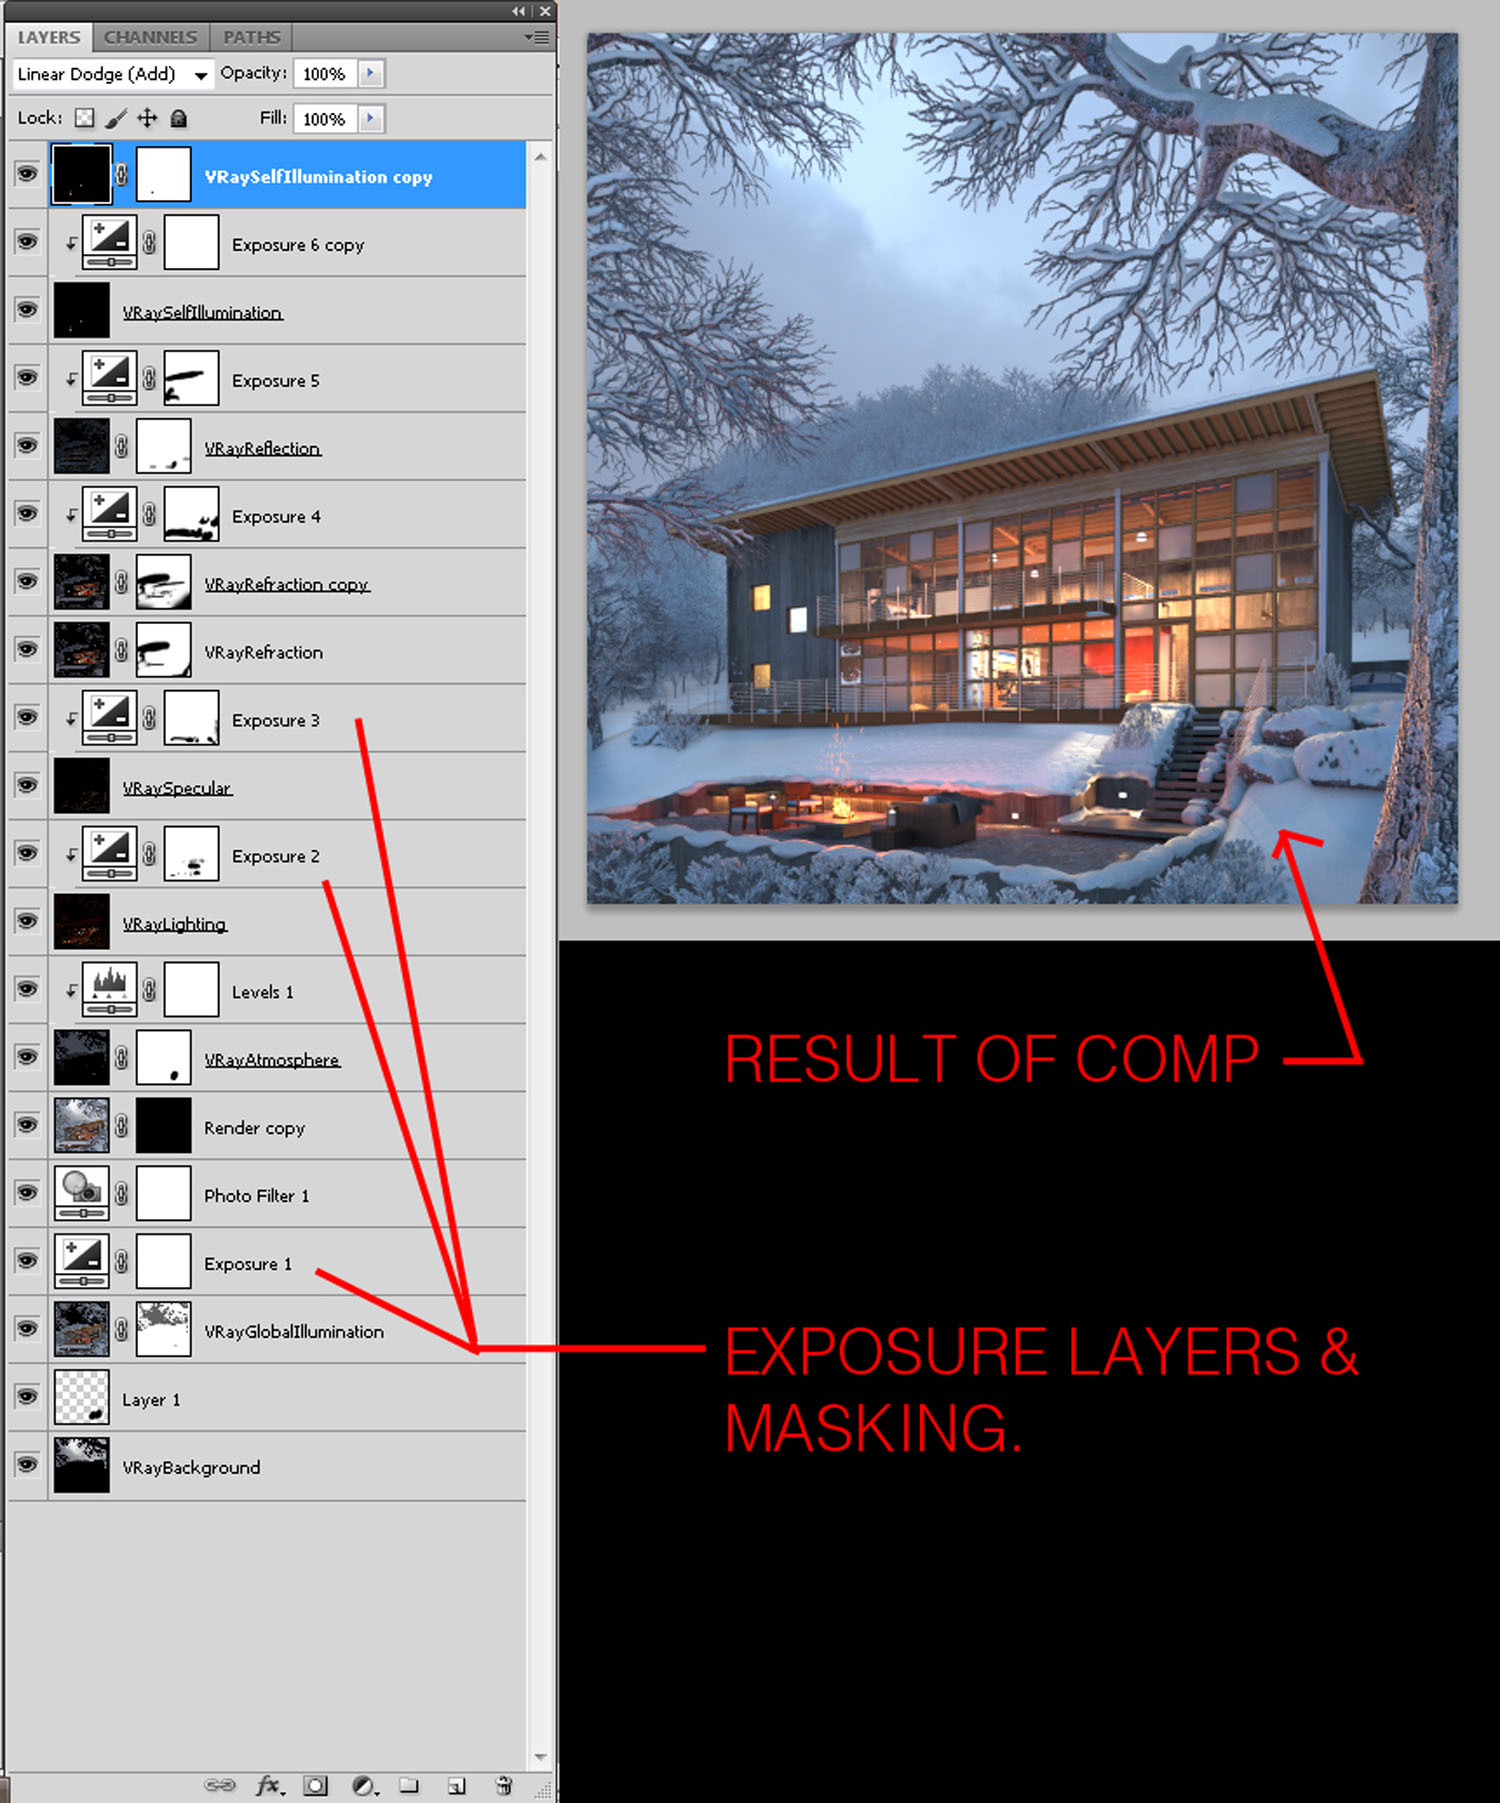
After using many exposure layers and masking the comp came together something like this.
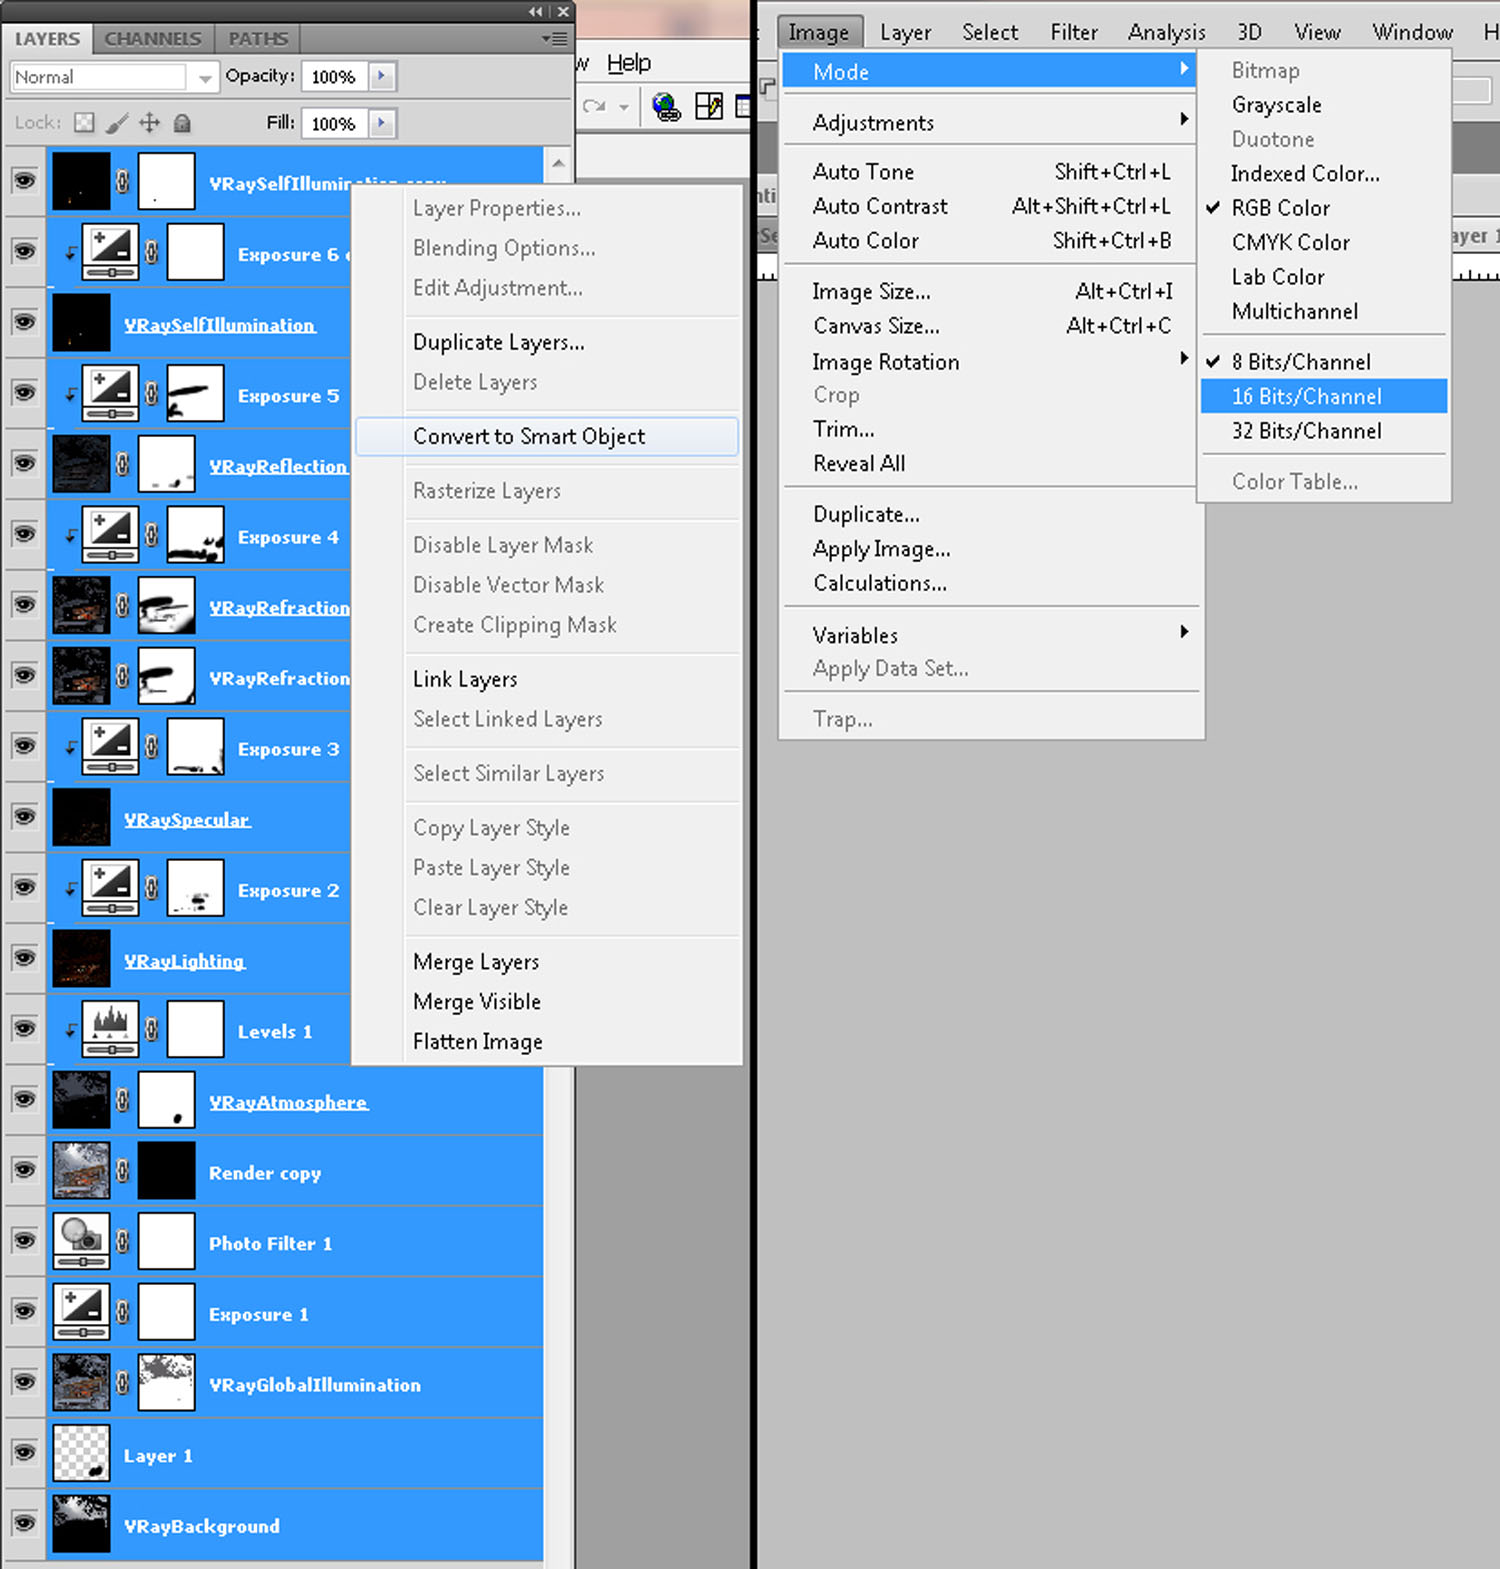
At this point we highlighted all the Photoshop layers, right clicked on them, and selected "convert to smart object." Then we went to image>mode>16 bits channel. This enabled us to change our PSD file to 16 bit without collapsing it, or changing the colors. Converting to 16 bit without creating a smart object will result in unanticipated changes to your file. Having the smart object makes everything non-destructive, and you can always go back to it and change it (it works sort of like an Xref). It was necessary to convert it so that the full range of PS filters / adjustments were available for the final stretch of compositing. 32 bit files are very limited on the effects that can be used in PS.
After we converted to 16 bit we were able to enhance the image much further using levels, curves, overlays, etc.
Beyond this we added a few more passes, including the snow pass. We also did a grunge pass using a V-Ray dirt override material. Doing this as a separate pass again enabled us to mask parts we didn't like.
After a few more PS tweaks we ended up with this.
All Done!
Hopefully this was helpful. Please feel free to ask if something didn't make sense.
You must be logged in to post a comment. Login here.
R
Rafael Calderon
Report Abuse
How much time did you spend in this render?
F
Faiz Royhan
Report Abuse
Hi Jeff mottle
Your article is very helpful, but even better if you arouses video tutorial. Because many people are still confused by just reading. I beg to make a training video. Thank you very much.

Adam Zollinger
Report Abuse
Hey guys. I did an additional tutorial for this image, and explained how we added animated snow and fire in after effects. You might find it interesting as well. You can see that one here http://www.ffkr3d.blogspot.com/2013/06/spruce-up-your-still-shots-with-after.html

Evgeny Strelkov
Report Abuse
thank you)
m
mrtz fard
Report Abuse
nice
d
djosa ikstrio
Report Abuse
Thank you for this great tutorial! You've really helped me understand compositig..
N
Nacho Angulo
Report Abuse
Amazing. I still wonder how to model that incredible house in 3ds max (I'm a bit of a beginner).
Thanks for sharing!
Tunahan Koca
Report Abuse
Great post!Thank you so much for sharing your knowledge and effort.Solution for creating snow is really practical and physically correct!Hope to see more work of yours.

pedro silva
Report Abuse
Master Work!
Congratulations
Mike unrealVIZ
Report Abuse
Wow, great image and huge work! I'm totally impressed! It looks like an old, handmade Christmas postcard. It got this special mood. Which part of the process gave it this slightly NPR look?
k
kas yensz
Report Abuse
very very nice
Chris Webb
Report Abuse
Helps make the winter coming less scary! Thanks for this!
T
Tony Stake
Report Abuse
Good job!!!
k
keyur patel
Report Abuse
fantastic
Msamir
Report Abuse
Very very nice, the transformation from the raw render to the final result is amazing.

Simon Moir
Report Abuse
Very nice, thankyou.
S
Scott Parris
Report Abuse
Good job!!! Hope you guys stay busy.
About this article
The Making Of Snowy Night by FFKR Architects' in-house illustrator team.
visibility37.5 k
favorite_border61
mode_comment17


