

Making Of
Making of The Unbuilt House
Hi everyone, first of all I would like to thank Jeff Mottle and the whole CGarchitect team for this great opportunity and for the 2013 3D Award – commissioned image nomination! I couldn’t have made this picture without the encouragement and patience my colleagues at ZOA provided.
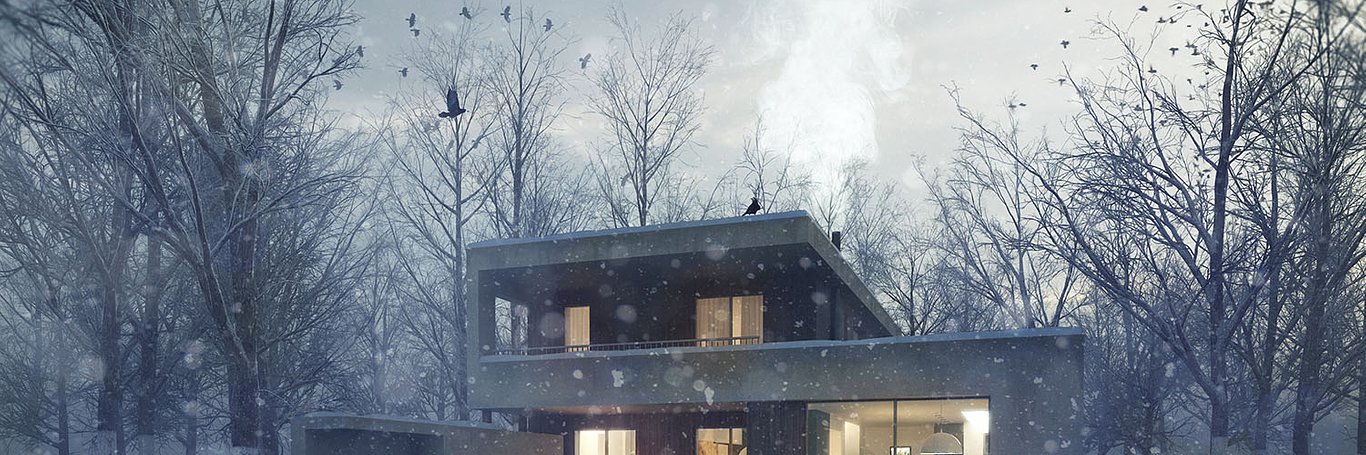
 Final render
Background
András Onodi at ZOA Architects designed this building which was originally located on the shore of Lake Balaton, Hungary. A few weeks after the planning phase, it turned out it would not be realized because of certain circumstances. But we really liked this project so I started the task of making a rendering for our portfolio. All in all I had approximately five working days for it.
Concept
Because of the background story it was obvious for me that I must make a melancholic picture. (I prefer such pictures as well.) I thought winter in a summer paradise is a good starting point. After I set up some contrasting pairs, for instance forest – beach (which is not sensible in this case), crows/raven (I don’t really know the difference – hehe) – people, coldness – warmth (similar in lights), darkness – brightness. I know everybody does that it’s just that I like to think that if I can figure out a few guidelines it will help me to stay on track later. It does not mean that I can’t refine the concept later. As a matter of fact almost every time I evolve my story during the process.
Workflow
I’ve never made any snowy pictures before so I was very excited! The other novelty in my workflow was to minimize the use of 3ds Max. I always do tons of stuff in post production but this time I only wanted to spend a few hours to model and texture, and a few minutes to render. This was possible because I required only one good image. During the process I found it very hard to not work on the details in 3ds Max, so I decided to create pre-renders as much as possible and create “sketches” in Photoshop from the very beginning. This way I was able to see which parts required more details in max and which are easier to create in Photoshop. It’s not a big thing but it does make your workflow very-very effective.
1. Preparations
I always use a linear workflow.
The model was made earlier during the design stage with simple box modelling techniques. Keeping in mind that almost everything is going to be made in Photoshop, I only did some tweaking where it was absolutely necessary and inserted some props (armchair, firewoods, etc.).
2. Modelling
2.1. Snow
I made a simple box where I thought the snow would pile up – mostly in the corners and at the edges of the terrace. After that I applied a few noise modifiers at different scales. That’s all.
 Snow model
2.2. Fire
The fire is two simple planes with a picture from cgtextures (slightly modified in PS). One is aligned perpendicularly to the Z-axis of the camera and the other is parallel to the edge of the fireplace. It doesn’t have to be very precise it just adds dimension to the flat fire.
2.3. Logs
For the logs, I used a photo reference from cgtextures. I placed it on a plane and drew a spline around it. Then extruded it and added a little chamfer on the edges. I used a different photo for the bark part.
 Fire and logs model
2.4. Blanket
The armchair next to the fire is a BoConcept Schelly chair which I’m very fond of. It’s simple, yet cozy looking! For more coziness and realism (you wouldn’t sit there without a warm blanket that’s for sure) I added a sloppily dropped blanket.
The blanket is a simple plane made with reactor cloth modifier. The plane has a very few segments. In this case 4x4 was enough to keep things fast and clean. For swiftness I also did a simplified lowpoly model of the chair. After a few drops the lowpoly blanket was satisfying so I increased the vertices with a Turbosmooth modifier. Some vertices “sinked” into the highpoly model but why should I waste my time on something that isn’t even visible? By the way it was a hard lesson for me because usually I like things nice and tidy. But efficiency must be a priority in this (and every) business.
 Blanket model
3. Materials
Materials are very-very simple. Again it’s because of the heavy Photoshop I plan use. I just focused on some reflections for instance on the wooden terrace.
 Snow and wood material
4. Lights
VrayDomeLight is the main light with HDRI (vizpeople HDRI v1) and there are some smaller vray light planes to light up the interior. To spice things up a little, I added some VrayIESLights here and there. For the light of the fire I chose a spherical vray light with warm colors.
 Lights
5. Environment
I used VrayEnvironmentFog instead I could’ve used Zdepth and post work. I just wanted to try out VrayEnvironmentFog.

VrayEnvironmentFog settings
6. Rendering
 Render setup
There’s absolutely nothing special about the render settings. These are very standard medium quality settings.
7. Post production
Again, nothing special. There’s no secret, just throw the elements on the canvas and blend them into the picture. It’s always fun to see your concept come to life.
(VFX breakdown)
 Raw render
Final image
Thank you for reading it! I hope you liked it!
More works from ZOA at www.zoa3d.com !
You must be logged in to post a comment. Login here.
g
gabor nagy
Report Abuse
impressive work!
r
roberto Freitas
Report Abuse
Beautiful home....cool
D
Dave Jochum
Report Abuse
The rendering is very well done. The presentation of it here with a beautifully organized explanation of methodology is outstanding. Thank you!
Valdano
Report Abuse
This is just amazing! Very well done!
About this article
Making of The Unbuilt House by Csaba Banati
visibility21.9 k
favorite_border26
mode_comment4


