

Tutorials
Material Libraries

Material Libraries
Ted Boardman tedb@tbmax.com http://www.tbmax.com
Siggraph 2002
I’d like to thank Jeff Mottle for hosting a great get-together for the cgarchitect participants of Siggraph 2002. Frankly, I was a little surprised there are so many architects at Siggraph, especially with the economy lagging these days. Siggraph is heavily skewed toward the film and television crowd with a fair amount of computer gaming thrown in.
When you think about it though, many of you entered into architecture to create spaces and worlds for people to exist in. That’s pretty much what movies and games are all about even though it may be for entirely different reasons. Both areas of visualization have lots that they can learn from each other. For example, the movie industry could learn more about space and scale in the fantasy worlds they create within the computer and architects could learn about storyboarding and pre-planning that would allow much move efficient scenes that contain only what the client needs to see.
If I had to choose a common technical theme throughout my conversations it would seem that better control of shadows and reflections were high on many of your lists. Also better methods of creating immersive environments for your clients to wander freely about in, while retaining high quality lights and materials was mentioned in several conversations.
The software industry is making great strides in that direction and hardware is almost a non-issue with all the powerful systems being offered at reasonable prices.
It was great to see some old acquaintances and to meet some new ones and to hear impressions of what is happening with visualization in the architectural fields. I really want to thank those of you who didn’t make it to the reception, but did stop me on the show floor to introduce yourselves and let me know that you read this column.
Hope to see more of you next year in San Diego.
Now Where Did I Put That?
A question that is posted quite often on the various VIZ and max support forums is “why can’t I have more than 24 materials?” so I thought I would ramble through some of the tools and concepts available for storing and locating materials while covering some more general materials issues along the way. Keeping track of your materials will increase productivity by reducing the amount of time you spend searching for and recreating materials.
There are essentially three places that materials can be stored in either 3ds max or Autodesk VIZ:
• Material Editor – materials can be kept in the 24 Material Editor sample windows
• Scene – materials can be applied to, and retrieved from, objects in the scene.
• Material Library – materials can be stored in a separate file with the .mat file ending
Material Editor: The First Choice
Very often you will be creating your materials from scratch in the Material Editor, as a matter of fact, I tend to recommend it, even though the learning curve seems steep at first.
Use the materials that ship with the software and materials that you may get from other sources as guides to creating your own materials. The materials in your scene will be the primary component of visualization that defines your style and acts as your signature to distinguish your work from others. Take the time to learn the ins and out of the Material Editor and how the materials you create interact with light to make your images stand out. There is nothing more discouraging than to go into a presentation or job interview and have your scenes looking similar to the last applicant because all the materials are “out of the box”.
When you open the Material Editor you are presented with six sample windows with spheres that show a representation of the materials you are creating. I say representation because of the lighting and the fact that it is a sample sphere by default. Scene lighting affects the look of your material profoundly. You will often get a great looking material on the sample sphere that is just plain embarrassing when rendered. Two things are the cause of this, the lighting and the shape of the surface. The shape of surfaces is especially important for materials with reflections and specular highlights as each play very differently over a flat or curved surface.
TIP: If you create an object that is about 100x100x100 units and save it to a file, (optionally with lights, camera, and mapping coordinates), you can it in any sample window in place of the default sphere. See Figure 1 for a lofted object that has a combination of flat and curved surfaces. In the Material Editor, go to Options, Custom Sample Objects and load the file. Then in the Material Editor, click the Sample Type button and you will have a new flyout button that will call the new sample object. To better see the results of any reflections in the material you can also turn on the Background toggle to see a checkered background in the sample window.
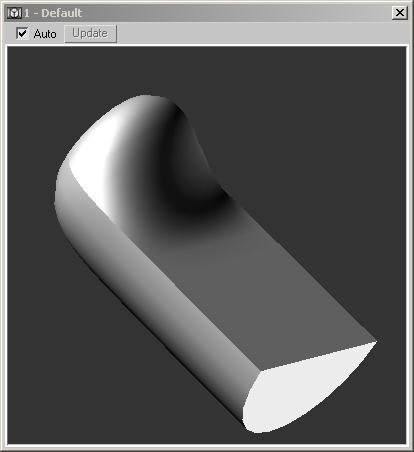
Figure 1: A Custom Sample Object used in the Material Editor for more accurate material rendition.
Note: Radiosity and Light Tracer rendering effects are never seen in the Material Editor
See why I said I’d ramble…when you create a material in the Material Editor and save the file the material remains in the editor and will be there when you open the file again. However, if you create a material in the Material Editor and quit or reset without saving the material is lost forever.
Scene Materials: A Better Choice
When you create materials in the Material Editor and assign them to objects in the scene the materials are, of course, saved with the file. Even if you clear the Material Editor, as long as a material is assigned to an object it is not deleted from the scene.
Let’s assume you have created one material and assigned it to an object in the scene. By the way, you can tell that a material has been assigned to an object in the scene by the triangles in the corners of the sample window. These triangles indicate a “hot” material; when you change the material in the Material Editor it will automatically update in the scene.
For whatever reason, you then drag one of the default sample windows on top of your hot material sample window. Your material disappears along with the triangles in the sample window. The material is still on the object in the scene even though it is not in the Material Editor any longer.
But, you were not really finished editing that material and now it’s gone and you can’t make any changes! No, that’s not the case at all. You can retrieve materials from objects in the scene and place them back in the Material Editor by using the eyedropper button (Pick Material from Object) just to the left of the material name field and picking the object in any viewport.
Note: if you replace a material in a sample window that hasn’t been assigned to an object in the scene, you will lose that material.
TIP: if you double-click on a sample window, you can magnify the window for better viewing. You can also rotate the sample by holding the mouse wheel down and moving the cursor over the original sample window (not the magnified one) or you can right click on the sample window and use Drag/Rotate.
Material Libraries: The Best, Hands Down Choice
The best method of dealing with materials is to use Material Libraries. These are specific files with the .mat ending that store the descriptions of your materials. The biggest advantage of storing materials in libraries is that the materials will be available from any scene and by all users in your company. It is a good habit to put your material in a library as soon as you create it.
The process goes like this the first time around:
1. You create a material in the Material Editor and click the Get Material button to call the Material/Map Browser. By default this show you a list of new material types (blue spheres) and map types (green or red parallelograms). See Figure 2.
Figure 2: The default Material/Map Browser shows material and map types
Note: the red parallelograms indicate Show Map in Viewport is active for that map.
2. In the Browser, check the Browse From: Mtl Library radio button and you get a list of material and maps in the current library, which by default is 3dsmax.mat or 3dsviz.mat.
3. At the top right of the Browser, click the Clear Material Library button. This is non-destructive! It only clears the list and does nothing to the .mat file on disk.
4. Drag and drop your material from the sample window to the Browser.
5. In the Browser, click File:Save As and choose a sub-directory and filename that is appropriate.
Material Libraries may be opened from any scene and the material can be dragged from the library to any sample window in Material Editor or directly onto objects in the scene.
TIP: if you have Microsoft Access on your machine when you install max or VIZ the Windows file association may be set to .mat files from Access. Changing the Windows file association to max or VIZ will allow you to use the library files but will not harm Access in any way.
Set your Material Libraries up in logical groupings that make sense for your production environment. The material descriptions do no take up much disk space and can be duplicated in many different libraries. For example, you should have a Material Library that contains all the materials for each project, but you can also have libraries that contain all stone materials or sky materials, or a library that contains high-resolution materials. Each of those libraries may contain some of the same material descriptions.
Accessing Materials in a Scene
You now know that materials may be stored in a scene, but there are several areas of a scene from which you can view those materials by choosing from the Browse From options. You can browse from:
• Material Library – an open library file
• Mtl Editor – the 24 material sample windows
• Active Slot – only the selected sample window in Material Editor
• Selected – materials on the selected objects in the scene
• Scene – all materials assigned to objects in the scene
• New – the default listing of all material and map types used to create new materials
The Material/Map Browser also has an option in the File area to merge Material Libraries into the current library. This would allow you to make all wood materials available in the current project file, for example.
Summary
So, the answer to the original question is that you are not limited to only 24 materials. For all practical purposes there is no limit to the number of materials, only that you may only view and edit a maximum of 24 at any one time. In addition you could have 24 complex materials like Multi/Sub-Object or Blend materials that have multiple levels of blending in the Material Editor at any one time. Each sub-material could be dragged and drop individually onto objects in the scene.
There is plenty of flexibility in the system and it essentially becomes a management issue to coordinate all users to be familiar with library structure and to have policies in place to keep from overwriting or recreating existing materials.
Take the time to investigate the options available in the Material Editor so you can quickly create and edit your materials for knockout presentations that give you the edge over your competition.
Have fun and good luck.
You must be logged in to post a comment. Login here.
About this article
Material Libraries
visibility5.34 k
favorite_border0
mode_comment0


