


Making Of
The Making of the Reading Room
The Making of the "Reading Room" with HDRI lighting
Hi guys, my name Arie Kurniawan, this my first "making of" tutorial. I want to thank Jeff Mottle for giving me the opportunity to share my tutorial on CGarchitect. Today I will explain my very simple practice interior render with HDRI lighting.
OK lets just begin.
PREPARATION
For all of my projects I set my gamma for LWF (Linear Workflow) to get a correct brightness and because I want to do post production on my image.

MODELING
In this scene I used ready made models for accessories, so I just modeled the wall, floor, window object using basic edit poly. And I created a simple decorative cloth model in Clo3d 2011.
Fix model for camera view.

Book case for reflection on the mirror.
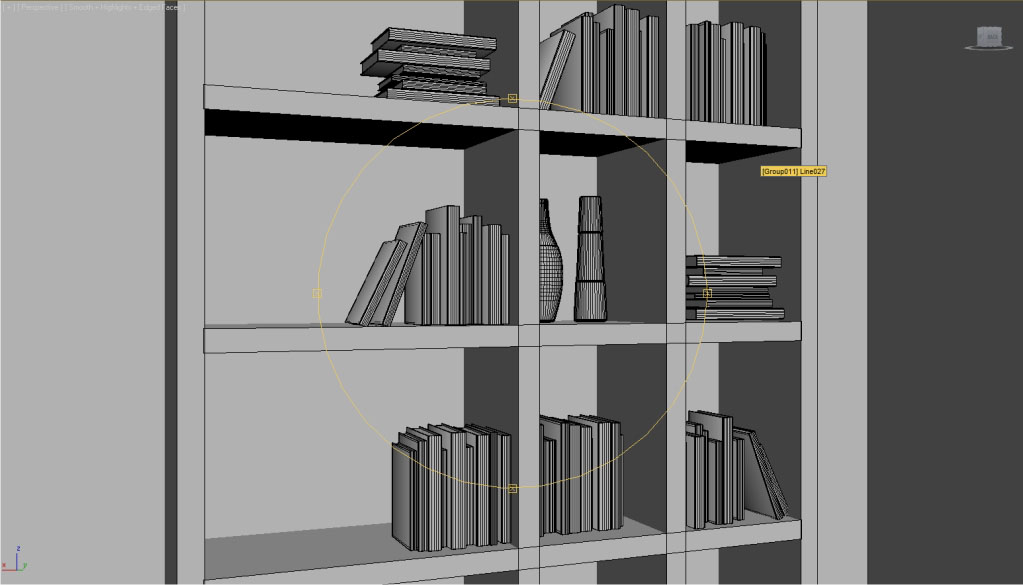
Cloth made in clo3d 2011 and the floor made only from a simple box.

LIGHTING
As I said before, in this scene I am using HDRI lighting with Vraylight Dome+HDRI map. You can see my method in the image below.

You only have to set the mapping type to spherical, horiz. rotation to control the sun beam direction, and gamma to get a correct GI, sun and strong shadow shape.
This is the simulation using different gamma values:

Increased gamma can make a soft shadow effect and weak sun lighting. Decreased gamma can make the shadow look sharpen and strong sun lighting.
Of course it is not a fixed setting. Different scenes require you to set different gamma values and also different horiz. rotation to get the correct lighting in your scene.
CAMERA SETTINGS
Just simple setting for my vrayphysical camera.

MATERIAL AND TEXTURING
There are a lot of advanced materials that I use in this simple scene. I only use standard method color selector to set the diffuse and reflect properties.
Wood Floor

Red leather

Fabric

RENDER PRESETS
Here are my render preset settings:

And this is the final raw rendered image:

Z-depth map image:

Reflection map image:

POST PRODUCTION
In this process I only use a simple technique for post production. I like natural colors in my rendered image.
1. Color correction using color balance and curves and then add little bit of diffuse glow.

2. Blend with a reflection map

3. Add a Depth Of Field effect using a z-depth map

4. Chromatic Aberration

FINAL RENDER RESULT
That's all of the post production and this is the final result:

I hope this simple "making of" will help you and you enjoyed reading it. And of course feel free to ask and questions. Thanks to everyone and best regards from an Indonesian 3d artist.
You must be logged in to post a comment. Login here.

Bruno Antunes
Report Abuse
Great! I´m making a similar image. But the landscape outside the window and the curtains is looking very bright. Now i'm gonna try this illumination method.

Panjul _Be
Report Abuse
mantap om...
k
kas yensz
Report Abuse
Nice simple tutorial.. i really like the cloth in marvelous clothing designer..
I have One question.. what is your workflow of the book..
Just simply modelling, and add just a diffuse map for every single book?
Greetz

opal coyz
Report Abuse
great, awesome, ruaar biasaaa.... :D
thanks for tutor...

Muneer Ahmed
Report Abuse
simple and very impressive tutorial presentation style is very nice thanks for sharing and congratulation :)
F
Ferry Sugianto
Report Abuse
perfect
Terry Irawan
Report Abuse
. .Kerennn Bro . . . thks for sharing . .
h
hary jumayan
Report Abuse
congratz!! good tutorial masta!
About this article
Arie Kurniawan breaks down his recent Reading Room image.
visibility39.9 k
favorite_border29
mode_comment28


