


Making Of
Making of Smirnova-lastochkina Office

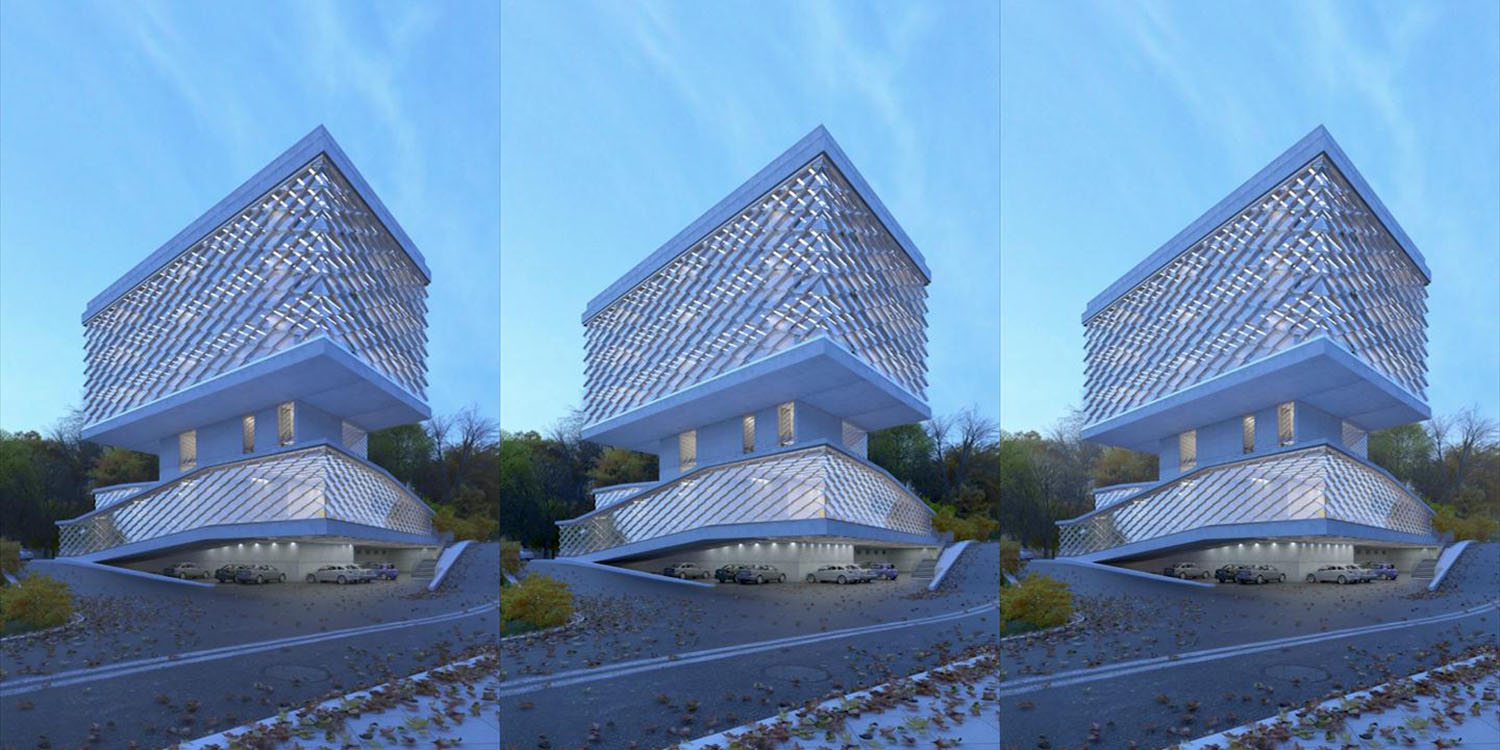
Hi, everyone! I am Serjozha Yakimenko and I would like to share with you the making of process of “Smirnova-lastochkina office” image.
This work was nominated for the 2014 3D Awards Student image category along with four others.
Thanks to Jeff Mottle, CGarchitect team and jury for the Best competition in Architectural visualization world.
“Smirnova-lastochkina office” is a part, of the designing project of the office building, during my educational program in Kyiv National University of Constructions and Architecture.
Workflow
Architectural concept
Visualization project
Reference images
Modelling
Camera matching
Materials
Light
Environment
Render and camera settings
Post-production
This project was done in two stages: architectural concept and visualization project. I’ll touch the first stage superficially, and second more deeply.
Architectural concept
The site is located in Kyiv city, Ukraine.
Some pictures, which I took during my walks around the site, helped me understand adjacent space.
Really there was a building under construction. I had a good opportunity to show, how good a building can be.
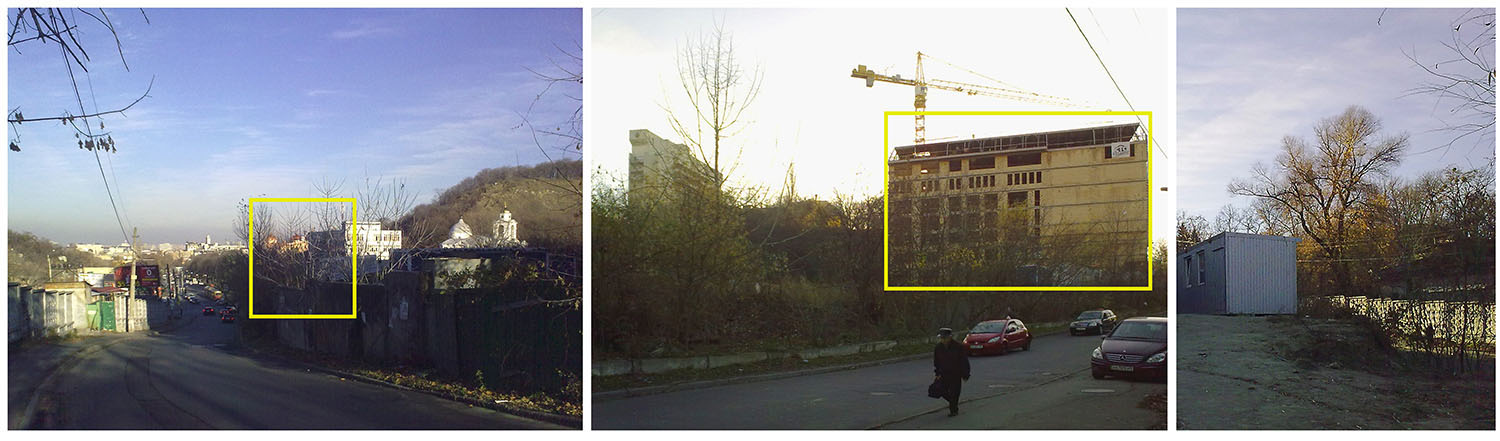
Photos from the site
This site is situated at the edge of contemporary and historical part of the city.
This building can be a buffer zone between those.
Its form: is simple prism, subdivided into four functional volumes.
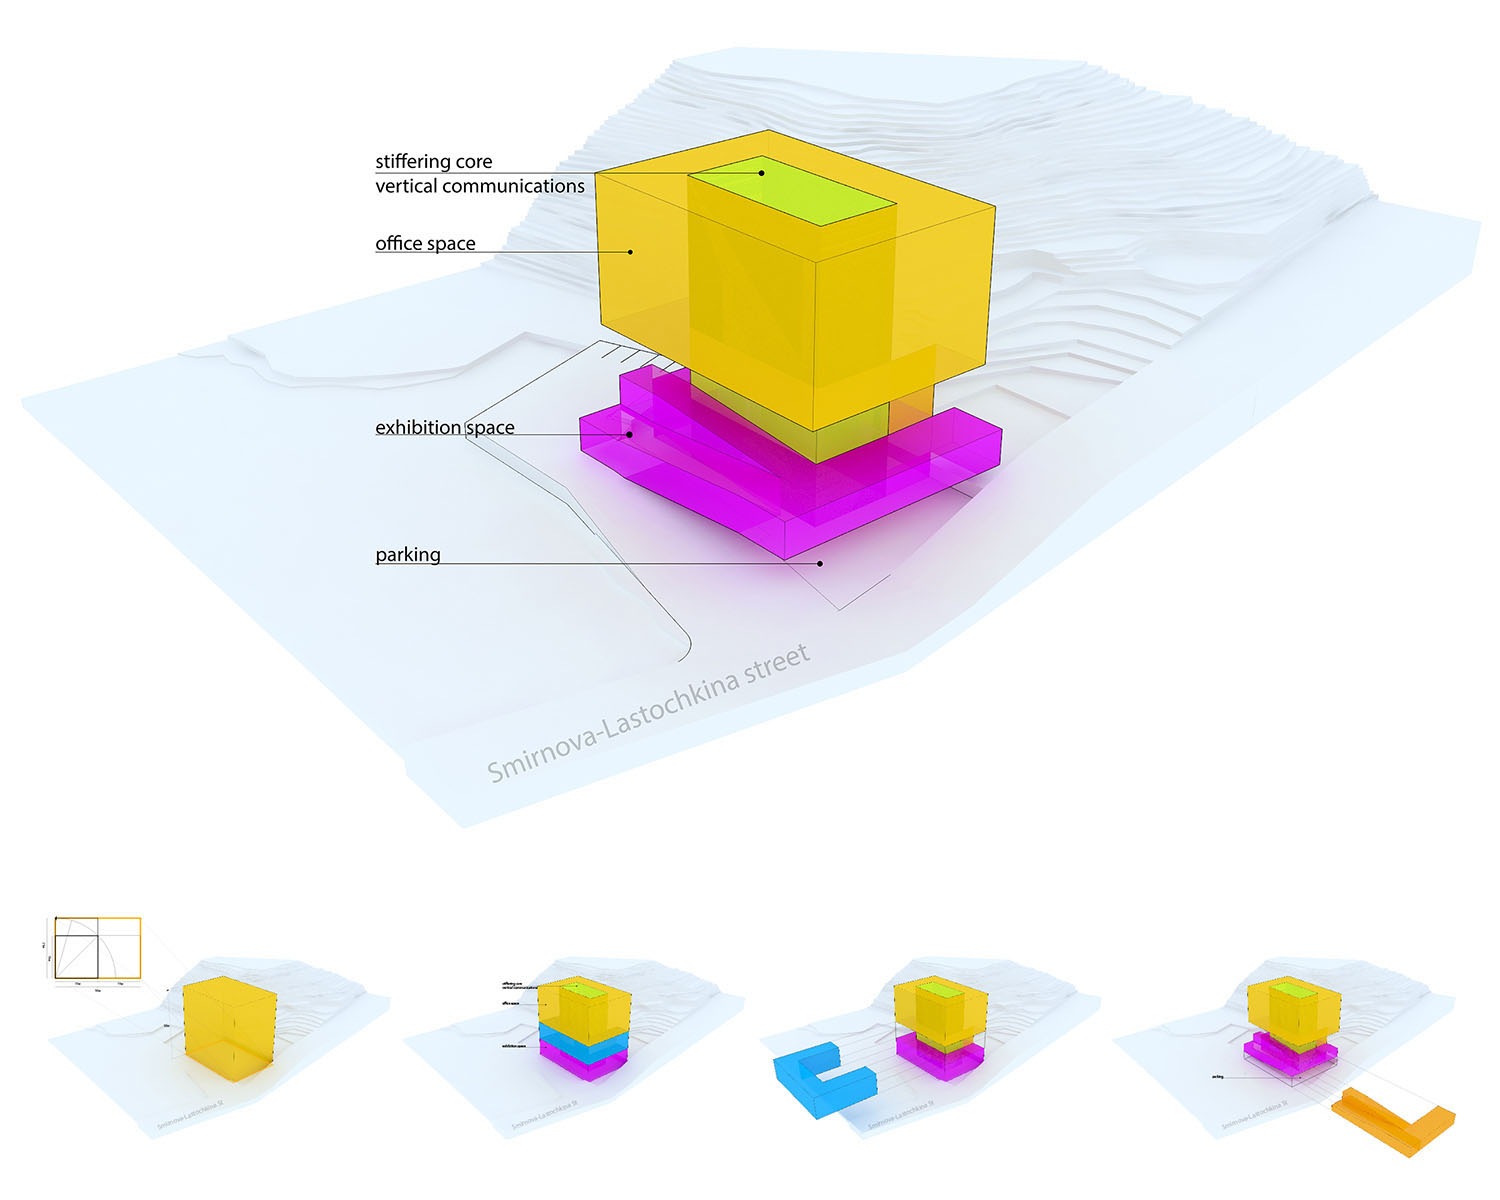
Functional and morphogenesis schemes
Visualization project
Concept: combination of simplicity and beauty, figurative contemporary view to history.
Reference images
I wanted the final image to be simple, nice and beautiful matching the mood of these images:
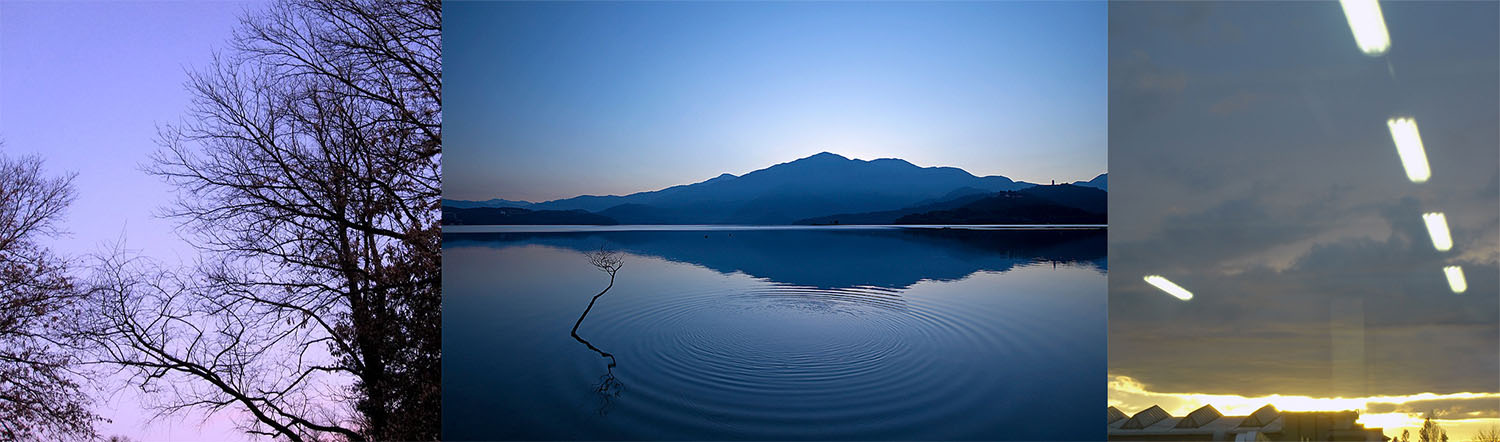
Reference images
Modelling
Main volume was designed in ArchiCAD and was merged into 3ds Max.
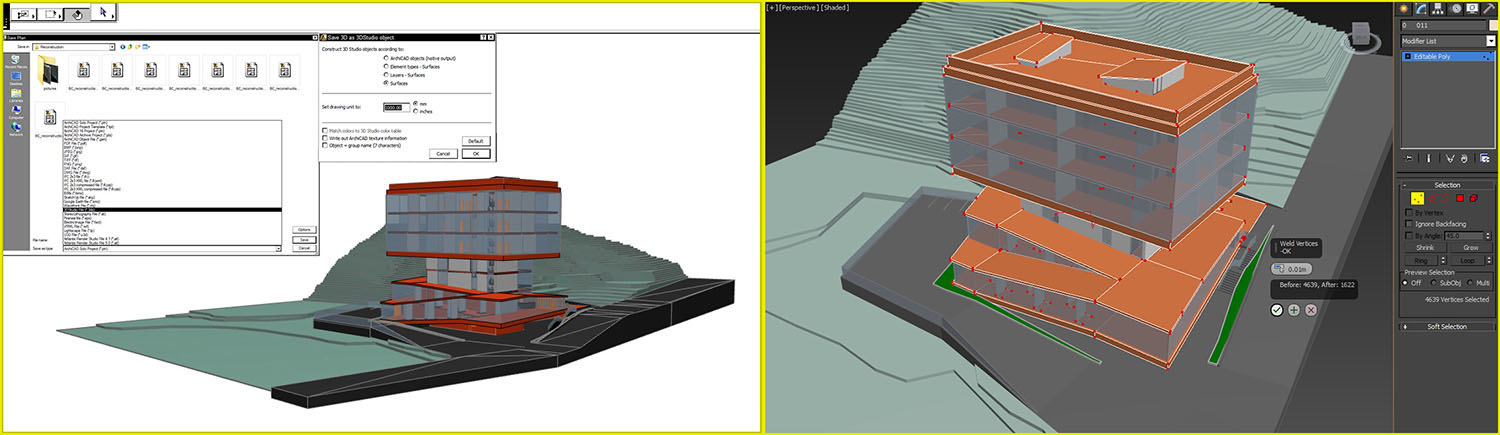
ArchiCad>3DS Max
I used the same material, for volumes, which I wanted to be one object in 3DS Max.
Saving model: In 3D view of the ArchiCAD, “Save as”, .3D format, by “Surfaces”, 1000.00mm.
Merging model: In new 3DS Max file, Import > Merge, 3DS model from ArchiCAD.
Optimizing model: For optimization, simple models were merged from ArchiCAD, I converted them to EditablePoly > selected all vertices > welded all of them with little amount.
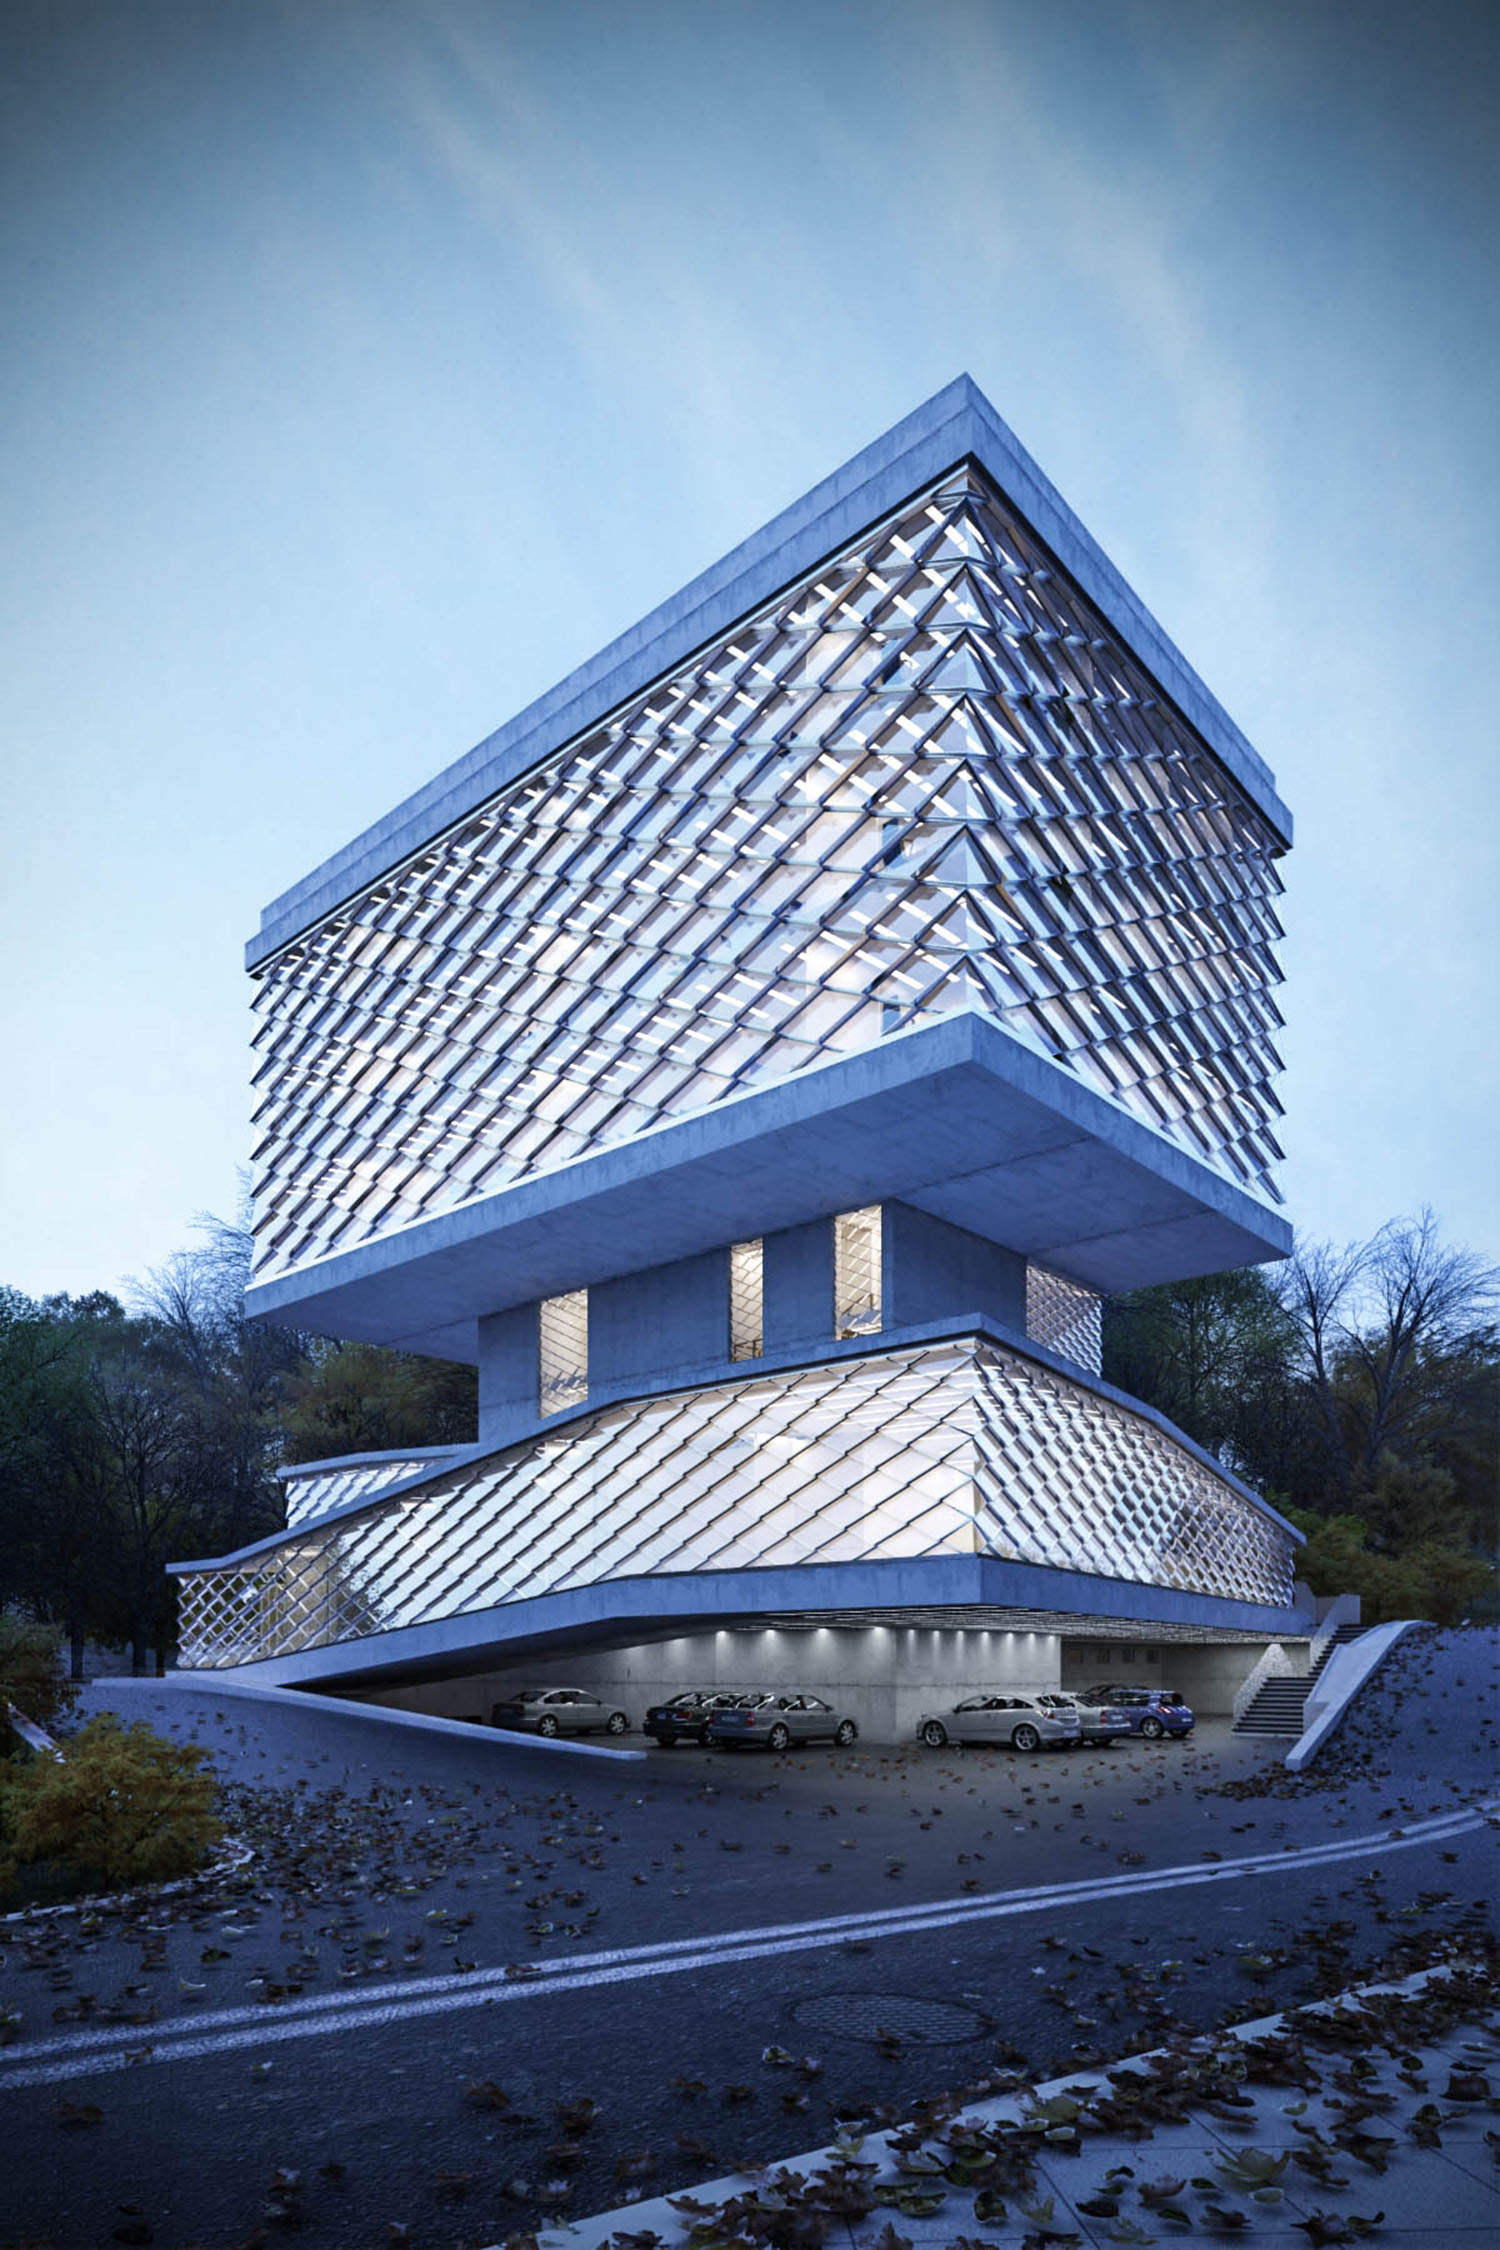
Next step was to search for the right geometry for facade system, which will cover all glass walls of the building.
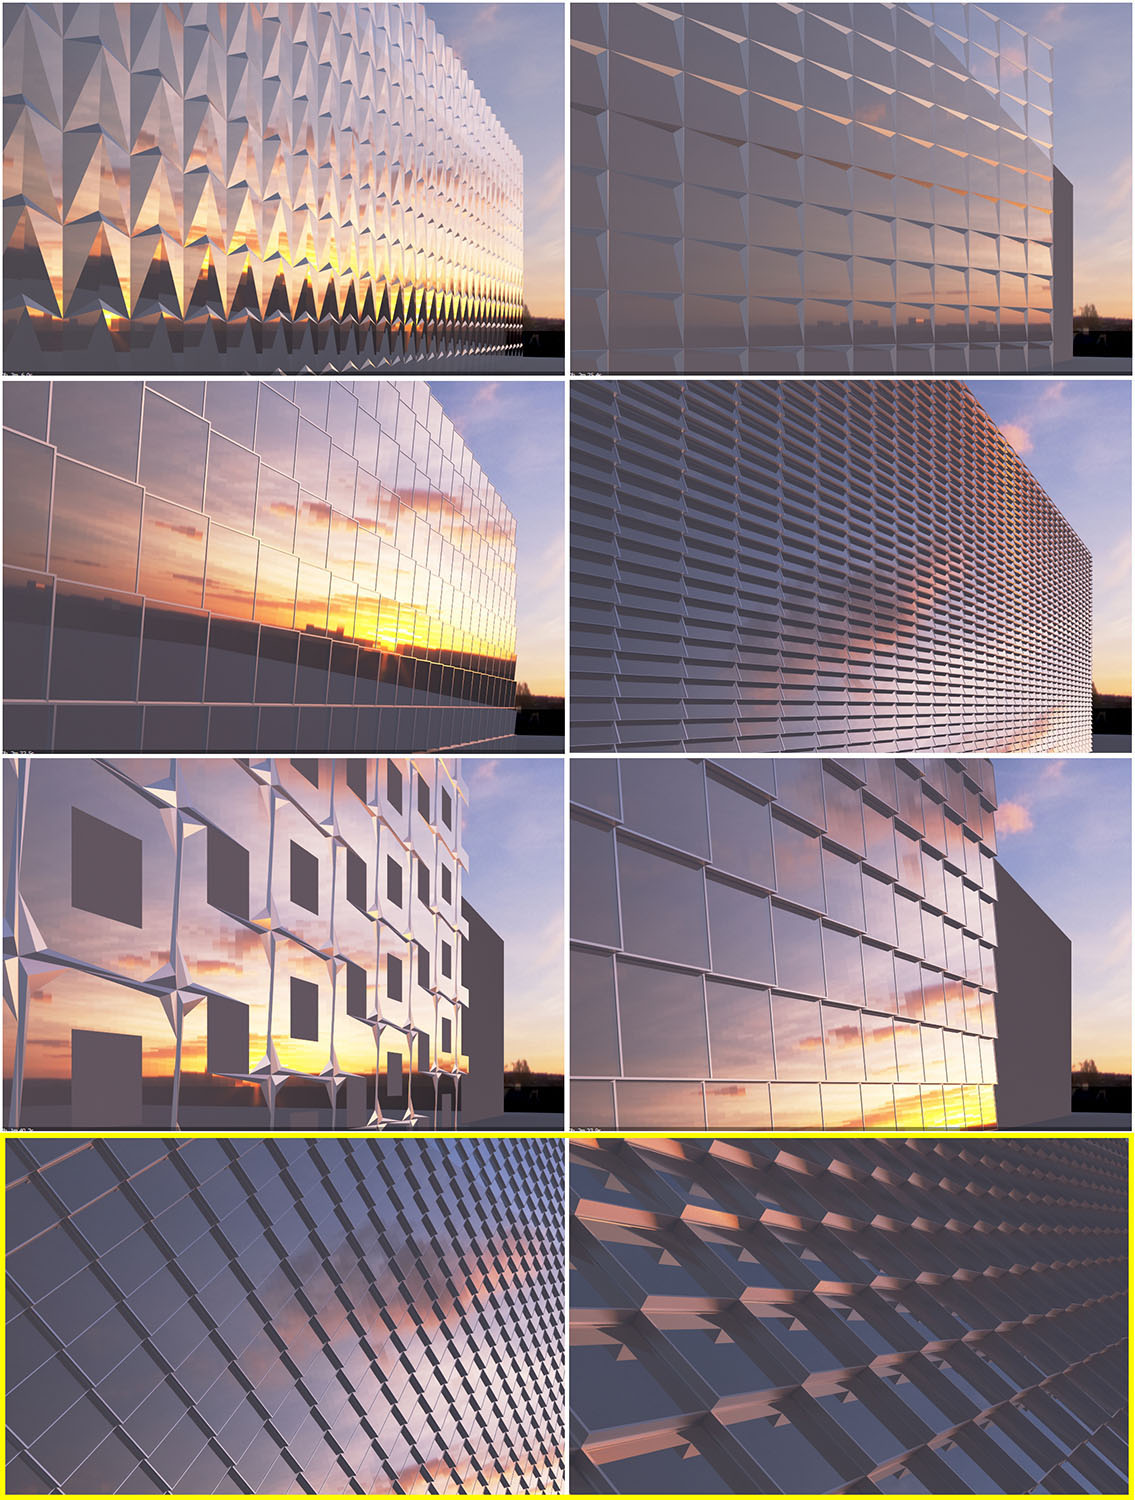
Facade system variations
I created several different views of the “walls”, and choose the one I liked the most.
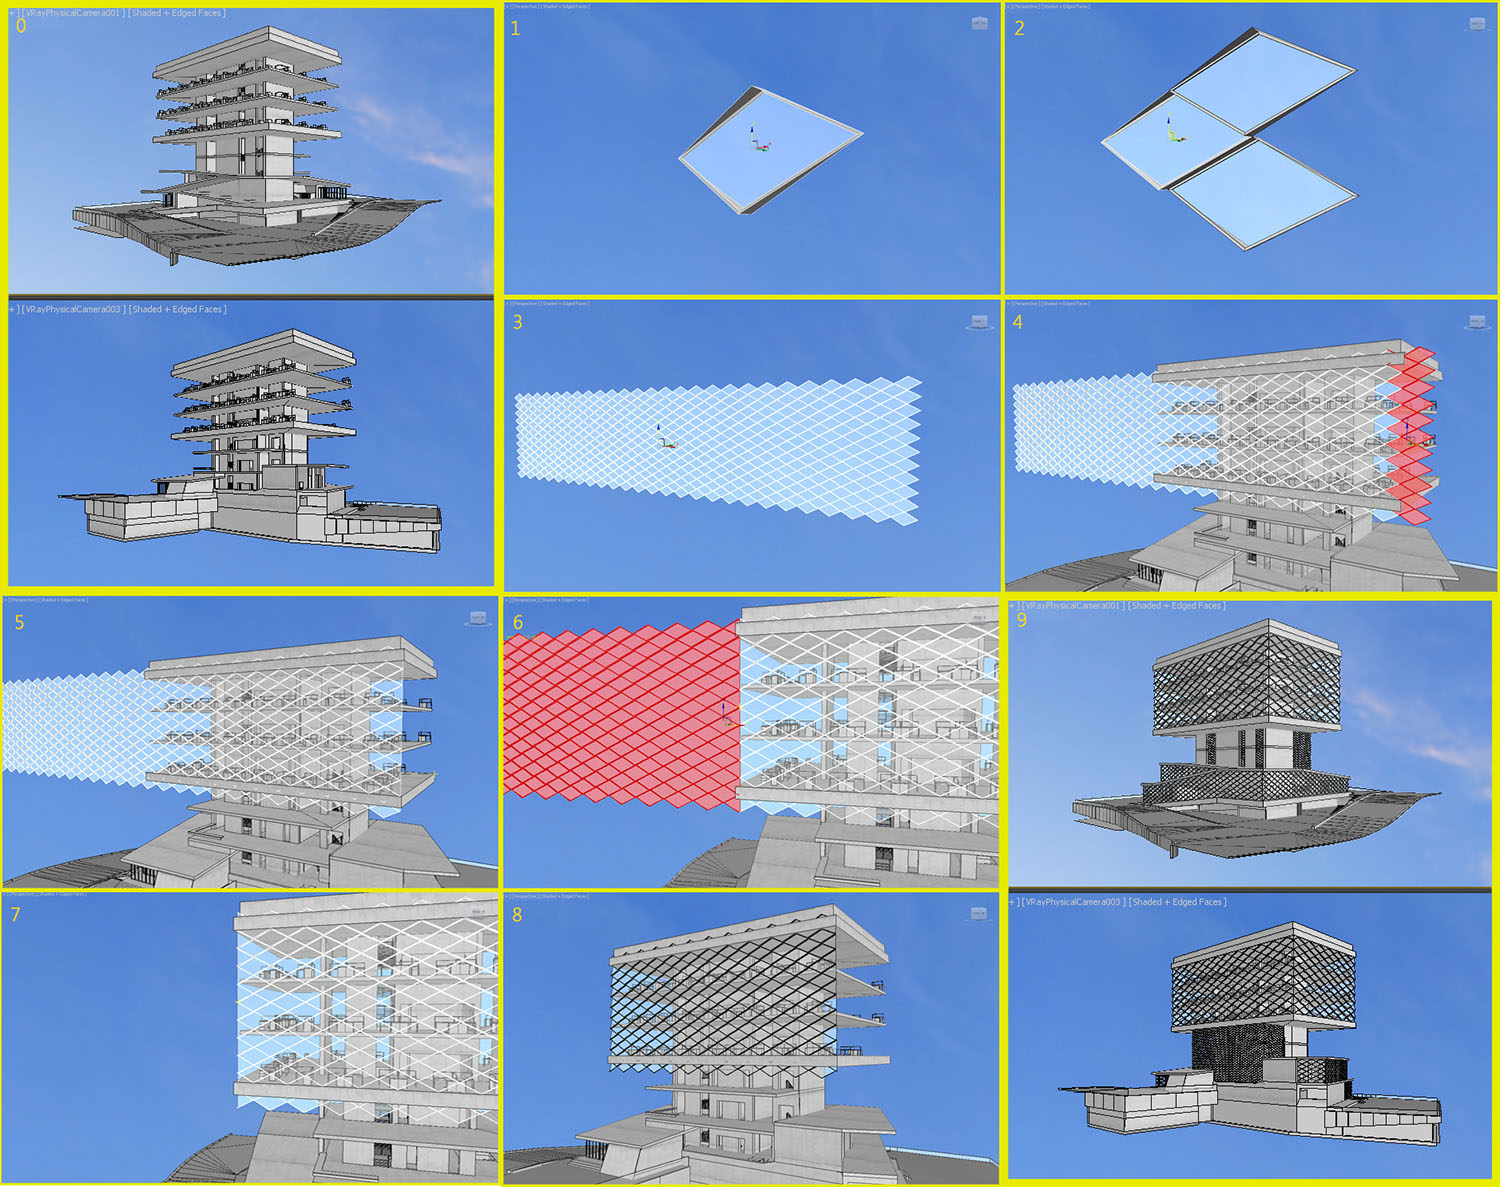
Modelling facade
For the whole facade I created one unified element and copied it several times, combined it all into one object and started integrating it into the structure of the building, moving, scaling, rotating, slicing it and welding as required.
This step finalized the geometry of my building.
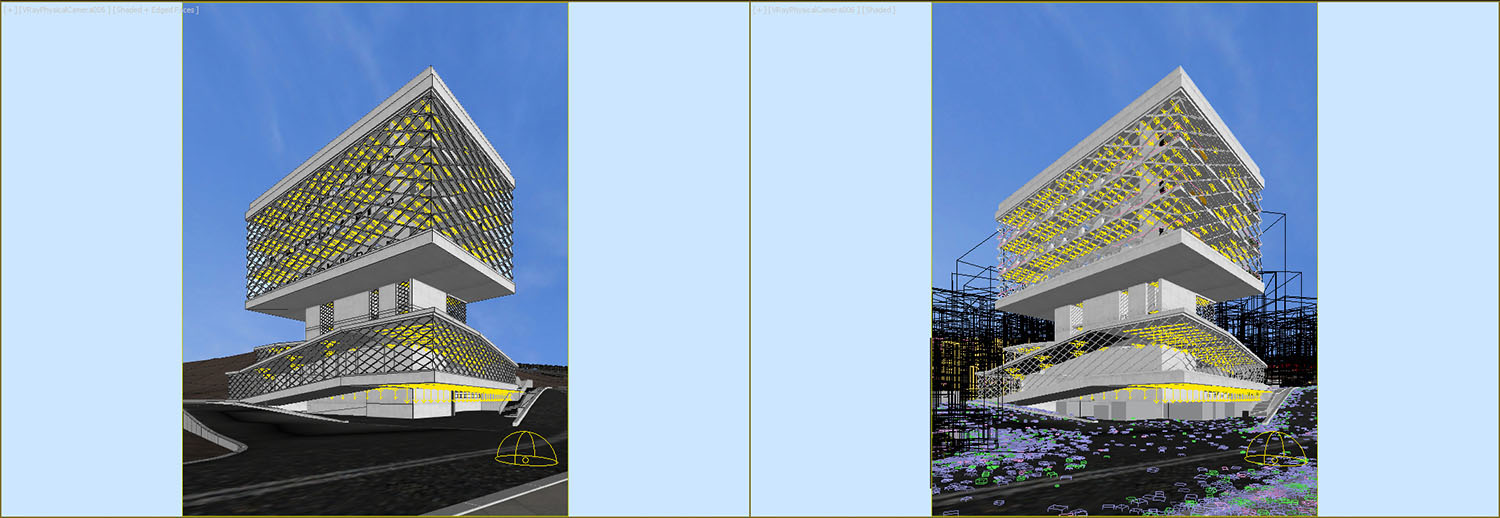
Camera matching
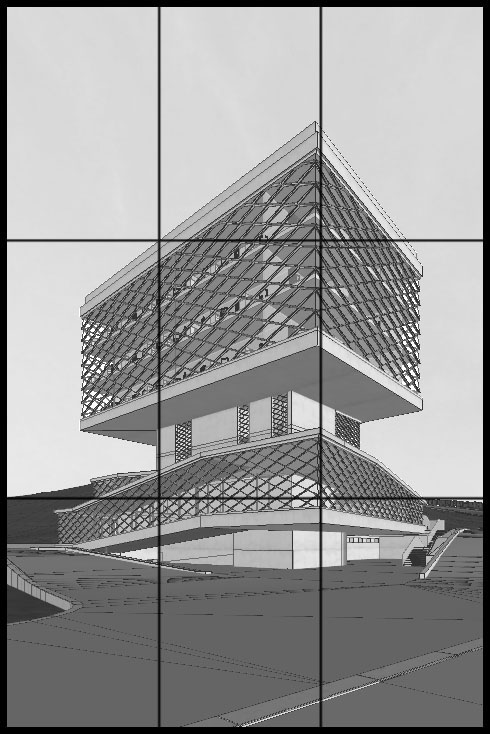
Camera view
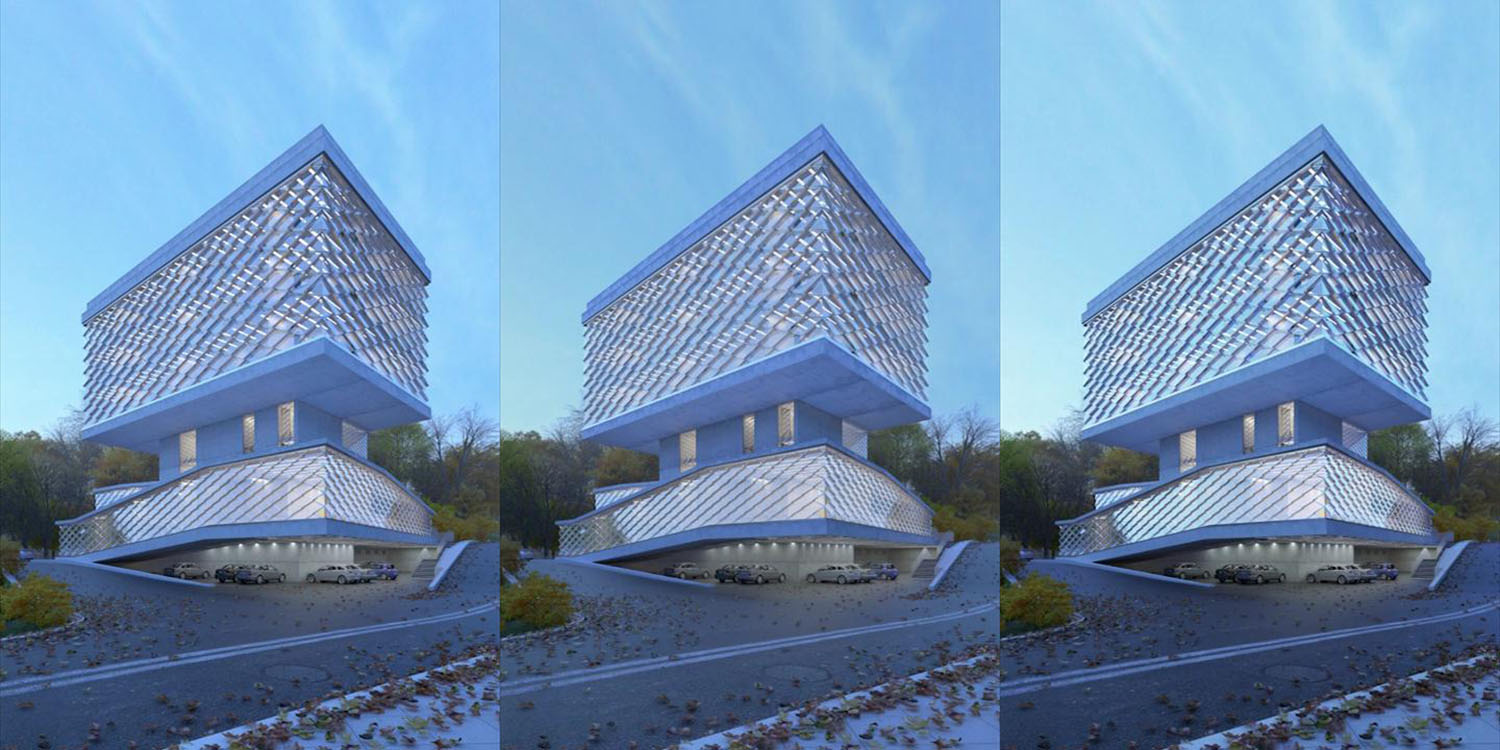
¾ seemed to me to be a good camera view, vertical orientation looks good for this view and adjusting through “rule of thirds” helped finalize composition of the frame.
Materials
I wanted the building to be pure, simple and understandable.
I decided to use not more than three “main” materials, to maintain simplicity.
Glass, steel and concrete are the three common, contemporary materials.
Facade materials
For facade materials - glass and steel with these settings:
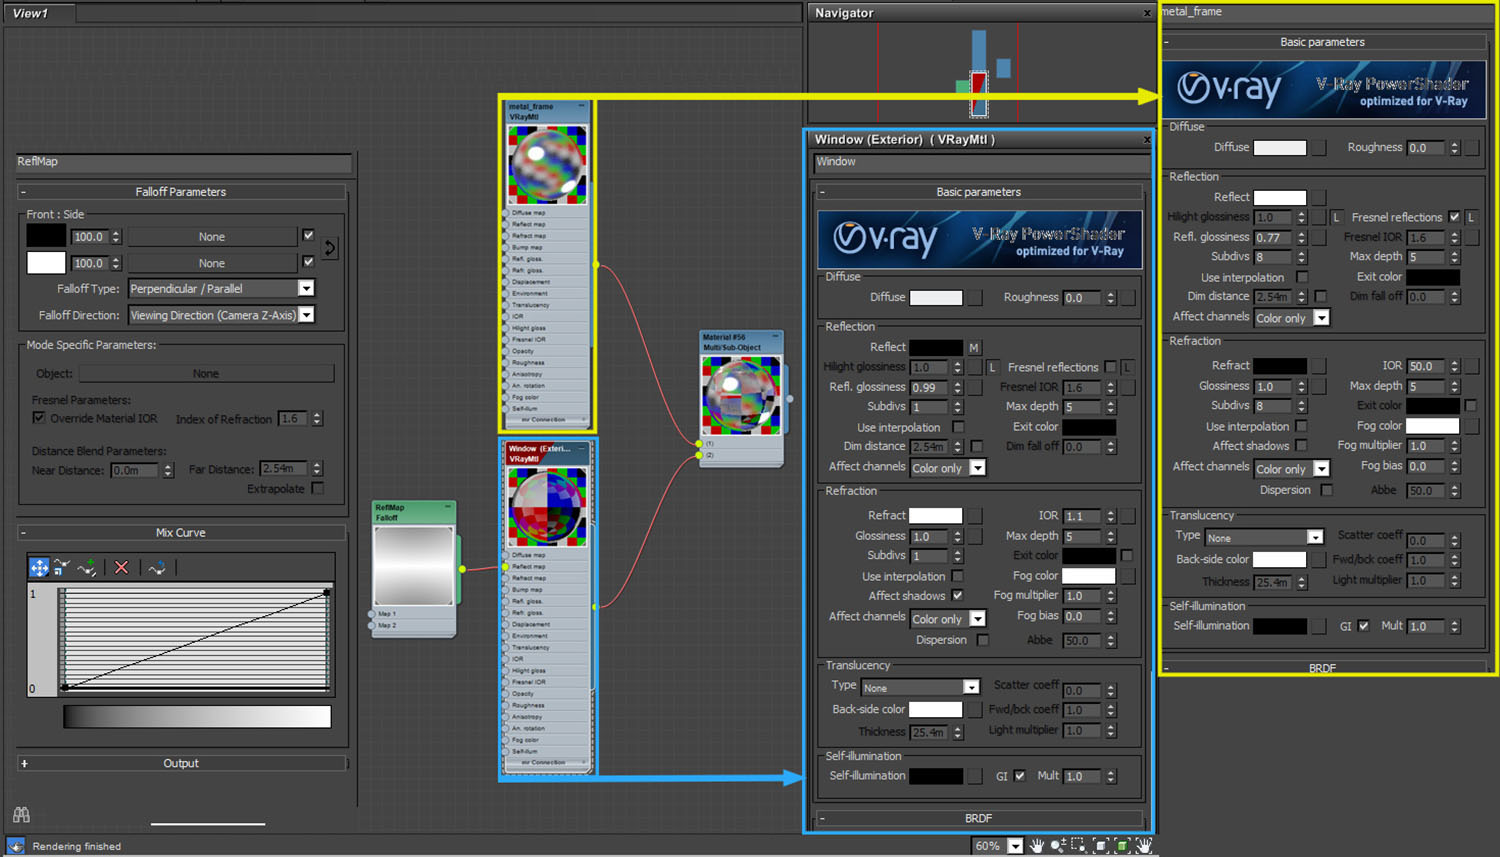
Facade materials
Concrete material
For structure (concrete) I tried different materials, using Arroway concrete collection maps.
Concrete material variations
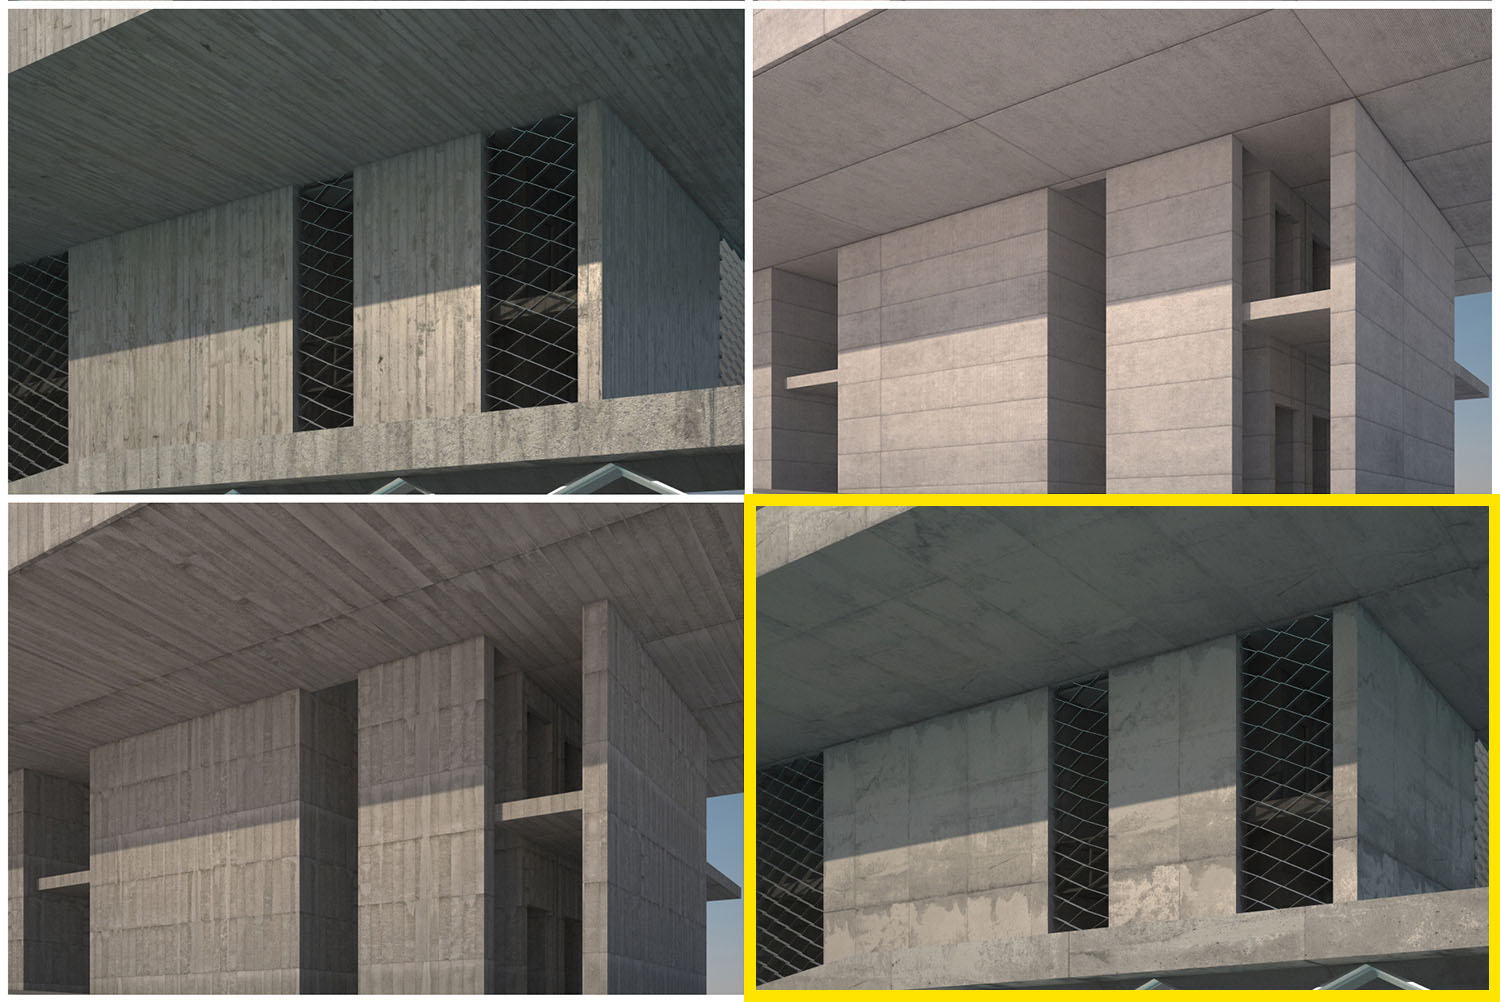
I liked the last one most; it has a nice scale and proportions of prints from formwork and nice leaks, which when used with the right mapping saves time, instead of drawing it manually.
Here are the properties I used for the concrete material:
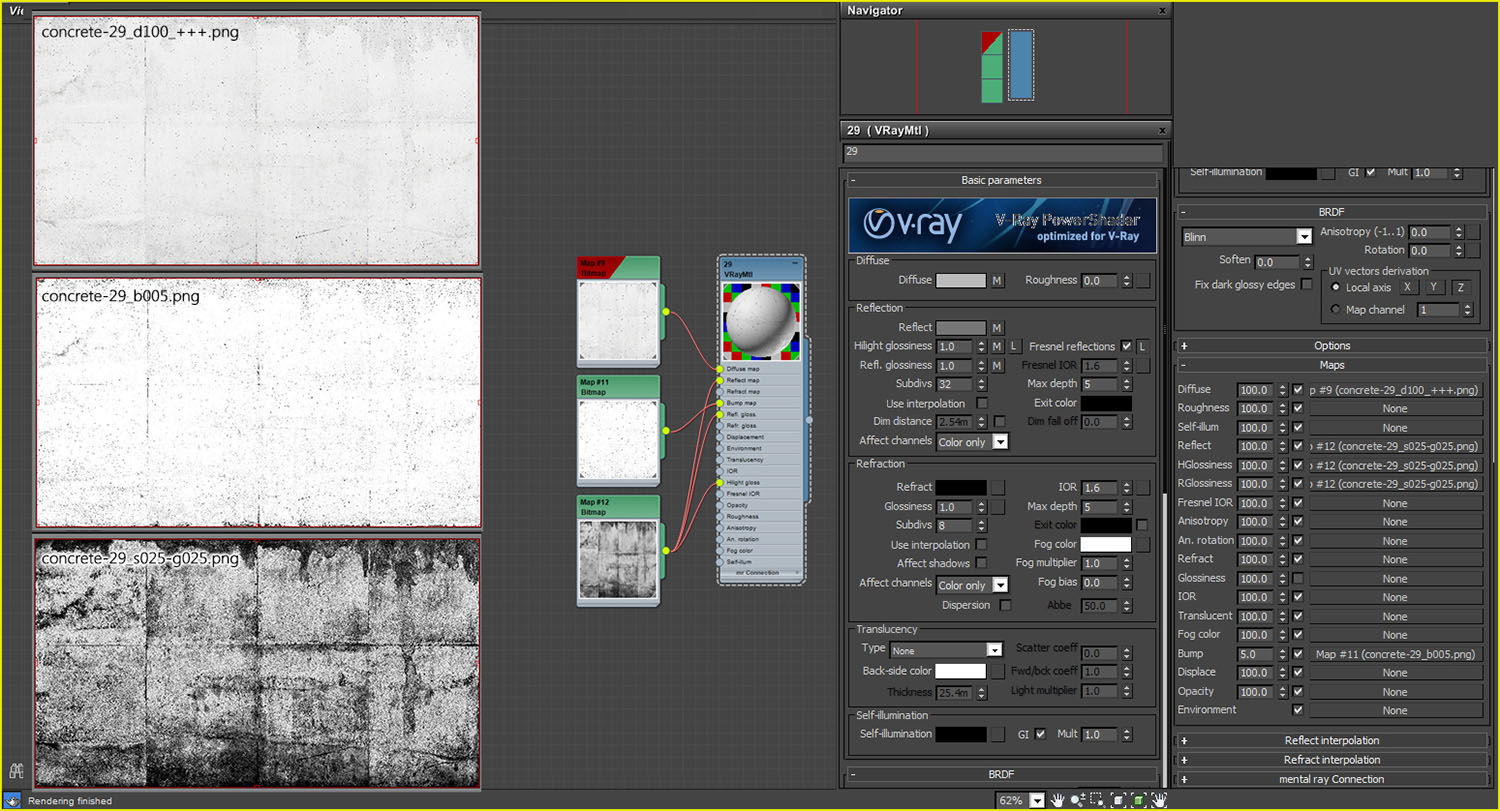
Concrete material
Right mapping with “unwrap UVW” modifier, helped to scale and place texture in good positions, leaks in the corners of the geometry, and form prints dividing structure into equal pieces.
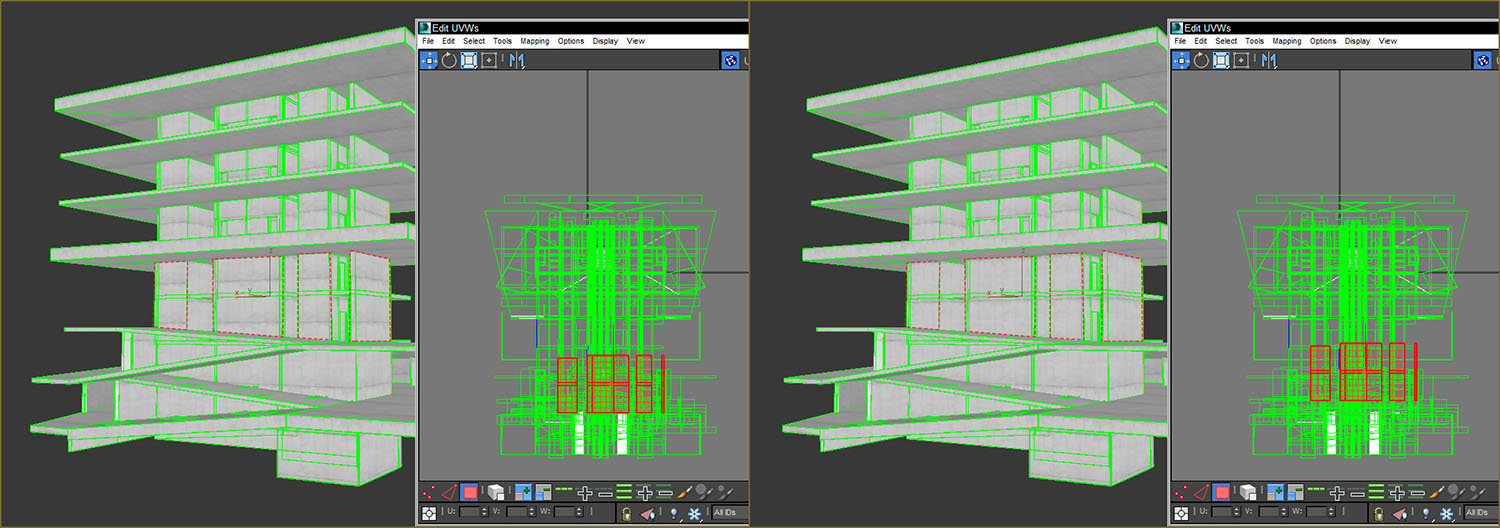
Reposition of texture
Road material
I rendered horizontal polygons of the road and drew a texture based on the contour edges of the render. I wanted it to have a separator of the road, pedestrian crossing area, parking marking, dirt edges and some details, for example hatch. Using different layer combinations and experimenting with it I was able to get a texture that I liked.
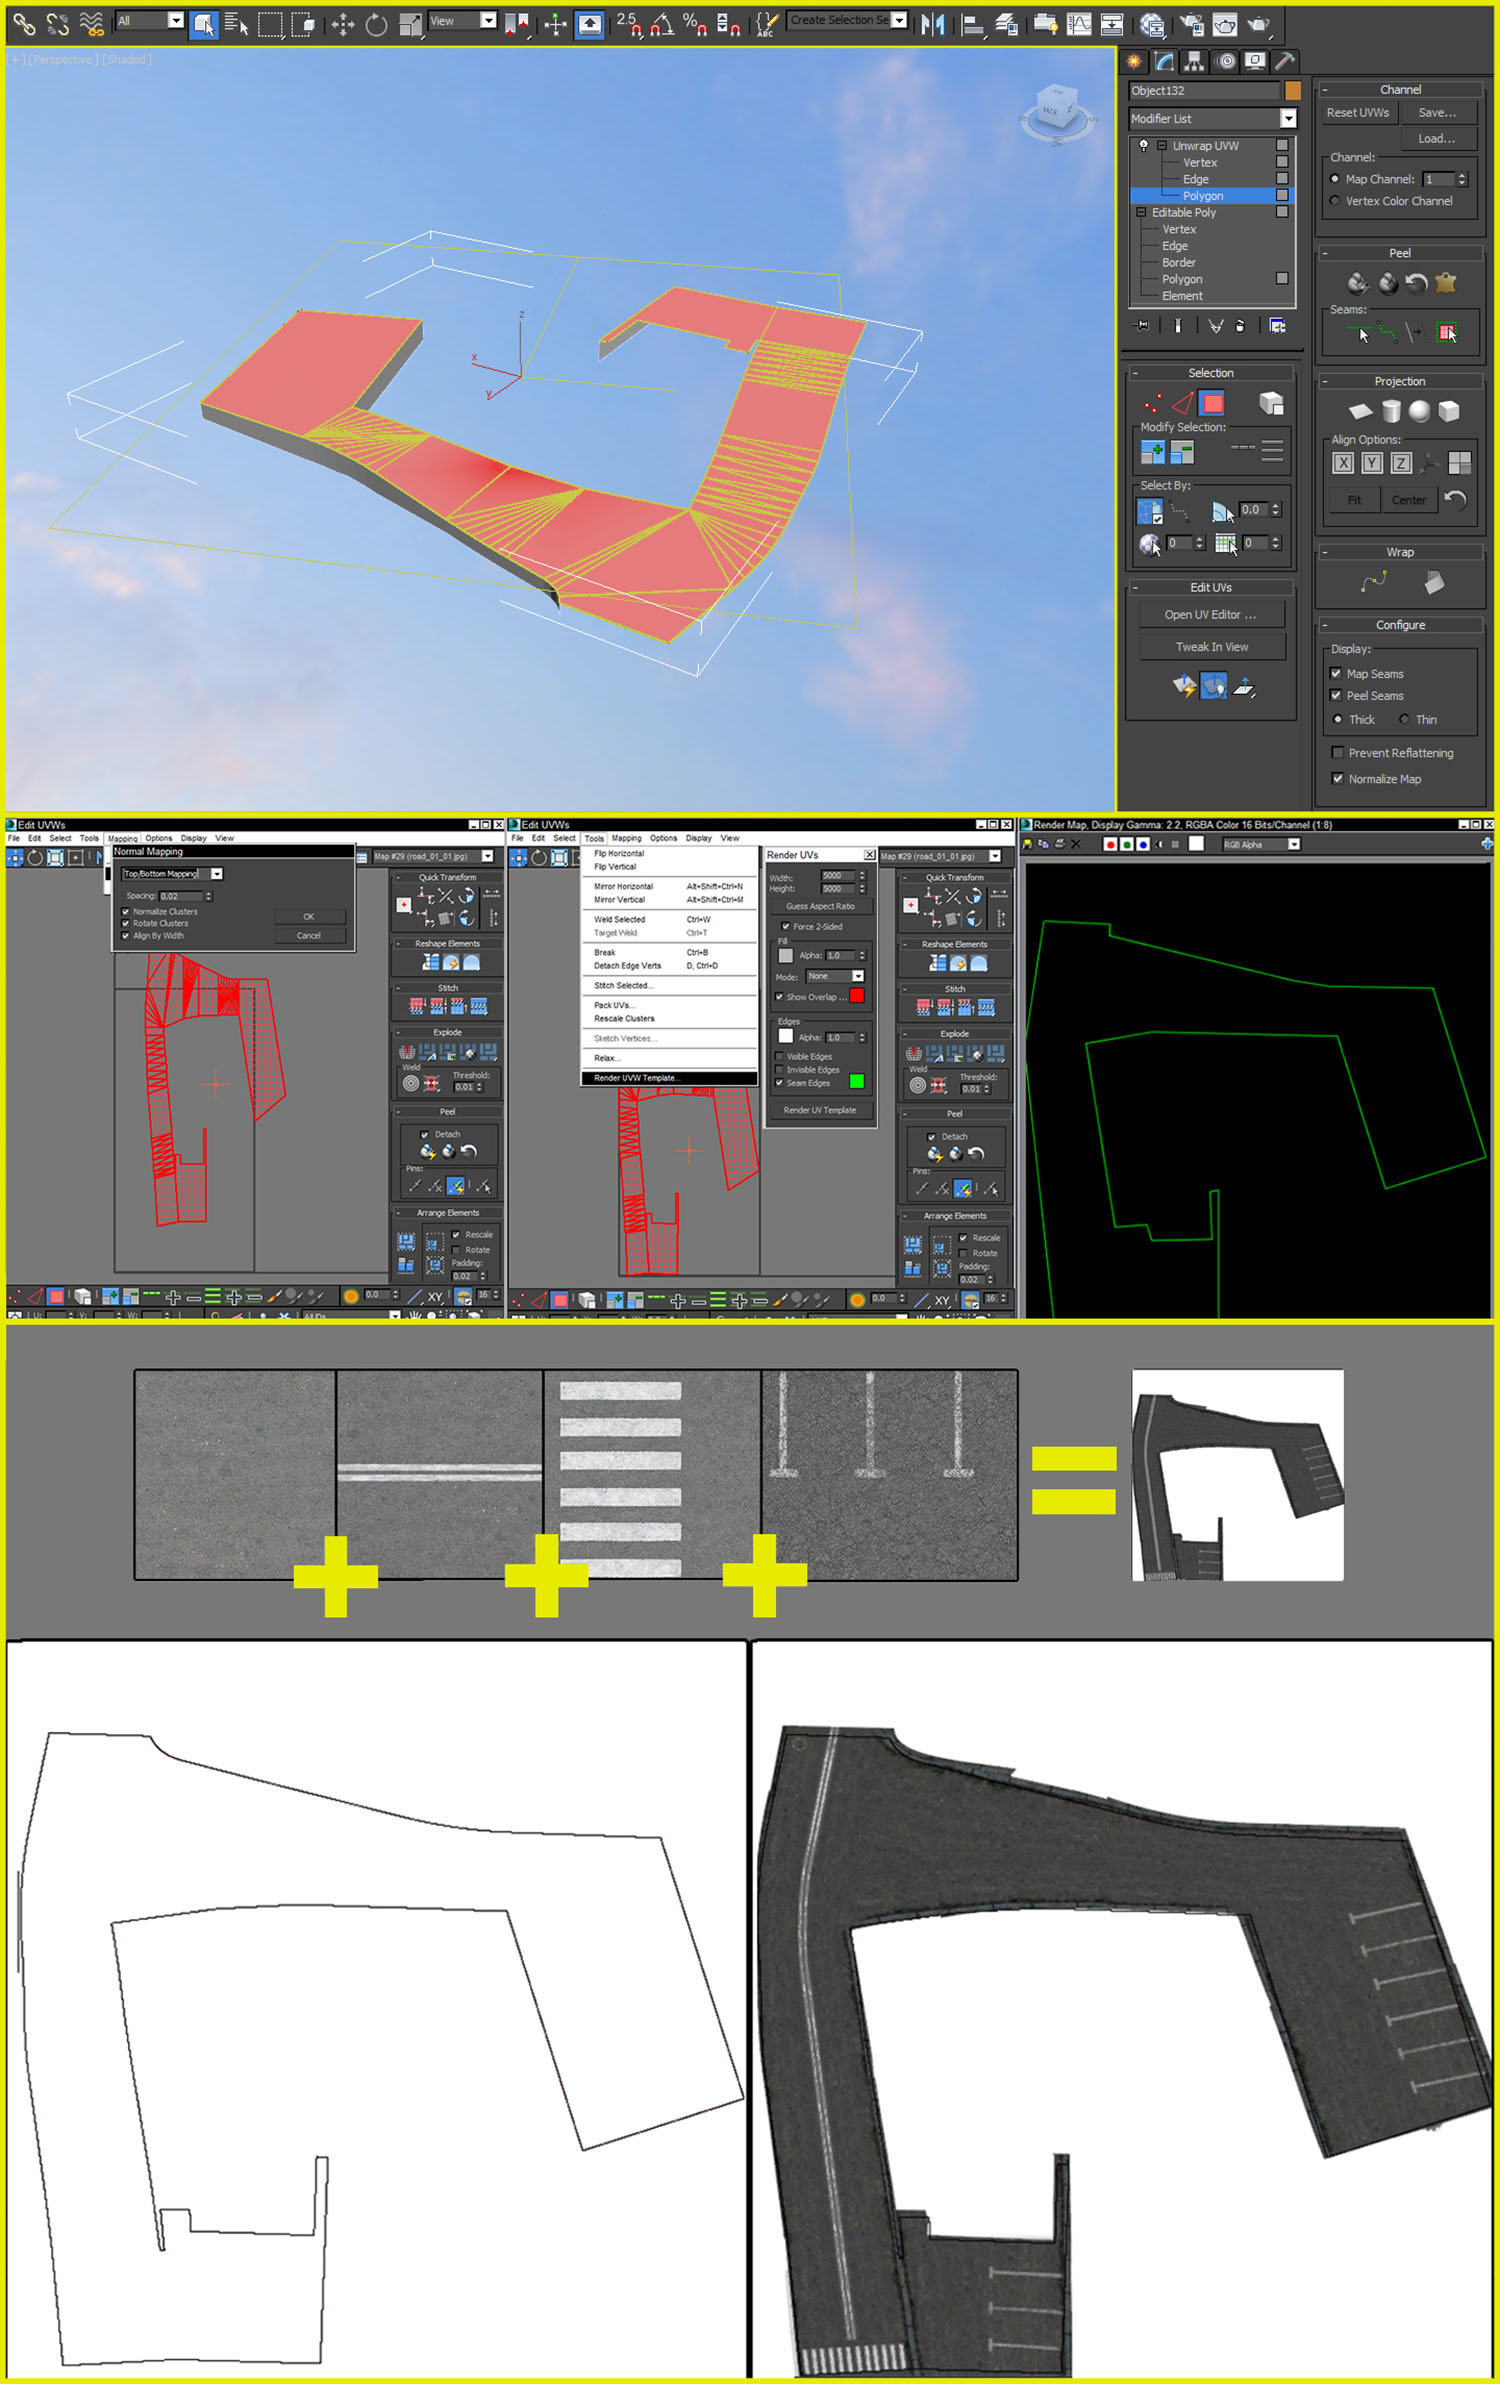
Creating road texture
Properties for the road material:
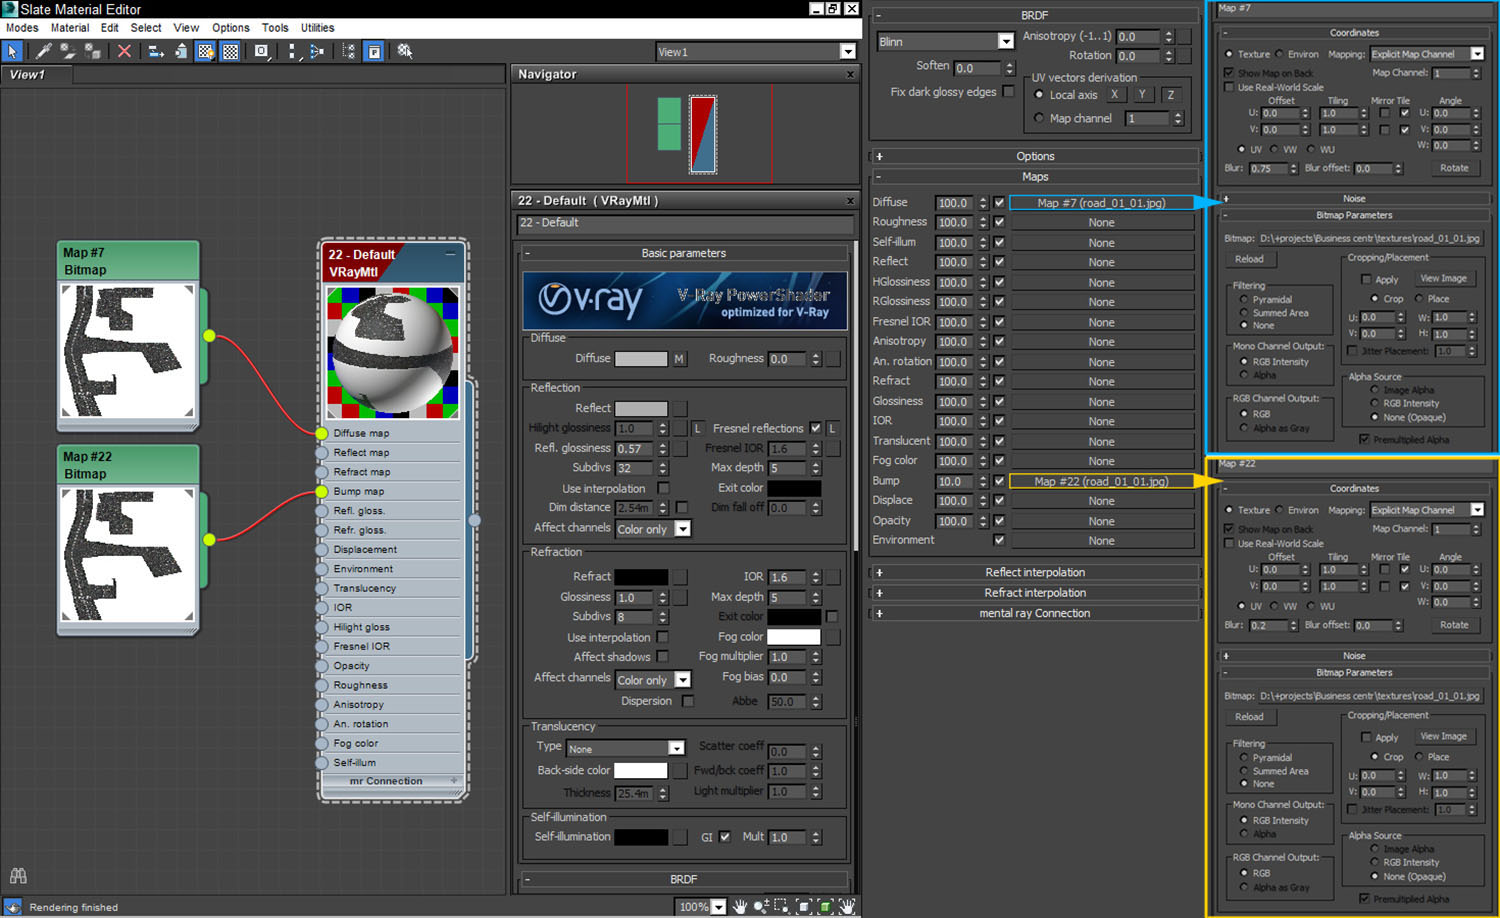
Road material
As you can see I used the same material for diffuse and bump with difference blur amount, I wanted the bump to look grainy and rough, so I used little amount of blur for the map.
Light
For illuminating the scene, I used two types of the light:
VrayDome with .jpg - for natural light;
VrayPlanes – for artificial lights.
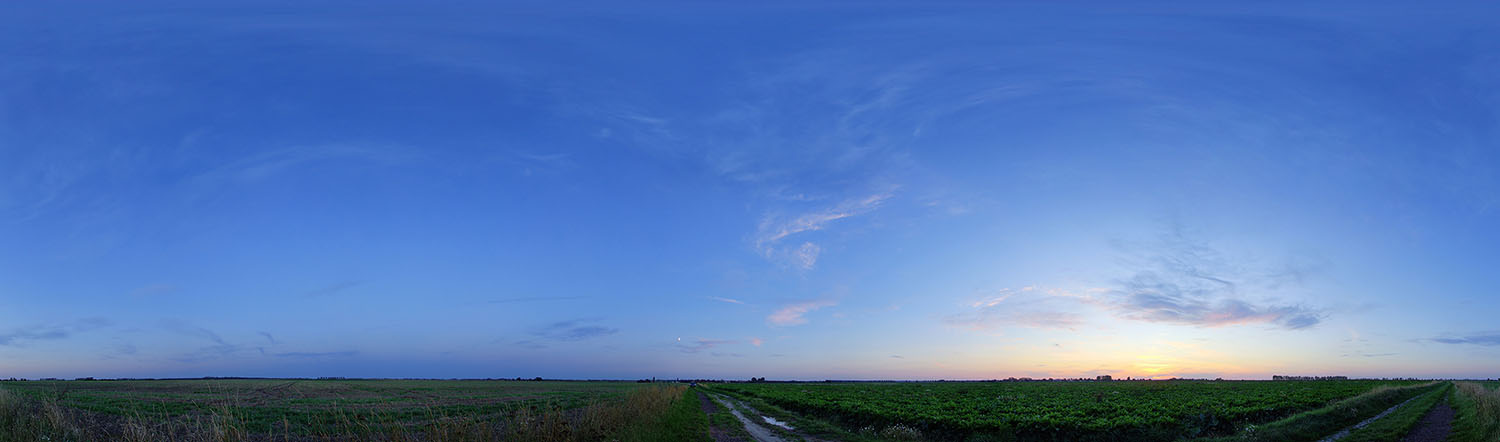
Map for illumination
Image that illuminated the scene.
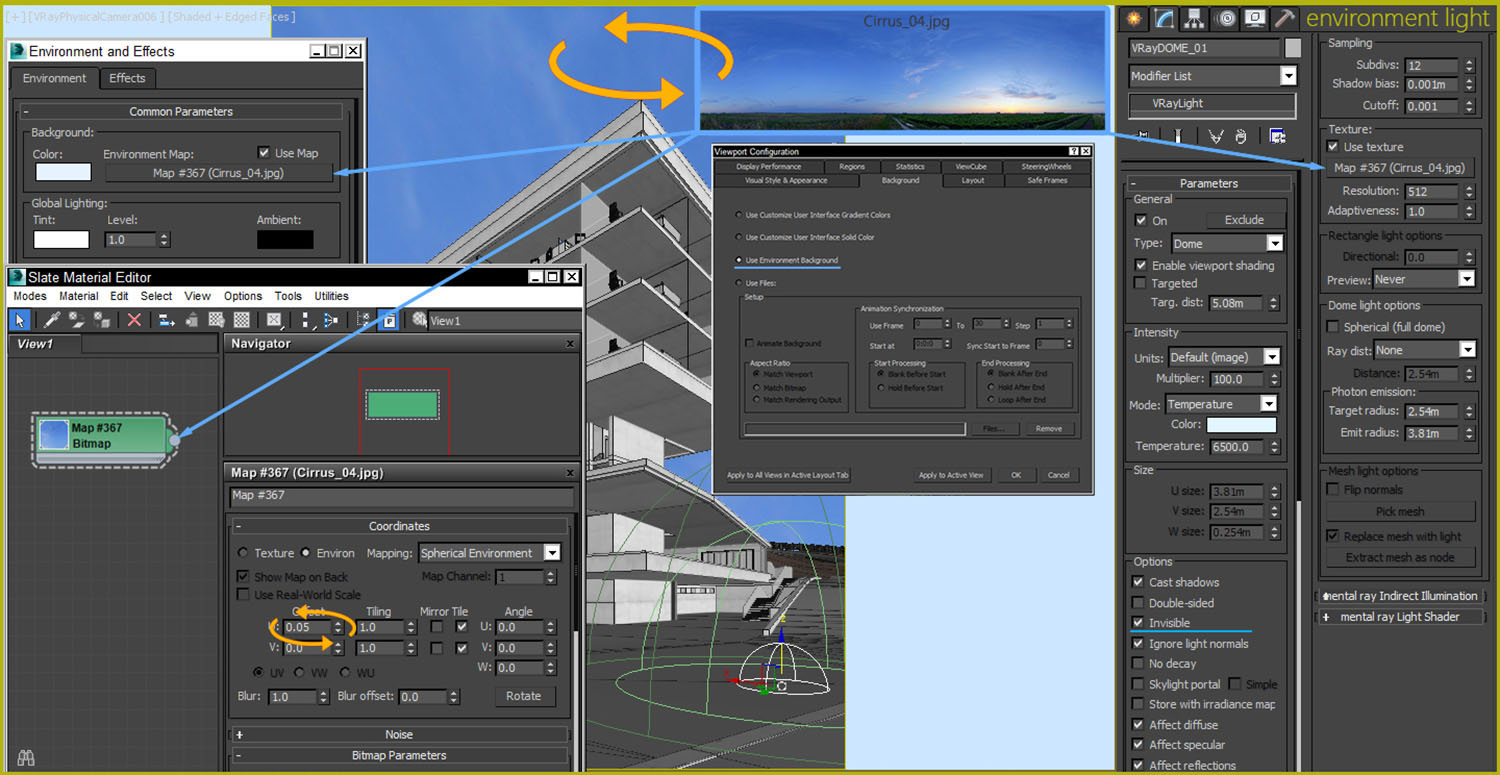
VrayDome light properties
In VrayDome light I loaded .jpg through standard Bitmap loader (Spherical mapping), check on Invisible, for right Alpha Channel, and loaded the same Map into Environment map (8 - hotkey). I wanted to see how it will look before the render, so I opened Viewport Configuration (Ctrl+B) and checked “Use Environment Background” and now I was able to see what happened to the Environment through the viewport. I rotated it as required. I wanted to reflect the yellowish-purple color on the glass, so I rotated the map behind the back.
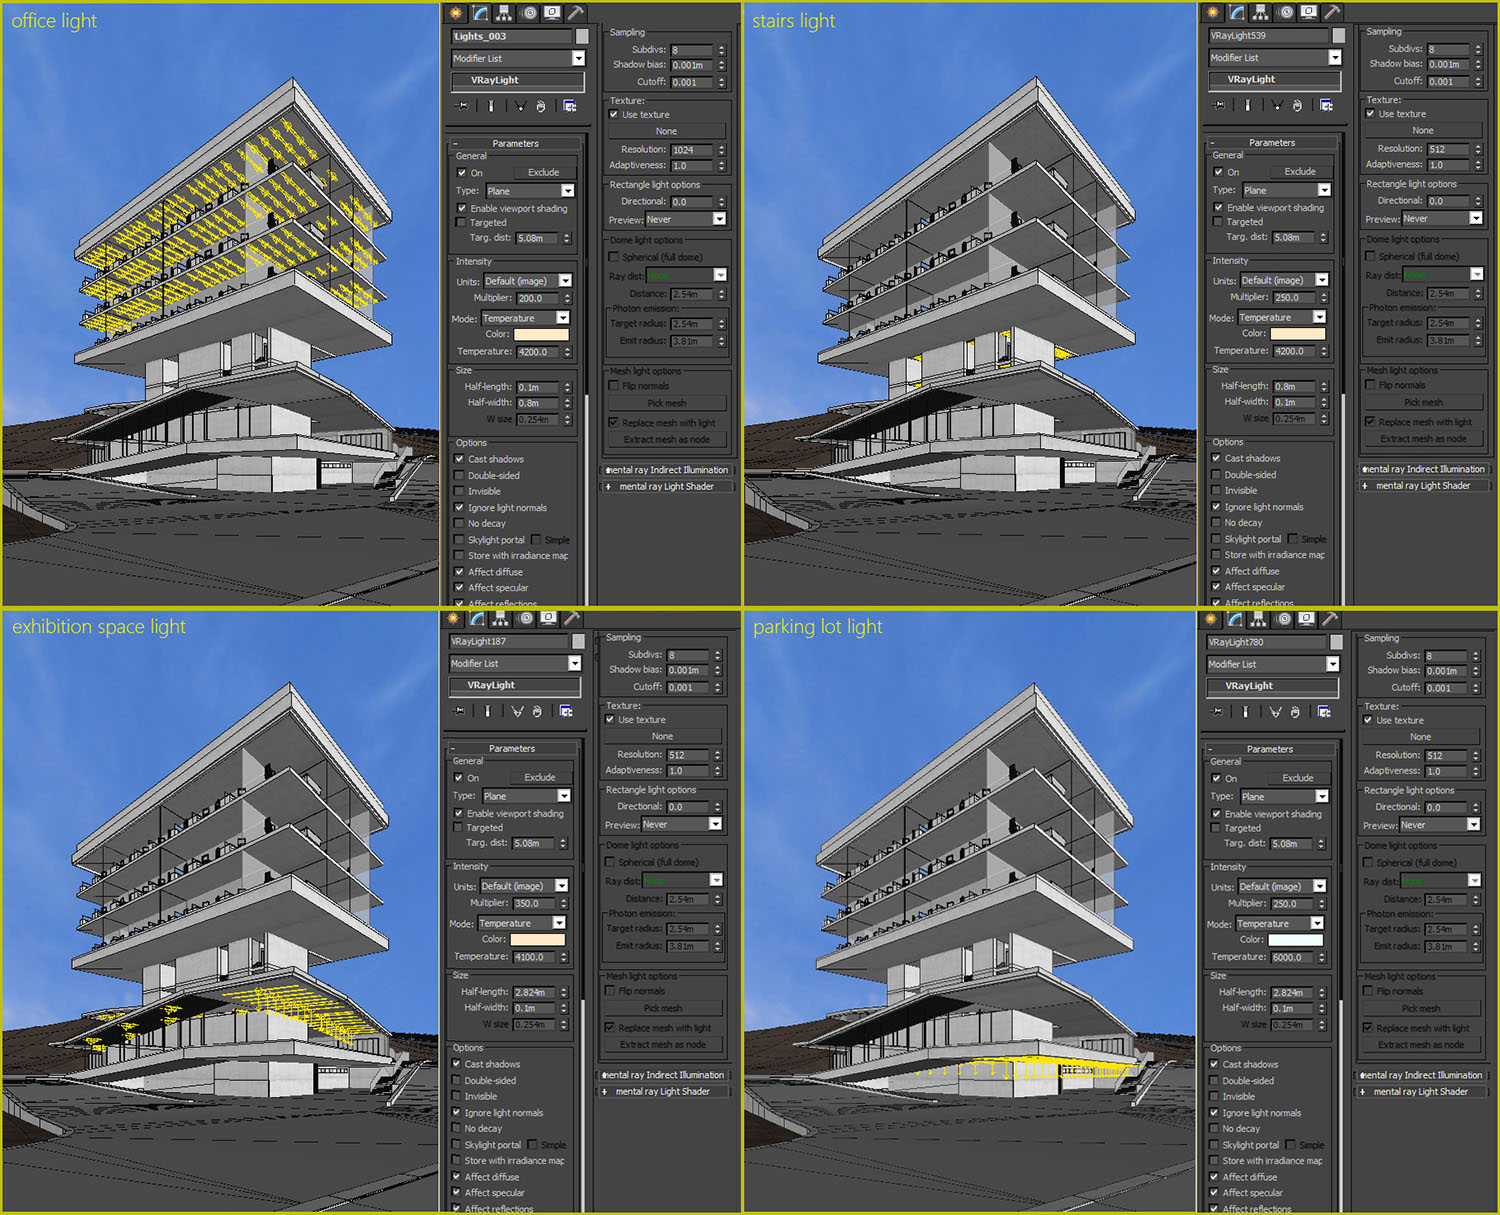
VrayLight properties
I had four different properties for the artificial light: for office block, vertical core, exhibition space and parking zone. I wanted them to be slightly different in temperature and power for the irradiance.
Environment
I divided all geometry into two main groups:
- primary (PG)
- secondary (SG)
Primary geometry – is the main geometry of the scene, which in most cases defines rough volume, which I need to render.
Secondary geometry – is the filling geometry, geometry which helps to create certain feeling of the image and mood. It can be very useful to enhance the image, like it does to show the destruction in the final result.
Primary geometry (left image) and Primary + Secondary geometry (right image).
The environment - was the Finalizing step of the image.
I divided the environment creation into three steps:
- Big scale geometry (ground, road) (PG)
- Middle scale filling geometry (trees, cars) (SG)
- Small scale, detailing geometry (leafs, grass) (SG)
I used Evermotion trees, for filling the scene. Before converting it to VrayProxy I attached trunk and branches into one object and leafs left in another for every tree, it gave me the possibility to delete leafs from the trees when I only wanted the branches to be visible.
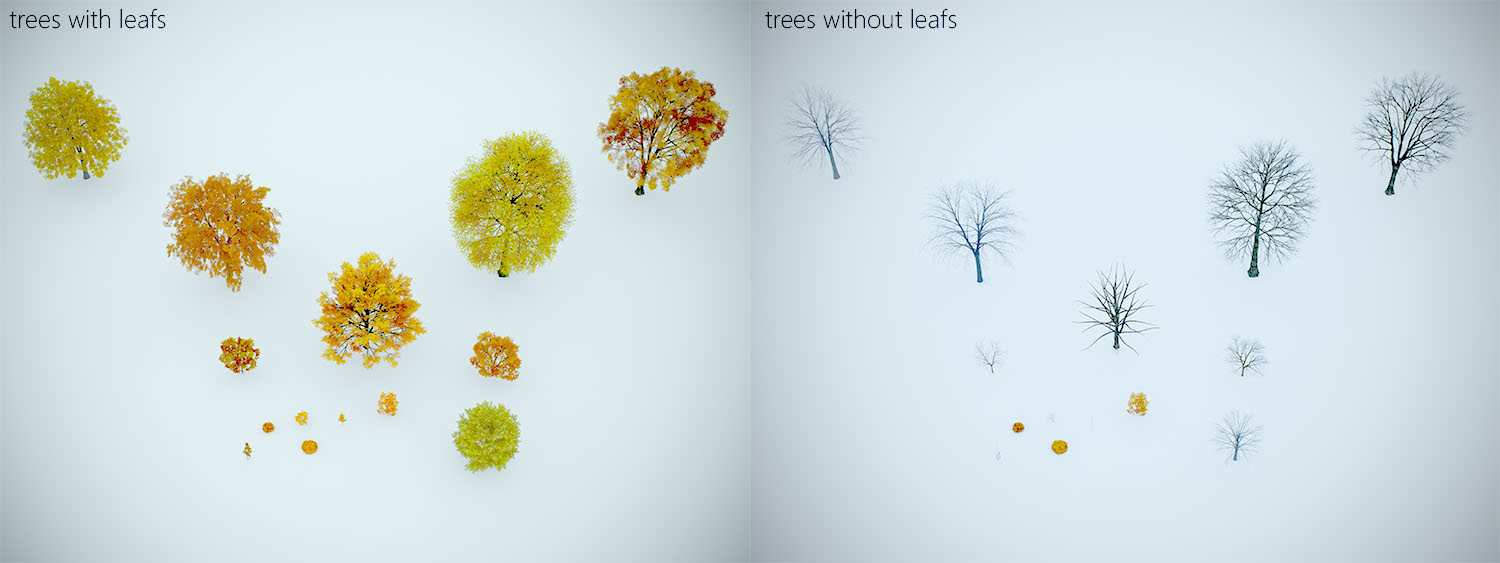
Trees with leafs and without
I converted trees to proxy separating wood part from leafs.
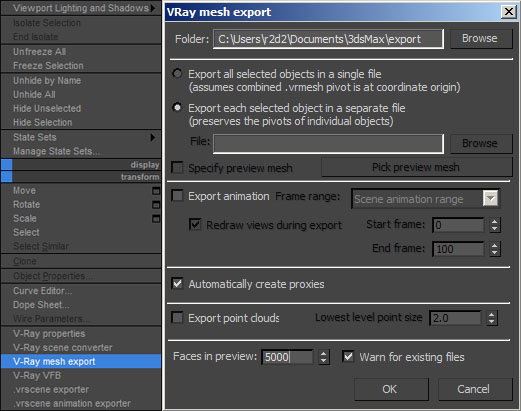
Proxy conversion settings
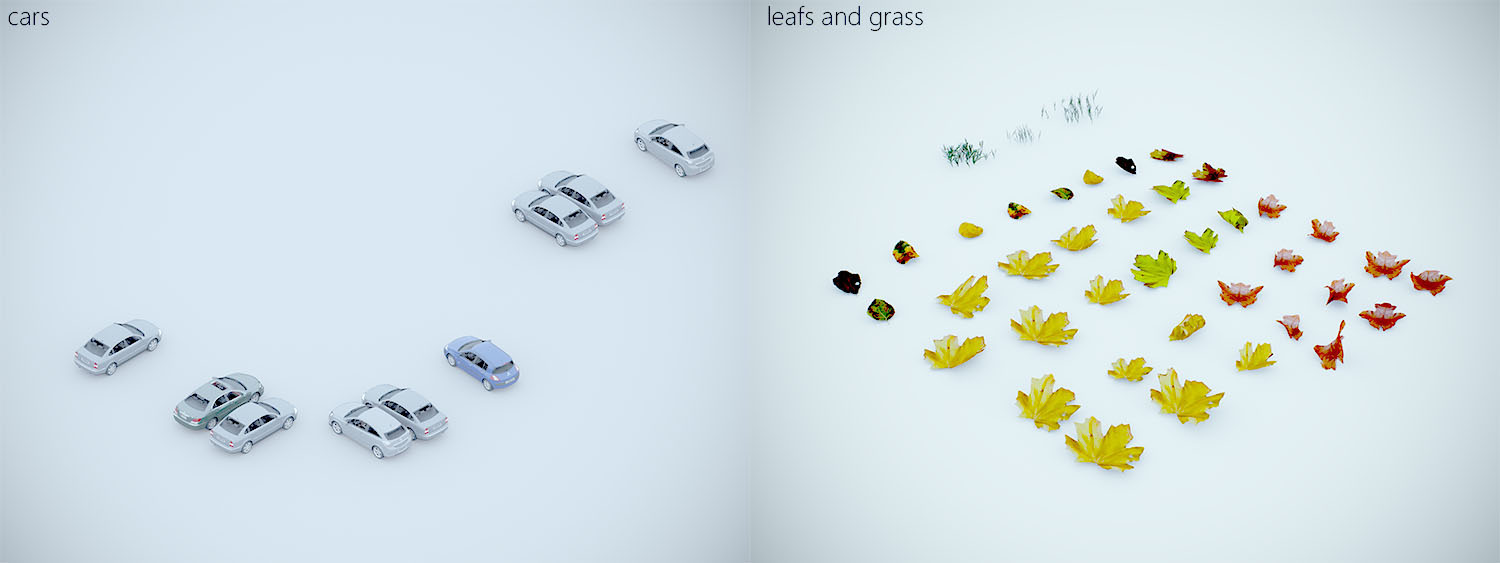
Cars, leafs and grass
I created some leafs to lay on the ground, for small scale geometry, from different pictures I found on the internet, using bending and twisting modifiers I created variations of the same leafs. It is important to place pivot on the bottom of the leaf otherwise leafs will sink in the ground when scattering.
Cars and grass I used premodelled from the catalogues.
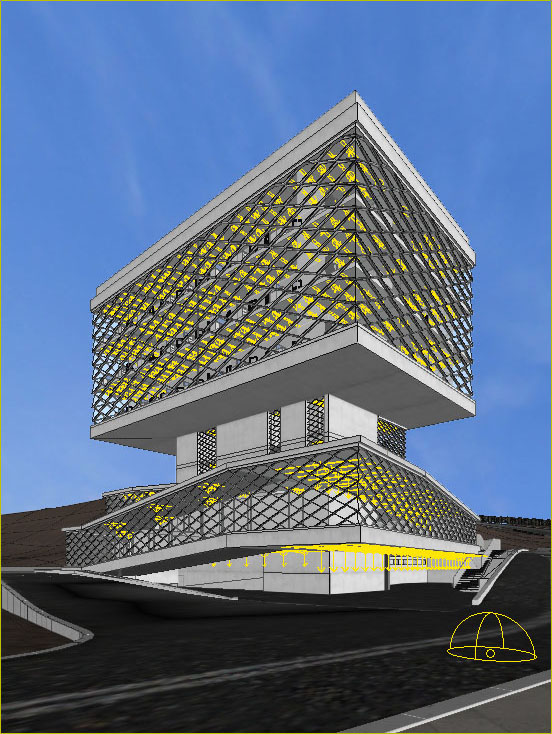
Primary geometry
First step, where I clearly see the silhouette of the building, ground, road and places. for further filling. (PG)
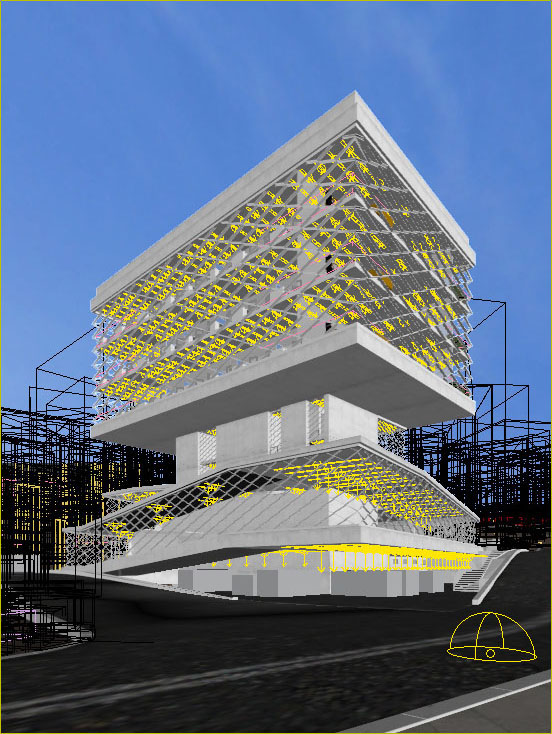
Primary geometry + Secondary geometry
Second step was filling scene with middle scale geometry (Cars, Trees, and Bushes) (SG)
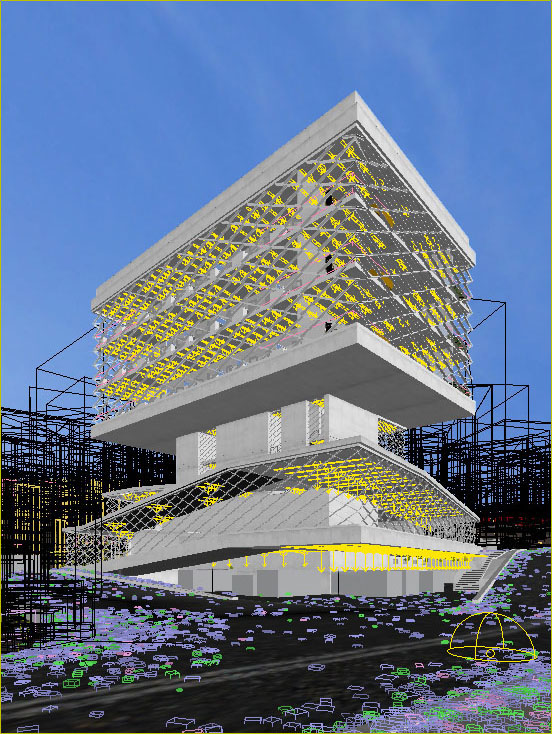
Primary geometry + Secondary geometry
The last finalizing step is to fill the scene with small scale geometry.
For scattering leafs, I used building painter, it is simple and easy to use.
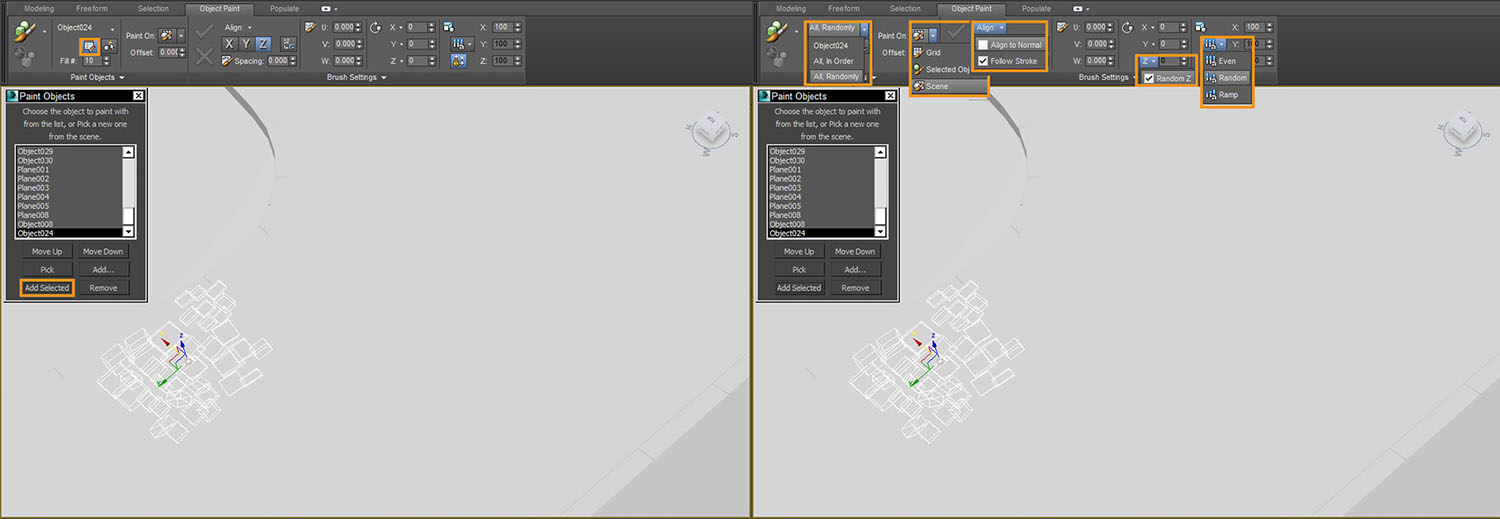
Tweaking the properties of the painter
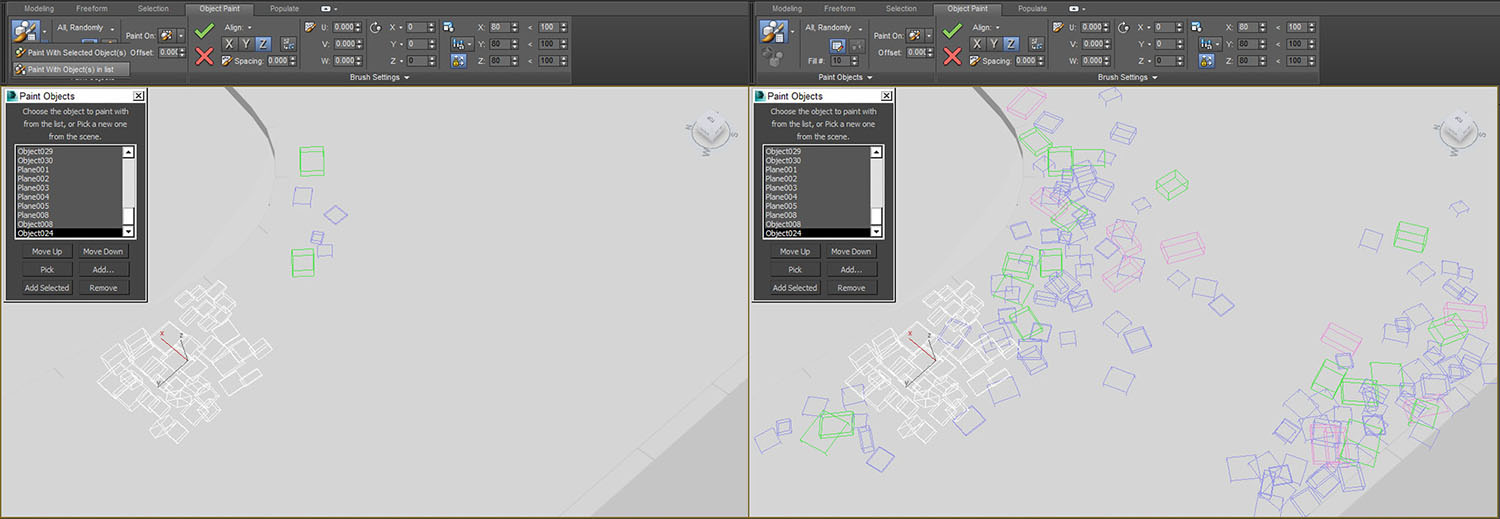
Scattering geometry using object paint
I wanted to scatter the leafs, such that they are denser towards the side of the road and less dense towards the middle of the road.
Render and camera settings
It took about 4 hours for the image 1600x2400 on i7 2600K, with these settings:

Render and camera settings
Post Production
Post-production is the step, which I like the most in image making. It is where you try to bring life to the image. It is where the impression of the image is created.
Raw render
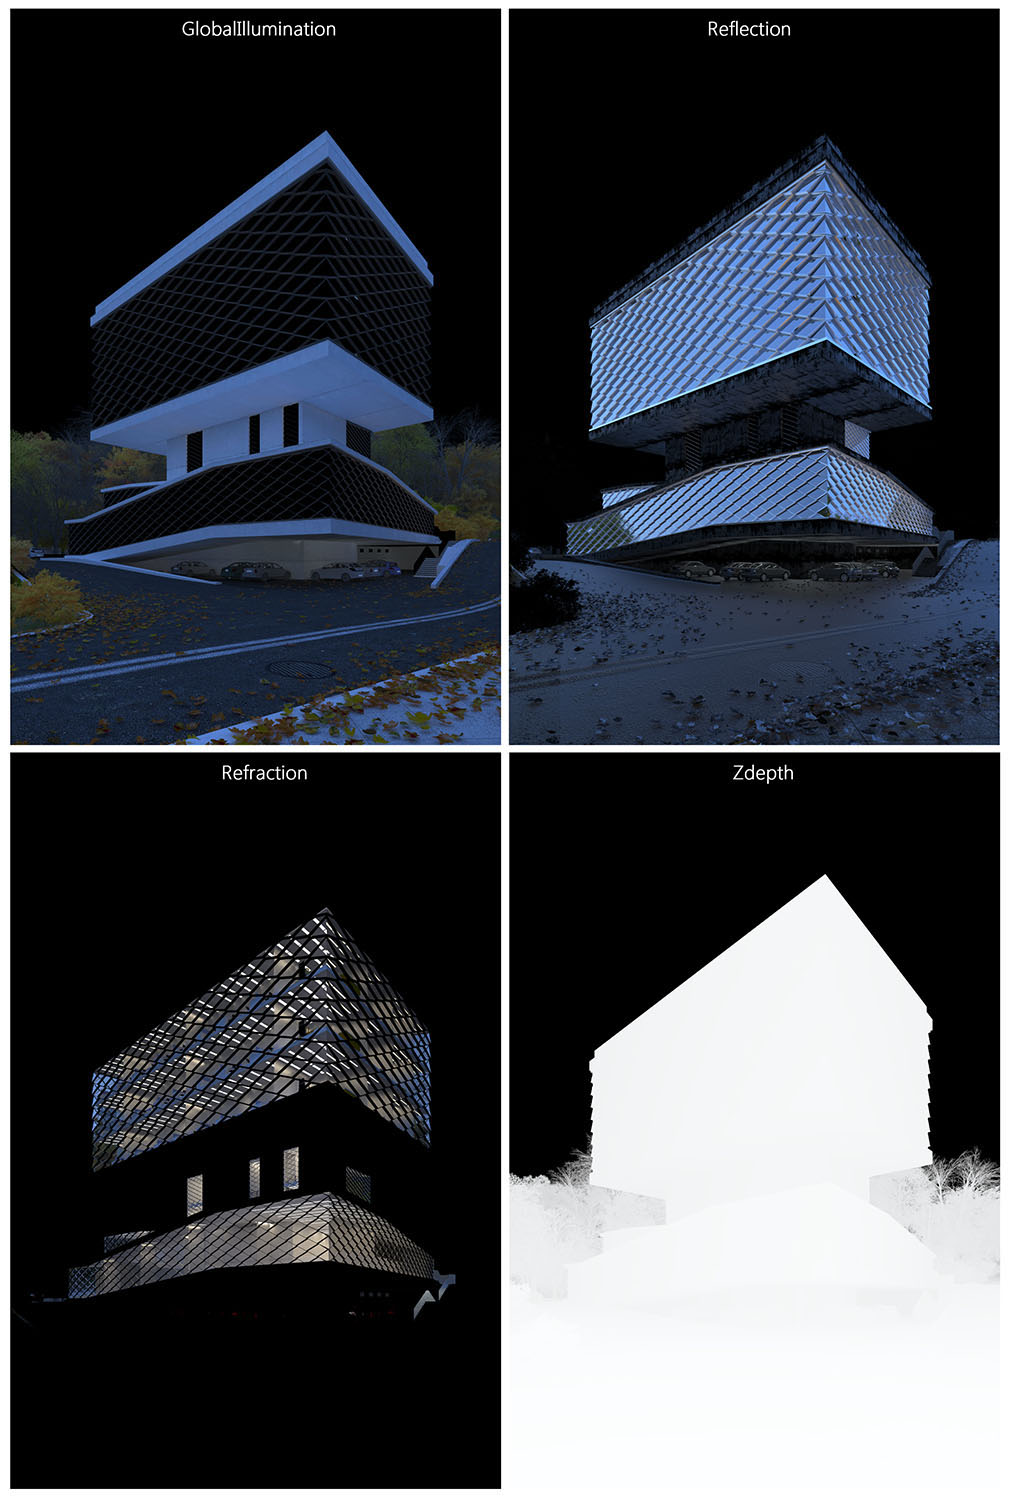
Channels I used mainly for post-production.
ZDepth channel helps a lot in creating atmospheric feeling and depth of the image, I use it very often, masking other channels like refraction, reflections, adding and decreasing contrast, saturation, brightness of the image.
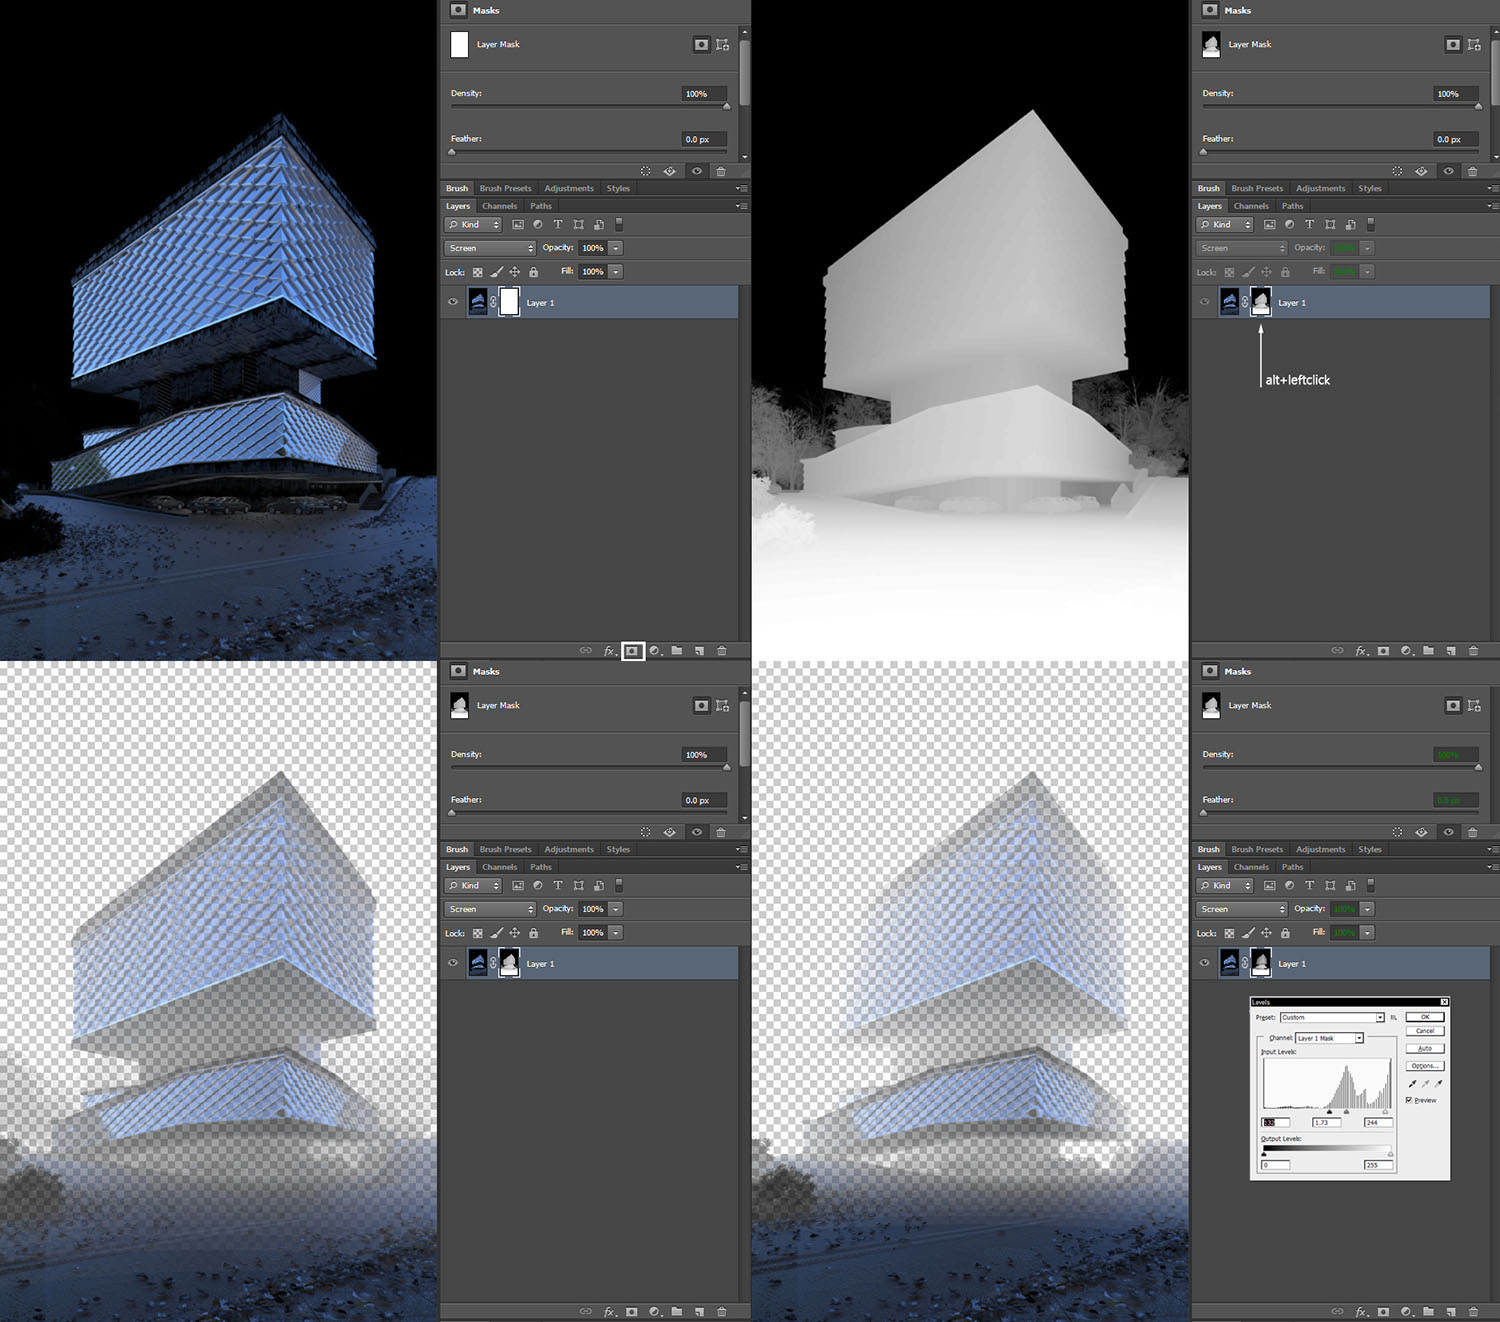
Using zdepth channel and masking the reflection channel.
For pasting zdepth into mask channel, click on mask button selecting reflection layer, press ALT click on mask and paste copied zdepth from buffer, you can control depth and effect of this layer simply by tweaking parameters of levels when the mask is selected. I use this masking technique for adding gradual contrast, saturation, blur and sharpening. It is simple to impact on image even more by inverting zdepth channel.
I divided post-production process into steps.
Adding light details, which I missed during render. Adding depth of the image and working with volume.
Tweaking contrast and exposure. Adding different channels, in different mounts, for reflection and refraction it is good to use screen blending method, but I often experiment with different settings to find the better look.
Final adjusting of contrast, saturation and adding vignette glow of glass through reflection+ refraction layer combination impacted by yellowish-orange filter on it.
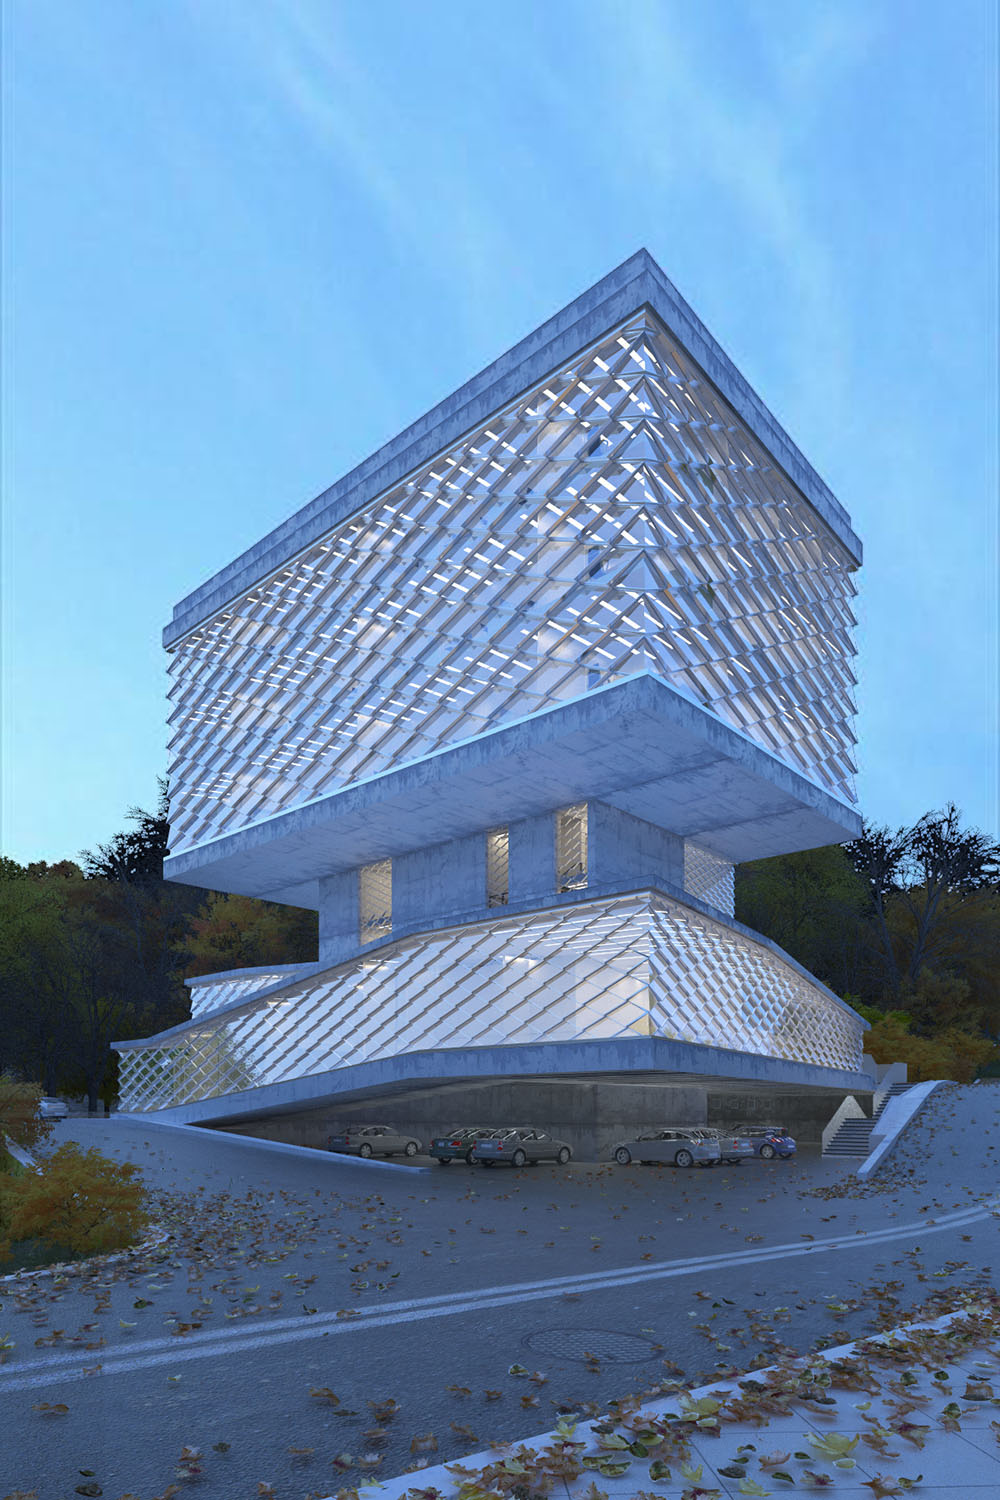
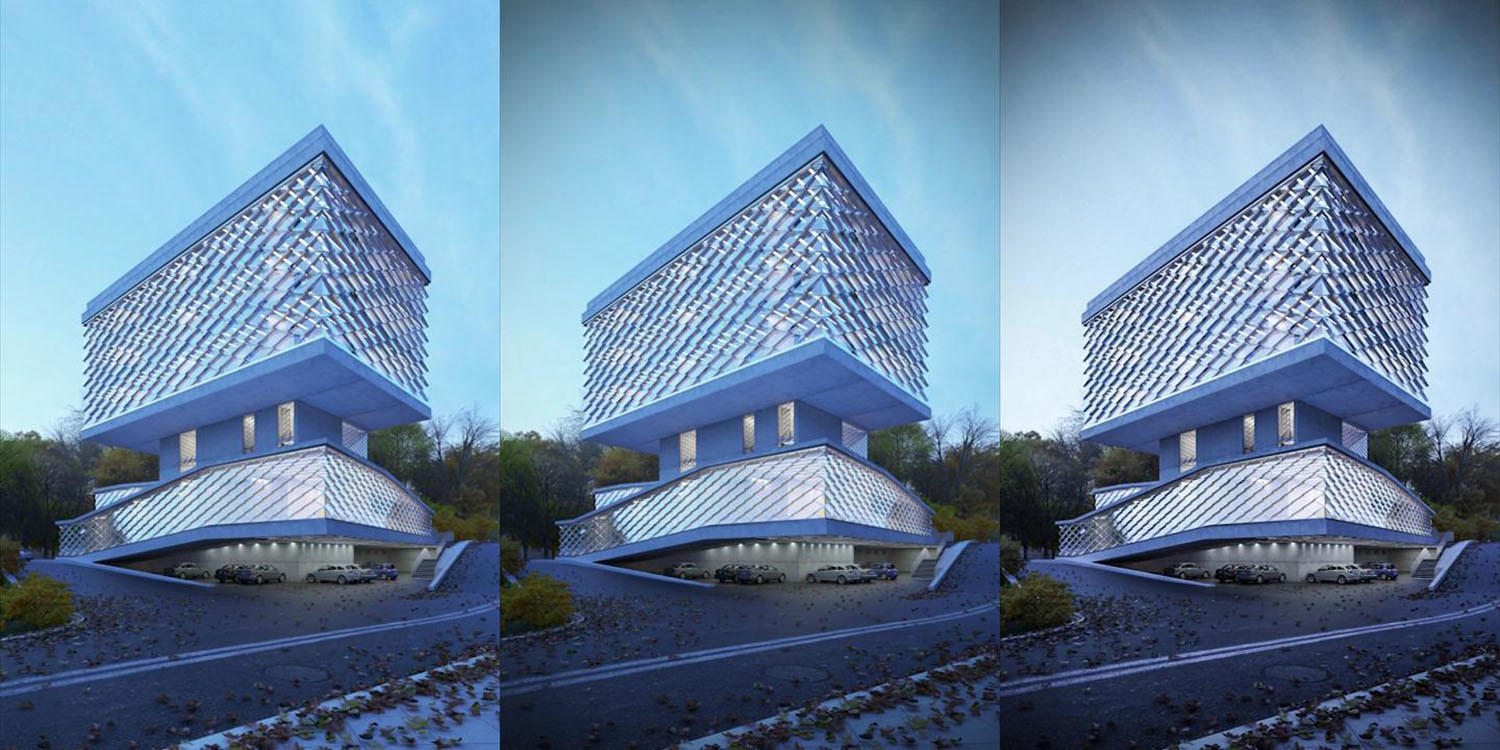
Final image
You can look at the series postproduction of images I made for this project.
smirnova-lastockina office PostPro from dearArch on Vimeo.
Hope you liked it!)
"Feel free to contact me:
e-mail - serjozhayakimenko@gmail.com
portfolio - www.behance.net/dearArch
facebook - www.facebook.com/dearArch
You must be logged in to post a comment. Login here.

Serjozha Ya
Report Abuse
Hello dear ali!
Thank you for appreciation, i'm very happy that tut helps you:)
ali ghafoori
Report Abuse
hello mr Serjozha.it's very good tutorial.thank you for sharing.
Serjozha Ya
Report Abuse
Thank you Nigel, I'll consider your advice! Wish you luck in Revit!
Definitely, I prefer 3dsmax, rather than Archicad and Revit both in all existing ways, more like nice images than documentation :)

Nigel Stutt
Report Abuse
Superb tutorial thanks, love the road I think the most, and the glazed cladding is unique. If I had to make a comment I would say that the concrete walls near to the road should be a little muckier, theyre too clean, but that is the only thing I noticed. Intersted to hear you using Archicad, I am learning Revit myself but still prefer modelling in 3dsmax - far more flexible than either Archicad or Revit but they both have a different function from 3dsmax really (BIM) buit they are a bit of a nightmare to use for non-regular buildings.
Serjozha Ya
Report Abuse
Thanks Sergio!)
Tweaking contrast and saturation did a part in it, feeling of depth and feeling of difference distance from the camera gave Zdepth channel, with properties the further - the whiter.

OlaRenders
Report Abuse
it´s amazing how better the trees look after the post production, comparing to the raw render. it´s just adding contrast that does so?
great work. thanks for sharing!
Serjozha Ya
Report Abuse
You're welcome! :)
Thanks for sharing RB! :)
O
One World
Report Abuse
Appreciate that .. useful link.
RB Cameron
Report Abuse
Here's a blog showing a possible Revit + 3dsMax workflow:
http://mistressofthedorkness.blogspot.com/2013/11/revit-3dsmax-utilizing-render.html
O
One World
Report Abuse
Cool.. I feel confident now. Thank you once again !!
Serjozha Ya
Report Abuse
Thank you RB Cameron!)
Thank you, One World!) It is the best solution I know. Model after importing doesn't gain extra geometry and very important, save possibility to work on it after importing to 3dsmax without problems, which can occur after importing non-Autodesk models.
If ArchiCad model after import to 3dsmax will have 1 million polygons, after Revit it will have about 250 hundreds.
In my case, as it was not a huge model, only 180 hundreds poly after ArchiCad and I didn't need to edit it, only deleting elements I didn't need, it was ok.
So benefits of Revit + 3dsmax combo in compare to ArciCad + 3dsmax:
-less geometry (approximately 1/4)
-possibility to edit (without witchcraft)
P.S. Seems like little ad to Autodesk :)
O
One World
Report Abuse
Beautiful work and really appreciate you sharing this with us. I am a regular REVIT user and we have increasing demand with renderings in our office. Do you think REVIT + 3DSmax combo works good? I am beginner at renderings in 3DSmax, do you have any suggestions. Thanks !
RB Cameron
Report Abuse
Nice!
Serjozha Ya
Report Abuse
Thank you Ivan!) tried to make it understandable.
ArchiCAD - 3ds max is good combo at start, guys who moved to Revit, say that it is better symbiosis, especially in Huge archi scenes. Model for import, is very clean and without extra polygons after Revit, think because it is both products of the same company.
I
Ivan Kunchev
Report Abuse
Very thorough Making Of. Appreciate it. I'm really happy when I see other architects use ArchiCAD - 3DS MAX combo.
Thanks for sharing!
Serjozha Ya
Report Abuse
Thank you Dude!) Almost melted from such a warm comment)
By the way, in around several weeks it will be the same weather, I tried to reproduce.
Happy, that it became useful for you!)
Thx!))
Thank you, Alex!) Most commonly TIF 16-bit, sometimes HDR.
K
Kretsul Di
Report Abuse
Good job man! Nice idea, great performance!
Your architecture looks pretty beautiful. Just feeling cold autumn mood of the picture, exciting!
I found some useful tips!) Thx a lot for sharing!
Good luck in cgarchfuture and congratulations!)
Alex Gorilluy
Report Abuse
Great image, nice tut, thanks for sharing.
It became very nice after post.
Which format and depths, are you using to save renders?
Serjozha Ya
Report Abuse
Thank you, Max Wood!
Kind of feeling of starting wind, which is raises it in to the air)
Serjozha Ya
Report Abuse
Thank you, max max!)
Function diagrams was rendered in 3ds max and was edited in Adobe Ph for adding explanations.
Facade was created simply by creating array of unify elements, which has possibility to connect to the same elements in six directions (up, up-left, left, left-down, down, down-right, right, right-up), and than slicing it on the corners.
About this article
Making of Smirnova-lastochkina Office Serjozha Yakimenko
visibility34.6 k
favorite_border25
mode_comment23


