

Tutorials
Trains, Boats, Planes

Trains, Boats, Planes
Ted Boardman tedb@tbmax.com http://www.tbmax.com
August on the coast of New Hampshire and Maine is usually the ideal month for boating, fishing, and other summer activities. While inland has been seasonably warm and relatively dry, the coast has had more than its share of dense fog. Reasonable enough weather for the beach, but just a few hundred yards offshore can be near zero visibility, making navigating the rocky coasts and tight harbors a real test of patience and navigation skills. Tuna fishing season is in full swing and while most of the Blue Fin species that are caught in New England waters are around 400 pounds, I did hear of one nearby that was 790 pounds. They are fished with rod and reel for the sport fisherman, but the commercial boats tend to harpoon them from a long pulpit extending off the bow of the boat. Pretty exciting stuff, in either case.
Travel has been quiet this month as I’m starting into another writing project and need to be in my office to be productive.
Siggraph in July was a very good event from my prospective. Discreet was showing 3ds max 6 as a very stable beta software at the show and while it will have enhancements like the Mental Ray rendering engine and more VIZ like visualization tools, the main focus is make it more stable and enhancing some productivity aids like more efficient spline handling and the revised Schematic View.
New advanced features are usually great for at least a segment of the user base, but my columns will still tend to focus on getting the most out of the tools that we’ve had for years and are not utilizing to their full potential.
This month I’ll address a couple of topics that have come to my attention in the form of questions from users lately. One is the animation of train cars. I developed a solution a few years ago that is simple and quite flexible. While it is applied to train cars here the same method could be used to animate all sorts of mechanical devices the follow similar tracks.
The next process will be the modeling of boats. If you can get hull plans to use as a background image, box modeling can be very effective in creating hulls quickly and accurately.
Lastly, I’ll show you how to create a plane in just a few simple steps.
Animating Train Cars
Many types of train cars are not rigid frames with wheels, but are a set of “trucks” of wheels at each end of the car that pivot on their own centers for a little steering capability. This example uses a path and hierarchical linking in conjunction with a Look-At constraint to keep the train convincing as it wends its way through a couple of switches.
One important factor with this setup is that it’s important to have constant velocity to keep a constant distance between the cars as they move. Another thing is to make the path long enough or only animate part of the frames so the train never reaches the far end during the animation. I’m sure there is a solution to both issues but I haven’t taken the time to work them out.
I haven’t had a look at it, but there is a free plug-in available at http://www.scriptspot.com called Toy Train that will help with train animation. However, there are some very fundamental techniques to learn from doing this exercise that you may be able to apply to other problems you encounter. Always see if you can find a solution first using basic max/VIZ tools and use plug-ins to enhance productivity or to do something that is impractical in the software alone.
I’m including a file that was created in 3ds max 4 so it should load into max or VIZ 4 and the process will be the same for either program.
The file called Max4_train.max contains simple objects for this example. There are two boxes that act as the rear and front trucks of wheels. There is a dummy at the rear truck and a train car that spans the two trucks. Of course there is a line that will act as a path through a switch that allows the train to move to another track.
I would suggest merging the path into a file of your own and walking through the steps first, then opening the finished file if it doesn’t work as expected.
The Train Exercise
1. The first step create a box called Rear_truck that is 5’ x 3’ x 2’. Next step is to apply a Path Constraint to the Rear_truck and to choose the train_path with the Add Path button.
2. In the Path Parameters rollout, check Follow and check Constant Velocity. In the Axis area check the Y-axis radio button to point it in the right direction for this example. See Figure 1. Dragging the Frame Slider with show the box moving along the path.
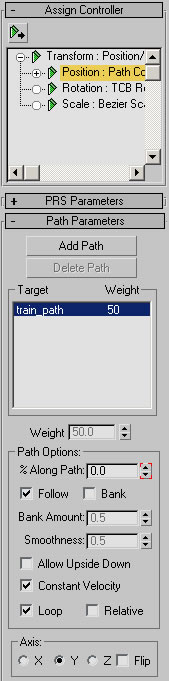
Figure 1: Assign a Path Constraint to the rear truck and check Follow and Constant Velocity.
3. Select the Rear_truck, go to Edit pull-down menu and choose Clone, name it Front_truck. Make it a Copy. Move the copy forward with the Transform Type-in, I used 16 feet on my example. Dragging the slider should show both boxes animating up the path, keeping their distance between them constant.
4. Create a Dummy and align it to the Rear_truck, Pivot to Pivot in all axis’.
5. Create a box for the train car that sits atop the two trucks and call it Car. My example is 23’ x 5’ x 4’. In Hierarchy panel, Affect Pivot Only, use Align to align the pivot of the car to the pivot of the Rear_truck.
6. Create a Dummy and align it Pivot to Pivot to the Rear_truck. The scene should look similar to Figure 2.
Figure 2: Copy the Rear_truck forward on the path and build and align a Car above them. Align the Pivot of the car to the Pivot of the Rear_truck. Create and Align a Dummy to the Rear_truck.
7. Use Linking to link the Car to the Dummy and the Dummy to the Rear_truck. The Select By Name dialog will look like Figure 3 when you check the Display Subtree option.. If you drag the slider the whole train will travel down the path, but the Car behaves badly on the curves.
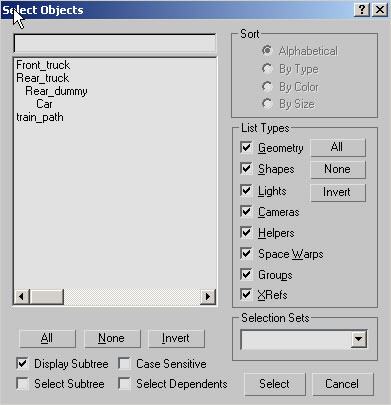
Figure 3: Link Car to Dummy01 and Dummy01 to Rear_truck.
8. Select the Car. In the Motion panel, highlight Rotation and assign a LookAt Constraint. Click Add LookAt Target and pick the Front_truck. The car will probably flip. Choose Y in the Select LookAt Axis area (or which ever makes the car point correctly). See Figure 4.
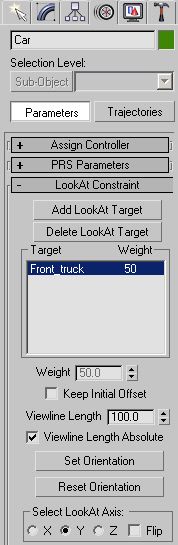
Figure 4: Assign a LookAt Constraint to the Car and pick Front_truck as the target
9. Drag the Frame Slider and the train car should follow the trucks around the switch bends.
To create other train cars you can select all the parts to this car, hold the Shift key and move them forward to an appropriate position. There is a file called Max4_train01.max (download file below) that illustrates two cars on the track.
While this is not a solution for all possible cases involving trains, you should learn some valuable lessons here that will help you with developing your own approaches to similar problems.
The Dory
In the next exercise you will create a quick Grand Banks style dory using box modeling. First you will call up dory plans as a background image, and then create a box by tracing those plans. Finally, you will slice the box and move vertices to match lines on the plans to rough out the hull.
The Dory Exercise
1. In a new file, go to Views pull-down, Background Image. In the dialog, click Files and open doryplan1.jpg. Check Match Bitmap in Aspect Ratio area and All Views in Apply Source and Display To area. See Figure 5.
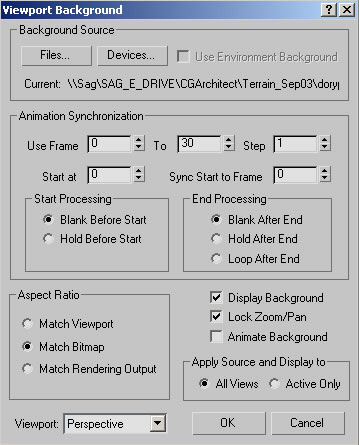
Figure 5: Open a background image called doryplan1.jpg in all views. (Download ZIP file below) Check Match Bitmap and All Views in the dialog.
2. Zoom out in each viewport to see the image fully. In each viewport disable the Grid with the G key and right-click on the Perspective label and turn of the image display.
3. Create a box in the Top viewport that matches the extent of the hull plan. It is helpful to make to Top viewport shaded and to right-click on the Box and set it’s properties to See-Through. See Figure 6.
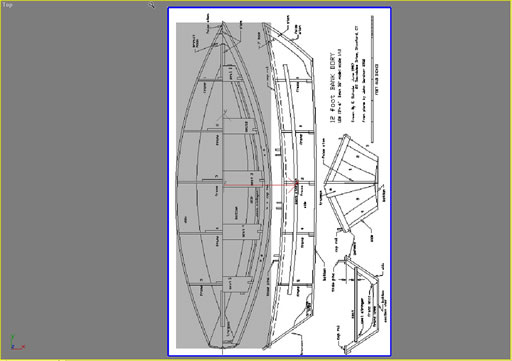
Figure 6: Create a box in the Top viewport and resize and align it to the top dory plan.
4. In the Left viewport, rotate the box 90 degrees and resize and align it with the side view plan. See Figure 7.

Figure 7: In Left viewport, rotate and resize the box to match the height of the dory in the side plan.
5. Select the box, right-click on it and Convert to Editable Poly. In the Modify panel, Stack view, highlight Element sub-object mode. (in Max 4 use F2 to highlight the sub-object in red) In the Edit Geometry rollout, click the Slice Plane button. Click the Slice button to slice the box vertically down the center.
6. In the Left viewport, rotate the yellow slice plane gizmo 90 degrees and move it to the lowest rib in the hull plan. See Figure 8.
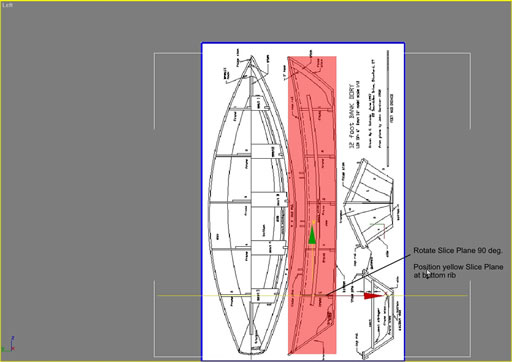
Figure 8: Rotate the Slice Plane 90 degs and position it over the lower rib in the Left viewport.
7. In the Modify panel, click the Slice button to cut new edges through the box. Repeat this step for each of the 6 other ribs. Click Slice Plane to exit that mode when you are done.
8. Now it’s a matter of going to sub-object vertices and moving vertices in place to match the outline of the plans. You will have to work in all the viewports and be careful which vertices you are moving, but the process will go quickly and the hull will be accurate. See Figures 9, 10, 11.
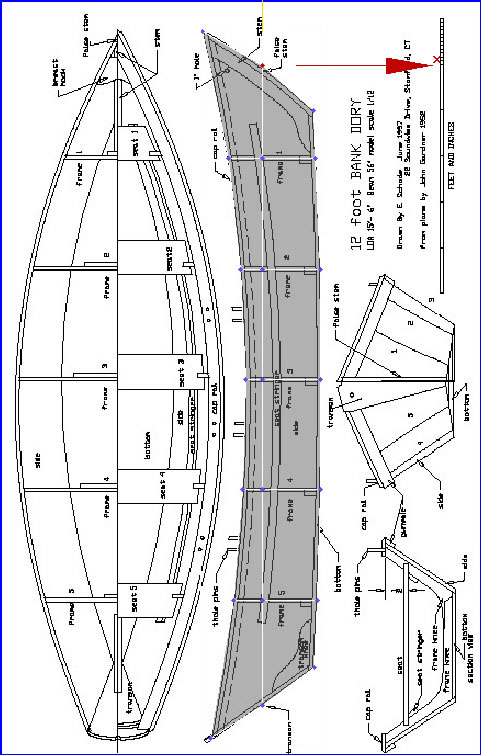
Figure 9: Use the side plan to move top and bottom vertices into place.
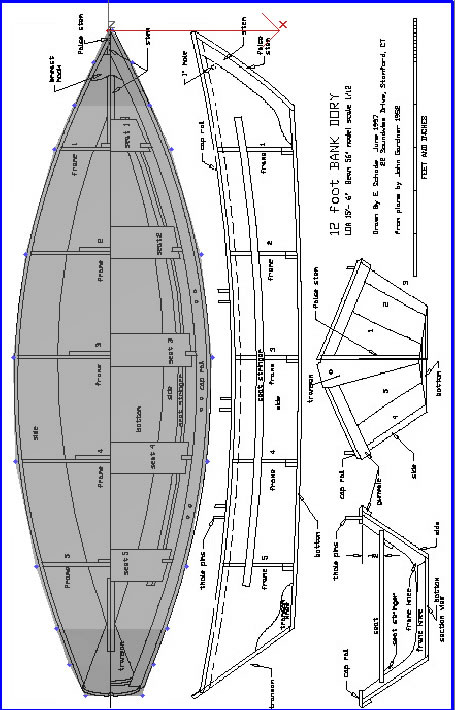
Figure 10: Rotate and move the object to align with the top plan.
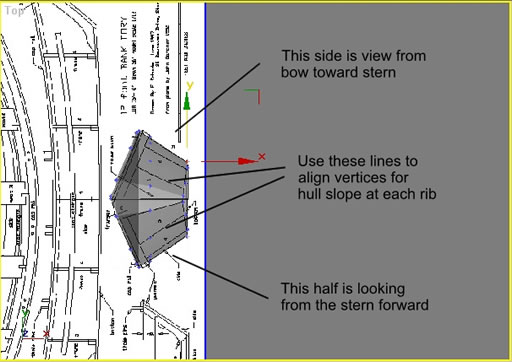
Figure 11: The end plan is a bit different. The plan show one side from the bow back to the last visible point and the other side shows from the stern forward. You will have to rotate several times so that each side matches with the correct plan. Use the Perspective viewport to select vertices to make sure you have the correct one.
What takes some getting used to is reading the end plans of the boat. While you are practicing, save often so when you make mistakes you don’t have to do it all over. That’s good advice at all times!
Try finding more complex boats and only doing half the hull then mirroring it and attaching and welding to make a whole hull. Max 5 users can use the Symmetry modifier to do that in one operation. To resize the boat correctly, you can apply an Xform modifier and scale it to what ever you want.
Plane Exercise
Go to Create, Plane. Pick and drag in the viewport.
Sorry couldn’t resist a little joke here. It made the title of the column sound better.
Summary
Train and boat questions come up fairly often on the various websites and, hopefully, these two simple exercises will set you on a path to find solutions to these and other questions that might be a related issue.
The point is, the more things you know how to do in max and VIZ the easier it will be to come up with innovative solutions of your own when you need them.
Good luck and have fun.
Ted
You must be logged in to post a comment. Login here.
About this article
Trains, Boats, Planes
visibility7.04 k
favorite_border1
mode_comment0


