

Tutorials
Tangram 3DS' Guide to Photo Matching
ABOUT TANGRAM 3DS
Tangram 3DS is a multimedia studio based in Kittery, ME that specializes in architectural visualization, marketing, and design.
https://www.tangram3ds.com/
Tangram 3DS is a multimedia studio based in Kittery, ME that specializes in architectural visualization, marketing, and design.
https://www.tangram3ds.com/
INTRODUCTION
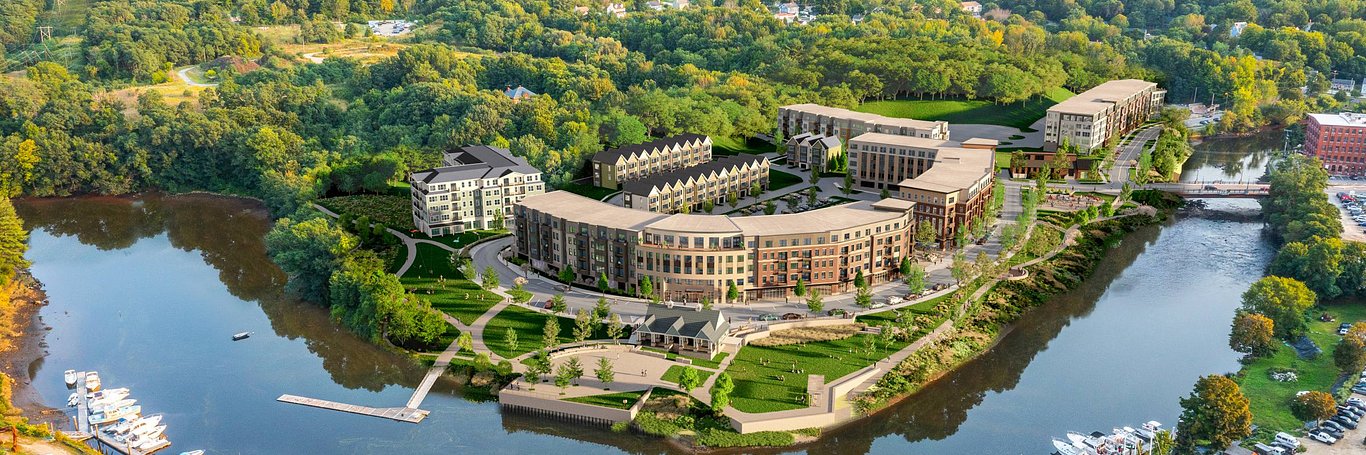
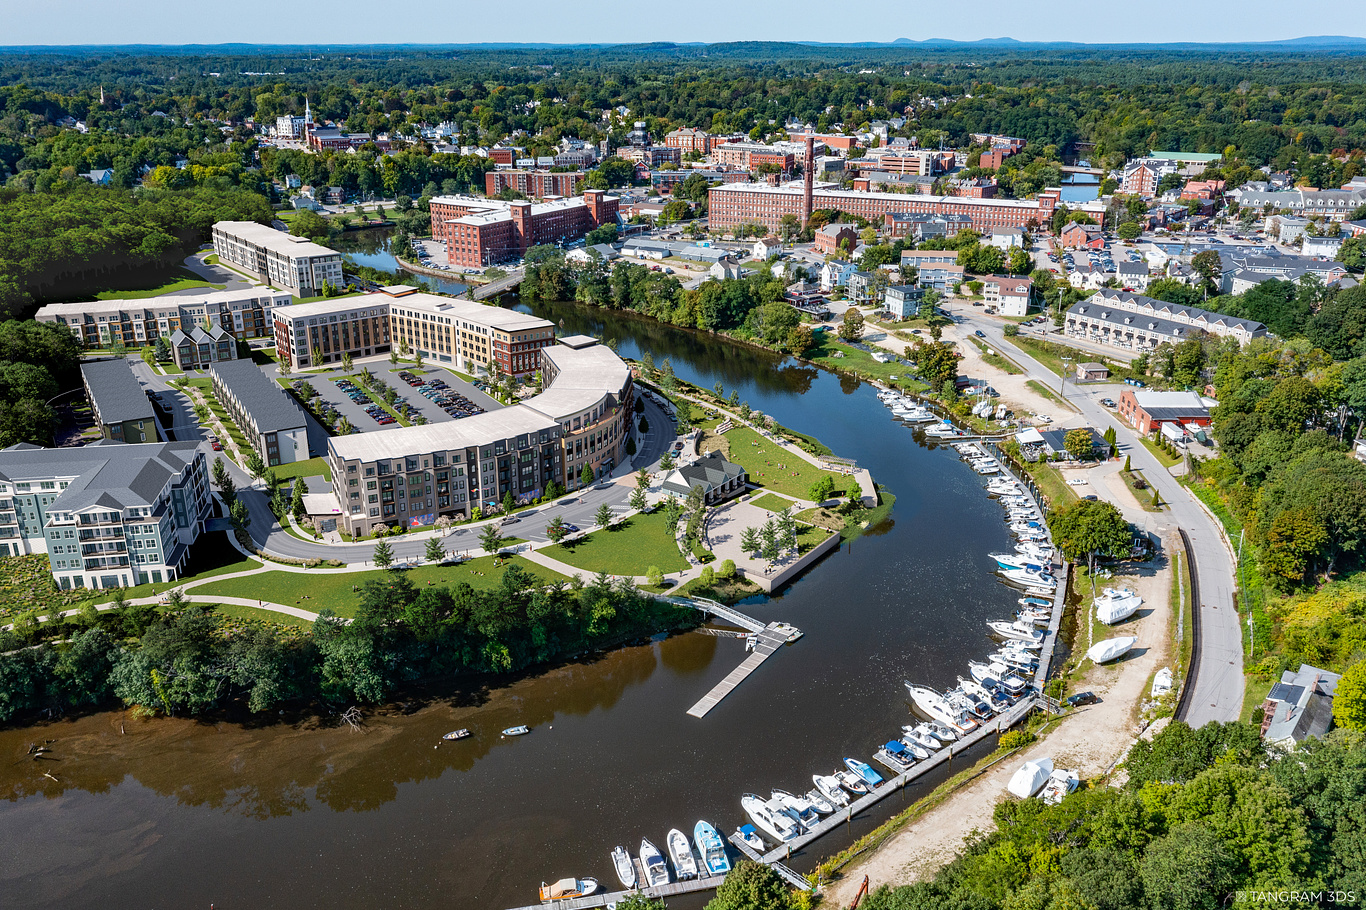
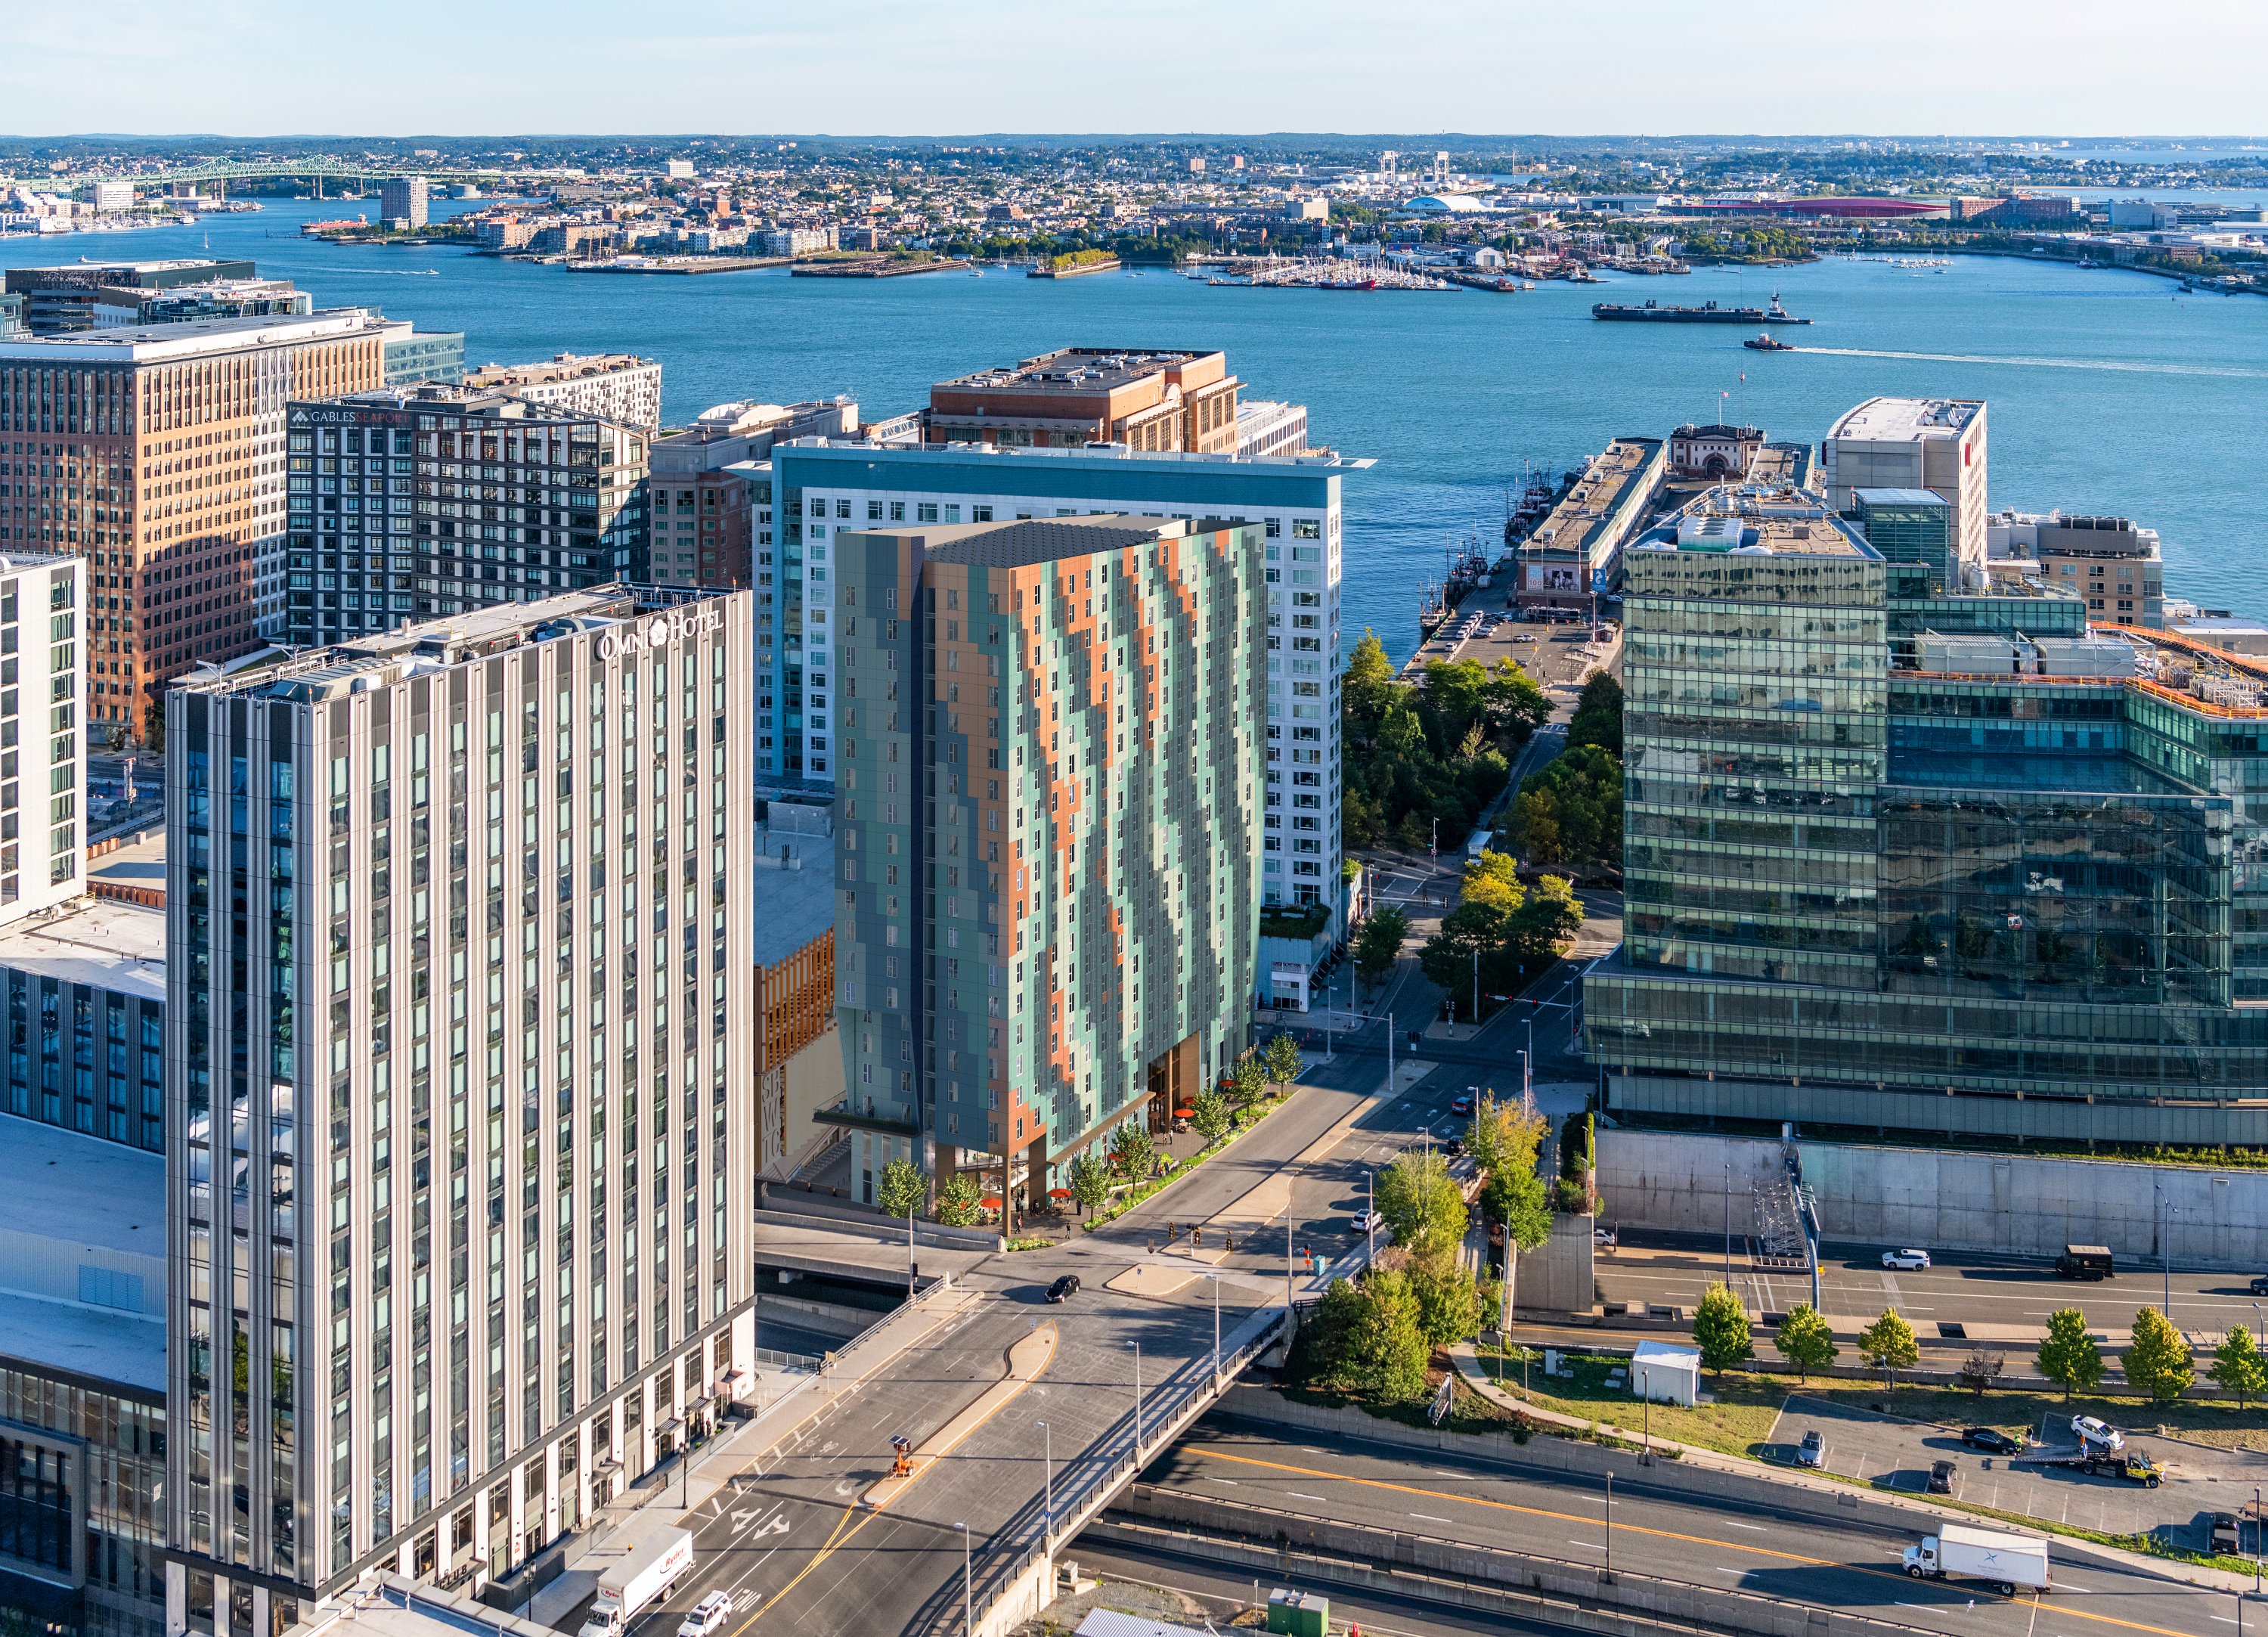
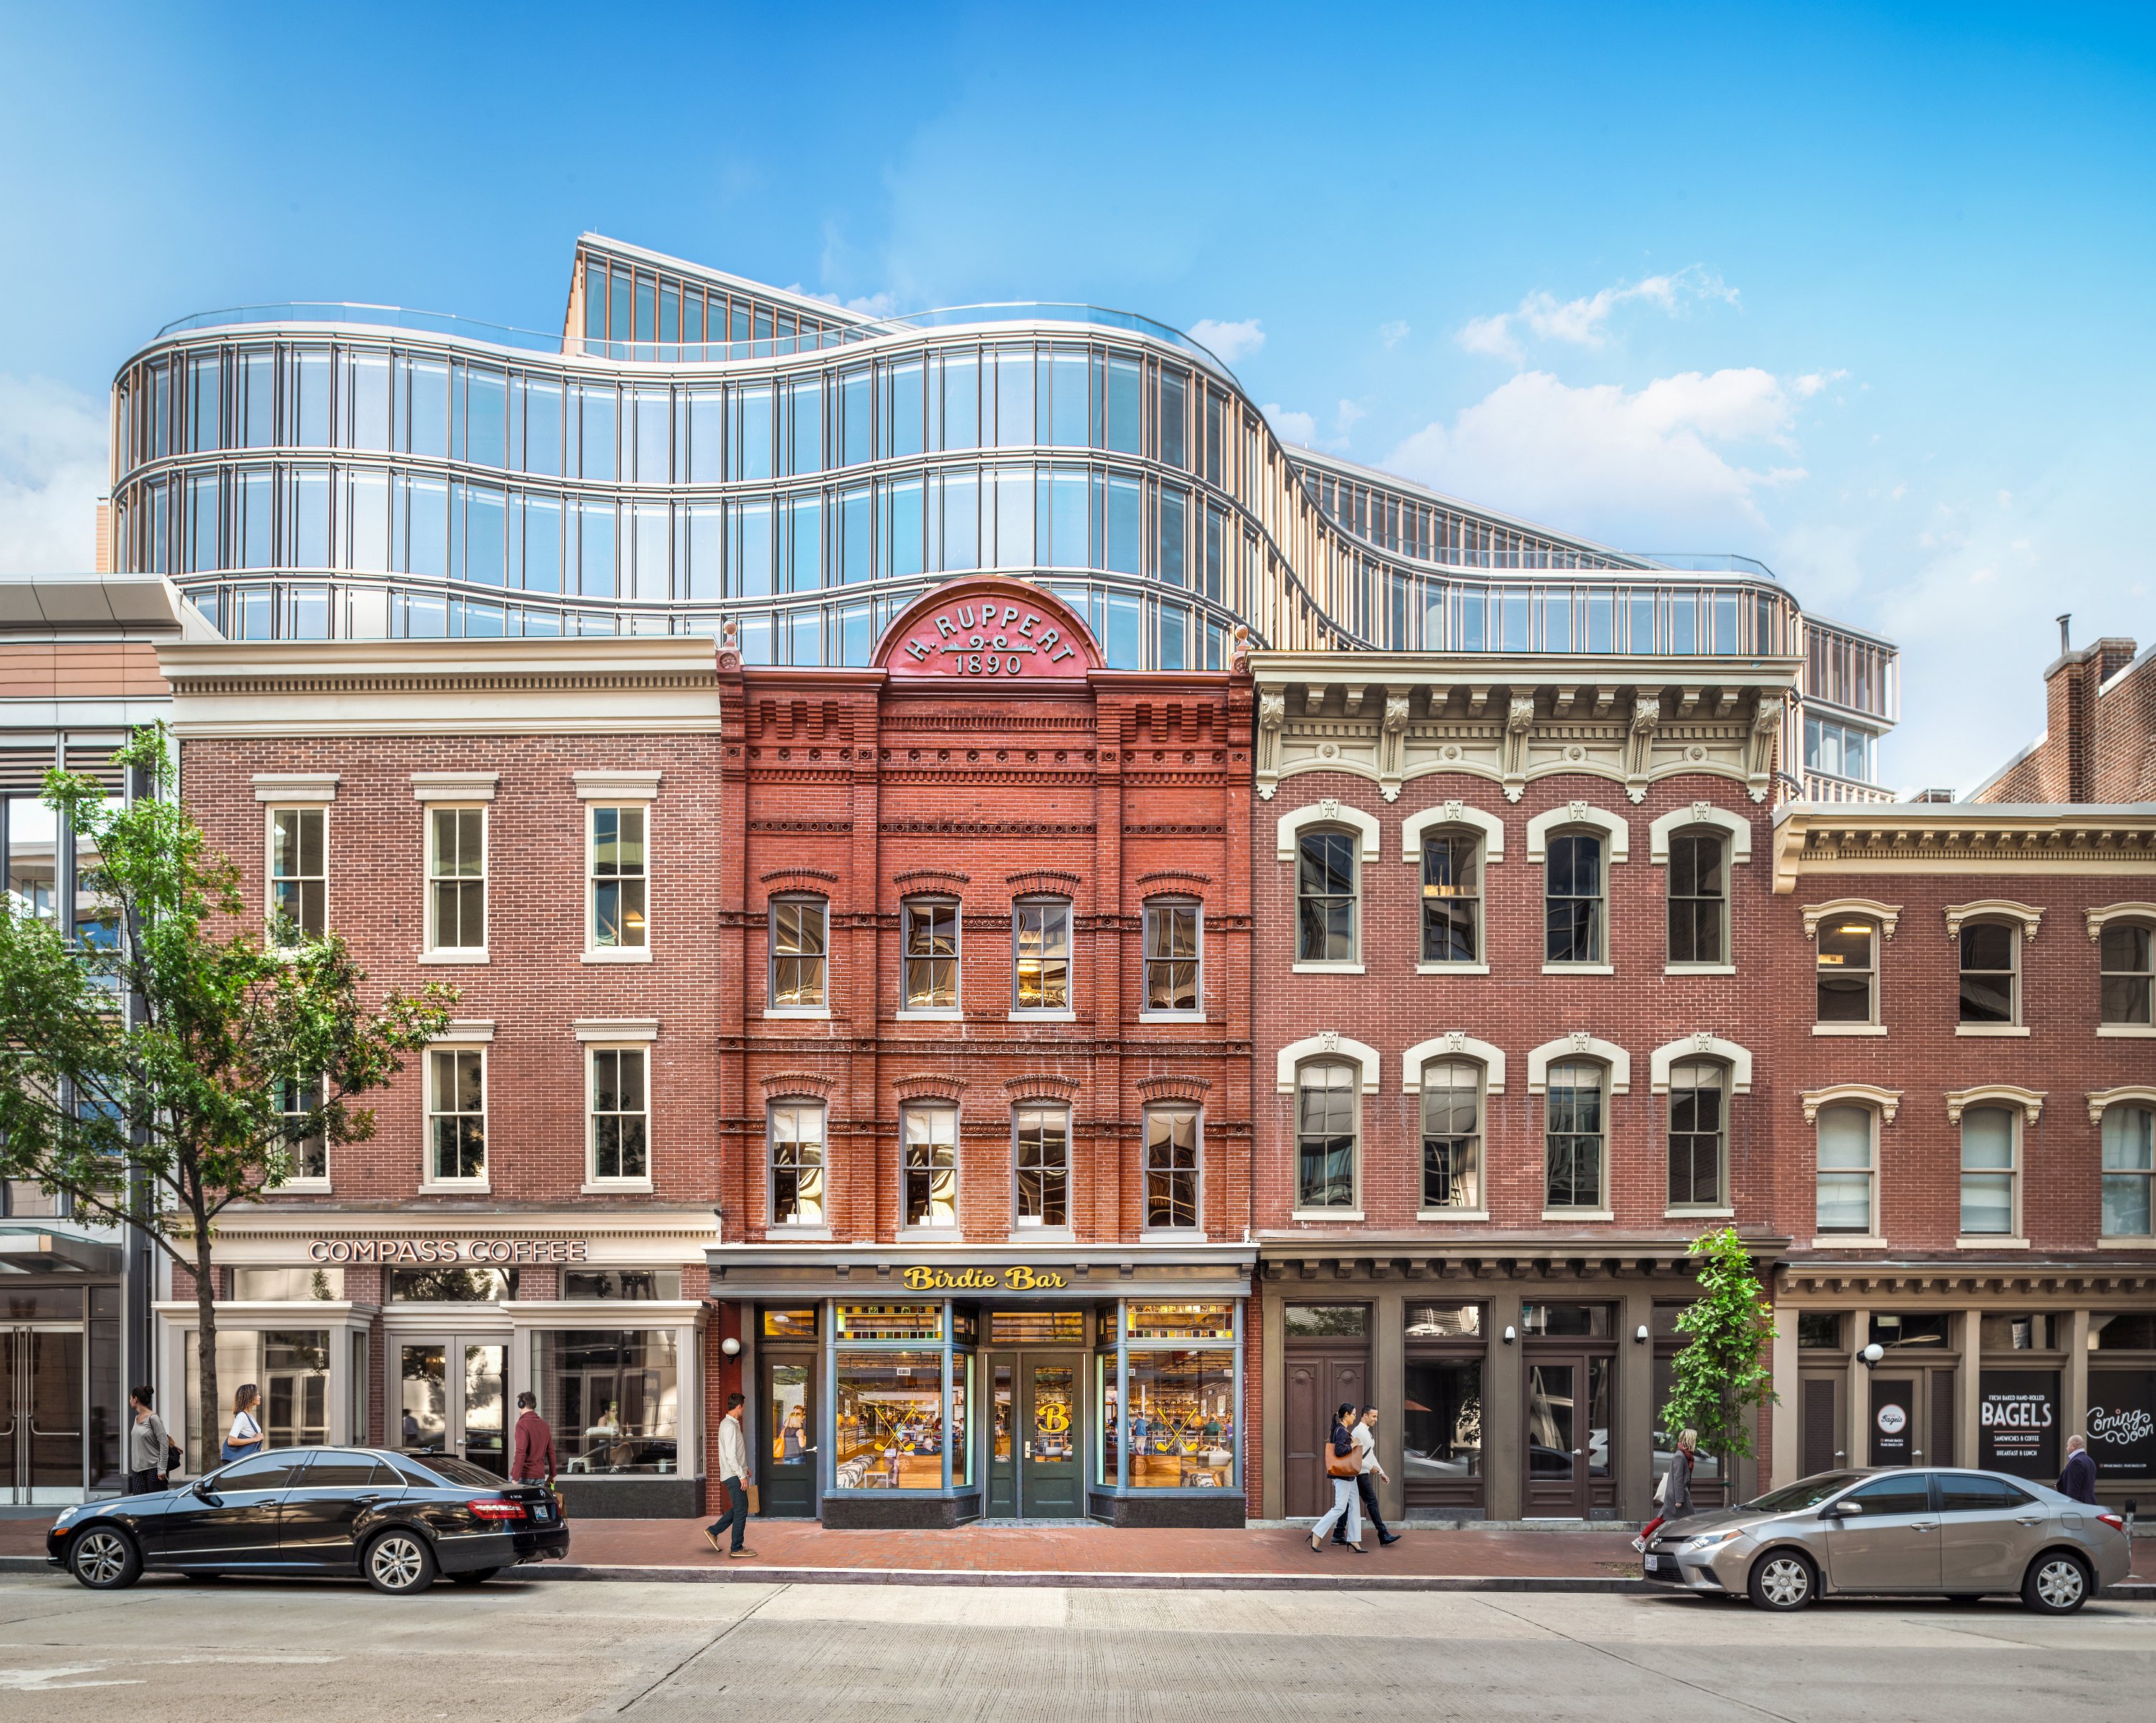
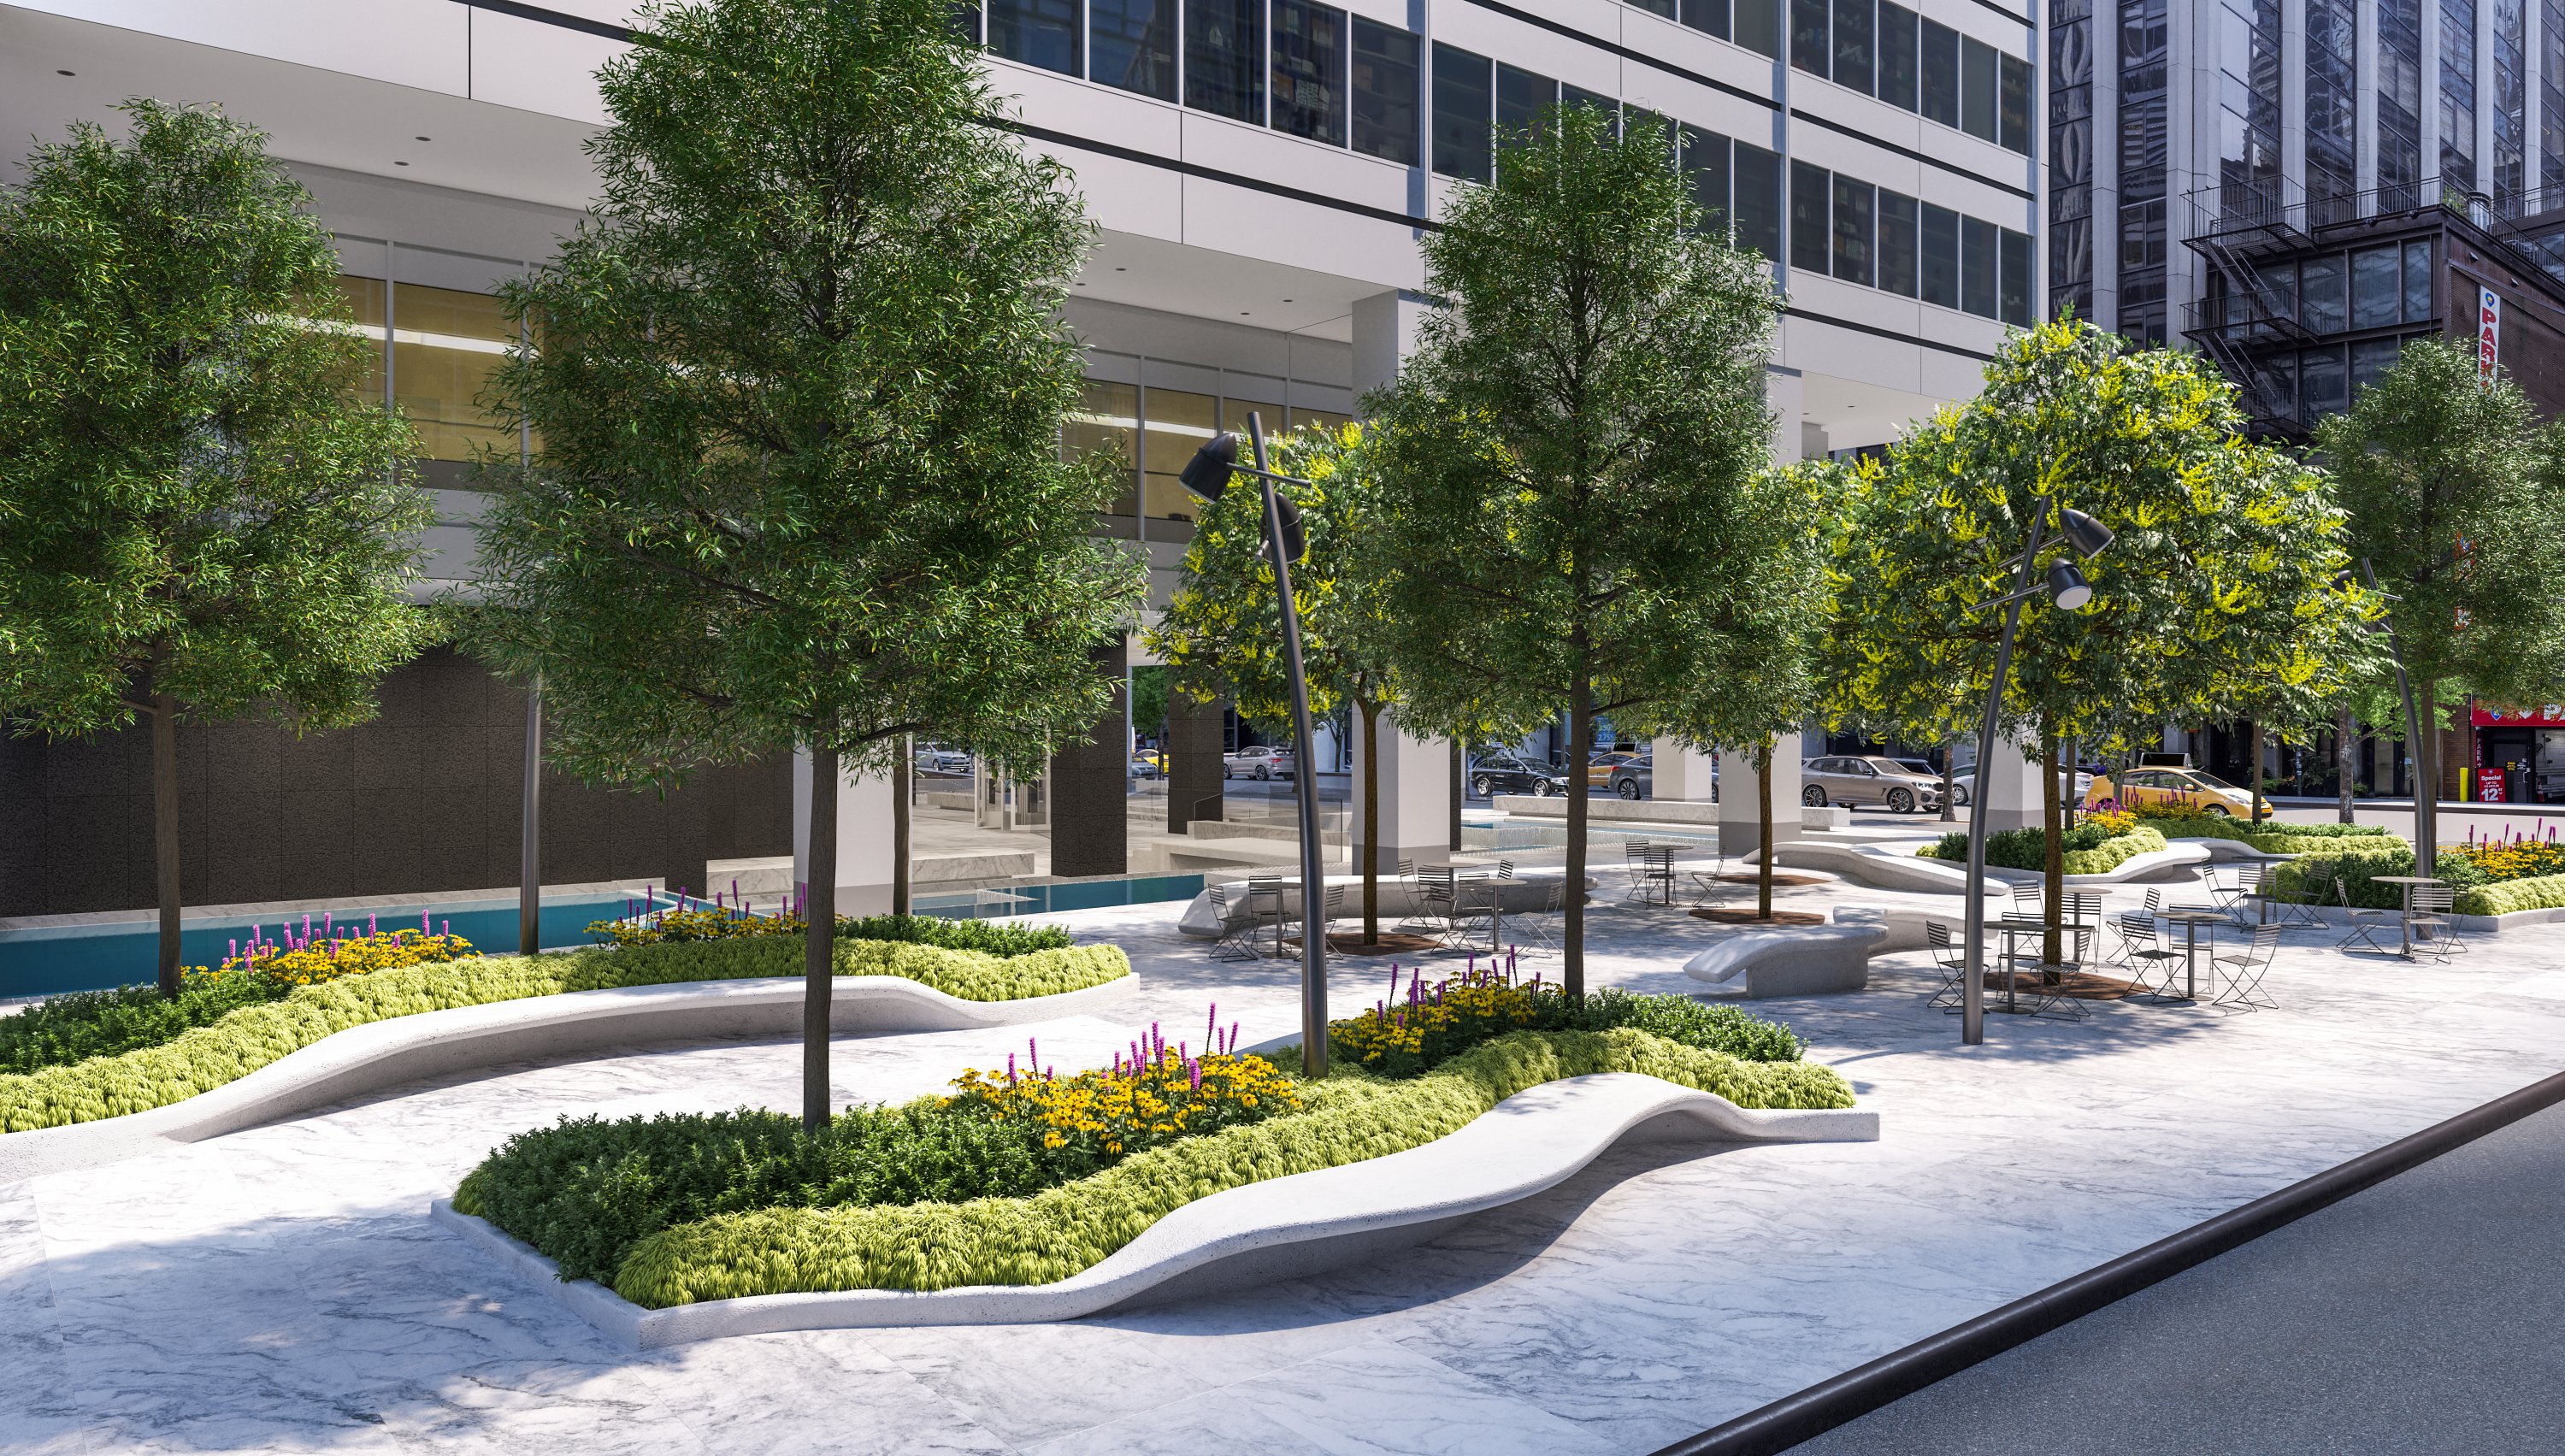
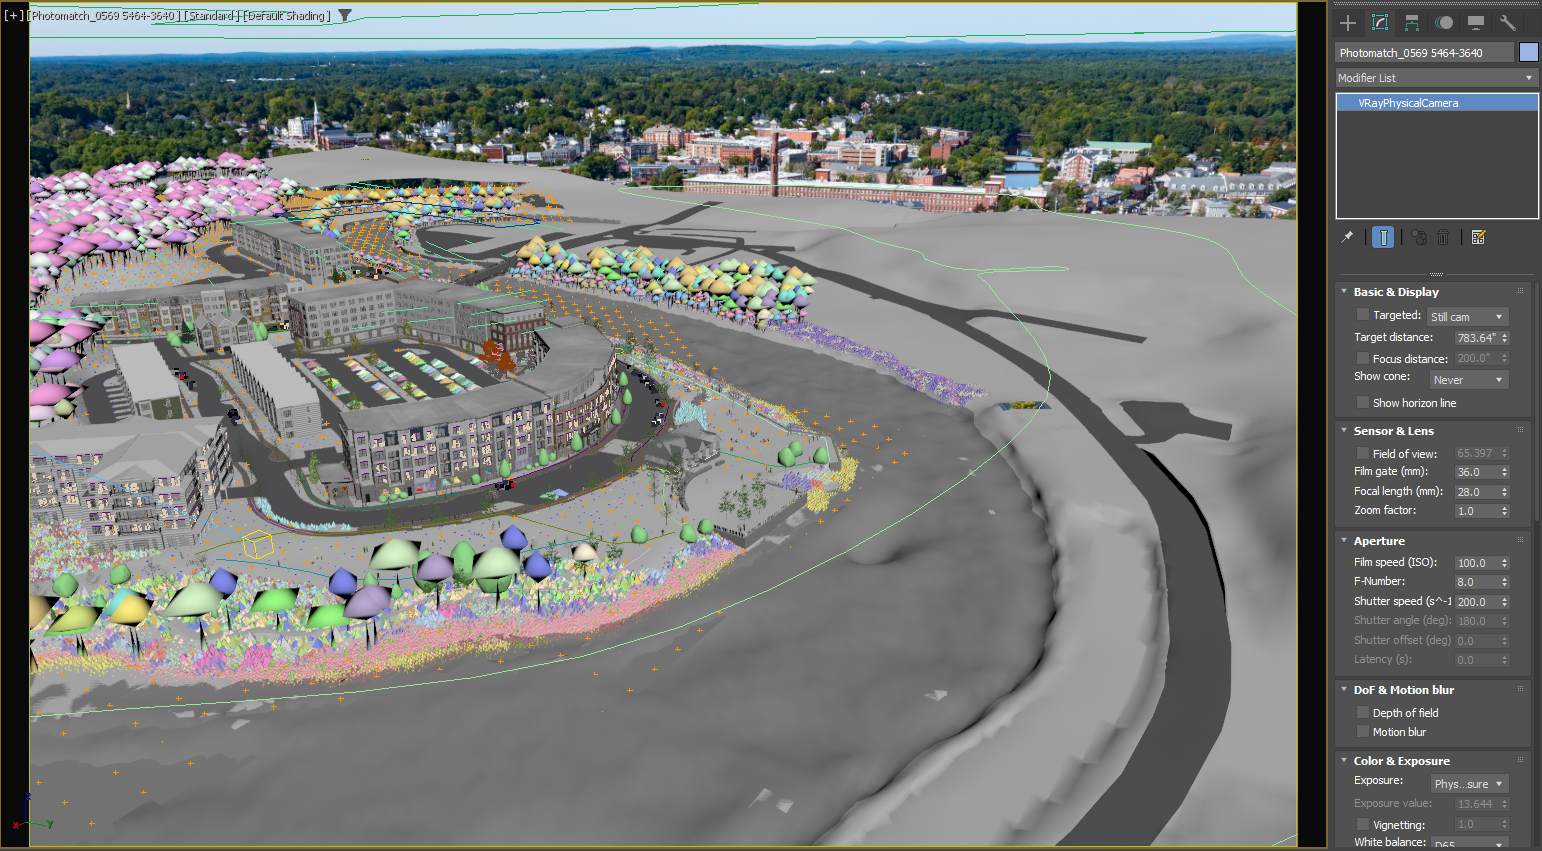
Photo matching is a cost-effective method to create realistic and impressive imagery by superimposing 3D models over high-resolution photography. This method is especially useful for projects that need to visualize a new building or construction such as a storefront or even a completely new structure without building an entire landscape or city in 3D (which would be incredibly time-consuming without spending money on prefabricated models).
In this guide, we will break down the steps (as well as tips and tricks) to setting up a successful photo match.
Note: The majority of this guide could be software agnostic but it is written and prepared using 3DsMax, Vray, and Adobe Photoshop.
In this guide, we will break down the steps (as well as tips and tricks) to setting up a successful photo match.
Note: The majority of this guide could be software agnostic but it is written and prepared using 3DsMax, Vray, and Adobe Photoshop.

STEP 1: SHOOTING YOUR PHOTO
It will not always be the case that you are taking your own photography for a photo match project, but if you can there are steps you can take to set yourself up for success once you are in 3D.
Be Mindful of Light: The lighting you capture in your photo will be the lighting you are matching to within your 3D scene, so it is important you shoot with sun angle, temperature, and time of day in mind. Clear, sunny days are preferred, however, sunset and dusk shots can provide lighting scenarios that are dramatic and eye-catching.
Be Mindful of Light: The lighting you capture in your photo will be the lighting you are matching to within your 3D scene, so it is important you shoot with sun angle, temperature, and time of day in mind. Clear, sunny days are preferred, however, sunset and dusk shots can provide lighting scenarios that are dramatic and eye-catching.
- TIP: When shooting at sunset and/or dusk use a low f-stop and slow shutter speed to try and capture as much light as you can (1/200 and 2.8 f).
- You may also have a brief window of time during twilight when the light is dim and flat, but it is worth waiting 15 minutes or so until dusk (particularly in urban settings) when artificial light becomes more pronounced and you can get some really fantastic environment color.
Focal Length: Shoot a variety of focal lengths so that you have options. This is especially true when working with clients who will want to choose their favorite. Even for personal projects, it is good to have a wide variety of options to find the best shot for your composition.
- When taking photos from the ground, in manual mode, a 14-22mm lens with an f8 focal length is a good aperture to have as much within the frame in focus as possible.
- When shooting aerial, you can set your f-number low, keeping everything in focus and allowing a wide shot.
Know your tech: It is important to be cognizant of a few key factors when taking your shots so you can replicate the settings and values of your physical camera to the one in your virtual scene.
- Focal Length (If you don't know the focal length of your shot, you may be able to find that data in the file's Advanced Properties)
- Height (You will want to match the camera's height off the ground to the height the camera was held at for the photo)
SETTING UP YOUR 3D SCENE
Units Setup:
Whenever you are working on architectural visualization or working on matching something from real life, it is important to make sure your units in your 3D software set to your preferred measurement scale (I like to use decimal inches).
Whenever you are working on architectural visualization or working on matching something from real life, it is important to make sure your units in your 3D software set to your preferred measurement scale (I like to use decimal inches).
- TIP: This can be set under your customize panel -> Units Setup
Background/Photo Setup:
Once your photo has been selected, take note of the image's size. In your scene, adjust the image aspect ratio to match the photo reference size.
- TIP: It can be easy to lose track of the render aspect ratios (particularly if you are working with multiple photos with different sizes) Name your cameras with the background image resolution for quick reference.
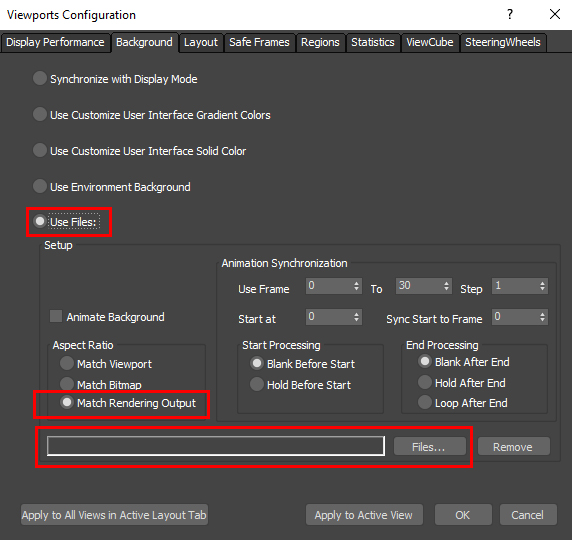
Set the photo you will be matching into your viewport background.
ALT+B (Viewport Background).
- Select 'Use Files:'
- Load the photo, using the 'Files...' button.
- Be sure to check the "Match Rendering Output" box.
IMPORTANT: Use 'Show Safe Frame' for the camera view (Shift + F) in order to display the correct proportions in the viewport
TIP: To increase performance, you can change the background texture size in the viewport - Customize > Preferences > Viewports > Configure Driver
MATCH YOUR MODEL TO THE BACKGROUND
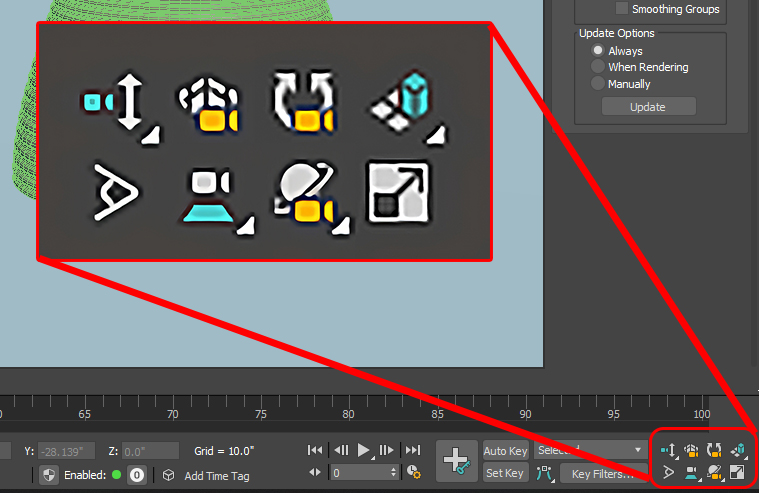
- Use the camera tools located at the bottom-right corner to help align your camera to match your model to the reference background.
- Rough in your camera location as best you can. For the camera's X and Y coordinates, use either site plan drawings or a Google Maps screenshot to help orient the camera.
- For either site drawing or Google Maps image, create a plane in 3ds Max and map the .jpeg into the diffuse. Scale the plane as needed until the dimensions are accurate to real life (if there is a two-lane road in your image or site drawing, scale it up until the width of the road is around 23 feet. Or if there is a parking lot, scale the image up until the parking spot width is 9 feet).
- Once you've roughed in your camera and have the model/building you're matching into placed properly, the next steps are adjusting your camera's position and rotation until your model/building is matching properly into what you see in your background photo.
- TIP: This process can sometimes be tedious; you get one part of your site or building lined up only to have another part be out of alignment. Be patient and make small changes until it comes together. The better the match, the less you need to compensate for in post.
-
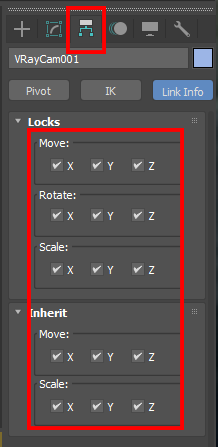
HINT: LOCK YOUR CAMERA
- Once your camera is perfectly set in place, the last thing you want is for it to shift accidentally and only find out when you are trying to composite it to your photo. Easily lock your camera's position, rotation, and scale via the hierarchy tab by checking off all the axis.
MATCHING SUN ANGLE
Whether using a Vray Sun & Sky, HDRI, or a combination of Sun and HDRI, you will want to match your in-scene lighting as close as possible to the lighting in your reference photo.
There are many methods to achieving this (and covering those lighting techniques is beyond the scope of this tutorial). Still, ultimately the more simple your lighting setup, the easier it is to make adjustments.
Since we will be compositing the render into our photo, we can rely on a Vray Sun and Sky to help get us in the same direction and temperature. The sun's direction can be matched by eye however there are useful tools such as SunCalc to accurately determine the precise angle of the sun based on time and location.
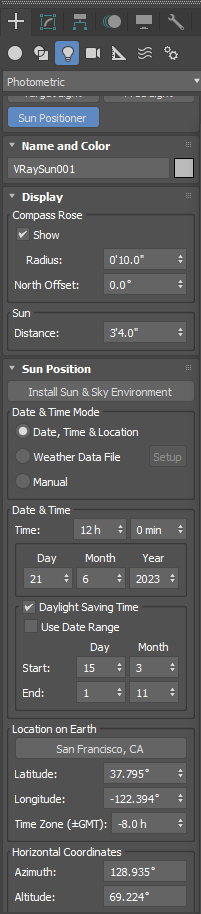
Sun Positioner: Another tool you can use within 3DsMax is the Sun Positioner. If you have the precise date, time, and location of your site you can simply input that data into the Sun Positioner and it will angle your sun to match that angle precisely.
Once your sun angle is set, similar to the camera, locking it's axis in the hierarchy tab can assure there won't be any strange shifts or jittering between rounds.
TIP: If you are working with multiple photo match renders of the same location, keyframing the sun position to coordinate with the different camera angles can make it easy to set up once and have everything where it needs to be.
There are many methods to achieving this (and covering those lighting techniques is beyond the scope of this tutorial). Still, ultimately the more simple your lighting setup, the easier it is to make adjustments.
Since we will be compositing the render into our photo, we can rely on a Vray Sun and Sky to help get us in the same direction and temperature. The sun's direction can be matched by eye however there are useful tools such as SunCalc to accurately determine the precise angle of the sun based on time and location.
Sun Positioner: Another tool you can use within 3DsMax is the Sun Positioner. If you have the precise date, time, and location of your site you can simply input that data into the Sun Positioner and it will angle your sun to match that angle precisely.
Once your sun angle is set, similar to the camera, locking it's axis in the hierarchy tab can assure there won't be any strange shifts or jittering between rounds.
TIP: If you are working with multiple photo match renders of the same location, keyframing the sun position to coordinate with the different camera angles can make it easy to set up once and have everything where it needs to be.
EDITING & COMPOSITING
Once your render is complete, you need to integrate it into your photo. The more realistic your lighting and materials, the more easily it will trick the human eye into 'belonging' in the photo. Rarely will you be able to simply drag and drop the render over your photo.
Photo Edits: In most cases, you will need to correct your verticals and horizontal lines in editing. There are options for auto-correcting verticals in software like Lightroom and Photoshop. However, there will be times you need to do this manually.
Your new render may cover more space or not cover enough of the original photo, shadows cast by objects that no longer exist, or foliage that needs to be pruned (or grown). Mileage will vary between projects but here are a few techniques and tips to help blend it seamlessly.
3D Bumpers: If you can manage it, having 3D models of trees or other bordering objects can help make this process easier. The less you need to manipulate and preserve the original photo and render, the less likely there will be revealing patches a trained CG eye can pick out.
Color/Temperature Adjustment: You can save time by matching the color and temperature of the light in your scene after rendering. In Photoshop, it is easy enough to utilize adjustment layers such as color balance or Camera Raw Filter if you are a little more experienced. You shouldn't have to alter it too drastically if you were mindful of your lighting in 3D, but a slight cooling or warming of a render to match the tone of the photo can go a long way.
- TIP: This point goes double for matching the color and pattern of grass and foliage. Nothing betrays a render the same way bright green, flawless, astro-turf-style 3D grass does. If you aren't able to fine tune the grass in 3D, paint in small sections that are slightly more yellowed and break up the blades with small clone stamped sections of grass sampled from elsewhere in the image.
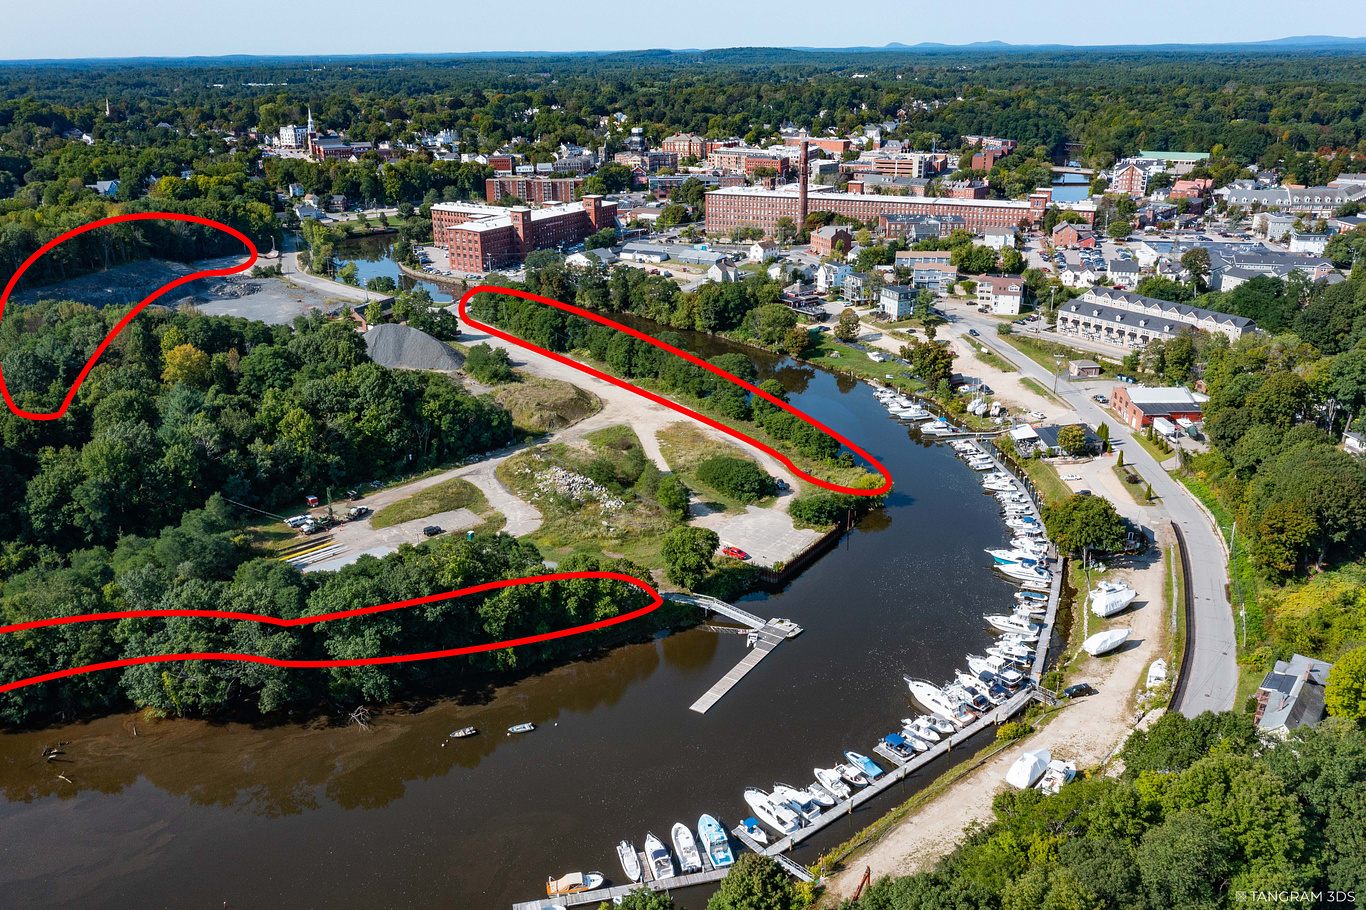
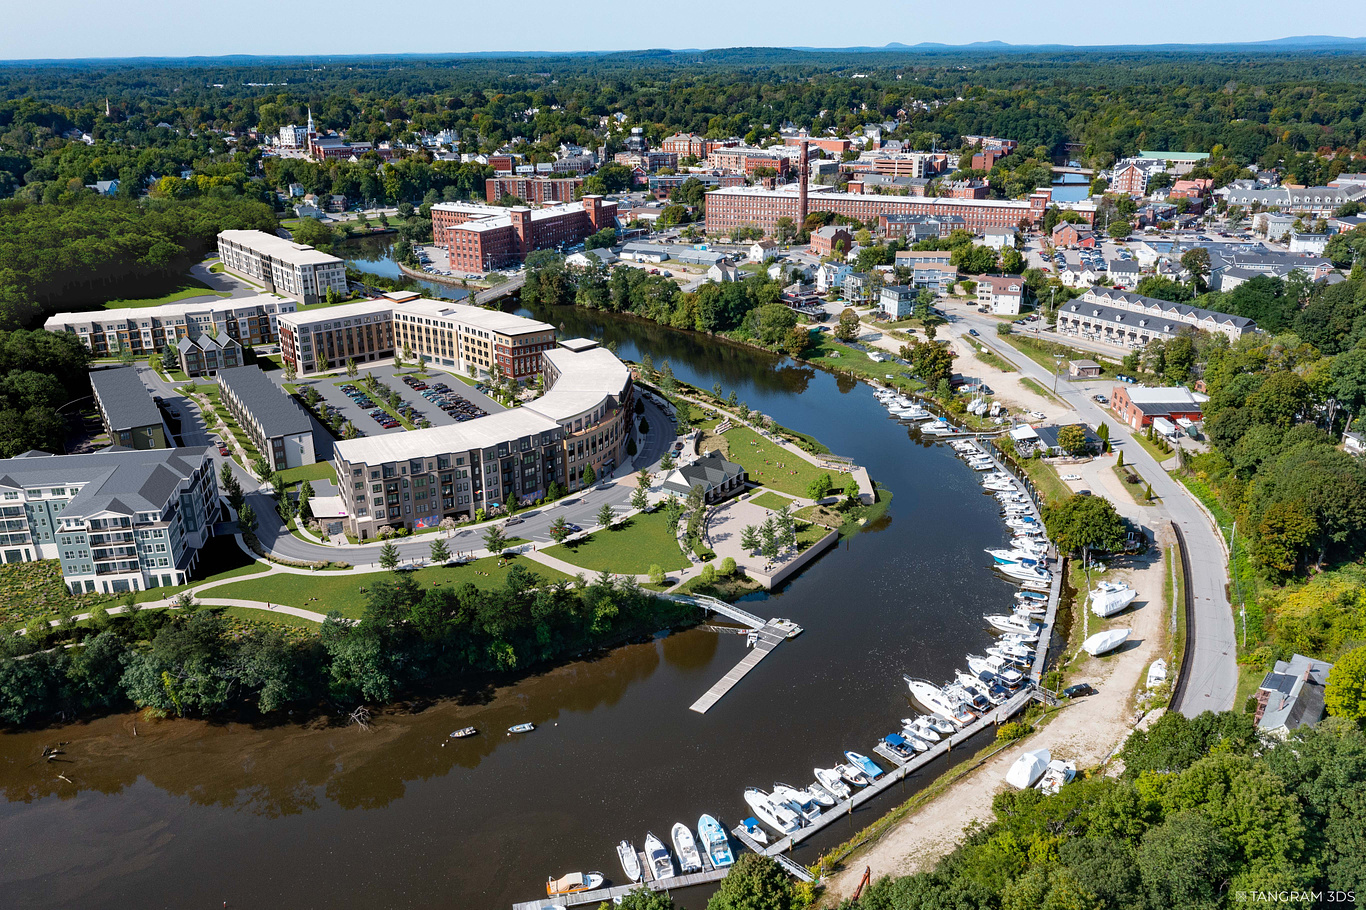
Paint in the seams: In your editing software of choice (mine is Photoshop), using tools like clone stamp, spot healing brush, and even a regular paintbrush go over where your render meets the photo. In our example, there are three major areas of concern where the tree-line is going to change dramatically from the before to the after. By sampling from the trees in the photo, blending with our CG foliage, and cloning sections of the river, we can paint in the borders to make the render and the photo fit nicely.
- Cut and Paste Selections: Don't be afraid to take the time to make a selection (such as a tree-line) and copy it to a new layer. It can be easier to clone stamp specific elements once they have been separated from the original image.
- Paint shadows: After spending an hour hand painting out a troublesome tree, it can be easy to forget to paint out or paint in shadows & reflections. It is always worth it to go back and make sure those details are sketched in. Even if they are loose, a suggested shadow to help ground an image is better than no shadow and a sense of floating.
- Layering: A render that sits flat over a photo can seem uncanny, so look for opportunities to paint the render in the photo by strategically painting certain photographic elements over the render (such as branches, telephone wires, foliage, etc). This enhanced depth can help unify the entire image.
CONCLUSION
With practice, each artist will come to their own favored process for setting up a successful photo match for their rendering. It is incredibly cost-effective and can save inordinate amounts of time versus building out or otherwise resourcing an entire 3D production for a vast landscape (such as in our example). Even for smaller scale projects, not needing to worry about rebuilding a street, a parking lot, or forest clearing and allowing yourself time to focus on your model and lighting quality.
I hope this tutorial has been helpful and informative! Stay on the look out for more tutorials and tips from Tangram 3DS on how we achieve our goals and let us help you achieve yours!
I hope this tutorial has been helpful and informative! Stay on the look out for more tutorials and tips from Tangram 3DS on how we achieve our goals and let us help you achieve yours!
You must be logged in to post a comment. Login here.
About this article
Tangram 3DS provides a brief tutorial with tips on how to set your camera match rendering project on the path towards success.
visibility183
favorite_border2
mode_comment0