Bruce Nuclear - Power Generation Plant
You must be logged in to post a comment. Login here.

Antoine Desjardins
Report Abuse
Thanks Roberts. I'd make the changes, but the job's long gone. Good to keep in mind for next time though.
R
Roberts Wrong
Report Abuse
The DOF is a bit much and makes it look like you're looking at a toy. Also, the carpet's so bumpy compared to everything else so it compounds this "toy like" look.
I'd put some neutralish Windows/PC screen on the LCD or make them black instead of white.
r
ralf kirsch
Report Abuse
Compliment James. You gave perfect advices. Thats why I like this forum. RK
Antoine Desjardins
Report Abuse
Thanx for the quick response James. You are right about the carpet... just talked to our project manager and he told me that there's a angular fascia going on the raised floor. I'd correct it but this baby's shipping out. The floor's scale has been emphasized.. my last crit from the owner of the company was that the floor's scale was too small... I guess I over shot it.
Thanx for being picky though. Attention to details like these definately contribute to creating photorealistic illustrations and I appreciate all the help. That mr shader element (a/o pass) really adds pop in post - great tip!

James Insley
Report Abuse
very nice sir. This has really come along. The materials look really good and the ceiling came out well.
Just a few things, a little too much dof for my taste and the carpet (texture seems a little big scale wise...) running underneath the units right to curb catches my eye as maybe not being quite correct.
but that's just me being picky....
Antoine Desjardins
Report Abuse
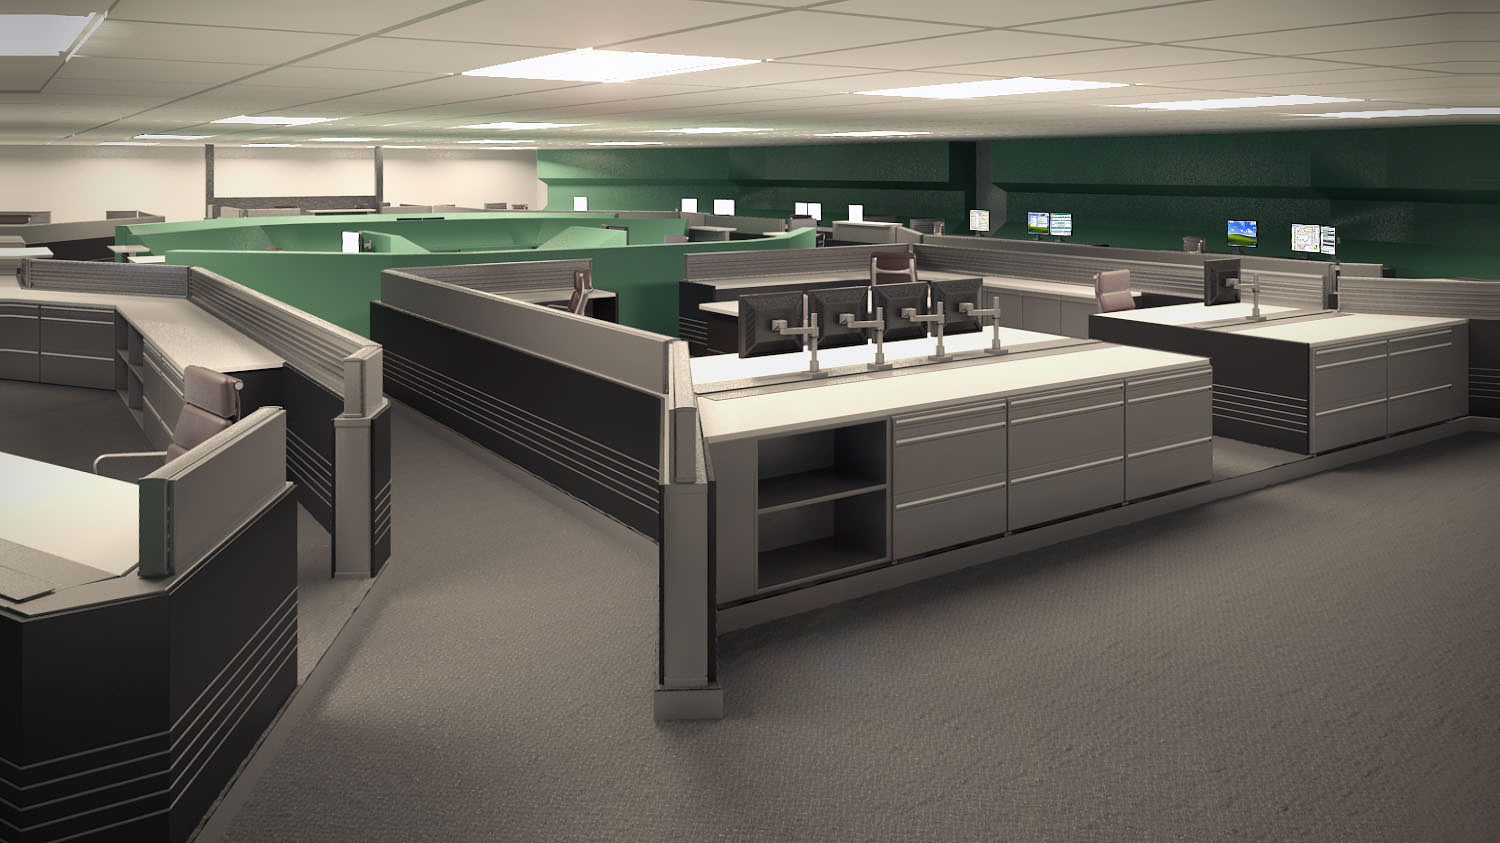
Here's the final product.. any tips?
[ATTACH=CONFIG]39521[/ATTACH]
Antoine Desjardins
Report Abuse
Thanx for the advice guys. Your input has really improved the viz.

Justin Hunt
Report Abuse
for the fluro's I'd just use a photometric light set to rectangle (about the size of the fixing), To help speed things up set the Attenuation to be slightly longer than the floor to ceiling height. Then if you really want to see the fluro tube, create a cylinder and apply a A&D with self illumination set, and your choice to have them emit FG samples or not.
jhv
James Insley
Report Abuse
Looks nice, that floor texture needs more work...
if you go to render elements -> add mr shader element (might not be called exactly that, its near the bottom), set it as AO -> you can drag and drop that into your material editor and adjust the settings. it will give you a nice ao pass to composite at the end of the render.
Antoine Desjardins
Report Abuse
BAM!!! [ATTACH=CONFIG]39461[/ATTACH]
I realize that I had the glare/bloom settings too high, but w/e.. I'll have to fix that next week.
Also, does anyone have a good a/o technique for compositing in post?
Antoine Desjardins
Report Abuse
There is almost no noise! The thing looks great in terms of physical accuracy. 1-question: how would you replicate a t-bar cieling with standard flourescent lighting? I did a hack-job with photometrics which really increases render times. Unfortunately, power plant controll rooms are located directly over the reactor so there are no opportunities to incorporate natural light :( . I also adjusted the white point to 4,200K so its not so muddy. Any suggestions for the lighting?
James Insley
Report Abuse
D'oh! never answer posts before coffee. You are correct.
Is the render getting there as far as noise, etc?
Antoine Desjardins
Report Abuse
Are you sure .05 is a correct value for the global tuning parameter? I thought .05 and .03 are more appropriate for the spatial contrast fields.. Anyway, the render is 50% complete so ill be posting results shortly. Thanx again!
James Insley
Report Abuse
your global tuning should be all .05 by default... I usually use .03 to get mr to aim a little higher in my desired sampling range.
Antoine Desjardins
Report Abuse
Thanks Justin! These changes really sped up the render. I assume the defaults for the global tuning parameters are all 1?
Justin Hunt
Report Abuse
just a few quick things
1) estore the global tuning parameters back to default, these would be the last things to play with.
2) Seeing that you are using Photons, leave FG bounces 0, any more are automatically discarded anyway
3) Set FG to "Draft"
4) Leave the FG multiplier @ 1, if you want to brighten the scene rather use exposure control
5)FG noise Filtering High is very slow, rather use the the default setting or none
6)Photon Max photons per Sample, try 1500 or less
7)Turn ON Optamize for FG
8)Trace Depth 15 (These are the number of bounces the photons will make)
What are the lights? can you post those settings?
jhv
9)Average GI Photons per Light, 20000 is a starting point so try 80 000
Antoine Desjardins
Report Abuse
Please see attached render settings :)
(Also, if you see something that's way off... remember, I'm a noob and im in need of jedi-like guidance)
-Tron
[ATTACH=CONFIG]39430[/ATTACH]
Antoine Desjardins
Report Abuse
I actually just figured that one out by spending loads of time reading threads on forums. It took care of the problem, but what data am I losing when I activate the highlight and FG setting?
Also, I've improved the lighting by using an A/O material in the material overide area (see attached image).
I will be posting updated renders w/ materials shortly. Thanx for the help!
-Tron[ATTACH=CONFIG]39428[/ATTACH]
James Insley
Report Abuse
post your settings, it would help a lot.
have you tried highlights and FG only for the green material?
What are your render settings?